User Guide
Page 3
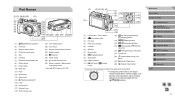
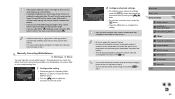
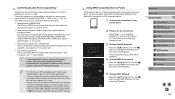
... (11) [ (AE lock)] / [ button (Index)] (12) [ (AF Frame adjustment)] / [ (Magnify)] button (13) [ (Menu)] button (14) [ (Information)] button (15) [ (ISO speed)] / [ (Wi-Fi)] / Up button (16) [ (Manual focus)] / Left button (17) Control dial (18) [ (Quick setting menu)] / Set button (19) [ (Flash)] / Right button (20) [ (Erase)] / Down button * Touch may not be detected...
... (11) [ (AE lock)] / [ button (Index)] (12) [ (AF Frame adjustment)] / [ (Magnify)] button (13) [ (Menu)] button (14) [ (Information)] button (15) [ (ISO speed)] / [ (Wi-Fi)] / Up button (16) [ (Manual focus)] / Left button (17) Control dial (18) [ (Quick setting menu)] / Set button (19) [ (Flash)] / Right button (20) [ (Erase)] / Down button * Touch may not be detected...

User Guide
Page 4
... to simply as "lenses" and "mount adapters", regardless of whether they are included in the lens kit or sold separately. ●● Illustrations in this manual show the camera with lens EF-M 15-45mm f/3.5-6.3 IS STM attached. ●● For convenience, all supported memory cards are simply referred to represent the...
... to simply as "lenses" and "mount adapters", regardless of whether they are included in the lens kit or sold separately. ●● Illustrations in this manual show the camera with lens EF-M 15-45mm f/3.5-6.3 IS STM attached. ●● For convenience, all supported memory cards are simply referred to represent the...

User Guide
Page 5
... Card 18 Setting the Date and Time 18 Changing the Date and Time 19 Display Language 20 Attaching a Lens 20 Detaching a Lens 21 Lens Instruction Manuals 21 Attaching EF and EF-S Lenses 21 Detaching a Lens 22 Using a Tripod 22 Stabilizing the Image 22 Trying the Camera Out 23 Holding the Camera...
... Card 18 Setting the Date and Time 18 Changing the Date and Time 19 Display Language 20 Attaching a Lens 20 Detaching a Lens 21 Lens Instruction Manuals 21 Attaching EF and EF-S Lenses 21 Detaching a Lens 22 Using a Tripod 22 Stabilizing the Image 22 Trying the Camera Out 23 Holding the Camera...
User Guide
Page 7
Adjusting White Balance 65 Custom White Balance 65 Manually Correcting White Balance 66 Using Your Favorite Shades (Picture Style 67 Adjusting Picture Styles 68 Saving Customized Picture Styles 69 Shooting Range and Focusing 69 ... (Touch AF 71 Shooting with the AF Lock 71 Shooting with Servo AF 72 Changing the Focus Setting 73 Fine-tuning Focus 73 Shooting in Manual Focus Mode 74 Easily Identifying the Focus Area (MF Peaking 74 Flash 75 Changing the Flash Mode 75 Auto 75 On 75 Slow Synchro 75...
Adjusting White Balance 65 Custom White Balance 65 Manually Correcting White Balance 66 Using Your Favorite Shades (Picture Style 67 Adjusting Picture Styles 68 Saving Customized Picture Styles 69 Shooting Range and Focusing 69 ... (Touch AF 71 Shooting with the AF Lock 71 Shooting with Servo AF 72 Changing the Focus Setting 73 Fine-tuning Focus 73 Shooting in Manual Focus Mode 74 Easily Identifying the Focus Area (MF Peaking 74 Flash 75 Changing the Flash Mode 75 Auto 75 On 75 Slow Synchro 75...

User Guide
Page 9
...Changing Touch Screen Settings 142 Cleaning the Image Sensor 142 Turning Auto Cleaning Off 142 Activating the Cleaner 143 Cleaning Manually 143 Checking Certification Logos 144 Setting Copyright Information to Record in Images 144 Deleting All Copyright Information 144 Adjusting ... Flash Custom Functions 156 Resetting External Flash Functions 157 Using External Microphones 157 Using the Software 158 Software 158 Software Instruction Manual 158 Checking Your Computer Environment 158 Installing the Software 158 Saving Images to a Computer 159 Before Use Basic Guide Advanced ...
...Changing Touch Screen Settings 142 Cleaning the Image Sensor 142 Turning Auto Cleaning Off 142 Activating the Cleaner 143 Cleaning Manually 143 Checking Certification Logos 144 Setting Copyright Information to Record in Images 144 Deleting All Copyright Information 144 Adjusting ... Flash Custom Functions 156 Resetting External Flash Functions 157 Using External Microphones 157 Using the Software 158 Software 158 Software Instruction Manual 158 Checking Your Computer Environment 158 Installing the Software 158 Saving Images to a Computer 159 Before Use Basic Guide Advanced ...

User Guide
Page 21
... toward [ ] as you want to zoom, do it clicks into place, as shown by the arrow. http://www.canon.com/icpd/ Attaching EF and EF-S Lenses If you use Mount Adapter EF-EOS M, you can use . Align the lens retraction index with the zoom position index, and then release the switch. ●... EF-S lens, align the mount indexes (the white squares) on the lens and adapter, and turn the zoom ring on a 35mm camera. Lens Instruction Manuals Download lens manuals from the following step 2 in use EF and EF-S lenses. 1 Make sure the camera is off . ●●Hold down the lens release button...
... toward [ ] as you want to zoom, do it clicks into place, as shown by the arrow. http://www.canon.com/icpd/ Attaching EF and EF-S Lenses If you use Mount Adapter EF-EOS M, you can use . Align the lens retraction index with the zoom position index, and then release the switch. ●... EF-S lens, align the mount indexes (the white squares) on the lens and adapter, and turn the zoom ring on a 35mm camera. Lens Instruction Manuals Download lens manuals from the following step 2 in use EF and EF-S lenses. 1 Make sure the camera is off . ●●Hold down the lens release button...

User Guide
Page 28
... button halfway or all the way down to shoot. Shutter Button To ensure that you focus on , press the shutter button halfway (=28). In this manual, shutter button operations are displayed around image areas in Shooting Mode The screen is automatically deactivated after a specific period of inactivity. In about two more...
... button halfway or all the way down to shoot. Shutter Button To ensure that you focus on , press the shutter button halfway (=28). In this manual, shutter button operations are displayed around image areas in Shooting Mode The screen is automatically deactivated after a specific period of inactivity. In about two more...
User Guide
Page 59
...] and press the [ ] button. ●●Choose [Wind Filter] and then [Off]. Using the Attenuator The attenuator can set the level manually to define the level and then press the [ ] button. ●●To restore the original setting, repeat this reduces the recording volume for these...In [Auto], although the recording level (volume) is no wind. level]. In the next screen, press the [ ][ ] buttons or turn the [ ] dial to select [Manual] and then press the [ ] button. ●●Press the [ ] button to choose [Rec. In the next screen, press the [ ][ ] buttons or turn the...
...] and press the [ ] button. ●●Choose [Wind Filter] and then [Off]. Using the Attenuator The attenuator can set the level manually to define the level and then press the [ ] button. ●●To restore the original setting, repeat this reduces the recording volume for these...In [Auto], although the recording level (volume) is no wind. level]. In the next screen, press the [ ][ ] buttons or turn the [ ] dial to select [Manual] and then press the [ ] button. ●●Press the [ ] button to choose [Rec. In the next screen, press the [ ][ ] buttons or turn the...

User Guide
Page 65
For manually setting a custom white balance. Custom White Balance For image colors that was captured in step 1 and then press [ ]. ●●In the confirmation screen, press ... [ ]. For shooting in fair weather. For shooting outdoors in cloudy weather or at twilight. For shooting with a sheet of white paper, etc. ●●Focus manually and shoot (=74). 2 Select [Custom White Balance]. ●●On the [ 4] tab, select [Custom White Balance] and then press the [ ] button. ●●The custom...
For manually setting a custom white balance. Custom White Balance For image colors that was captured in step 1 and then press [ ]. ●●In the confirmation screen, press ... [ ]. For shooting in fair weather. For shooting outdoors in cloudy weather or at twilight. For shooting with a sheet of white paper, etc. ●●Focus manually and shoot (=74). 2 Select [Custom White Balance]. ●●On the [ 4] tab, select [Custom White Balance] and then press the [ ] button. ●●The custom...
User Guide
Page 66
... white data, although this may not be obtained. ●● A message will be retained even after changing the white balance value in step 1. Manually Correcting White Balance Still Images Movies You can also access the screen in step 2 by turning the [ ][ ] dials. ●●To reset...9679; You can also choose the correction level by touching or dragging the bar in step 1 or the frame in step 2. ●● You can manually correct white balance. G: green ●● One level of a white object, a gray chart or 18% gray reflector (commercially available) can produce a ...
... white data, although this may not be obtained. ●● A message will be retained even after changing the white balance value in step 1. Manually Correcting White Balance Still Images Movies You can also access the screen in step 2 by turning the [ ][ ] dials. ●●To reset...9679; You can also choose the correction level by touching or dragging the bar in step 1 or the frame in step 2. ●● You can manually correct white balance. G: green ●● One level of a white object, a gray chart or 18% gray reflector (commercially available) can produce a ...
User Guide
Page 70
... misinterpret non-human subjects as desired, and then press the shutter button all the way down (Focus Lock). ●● Follow steps 2 - 4 in "Shooting in Manual Focus Mode" (=74) to magnify the position of the AF frame. The touch shutter does not work while using this operation. +Tracking ●● After...
... misinterpret non-human subjects as desired, and then press the shutter button all the way down (Focus Lock). ●● Follow steps 2 - 4 in "Shooting in Manual Focus Mode" (=74) to magnify the position of the AF frame. The touch shutter does not work while using this operation. +Tracking ●● After...
User Guide
Page 74
... or drag the screen to turn the camera back on. ●●[MF] is not possible in AF mode, use manual focus. Magnifying the screen display will make manual focusing easier. Shooting in Manual Focus Mode Still Images Movies When focusing is displayed. 2 Display the magnifying frame. ●●Press the [ ] button. ●...
... or drag the screen to turn the camera back on. ●●[MF] is not possible in AF mode, use manual focus. Magnifying the screen display will make manual focusing easier. Shooting in Manual Focus Mode Still Images Movies When focusing is displayed. 2 Display the magnifying frame. ●●Press the [ ] button. ●...

User Guide
Page 79
...Select the desired option and press the [ ] button to set with around the contours of the subject. For details, refer to the EOS Utility instruction manual (=158). * There is no data for your lens, you can add it again. ●● The corrections are also applied ... ●● Peripheral illumination correction and chromatic aberration correction cannot be applied to JPEG images already taken. ●● When using a non-Canon lens, setting the corrections to [Disable] is recommended, even if [Correction data available] is displayed. ●● RAW images can be corrected...
...Select the desired option and press the [ ] button to set with around the contours of the subject. For details, refer to the EOS Utility instruction manual (=158). * There is no data for your lens, you can add it again. ●● The corrections are also applied ... ●● Peripheral illumination correction and chromatic aberration correction cannot be applied to JPEG images already taken. ●● When using a non-Canon lens, setting the corrections to [Disable] is recommended, even if [Correction data available] is displayed. ●● RAW images can be corrected...

User Guide
Page 84
... standard exposure cannot be obtained with the defined shutter speed and aperture value, the ISO speed is displayed in [ ] mode fixed to [Disable]. ●● [ ]: Manual ●● Calculation of standard exposure is based on your specified shutter speed or aperture value. If deviation from the standard exposure level exceeds two...
... standard exposure cannot be obtained with the defined shutter speed and aperture value, the ISO speed is displayed in [ ] mode fixed to [Disable]. ●● [ ]: Manual ●● Calculation of standard exposure is based on your specified shutter speed or aperture value. If deviation from the standard exposure level exceeds two...

User Guide
Page 85
...[Built-in long exposures when [Long exp. When the flash is a way to reduce noise in flash settings] and set the [Flash Mode] to [Manual flash] (=32). 2 Configure the settings. ●●Raise the flash, press the [ ] button and immediately turn off image stabilization when using a ... going to the menu (=32), choosing the [ 3] tab, selecting [Built-in flash settings] in [ ], [ ] and [ ] modes. 1 Set the flash mode to [Manual flash]. ●●Press the [ ] button and select [Flash Control] on a tripod or take other means to secure the camera (=78). ●● Since bulb...
...[Built-in long exposures when [Long exp. When the flash is a way to reduce noise in flash settings] and set the [Flash Mode] to [Manual flash] (=32). 2 Configure the settings. ●●Raise the flash, press the [ ] button and immediately turn off image stabilization when using a ... going to the menu (=32), choosing the [ 3] tab, selecting [Built-in flash settings] in [ ], [ ] and [ ] modes. 1 Set the flash mode to [Manual flash]. ●●Press the [ ] button and select [Flash Control] on a tripod or take other means to secure the camera (=78). ●● Since bulb...

User Guide
Page 115
... Digital Living Network Alliance. 7 Wi-Fi Functions Send images wirelessly from the camera to collectively as "smartphones". *2 CANON iMAGE GATEWAY is Canon's online photo service. *3 The printer must support PictBridge (supporting DPS over IP), which allows direct photo printing via...;● Sending to PC (=131) Canon Wi-Fi-compatible cameras ●● Converting images (= 129) Printer *3 ●● Printing images (=127) DLNA-compatible media players *4 ●● Viewing images (=126) *1 For convenience in this manual, smartphones, tablets and other compatible devices...
... Digital Living Network Alliance. 7 Wi-Fi Functions Send images wirelessly from the camera to collectively as "smartphones". *2 CANON iMAGE GATEWAY is Canon's online photo service. *3 The printer must support PictBridge (supporting DPS over IP), which allows direct photo printing via...;● Sending to PC (=131) Canon Wi-Fi-compatible cameras ●● Converting images (= 129) Printer *3 ●● Printing images (=127) DLNA-compatible media players *4 ●● Viewing images (=126) *1 For convenience in this manual, smartphones, tablets and other compatible devices...
User Guide
Page 119
... camera can be viewed from the smartphone (=135). You can also use an existing access point when connecting the camera to the access point user manual. Using Another Access Point You can easily connect again by touching [ ][ ], and then configure the setting. ●● If you access the Wi-Fi menu...
... camera can be viewed from the smartphone (=135). You can also use an existing access point when connecting the camera to the access point user manual. Using Another Access Point You can easily connect again by touching [ ][ ], and then configure the setting. ●● If you access the Wi-Fi menu...
User Guide
Page 120
... refers to all Wi-Fi routers and base stations as the setting. ●● If system administrator status is needed to the access point user manual. ●● A router is a device that the Wi-Fi router or base station conforms to choose [PBC Method], and then press the [ ] button. Using WPS...
... refers to all Wi-Fi routers and base stations as the setting. ●● If system administrator status is needed to the access point user manual. ●● A router is a device that the Wi-Fi router or base station conforms to choose [PBC Method], and then press the [ ] button. Using WPS...
User Guide
Page 121
... Shooting Modes 4 P Mode 5 Tv, Av, aMn,danMdMCoMdeodes 6 Playback Mode 7 Wi-Fi Functions 8 Set-Up Menu 9 Accessories 10 Appendix Index 121 Be sure to the user manual included with your access point.
... Shooting Modes 4 P Mode 5 Tv, Av, aMn,danMdMCoMdeodes 6 Playback Mode 7 Wi-Fi Functions 8 Set-Up Menu 9 Accessories 10 Appendix Index 121 Be sure to the user manual included with your access point.
User Guide
Page 122
...Web service you reconnect to a previous access point, "*" is required to complete camera settings for CANON iMAGE GATEWAY and other than CANON iMAGE GATEWAY if you choose [Refresh] in step 2 to update the list, choose [Manual Settings] in "Adding a Smartphone Using the Wi-Fi Menu" (=118) to select the smartphone... Point Mode]. ●● To use a different access point, select [Switch Network] on the access point itself or refer to the user manual. ●● Up to 16 access points will be applicable. If no access points are detected even after you desire to use the same ...
...Web service you reconnect to a previous access point, "*" is required to complete camera settings for CANON iMAGE GATEWAY and other than CANON iMAGE GATEWAY if you choose [Refresh] in step 2 to update the list, choose [Manual Settings] in "Adding a Smartphone Using the Wi-Fi Menu" (=118) to select the smartphone... Point Mode]. ●● To use a different access point, select [Switch Network] on the access point itself or refer to the user manual. ●● Up to 16 access points will be applicable. If no access points are detected even after you desire to use the same ...
