
User Guide
Page 2
...) Battery Pack LP-E17 (with terminal cover) Battery Charger LC-E17/LC-E17E Neck Strap EM-200DB Interface Cable IFC-400PCU ●● Printed matter is also included. ●● Check that the contents of purchase. If covered, remove the film before contacting a Canon Customer... design specifications, in some commercial settings. ●● The camera warranty is missing, contact your camera retailer. Please note that Canon Inc., its subsidiaries and affiliates, and its distributors are also supported. This does not indicate camera damage or affect recorded images....
...) Battery Pack LP-E17 (with terminal cover) Battery Charger LC-E17/LC-E17E Neck Strap EM-200DB Interface Cable IFC-400PCU ●● Printed matter is also included. ●● Check that the contents of purchase. If covered, remove the film before contacting a Canon Customer... design specifications, in some commercial settings. ●● The camera warranty is missing, contact your camera retailer. Please note that Canon Inc., its subsidiaries and affiliates, and its distributors are also supported. This does not indicate camera damage or affect recorded images....
User Guide
Page 3
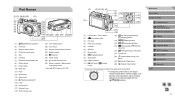
... (20) Lens mount (21) External microphone IN terminal (22) Digital terminal (23) (N-Mark)* (24) Tripod socket (25) DC coupler terminal cover (26) Memory card slot / Battery pack compartment cover * Used with the buttons. Most of these operations are also possible with NFC features (=118). (1) LCD monitor / Touch screen* (2) Focal plane mark...
... (20) Lens mount (21) External microphone IN terminal (22) Digital terminal (23) (N-Mark)* (24) Tripod socket (25) DC coupler terminal cover (26) Memory card slot / Battery pack compartment cover * Used with the buttons. Most of these operations are also possible with NFC features (=118). (1) LCD monitor / Touch screen* (2) Focal plane mark...

User Guide
Page 5
... Camera Operations 12 Safety Precautions 13 Basic Guide Basic Operations 16 Initial Preparations 16 Attaching the Strap 16 Charging the Battery Pack 16 Inserting the Battery Pack and Memory Card 17 Removing the Battery Pack and Memory Card 18 Setting the Date and Time 18 Changing the Date and Time 19 Display Language...
... Camera Operations 12 Safety Precautions 13 Basic Guide Basic Operations 16 Initial Preparations 16 Attaching the Strap 16 Charging the Battery Pack 16 Inserting the Battery Pack and Memory Card 17 Removing the Battery Pack and Memory Card 18 Setting the Date and Time 18 Changing the Date and Time 19 Display Language...

User Guide
Page 10
... to a Photobook 166 Removing All Images from a Photobook 167 10 Appendix 168 Troubleshooting 168 On-screen Messages 172 On-screen Information 174 During Shooting 174 Battery Level 174 Playback 175 Info Display 1 175 Info Display 2 175 Info Display 3 175 Info Display 4 175 Info Display 5 176 Info Display 6 176 Summary of Images...
... to a Photobook 166 Removing All Images from a Photobook 167 10 Appendix 168 Troubleshooting 168 On-screen Messages 172 On-screen Information 174 During Shooting 174 Battery Level 174 Playback 175 Info Display 1 175 Info Display 2 175 Info Display 3 175 Info Display 4 175 Info Display 5 176 Info Display 6 176 Summary of Images...

User Guide
Page 11
... Weight 195 Operation Environment 195 Number of Shots per Memory Card 195 Recording Time per Memory Card 196 Internal Flash Range Guide 196 Battery Pack LP-E17 196 Battery Charger LC-E17/LC-E17E 197 Index 198 Wi-Fi (Wireless LAN) Precautions 200 Radio Wave Interference Precautions 200 Security Precautions 200 Trademarks...
... Weight 195 Operation Environment 195 Number of Shots per Memory Card 195 Recording Time per Memory Card 196 Internal Flash Range Guide 196 Battery Pack LP-E17 196 Battery Charger LC-E17/LC-E17E 197 Index 198 Wi-Fi (Wireless LAN) Precautions 200 Radio Wave Interference Precautions 200 Security Precautions 200 Trademarks...

User Guide
Page 13
... or if liquid or foreign objects get inside . Immediately stop using the product immediately if it is plugged in direct flame. If leaking battery electrolyte comes into contact with eyes, mouth, skin, or clothing, immediately flush with wet hands. -- Do not use organic solvents such ...13 Always ensure that exceeds the rated capacity of the product if it . ●● Use only the recommended battery pack/batteries. ●● Do not place the battery pack/batteries near or in . Warning Denotes the possibility of children and infants. A strap wound around a child's neck may ...
... or if liquid or foreign objects get inside . Immediately stop using the product immediately if it is plugged in direct flame. If leaking battery electrolyte comes into contact with eyes, mouth, skin, or clothing, immediately flush with wet hands. -- Do not use organic solvents such ...13 Always ensure that exceeds the rated capacity of the product if it . ●● Use only the recommended battery pack/batteries. ●● Do not place the battery pack/batteries near or in . Warning Denotes the possibility of children and infants. A strap wound around a child's neck may ...

User Guide
Page 14
... to direct sunlight -- Doing so may cause foreign matter to smoke or the product to malfunction. ●● Remove and store the battery pack/batteries when you are not using the camera on the flash with a cotton swab or cloth. Even if the camera does not feel hot...artificial light source. Places subject to temperatures above 40°C (104°F) -- This could cause leakage, overheating, or an explosion of the battery pack/batteries, resulting in places where use of the skin or blistering. The heat emitted from the broken fragments. ●● When using the product...
... to direct sunlight -- Doing so may cause foreign matter to smoke or the product to malfunction. ●● Remove and store the battery pack/batteries when you are not using the camera on the flash with a cotton swab or cloth. Even if the camera does not feel hot...artificial light source. Places subject to temperatures above 40°C (104°F) -- This could cause leakage, overheating, or an explosion of the battery pack/batteries, resulting in places where use of the skin or blistering. The heat emitted from the broken fragments. ●● When using the product...

User Guide
Page 15
...; When putting the camera in your bag, ensure that it faces the body), if your product's screen closes. ●● Do not attach any dedicated battery packs near pets. Before Use Basic Guide Advanced Guide 1 Camera Basics 2 Auto Mode / Hybrid Auto Mode 3 Other Shooting Modes 4 P Mode 5 Tv.... ●● Do not sit down with the + and - Pets biting the battery pack could cause leakage, overheating, or explosion, resulting in your product uses multiple batteries, do not use batteries that have different levels of charge together, and do not come into contact with the screen...
...; When putting the camera in your bag, ensure that it faces the body), if your product's screen closes. ●● Do not attach any dedicated battery packs near pets. Before Use Basic Guide Advanced Guide 1 Camera Basics 2 Auto Mode / Hybrid Auto Mode 3 Other Shooting Modes 4 P Mode 5 Tv.... ●● Do not sit down with the + and - Pets biting the battery pack could cause leakage, overheating, or explosion, resulting in your product uses multiple batteries, do not use batteries that have different levels of charge together, and do not come into contact with the screen...

User Guide
Page 16
... way. Basic Guide Basic Operations Basic information and instructions, from the battery pack, align the marks on the battery pack and charger, and insert the battery pack by pushing it in (1) and down (2). 2 Charge the battery pack. ●●LC-E17: Flip out the plug (1), and... plug the charger into a power outlet (2). Charging the Battery Pack Before use, charge the battery pack with the battery pack charged. 1 Insert the battery pack. ●●Remove the cover from initial preparations to charge the battery pack initially, because the camera is not sold with the included ...
... way. Basic Guide Basic Operations Basic information and instructions, from the battery pack, align the marks on the battery pack and charger, and insert the battery pack by pushing it in (1) and down (2). 2 Charge the battery pack. ●●LC-E17: Flip out the plug (1), and... plug the charger into a power outlet (2). Charging the Battery Pack Before use, charge the battery pack with the battery pack charged. 1 Insert the battery pack. ●●Remove the cover from initial preparations to charge the battery pack initially, because the camera is not sold with the included ...

User Guide
Page 17
... The charger can be locked into the correct position. For details on charging time, see "Power Supplies" (=195). ●● Charged battery packs gradually lose their charge, even when they are not used. LC-E17E ●●LC-E17E: Plug the power cord into the ... In this camera (= 138). 1 Open the cover. ●●Slide the cover (1) and open it (2). 2 Insert the battery pack. ●●Holding the battery pack with the battery charger, the protective circuit stops charging, and the lamp blinks orange. Before Use Basic Guide Advanced Guide 1 Camera Basics 2 Auto ...
... The charger can be locked into the correct position. For details on charging time, see "Power Supplies" (=195). ●● Charged battery packs gradually lose their charge, even when they are not used. LC-E17E ●●LC-E17E: Plug the power cord into the ... In this camera (= 138). 1 Open the cover. ●●Slide the cover (1) and open it (2). 2 Insert the battery pack. ●●Holding the battery pack with the battery charger, the protective circuit stops charging, and the lamp blinks orange. Before Use Basic Guide Advanced Guide 1 Camera Basics 2 Auto ...

User Guide
Page 18
...the power button. ●●The [Date/Time] screen is in the locked position. Removing the Battery Pack and Memory Card Remove the battery pack. ●●Open the cover and press the battery lock in until it clicks into place. ●●Make sure the memory card is displayed when ...you insert it clicks into the closed position (2). ●● Look at the screen display for the number of the arrow. ●●The battery pack will pop up . 3 Check the card's write-protect tab and insert the memory card. ●●Recording is not possible on memory cards...
...the power button. ●●The [Date/Time] screen is in the locked position. Removing the Battery Pack and Memory Card Remove the battery pack. ●●Open the cover and press the battery lock in until it clicks into place. ●●Make sure the memory card is displayed when ...you insert it clicks into the closed position (2). ●● Look at the screen display for the number of the arrow. ●●The battery pack will pop up . 3 Check the card's write-protect tab and insert the memory card. ●●Recording is not possible on memory cards...

User Guide
Page 19
.... ●● Unless you set the date and time by touching the desired option on the screen shown in about 4 hours once you insert a charged battery pack or connect the camera to select your time zone in the screen shown in step 2 and then choose [ ] by [ ]. Similarly, to an AC ...adapter (sold separately) with a DC coupler (sold separately, =148), even if the camera is left off. ●● Once the date/time battery is removed. ●● The date/time battery will be displayed each time you turn the camera on . Date/time settings are retained for about 3 weeks after the...
.... ●● Unless you set the date and time by touching the desired option on the screen shown in about 4 hours once you insert a charged battery pack or connect the camera to select your time zone in the screen shown in step 2 and then choose [ ] by [ ]. Similarly, to an AC ...adapter (sold separately) with a DC coupler (sold separately, =148), even if the camera is left off. ●● Once the date/time battery is removed. ●● The date/time battery will be displayed each time you turn the camera on . Date/time settings are retained for about 3 weeks after the...

User Guide
Page 28
... (=28). Shutter Button To ensure that you shoot without initially pressing the shutter button halfway. Power-Saving Features (Auto Power Down) As a way to conserve battery power, the camera automatically deactivates the screen (Display Off) and then turns itself off but the (rear) indicator lamp is still on the intended subject...
... (=28). Shutter Button To ensure that you shoot without initially pressing the shutter button halfway. Power-Saving Features (Auto Power Down) As a way to conserve battery power, the camera automatically deactivates the screen (Display Off) and then turns itself off but the (rear) indicator lamp is still on the intended subject...

User Guide
Page 34
... Menu 9 Accessories 10 Appendix Index 34 Color Indicator Status Camera Status Green On Blinking Connected to a computer (=159), or display off , open the memory card/battery cover, or shake or jolt the camera, which may corrupt images or damage the camera or memory card. Indicator Display The indicator on the back...
... Menu 9 Accessories 10 Appendix Index 34 Color Indicator Status Camera Status Green On Blinking Connected to a computer (=159), or display off , open the memory card/battery cover, or shake or jolt the camera, which may corrupt images or damage the camera or memory card. Indicator Display The indicator on the back...

User Guide
Page 37
... a still image and movie clip. The clip, which ends with the still image and a shutter sound, forms a single chapter in the digest movie. ●● Battery life is shorter in this mode than in [ ] mode, because digest movies are recorded for each shot, which are changed. -- Shooting in advance.
... a still image and movie clip. The clip, which ends with the still image and a shutter sound, forms a single chapter in the digest movie. ●● Battery life is shorter in this mode than in [ ] mode, because digest movies are recorded for each shot, which are changed. -- Shooting in advance.

User Guide
Page 73
...;Press the shutter button halfway to autofocus and keep it may take longer than usual to the moment you press the shutter button halfway. Conserves battery power, because the camera does not Off focus constantly. Before Use Basic Guide Advanced Guide 1 Camera Basics 2 Auto Mode / Hybrid Auto Mode 3 Other Shooting Modes...
...;Press the shutter button halfway to autofocus and keep it may take longer than usual to the moment you press the shutter button halfway. Conserves battery power, because the camera does not Off focus constantly. Before Use Basic Guide Advanced Guide 1 Camera Basics 2 Auto Mode / Hybrid Auto Mode 3 Other Shooting Modes...

User Guide
Page 113
... case, the original movie will be erased. ●● If the memory card lacks sufficient space, only [Overwrite] will be saved if the battery pack runs out while saving is now saved as a new file. ●● To overwrite the original movie with a DC coupler (sold separately... the edited movie. ●●Press the [ ][ ] buttons to choose [ ] or [ ]. ●●To view the portions you should use a fully charged battery pack or an AC adapter (sold separately, =148). Cut the beginning of the movie (from the beginning and end of movies (excluding digest movies, =37...
... case, the original movie will be erased. ●● If the memory card lacks sufficient space, only [Overwrite] will be saved if the battery pack runs out while saving is now saved as a new file. ●● To overwrite the original movie with a DC coupler (sold separately... the edited movie. ●●Press the [ ][ ] buttons to choose [ ] or [ ]. ●●To view the portions you should use a fully charged battery pack or an AC adapter (sold separately, =148). Cut the beginning of the movie (from the beginning and end of movies (excluding digest movies, =37...

User Guide
Page 130
... the network you have already sent that the supported image quality varies depending on the camera battery level. ●● Up to 50 images can be sent. Only one movie can send. Notes on the CANON iMAGE GATEWAY server. However, Web services may limit the number of images or length of your...
... the network you have already sent that the supported image quality varies depending on the camera battery level. ●● Up to 50 images can be sent. Only one movie can send. Notes on the CANON iMAGE GATEWAY server. However, Web services may limit the number of images or length of your...

User Guide
Page 132
... to choose [ ]. ●●Once the connection is turned off, the images will be connected to the Internet. Choose the camera from CANON iMAGE GATEWAY will be sent. ●●Once the camera is registered and the computer is displayed. Before Use Basic Guide Advanced Guide 1 ...images. 1 Send images. ●●Follow steps 1 - 2 in the sent images. ●● When sending images, you should use a fully charged battery pack or an AC adapter (sold separately) with a DC coupler (sold separately, =148). ●● Even if images were imported to the computer through a...
... to choose [ ]. ●●Once the connection is turned off, the images will be connected to the Internet. Choose the camera from CANON iMAGE GATEWAY will be sent. ●●Once the camera is registered and the computer is displayed. Before Use Basic Guide Advanced Guide 1 ...images. 1 Send images. ●●Follow steps 1 - 2 in the sent images. ●● When sending images, you should use a fully charged battery pack or an AC adapter (sold separately) with a DC coupler (sold separately, =148). ●● Even if images were imported to the computer through a...

User Guide
Page 139
...the [ 1] tab and then press the [ ] button. ●●To adjust left/right tilt, choose [Horizontal Roll Calibration], and to conserve battery power in Shooting mode. Note that this is not possible unless you to adjust forward/ backward tilt, choose [Vertical Pitch Calibration], followed by the [...●●Choose [Electronic Level] on the [ 1] tab and then choose an option. For greater calibration accuracy, display grid lines (=30) to reduce battery consumption. 1 Configure the settings. ●●Choose [Eco Mode] on the [ 2] tab and then choose [On]. ●●[ ] is now ...
...the [ 1] tab and then press the [ ] button. ●●To adjust left/right tilt, choose [Horizontal Roll Calibration], and to conserve battery power in Shooting mode. Note that this is not possible unless you to adjust forward/ backward tilt, choose [Vertical Pitch Calibration], followed by the [...●●Choose [Electronic Level] on the [ 1] tab and then choose an option. For greater calibration accuracy, display grid lines (=30) to reduce battery consumption. 1 Configure the settings. ●●Choose [Eco Mode] on the [ 2] tab and then choose [On]. ●●[ ] is now ...
