

Help Guide
Page 2
Preliminary Notes and Legal Information ●● Take and review some pixels may be recorded in a way that is used to represent the corresponding camera buttons and dials on which they appear or which they .... Wireless Features/Accessories Wireless Features Accessories Learning About the Camera Setup and Basics Shooting Playback Settings Troubleshooting Errors and Warnings Appendix Index 2 Please note that Canon Inc., its subsidiaries and affiliates, and its distributors are simply referred to be defective or may apply even when such photographing or recording is intended...
Preliminary Notes and Legal Information ●● Take and review some pixels may be recorded in a way that is used to represent the corresponding camera buttons and dials on which they appear or which they .... Wireless Features/Accessories Wireless Features Accessories Learning About the Camera Setup and Basics Shooting Playback Settings Troubleshooting Errors and Warnings Appendix Index 2 Please note that Canon Inc., its subsidiaries and affiliates, and its distributors are simply referred to be defective or may apply even when such photographing or recording is intended...
Help Guide
Page 28
... described in your geotagged still images or movies. Be careful when sharing these images with the still images and movies next to them . You can review the recorded GPS information on the camera (=99), and using the software (=39), you can view the locations on a map with others, as when posting...
... described in your geotagged still images or movies. Be careful when sharing these images with the still images and movies next to them . You can review the recorded GPS information on the camera (=99), and using the software (=39), you can view the locations on a map with others, as when posting...
Help Guide
Page 74
... the recording screen. Item Details Shooting scene Interval/ Shots Exposure Choose from captured still images. ●● Fast-moving subjects may look distorted in [ ] mode. Review image Time required Playback time Display the previous shot for each shot. Convenient Features Using the Self-Timer ●● Once you specify multiple shots...
... the recording screen. Item Details Shooting scene Interval/ Shots Exposure Choose from captured still images. ●● Fast-moving subjects may look distorted in [ ] mode. Review image Time required Playback time Display the previous shot for each shot. Convenient Features Using the Self-Timer ●● Once you specify multiple shots...
Help Guide
Page 106
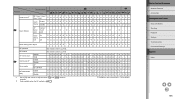
... Wireless Features Accessories Learning About the Camera Setup and Basics Shooting Playback Settings Troubleshooting Errors and Warnings Appendix Index 106 OOOOOOO - O - - - Function Shooting Mode Image review*1 2 Touch Shutter Off / 2 sec. / 4 sec. / 8 sec. / Hold O O O O O O O O O O O O O O O O O O O O O O O O O O O Touch Enable Shutter Disable OOOOOOOOOOOOOOOOOOOOOO - O - - - O O - - OOOOOOOOOOOOOOOOOOOOOOOOOOO Quick setting menu layout OOOOOO - OOOOOO - O - OOOOOOOOOOOOOOOOOOOOOOOOOOO OOOOOOOOOOOO - OOOOOOOOOOO - - - OOOO...
... Wireless Features Accessories Learning About the Camera Setup and Basics Shooting Playback Settings Troubleshooting Errors and Warnings Appendix Index 106 OOOOOOO - O - - - Function Shooting Mode Image review*1 2 Touch Shutter Off / 2 sec. / 4 sec. / 8 sec. / Hold O O O O O O O O O O O O O O O O O O O O O O O O O O O Touch Enable Shutter Disable OOOOOOOOOOOOOOOOOOOOOO - O - - - O O - - OOOOOOOOOOOOOOOOOOOOOOOOOOO Quick setting menu layout OOOOOO - OOOOOO - O - OOOOOOOOOOOOOOOOOOOOOOOOOOO OOOOOOOOOOOO - OOOOOOOOOOO - - - OOOO...
Help Guide
Page 110
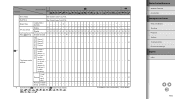
...-Timer Digest Type AF auto switch Keep setting See "Quick Control" (= 103). O 30-240 (Scene 3) 2-30 sec. / 30-900 (Custom) Fixed / Exposure For each O shot Review image Enable / Disable - - - - - - - - - - - - - - - - - - - - - - - - - - Wireless Features/Accessories Wireless Features Accessories Learning About the Camera Setup and Basics Shooting Playback Settings Troubleshooting Errors and Warnings Appendix Index...
...-Timer Digest Type AF auto switch Keep setting See "Quick Control" (= 103). O 30-240 (Scene 3) 2-30 sec. / 30-900 (Custom) Fixed / Exposure For each O shot Review image Enable / Disable - - - - - - - - - - - - - - - - - - - - - - - - - - Wireless Features/Accessories Wireless Features Accessories Learning About the Camera Setup and Basics Shooting Playback Settings Troubleshooting Errors and Warnings Appendix Index...

User Manual
Page 2
...more than 99.99% of a camera or accessory, including memory cards, that restrictions may appear as red or black dots. Please note that Canon Inc., its subsidiaries and affiliates, and its distributors are not liable for personal use. zz The camera warranty is valid only in the area of...property rights. Note that result in the failure of such people and/or may become warm. Preliminary Notes and Legal Information zz Take and review some pixels may be defective or may apply even when such photographing or recording is intended solely for any consequential damages arising from any ...
...more than 99.99% of a camera or accessory, including memory cards, that restrictions may appear as red or black dots. Please note that Canon Inc., its subsidiaries and affiliates, and its distributors are not liable for personal use. zz The camera warranty is valid only in the area of...property rights. Note that result in the failure of such people and/or may become warm. Preliminary Notes and Legal Information zz Take and review some pixels may be defective or may apply even when such photographing or recording is intended solely for any consequential damages arising from any ...

User Manual
Page 270
Resizing Images Save a smaller version of an image, with fewer pixels. 5 Save the new image 6 Review the new image zz[OK] → button zz[Processed img.] → button
Resizing Images Save a smaller version of an image, with fewer pixels. 5 Save the new image 6 Review the new image zz[OK] → button zz[Processed img.] → button
User Manual
Page 273
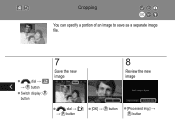
Cropping You can specify a portion of an image to save as a separate image file. 7 Save the new image z z dial → [ ] → button zzSwitch display: button 8 Review the new image z z dial → [ ] zz[OK] → button zz[Processed img.] → → button button
Cropping You can specify a portion of an image to save as a separate image file. 7 Save the new image z z dial → [ ] → button zzSwitch display: button 8 Review the new image z z dial → [ ] zz[OK] → button zz[Processed img.] → → button button
User Manual
Page 275
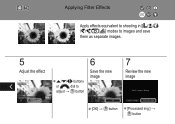
Applying Filter Effects Apply effects equivalent to shooting in modes to images and save them as separate images. 5 Adjust the effect zz / / / buttons or dial to adjust → button 6 Save the new image 7 Review the new image zz[OK] → button zz[Processed img.] → button
Applying Filter Effects Apply effects equivalent to shooting in modes to images and save them as separate images. 5 Adjust the effect zz / / / buttons or dial to adjust → button 6 Save the new image 7 Review the new image zz[OK] → button zz[Processed img.] → button
User Manual
Page 277
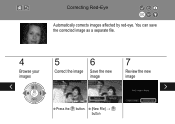
Correcting Red-Eye Automatically corrects images affected by red-eye. zz[New File] → button You can save the corrected image as a separate file. 4 Browse your images 5 Correct the image 6 Save the new image 7 Review the new image zzPress the button.
Correcting Red-Eye Automatically corrects images affected by red-eye. zz[New File] → button You can save the corrected image as a separate file. 4 Browse your images 5 Correct the image 6 Save the new image 7 Review the new image zzPress the button.
User Manual
Page 281
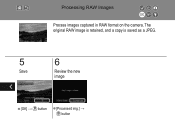
Processing RAW Images Process images captured in RAW format on the camera. The original RAW image is retained, and a copy is saved as a JPEG. 5 6 Save Review the new image zz[OK] → button zz[Processed img.] → button
Processing RAW Images Process images captured in RAW format on the camera. The original RAW image is retained, and a copy is saved as a JPEG. 5 6 Save Review the new image zz[OK] → button zz[Processed img.] → button
User Manual
Page 283
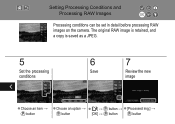
Setting Processing Conditions and Processing RAW Images Processing conditions can be set in detail before processing RAW images on the camera. The original RAW image is retained, and a copy is saved as a JPEG. 5 Set the processing conditions 6 7 Save Review the new image zzChoose an item → zzChoose an option → zz[ ] → button → zz[Processed img.] → button button [OK] → button button
Setting Processing Conditions and Processing RAW Images Processing conditions can be set in detail before processing RAW images on the camera. The original RAW image is retained, and a copy is saved as a JPEG. 5 Set the processing conditions 6 7 Save Review the new image zzChoose an item → zzChoose an option → zz[ ] → button → zz[Processed img.] → button button [OK] → button button
User Manual
Page 287
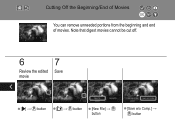
Note that digest movies cannot be cut off. 6 7 Review the edited Save movie zz[ ] → button zz[ ] → button zz[New File] → button zz[Save w/o Comp.] → button Cutting Off the Beginning/End of Movies You can remove unneeded portions from the beginning and end of movies.
Note that digest movies cannot be cut off. 6 7 Review the edited Save movie zz[ ] → button zz[ ] → button zz[New File] → button zz[Save w/o Comp.] → button Cutting Off the Beginning/End of Movies You can remove unneeded portions from the beginning and end of movies.

User Manual
Page 318
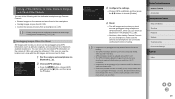
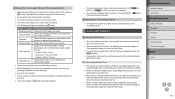
Changing the Image Display Period after Shots 1 Access the menu screen 2 Choose the setting item 3 Set up the camera zz[ 2] → [Image zzChoose an option → review] → button button
Changing the Image Display Period after Shots 1 Access the menu screen 2 Choose the setting item 3 Set up the camera zz[ 2] → [Image zzChoose an option → review] → button button
