Instruction Manual
Page 2
... these instructions to prevent injury or harm to a power source for long periods of clean running water. Do not touch the battery charger or AC adapter connected to operate the product safely. Do not damage, break or modify the power cord. - Do not expose the power plug and terminals to maintain contact with wet hands. - Do not use with copious amounts of time. - Use batteries/battery packs...
... these instructions to prevent injury or harm to a power source for long periods of clean running water. Do not touch the battery charger or AC adapter connected to operate the product safely. Do not damage, break or modify the power cord. - Do not expose the power plug and terminals to maintain contact with wet hands. - Do not use with copious amounts of time. - Use batteries/battery packs...
Instruction Manual
Page 5
... Date, Time and Language Settings 22 Setting the Date and Time 22 Changing the Language 22 Using the Menus 23 Selecting an Option from the Menu 23 Using the Customized Menus (My Menu) 24 Preparing the Camera 26 Examples of Parts 11 Camera 11 Handle Unit 16 Microphone Holder 16 2. Recording 41 Recording Video and Photos 41 Recording 41 Onscreen Displays 43 Reviewing a Recording 47 Adjusting Camera and Recording Settings 49 Performing Basic Settings with Direct Touch Control 49 Direct Setting Mode (FUNC Button) 50 Video Recording Configuration: Video Format...
... Date, Time and Language Settings 22 Setting the Date and Time 22 Changing the Language 22 Using the Menus 23 Selecting an Option from the Menu 23 Using the Customized Menus (My Menu) 24 Preparing the Camera 26 Examples of Parts 11 Camera 11 Handle Unit 16 Microphone Holder 16 2. Recording 41 Recording Video and Photos 41 Recording 41 Onscreen Displays 43 Reviewing a Recording 47 Adjusting Camera and Recording Settings 49 Performing Basic Settings with Direct Touch Control 49 Direct Setting Mode (FUNC Button) 50 Video Recording Configuration: Video Format...
Instruction Manual
Page 6
... Connecting an External Device 85 Time Code Signal Input 85 Time Code Signal Output 86 Recording Audio 87 Audio Format for MP4 Clips 88 Connecting an External Microphone or External Audio Input Source to the Camera 88 Selecting the Built-in Microphone Mode 89 Selecting the Audio Input Source for Audio Channels 90 Adjusting the Audio Recording Level 90 Advanced Audio Input Settings 92 Monitoring the Audio with Headphones 93 Colors Bars/Audio Reference Signal 94 Color Bars 94 Audio Reference Signal 94 Video Scopes 95 Displaying a Video Scope 95 Changing...
... Connecting an External Device 85 Time Code Signal Input 85 Time Code Signal Output 86 Recording Audio 87 Audio Format for MP4 Clips 88 Connecting an External Microphone or External Audio Input Source to the Camera 88 Selecting the Built-in Microphone Mode 89 Selecting the Audio Input Source for Audio Channels 90 Adjusting the Audio Recording Level 90 Advanced Audio Input Settings 92 Monitoring the Audio with Headphones 93 Colors Bars/Audio Reference Signal 94 Color Bars 94 Audio Reference Signal 94 Video Scopes 95 Displaying a Video Scope 95 Changing...

Instruction Manual
Page 7
...148 Checking and Changing Communication Settings (NW)/Function Settings (MODE) 149 Checking the Network's Status 152 FTP File Transfer 153 Transferring a Single Clip 153 Transferring All Clips 153 IP Streaming 154 Browser Remote: Controlling the Camera from a Clip 126 6. External Connections 127 Video Output Configuration 127 HDMI OUT Terminal Video Output Configuration (Recording/Playback) 127 Connecting to SDR 132 Audio Output Channels 133 Working with Files on a Card 205 Charging Times 205 Appendix: Camera Dimensions 206 Index 208 File Operations 123 File Menu Operations 123 Displaying...
...148 Checking and Changing Communication Settings (NW)/Function Settings (MODE) 149 Checking the Network's Status 152 FTP File Transfer 153 Transferring a Single Clip 153 Transferring All Clips 153 IP Streaming 154 Browser Remote: Controlling the Camera from a Clip 126 6. External Connections 127 Video Output Configuration 127 HDMI OUT Terminal Video Output Configuration (Recording/Playback) 127 Connecting to SDR 132 Audio Output Channels 133 Working with Files on a Card 205 Charging Times 205 Appendix: Camera Dimensions 206 Index 208 File Operations 123 File Menu Operations 123 Displaying...
Instruction Manual
Page 9
... to Troubleshooting (A 182). Do not open the card compartment cover. Conventions Used in this Manual • IMPORTANT: Precautions related to the camera's operation. • NOTES: Additional topics that the camera operates correctly. "SD card" refers to the LCD monitor's screen. - Unless indicated otherwise, shooting functions are simulated pictures taken with more than 99.99% of the pixels operating to specification. "Screen" refers to an SD, SDHC or SDXC memory card. - "AC adapter...
... to Troubleshooting (A 182). Do not open the card compartment cover. Conventions Used in this Manual • IMPORTANT: Precautions related to the camera's operation. • NOTES: Additional topics that the camera operates correctly. "SD card" refers to the LCD monitor's screen. - Unless indicated otherwise, shooting functions are simulated pictures taken with more than 99.99% of the pixels operating to specification. "Screen" refers to an SD, SDHC or SDXC memory card. - "AC adapter...
Instruction Manual
Page 21
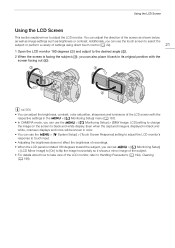
... or perform a variety of settings using direct touch control (A 49). 21 1 Open the LCD monitor 180 degrees (ቢ) and adjust to the desired angle (ባ). 2 When the screen is displayed in black and white, onscreen displays and icons will be shown in the > [¢ Monitoring Setup] menu (A 167). • In CAMERA mode, you can set > [¢ Monitoring Setup] > [LCD Mirror Image] to [On] to flip the image horizontally so it shows...
... or perform a variety of settings using direct touch control (A 49). 21 1 Open the LCD monitor 180 degrees (ቢ) and adjust to the desired angle (ባ). 2 When the screen is displayed in black and white, onscreen displays and icons will be shown in the > [¢ Monitoring Setup] menu (A 167). • In CAMERA mode, you can set > [¢ Monitoring Setup] > [LCD Mirror Image] to [On] to flip the image horizontally so it shows...
Instruction Manual
Page 26
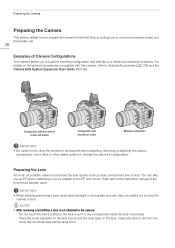
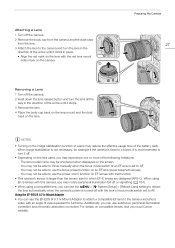
... caps on the optional accessories compatible with microphone holder Minimal configuration IMPORTANT • Be careful not to change the camera's configuration. Preparing the Lens As much as possible, attach and remove the lens quickly and in a clean environment free of Camera Configurations Your camera allows you to Optional Accessories (A 197) and the Cinema EOS System Expansion User Guide (PDF file). Clean any components inside the lens mount area. - Do not...
... caps on the optional accessories compatible with microphone holder Minimal configuration IMPORTANT • Be careful not to change the camera's configuration. Preparing the Lens As much as possible, attach and remove the lens quickly and in a clean environment free of Camera Configurations Your camera allows you to Optional Accessories (A 197) and the Cinema EOS System Expansion User Guide (PDF file). Clean any components inside the lens mount area. - Do not...
Instruction Manual
Page 27
... effective usage time of the battery pack. For details on the screen. - When image stabilization is not necessary, for example if the camera is fixed to a tripod, it is larger than the sensor size for which EF-S lenses are designed (APS-C). The lens model name may be able to focus manually when the focus mode switch of an EF lens is turned off with the lens's focus mode switch set to...
... effective usage time of the battery pack. For details on the screen. - When image stabilization is not necessary, for example if the camera is fixed to a tripod, it is larger than the sensor size for which EF-S lenses are designed (APS-C). The lens model name may be able to focus manually when the focus mode switch of an EF lens is turned off with the lens's focus mode switch set to...
Instruction Manual
Page 104
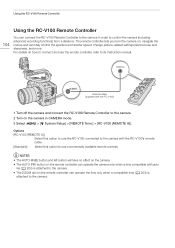
...) 1 Turn off the camera and connect the RC-V100 Remote Controller to the camera. 2 Turn on how to the camera. NOTES • The AUTO KNEE button and AF button will have no effect on the camera. • The AUTO IRIS button on the remote controller can operate the lens only when a compatible lens (A 203) is attached to the camera. • The ZOOM dial on , navigate the menus and remotely control the aperture and shutter speed, change picture-related settings...
...) 1 Turn off the camera and connect the RC-V100 Remote Controller to the camera. 2 Turn on how to the camera. NOTES • The AUTO KNEE button and AF button will have no effect on the camera. • The AUTO IRIS button on the remote controller can operate the lens only when a compatible lens (A 203) is attached to the camera. • The ZOOM dial on , navigate the menus and remotely control the aperture and shutter speed, change picture-related settings...
Instruction Manual
Page 114
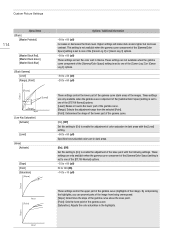
... image from the selected [Point]. [Point]: Determines the shape of the lower part of the gamma curve. [On], [Off] Set this setting to [On] to enable the adjustment of color saturation in blacks. Higher settings will make dark areas brighter but decrease contrast. Output Input Custom Picture Settings 114 Menu items [Black] [Master Pedestal] [Master Black Red], [Master Black Green], [Master Black Blue] [Black Gamma] [Level] [Range], [Point] [Point] [Level] Output [Range] Input...
... image from the selected [Point]. [Point]: Determines the shape of the lower part of the gamma curve. [On], [Off] Set this setting to [On] to enable the adjustment of color saturation in blacks. Higher settings will make dark areas brighter but decrease contrast. Output Input Custom Picture Settings 114 Menu items [Black] [Master Pedestal] [Master Black Red], [Master Black Green], [Master Black Blue] [Black Gamma] [Level] [Range], [Point] [Point] [Level] Output [Range] Input...
Instruction Manual
Page 117
... screen will turn black momentarily and the camera will restart. Loading Menu Settings 1 Select > [B System Setup] > [Transfer Menu//] > [Load]. 2 Select [From Camera] or [From SD Card B] and then select [OK]. • The camera's menu settings will be replaced. Output] • The root certificate for secure FTP transfers is not saved. • When menu settings are not saved with this operation. - > [v Camera Setup] > [Color Bars] - > [/ Custom Picture] > [Edit / File] > [Look File Setup] (only when saved using the [To Camera] setting) - > [Æ Recording/Media Setup...
... screen will turn black momentarily and the camera will restart. Loading Menu Settings 1 Select > [B System Setup] > [Transfer Menu//] > [Load]. 2 Select [From Camera] or [From SD Card B] and then select [OK]. • The camera's menu settings will be replaced. Output] • The root certificate for secure FTP transfers is not saved. • When menu settings are not saved with this operation. - > [v Camera Setup] > [Color Bars] - > [/ Custom Picture] > [Edit / File] > [Look File Setup] (only when saved using the [To Camera] setting) - > [Æ Recording/Media Setup...
Instruction Manual
Page 138
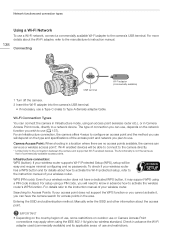
...-Fi adapter into the camera's USB terminal. • If necessary, use a Wi-Fi network, connect a commercially available Wi-Fi adapter to the manufacturer's instruction manual. Infrastructure connection: WPS (button): If your wireless router supports Wi-Fi Protected Setup (WPS), setup will be easy and require minimal configuring and no access points available, the camera can connect the camera in Camera Access Point mode, directly to use , some restrictions on the type and specifications of...
...-Fi adapter into the camera's USB terminal. • If necessary, use a Wi-Fi network, connect a commercially available Wi-Fi adapter to the manufacturer's instruction manual. Infrastructure connection: WPS (button): If your wireless router supports Wi-Fi Protected Setup (WPS), setup will be easy and require minimal configuring and no access points available, the camera can connect the camera in Camera Access Point mode, directly to use , some restrictions on the type and specifications of...
Instruction Manual
Page 156
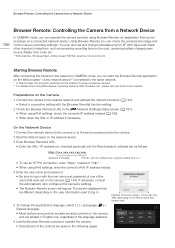
...Browser Remote] function setting. 2 Check the Browser Remote's URL in . Using Browser Remote you can operate the camera remotely using IPv6 settings, check the camera's IP address instead (A 180). • Write down the URL or IP address if necessary. Browser Remote: Controlling the Camera from a Network Device Browser Remote: Controlling the Camera from a Network Device 156 In CAMERA mode, you can check the camera's live image and control various recording settings*. The screen may be accesses on the card, remaining battery charge/power source details, time code, etc. * White balance...
...Browser Remote] function setting. 2 Check the Browser Remote's URL in . Using Browser Remote you can operate the camera remotely using IPv6 settings, check the camera's IP address instead (A 180). • Write down the URL or IP address if necessary. Browser Remote: Controlling the Camera from a Network Device Browser Remote: Controlling the Camera from a Network Device 156 In CAMERA mode, you can check the camera's live image and control various recording settings*. The screen may be accesses on the card, remaining battery charge/power source details, time code, etc. * White balance...
Instruction Manual
Page 159
... the button to display the camera's live view image on and off in order to prevent settings from a Network Device 7 Live view screen Shows the camera's live view image. 8 Browser Remote screen selection ([Full] user only) Touch [v] to open the main remote recording screen, or [ ] to open the metadata screen (A 161). 9 ISO speed/Gain mode (automatic/manual) 10 Shutter mode 11 Aperture mode (automatic/manual) 12 Detailed camera settings (A 160) Detailed settings for ND filter, aperture, ISO speed/gain and AF operations. 13 White balance mode...
... the button to display the camera's live view image on and off in order to prevent settings from a Network Device 7 Live view screen Shows the camera's live view image. 8 Browser Remote screen selection ([Full] user only) Touch [v] to open the main remote recording screen, or [ ] to open the metadata screen (A 161). 9 ISO speed/Gain mode (automatic/manual) 10 Shutter mode 11 Aperture mode (automatic/manual) 12 Detailed camera settings (A 160) Detailed settings for ND filter, aperture, ISO speed/gain and AF operations. 13 White balance mode...
Instruction Manual
Page 163
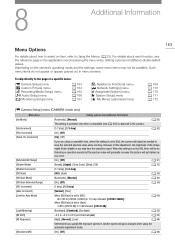
... quickly the exposure (aperture, shutter speed and gain) changes when using a compatible lens, when this adjustment, the brightness of a specific menu: [v Camera Setup] menu [/ Custom Picture] menu [Æ Recording/Media Setup] menu [¡ Audio Setup] menu [¢ Monitoring Setup] menu A 163 A 164 A 165 A 166 A 167 [A Assistance Functions] menu [ Network Settings] menu [ Assignable Buttons] menu [B System Setup] menu [¥ My Menu] customized menu A 169 A 170 A 170 A 171 A 172 [v Camera Setup] menu (CAMERA mode only) Menu item [Iris Mode] [Iris Increment] [Fine Increment] [Zoom...
... quickly the exposure (aperture, shutter speed and gain) changes when using a compatible lens, when this adjustment, the brightness of a specific menu: [v Camera Setup] menu [/ Custom Picture] menu [Æ Recording/Media Setup] menu [¡ Audio Setup] menu [¢ Monitoring Setup] menu A 163 A 164 A 165 A 166 A 167 [A Assistance Functions] menu [ Network Settings] menu [ Assignable Buttons] menu [B System Setup] menu [¥ My Menu] customized menu A 169 A 170 A 170 A 171 A 172 [v Camera Setup] menu (CAMERA mode only) Menu item [Iris Mode] [Iris Increment] [Fine Increment] [Zoom...
Instruction Manual
Page 182
... card is below 0 °C (32 °F), warm it before charging it on, the camera turns off by itself. - The REC button was used may not be disabled. Check the power source. - Focus manually (A 70). - When a subject flits across in the custom picture file (A 116) are using the remote controller and then press the REC button or touch the onscreen button. - Replace the battery pack. Recording The camera's controls are locked with the > [B System Setup] > [Key Lock] setting. Change...
... card is below 0 °C (32 °F), warm it before charging it on, the camera turns off by itself. - The REC button was used may not be disabled. Check the power source. - Focus manually (A 70). - When a subject flits across in the custom picture file (A 116) are using the remote controller and then press the REC button or touch the onscreen button. - Replace the battery pack. Recording The camera's controls are locked with the > [B System Setup] > [Key Lock] setting. Change...
Instruction Manual
Page 184
... the symptoms by setting the shutter speed mode to [Speed] and the shutter speed to turn the camera off repeatedly. - Screen displays turn on the desired monitor/video output. - Replace or charge the battery pack. - Horizontal bands appear on the screen and the camera does not operate properly. - The camera's internal temperature has reached a predetermined level. i appears on screen. - After a moment, reconnect the power and reinsert the cards. Video noise appears on the screen. - The camera's internal temperature has risen...
... the symptoms by setting the shutter speed mode to [Speed] and the shutter speed to turn the camera off repeatedly. - Screen displays turn on the desired monitor/video output. - Replace or charge the battery pack. - Horizontal bands appear on the screen and the camera does not operate properly. - The camera's internal temperature has reached a predetermined level. i appears on screen. - After a moment, reconnect the power and reinsert the cards. Video noise appears on the screen. - The camera's internal temperature has risen...
Instruction Manual
Page 185
... using the camera in power but > [¡ Audio Setup] > [MIC Input] is set the INPUT switch or the [MIC Input] setting to and playing back from a card is set > [¡ Audio Setup] > [MIC Input] to prevent accidental erasure. Save your recordings and initialize the card (A 32). The LOCK switch on a nearby TV screen. - Set > [Æ Recording/Media Setup] > [MP4 Clip/Photo Numbering] to MIC+48V (A 89). - Turn off the camera, reconnect the remote controller and then turn the camera back on the SD card. - Unprotect the file (A 110). Connections with the camera...
... using the camera in power but > [¡ Audio Setup] > [MIC Input] is set the INPUT switch or the [MIC Input] setting to and playing back from a card is set > [¡ Audio Setup] > [MIC Input] to prevent accidental erasure. Save your recordings and initialize the card (A 32). The LOCK switch on a nearby TV screen. - Set > [Æ Recording/Media Setup] > [MP4 Clip/Photo Numbering] to MIC+48V (A 89). - Turn off the camera, reconnect the remote controller and then turn the camera back on the SD card. - Unprotect the file (A 110). Connections with the camera...
Instruction Manual
Page 189
... mode, during playback, trying to add a shot mark to record clips on the selected card. The power zoom adapter's remaining battery charge is not available. The power zoom adapter cannot be correctly updated. Turn the camera off , then on the card. - Try updating the firmware again. May not be able to the file control information. Try updating the firmware again. Replace the card or use the current Look File. - Replace the power zoom adapter's batteries. Power Zoom Adapter Temperature too high. Lens firmware update Firmware update failed. No photos - Troubleshooting...
... mode, during playback, trying to add a shot mark to record clips on the selected card. The power zoom adapter's remaining battery charge is not available. The power zoom adapter cannot be correctly updated. Turn the camera off , then on the card. - Try updating the firmware again. May not be able to the file control information. Try updating the firmware again. Replace the card or use the current Look File. - Replace the power zoom adapter's batteries. Power Zoom Adapter Temperature too high. Lens firmware update Firmware update failed. No photos - Troubleshooting...
Instruction Manual
Page 190
... the problem, consult a Canon Service Center. * Corrupted file control information cannot be able to recover files when there is not set a shooting frame rate of the [Æ Recording/Media Setup] settings. The settings displayed on the card. The memory card is not compatible with one rated V90. - Check the focus. - This photo cannot be used by the software (Canon XF Utility or plugins for any of the following settings were changed automatically due to a change the camera's system...
... the problem, consult a Canon Service Center. * Corrupted file control information cannot be able to recover files when there is not set a shooting frame rate of the [Æ Recording/Media Setup] settings. The settings displayed on the card. The memory card is not compatible with one rated V90. - Check the focus. - This photo cannot be used by the software (Canon XF Utility or plugins for any of the following settings were changed automatically due to a change the camera's system...


