Instruction Manual
Page 2
... Camcorder, EOS C300 / EOS C300 PL Systems. This device complies with the limits for help. However, there is no guarantee that may cause undesired operation. If this device must accept any changes or modifications to provide reasonable protection against harmful interference in the manual. One Canon Park, ...shielded cable is used as the inside of the equipment. CAUTION: • Danger of explosion if the wrong type of FCC Rules. EOS C300 / EOS C300 PL / CA-940N / CG-940 identification plate is connected. • Consult the dealer or an experienced radio/TV technician for ...
... Camcorder, EOS C300 / EOS C300 PL Systems. This device complies with the limits for help. However, there is no guarantee that may cause undesired operation. If this device must accept any changes or modifications to provide reasonable protection against harmful interference in the manual. One Canon Park, ...shielded cable is used as the inside of the equipment. CAUTION: • Danger of explosion if the wrong type of FCC Rules. EOS C300 / EOS C300 PL / CA-940N / CG-940 identification plate is connected. • Consult the dealer or an experienced radio/TV technician for ...
Instruction Manual
Page 7
... 51 Recording Video 51 Preparing to Record 51 Recording 51 Remote Operation Using Wi-Fi Remote 54 Onscreen Displays 55 Rear Panel Displays 57 Canon Log Gamma and CINEMA Preset 58 Video Configuration: Type of Contents 1. AE Shift 72 Light Metering Mode 73 White Balance 74 Setting the...Operation Using Wi-Fi Remote 67 ND Filter 68 Using the ND Filter 68 Remote Operation Using Wi-Fi Remote 68 # Adjusting the Aperture 69 Manual Aperture 69 Momentary Automatic Aperture - Push Auto Iris 71 Automatic Aperture 72 Exposure Compensation - Preparations 23 Preparing the Power Supply 23 Using a Battery...
... 51 Recording Video 51 Preparing to Record 51 Recording 51 Remote Operation Using Wi-Fi Remote 54 Onscreen Displays 55 Rear Panel Displays 57 Canon Log Gamma and CINEMA Preset 58 Video Configuration: Type of Contents 1. AE Shift 72 Light Metering Mode 73 White Balance 74 Setting the...Operation Using Wi-Fi Remote 67 ND Filter 68 Using the ND Filter 68 Remote Operation Using Wi-Fi Remote 68 # Adjusting the Aperture 69 Manual Aperture 69 Momentary Automatic Aperture - Push Auto Iris 71 Automatic Aperture 72 Exposure Compensation - Preparations 23 Preparing the Power Supply 23 Using a Battery...
Instruction Manual
Page 9
... Appear on an External Monitor 142 Saving Clips to a Computer 143 System Requirements 143 Installing and Uninstalling Canon XF Utility (Windows) 144 Installing and Uninstalling Canon XF Utility (Mac OS) 146 Viewing the Software Instruction Manuals 149 7. 9 Clip Operations 130 Using the Clip Menu 131 Displaying Clip Information 131 Adding $ Marks or % Marks...
... Appear on an External Monitor 142 Saving Clips to a Computer 143 System Requirements 143 Installing and Uninstalling Canon XF Utility (Windows) 144 Installing and Uninstalling Canon XF Utility (Mac OS) 146 Viewing the Software Instruction Manuals 149 7. 9 Clip Operations 130 Using the Clip Menu 131 Displaying Clip Information 131 Adding $ Marks or % Marks...
Instruction Manual
Page 11
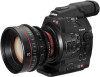
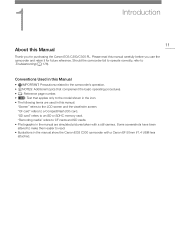
... make them easier to CF cards and SD cards. • Photographs in the manual are used in the manual show the Canon EOS C300 camcorder with a still camera. 1 Introduction 11 About this Manual Thank you use the camcorder and retain it for purchasing the Canon EOS C300/C300 PL. "Screen" refers to an SD or SDHC memory card. Please read...
... make them easier to CF cards and SD cards. • Photographs in the manual are used in the manual show the Canon EOS C300 camcorder with a still camera. 1 Introduction 11 About this Manual Thank you use the camcorder and retain it for purchasing the Canon EOS C300/C300 PL. "Screen" refers to an SD or SDHC memory card. Please read...
Instruction Manual
Page 12
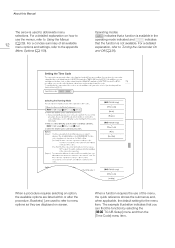
... explanation, refer to the appendix Menu Options (A 159). The example illustration indicates that the function is used to refer to abbreviate menu selections. About this Manual The arrow is not available. Brackets [ ] are used to menu options as they are listed within or after the procedure.
... explanation, refer to the appendix Menu Options (A 159). The example illustration indicates that the function is used to refer to abbreviate menu selections. About this Manual The arrow is not available. Brackets [ ] are used to menu options as they are listed within or after the procedure.
Instruction Manual
Page 13
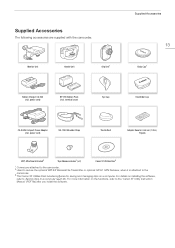
.... power cord) SS-1200 Shoulder Strap Thumb Rest Adapter Base for 0.64 cm (1/4 in.) Tripods WFT Attachment Bracket2 Tape Measure Hooks1 (x 2) Canon XF Utilities Disc3 1 Comes pre-attached to the camcorder. 2 Used to secure the optional WFT-E6 Wireless File Transmitter or optional GP-E1 GPS... Receiver, when it is attached to the camcorder. 3 The Canon XF Utilities Disc includes software for saving and managing clips on the functions, refer to a Computer (A 143). For details on installing the software...
.... power cord) SS-1200 Shoulder Strap Thumb Rest Adapter Base for 0.64 cm (1/4 in.) Tripods WFT Attachment Bracket2 Tape Measure Hooks1 (x 2) Canon XF Utilities Disc3 1 Comes pre-attached to the camcorder. 2 Used to secure the optional WFT-E6 Wireless File Transmitter or optional GP-E1 GPS... Receiver, when it is attached to the camcorder. 3 The Canon XF Utilities Disc includes software for saving and managing clips on the functions, refer to a Computer (A 143). For details on installing the software...
Instruction Manual
Page 29
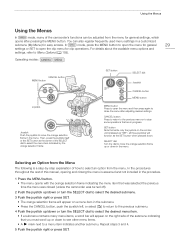
... button when pressed down. SELECT dial Turn the dial to move the orange selection frame in progress. In the procedures throughout the rest of this manual, opening and closing the menu is a step-by the orange selection frame. You can be adjusted from the Menu The following is assumed and not...
... button when pressed down. SELECT dial Turn the dial to move the orange selection frame in progress. In the procedures throughout the rest of this manual, opening and closing the menu is a step-by the orange selection frame. You can be adjusted from the Menu The following is assumed and not...
Instruction Manual
Page 32
... Lens As much as possible, attach and remove the lens quickly and in a clean environment free of the lens used. Refer also to the instruction manual of dust. Your camcorder is 32 nothing if not versatile and you can choose the configuration that best fits your needs and shooting conditions. Also...
... Lens As much as possible, attach and remove the lens quickly and in a clean environment free of the lens used. Refer also to the instruction manual of dust. Your camcorder is 32 nothing if not versatile and you can choose the configuration that best fits your needs and shooting conditions. Also...
Instruction Manual
Page 33
... the lens release button and turn it off. • Depending on the image stabilization function of an EF lens may not be able to focus manually when the focus mode switch is recommended to turn the lens all the way in the direction of the arrow until it is set to...
... the lens release button and turn it off. • Depending on the image stabilization function of an EF lens may not be able to focus manually when the focus mode switch is recommended to turn the lens all the way in the direction of the arrow until it is set to...
Instruction Manual
Page 69
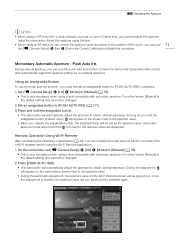
... Function] [Control Dial] [Grip Ctrl Dial] [Iris] Momentary automatic aperture - Control dial To assign aperture control to manual aperture. Operating modes: Manual Aperture Using the Control Dial You can only be changed , follow the procedure below to set to temporarily adjust the aperture... Available only with lenses compatible with automatic aperture is set a control dial's function to the camcorder. Push Auto Iris: During manual aperture, press an assignable button or use a small aperture value for a shallow depth of field by adjusting the aperture. Available...
... Function] [Control Dial] [Grip Ctrl Dial] [Iris] Momentary automatic aperture - Control dial To assign aperture control to manual aperture. Operating modes: Manual Aperture Using the Control Dial You can only be changed , follow the procedure below to set to temporarily adjust the aperture... Available only with lenses compatible with automatic aperture is set a control dial's function to the camcorder. Push Auto Iris: During manual aperture, press an assignable button or use a small aperture value for a shallow depth of field by adjusting the aperture. Available...
Instruction Manual
Page 70
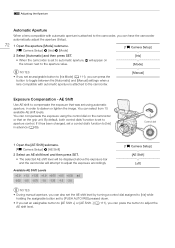
...close the aperture in 1/8-stop increments. (Onscreen displays will show the closest 1/3-stop aperture value. [~ Camera Setup] [Iris] [Mode] [Manual] [~ Camera Setup] [Iris] [Iris Increment] NOTES [1/3 stop aperture value.) • The selected value will be displayed on the Wi...70 [~ Camera Setup] > [Iris] > [Mode] • This submenu is available only with lenses compatible with automatic aperture. Otherwise, start from step 3. 2 Select [Manual] and then press SET. 3 Open the [Iris Increment] submenu. [~ Camera Setup] > [Iris] > [Iris Increment] 4 Select [1/2 stop], [1/3 stop] or [...
...close the aperture in 1/8-stop increments. (Onscreen displays will show the closest 1/3-stop aperture value. [~ Camera Setup] [Iris] [Mode] [Manual] [~ Camera Setup] [Iris] [Iris Increment] NOTES [1/3 stop aperture value.) • The selected value will be displayed on the Wi...70 [~ Camera Setup] > [Iris] > [Mode] • This submenu is available only with lenses compatible with automatic aperture. Otherwise, start from step 3. 2 Select [Manual] and then press SET. 3 Open the [Iris Increment] submenu. [~ Camera Setup] > [Iris] > [Iris Increment] 4 Select [1/2 stop], [1/3 stop] or [...
Instruction Manual
Page 71
... camcorder temporarily take control and automatically adjust the aperture (f/stop will end and the icon next to obtain optimal exposure. For other lenses, [Manual] is only necessary when using a lens compatible with no lens contacts, such as you hold the assignable button. • The camcorder will...PUSH AUTO IRIS] (A 111). 3 Press and hold the assignable button pressed down, will turn black and be grayed out. As long as a Canon Cinema lens, you cannot adjust the aperture using the camcorder. Once the adjustment is only necessary when using the Wi-Fi Remote application. 1 On...
... camcorder temporarily take control and automatically adjust the aperture (f/stop will end and the icon next to obtain optimal exposure. For other lenses, [Manual] is only necessary when using a lens compatible with no lens contacts, such as you hold the assignable button. • The camcorder will...PUSH AUTO IRIS] (A 111). 3 Press and hold the assignable button pressed down, will turn black and be grayed out. As long as a Canon Cinema lens, you cannot adjust the aperture using the camcorder. Once the adjustment is only necessary when using the Wi-Fi Remote application. 1 On...
Instruction Manual
Page 72
... compatible with automatic aperture is set an assignable button to [AE Shift +] or [AE Shift -] (A 111), you set to the camcorder. [Manual] Exposure Compensation - AE Shift Use AE shift to compensate the exposure that on [Iris] [Mode] NOTES • If you can press the ... AE Shift Levels +2.0 +1.5 +1.25 +1.0 +0.75 +0.5 +0.25 ±0 -0.25 -0.5 -0.75 -1.0 -1.25 -1.5 -2.0 [~ Camera Setup] [AE Shift] [±0] NOTES • During manual aperture, you can also set the AE shift level by turning a control dial assigned to [Iris] while holding the assignable button set to [PUSH AUTO...
... compatible with automatic aperture is set an assignable button to [AE Shift +] or [AE Shift -] (A 111), you set to the camcorder. [Manual] Exposure Compensation - AE Shift Use AE shift to compensate the exposure that on [Iris] [Mode] NOTES • If you can press the ... AE Shift Levels +2.0 +1.5 +1.25 +1.0 +0.75 +0.5 +0.25 ±0 -0.25 -0.5 -0.75 -1.0 -1.25 -1.5 -2.0 [~ Camera Setup] [AE Shift] [±0] NOTES • During manual aperture, you can also set the AE shift level by turning a control dial assigned to [Iris] while holding the assignable button set to [PUSH AUTO...

Instruction Manual
Page 77
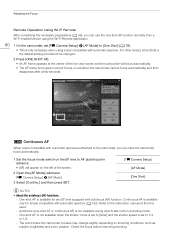
...the lens is set to focus. Adjusting the Focus Adjusting the Focus $ The camcorder does not have automatic focus control and focusing is done manually using the focus ring on the attached lens. # The camcorder offers 3 ways to AF. Continuous AF*: The camcorder focuses automatically all the... time. * Available only with lenses compatible with automatic aperture (A 192). # Focusing Methods and Required Settings Manual Focus Focusing Method Focus Ring Wi-Fi Remote Focus Mode Switch on the EF Lens MF or AF2 AF Assignable Button set to [ONE-SHOT...
...the lens is set to focus. Adjusting the Focus Adjusting the Focus $ The camcorder does not have automatic focus control and focusing is done manually using the focus ring on the attached lens. # The camcorder offers 3 ways to AF. Continuous AF*: The camcorder focuses automatically all the... time. * Available only with lenses compatible with automatic aperture (A 192). # Focusing Methods and Required Settings Manual Focus Focusing Method Focus Ring Wi-Fi Remote Focus Mode Switch on the EF Lens MF or AF2 AF Assignable Button set to [ONE-SHOT...
Instruction Manual
Page 78
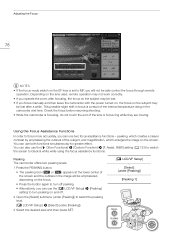
... for greater effect. You can also use the [£ LCD/VF Setup] > [Peaking] setting to turn peaking on and off peaking. • Alternatively, you focus manually and then leave the camcorder with the power turned on, the focus on the screen. Adjusting the Focus 78 NOTES • If the focus mode...
... for greater effect. You can also use the [£ LCD/VF Setup] > [Peaking] setting to turn peaking on and off peaking. • Alternatively, you focus manually and then leave the camcorder with the power turned on, the focus on the screen. Adjusting the Focus 78 NOTES • If the focus mode...
Instruction Manual
Page 79
... center of the screen. Press the CANCEL button to return the magnification frame to the gain settings of the edge monitor. # One-Shot AF During manual focus, you release the assignable button. Using an Assignable Button To use the one -shot AF function to have the camcorder focus automatically only once...
... center of the screen. Press the CANCEL button to return the magnification frame to the gain settings of the edge monitor. # One-Shot AF During manual focus, you release the assignable button. Using an Assignable Button To use the one -shot AF function to have the camcorder focus automatically only once...
Instruction Manual
Page 80
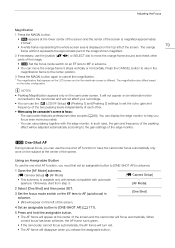
... aperture is attached to the camcorder, you can have the camcorder focus automatically. 1 Set the focus mode switch on the EF lens to the instruction manual of the screen. 2 Open the [AF Mode] submenu. [~ Camera Setup] > [AF Mode] 3 Select [Continu.] and then press SET. [~ Camera Setup] [AF Mode] [One Shot] NOTES...
... aperture is attached to the camcorder, you can have the camcorder focus automatically. 1 Set the focus mode switch on the EF lens to the instruction manual of the screen. 2 Open the [AF Mode] submenu. [~ Camera Setup] > [AF Mode] 3 Select [Continu.] and then press SET. [~ Camera Setup] [AF Mode] [One Shot] NOTES...

Instruction Manual
Page 81
Fast moving subjects - With some EF lenses, the camcorder may take longer in the following cases. - In such case, focus manually. 81 - Subjects with low contrast or without vertical lines - Through dirty or wet windows - Adjusting the Focus • Autofocus may take longer to focus automatically ... 29.97P, 25.00P, 24.00P or 23.98P. - Night scenes Reflective surfaces - When the frame rate is set to focus correctly. Visit your local Canon Web site for the latest information. • Autofocus may not work well on the following subjects or in the following cases.
Fast moving subjects - With some EF lenses, the camcorder may take longer in the following cases. - In such case, focus manually. 81 - Subjects with low contrast or without vertical lines - Through dirty or wet windows - Adjusting the Focus • Autofocus may take longer to focus automatically ... 29.97P, 25.00P, 24.00P or 23.98P. - Night scenes Reflective surfaces - When the frame rate is set to focus correctly. Visit your local Canon Web site for the latest information. • Autofocus may not work well on the following subjects or in the following cases.

Instruction Manual
Page 93
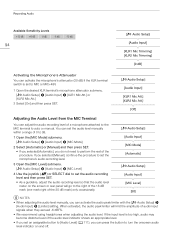
... (one mark right of the 20 dB mark) only occasionally. • Closing the protective cover for each channel. If the input level is set to manual audio level adjustment, you can use the [¡ Audio Setup] > [Audio Input] > [XLR ALC Link] setting to link the audio level adjustment of ...XLR Terminals You can set the audio recording level for audio input from the XLR terminals to auto or manual for each channel manually from being changed inadvertently. CH1/CH2 ã switches Manual Audio Level Adjustment You can set the audio level for XLR audio controls will limit the amplitude of ...
... (one mark right of the 20 dB mark) only occasionally. • Closing the protective cover for each channel. If the input level is set to manual audio level adjustment, you can use the [¡ Audio Setup] > [Audio Input] > [XLR ALC Link] setting to link the audio level adjustment of ...XLR Terminals You can set the audio recording level for audio input from the XLR terminals to auto or manual for each channel manually from being changed inadvertently. CH1/CH2 ã switches Manual Audio Level Adjustment You can set the audio level for XLR audio controls will limit the amplitude of ...
Instruction Manual
Page 94
...; Audio Setup] [Audio Input] [MIC Mode] [Automatic] [¡ Audio Setup] [Audio Input] [MIC Level] [50] NOTES • When adjusting the audio level manually, you selected [Manual], continue the procedure to set the microphone's audio recording level. 3 Open the [MIC Level] submenu. [¡ Audio Setup] > [Audio Input] > [MIC Level] ...Level from the MIC Terminal You can adjust the audio recording level of a microphone attached to the MIC terminal to auto or manual. If the input level is set an assignable button to [Audio Level] (A 111), you do not need to perform the rest of ...
...; Audio Setup] [Audio Input] [MIC Mode] [Automatic] [¡ Audio Setup] [Audio Input] [MIC Level] [50] NOTES • When adjusting the audio level manually, you selected [Manual], continue the procedure to set the microphone's audio recording level. 3 Open the [MIC Level] submenu. [¡ Audio Setup] > [Audio Input] > [MIC Level] ...Level from the MIC Terminal You can adjust the audio recording level of a microphone attached to the MIC terminal to auto or manual. If the input level is set an assignable button to [Audio Level] (A 111), you do not need to perform the rest of ...

