Instruction Manual
Page 2
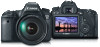
... GATEWAY services, refer to a Web service Save and share images (4) Operate the camera remotely using EOS Utility Remotely control the camera CANON iMAGE GATEWAY Web services are not supported in certain countries and areas. 2 Settings for "Send images to a Web ...to a smartphone Make images viewable Remote shooting (6) View images using a media player View images (3) Print images using a Wi-Fi printer Print images (Canon Image Gateway) (5) Send images to Canon Web site (http://canon.com/cig). What You Can Do Using the Wireless LAN Functions This camera's wireless LAN functions let you...
... GATEWAY services, refer to a Web service Save and share images (4) Operate the camera remotely using EOS Utility Remotely control the camera CANON iMAGE GATEWAY Web services are not supported in certain countries and areas. 2 Settings for "Send images to a Web ...to a smartphone Make images viewable Remote shooting (6) View images using a media player View images (3) Print images using a Wi-Fi printer Print images (Canon Image Gateway) (5) Send images to Canon Web site (http://canon.com/cig). What You Can Do Using the Wireless LAN Functions This camera's wireless LAN functions let you...

Instruction Manual
Page 3
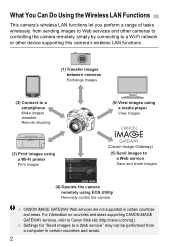
...the camera to a wireless LAN compatible printer supporting PictBridge (DPS over IP) to print images wirelessly. (4) D Operate the camera remotely using EOS Utility (p.93) Use EOS Utility via a wireless LAN instead of an interface cable, and operate your camera from computer wirelessly. (5) w Send images to a... Web service (p.103) Upload your images to CANON iMAGE GATEWAY, an online photo service for Canon users (free registration required), to a ...
...the camera to a wireless LAN compatible printer supporting PictBridge (DPS over IP) to print images wirelessly. (4) D Operate the camera remotely using EOS Utility (p.93) Use EOS Utility via a wireless LAN instead of an interface cable, and operate your camera from computer wirelessly. (5) w Send images to a... Web service (p.103) Upload your images to CANON iMAGE GATEWAY, an online photo service for Canon users (free registration required), to a ...
Instruction Manual
Page 4
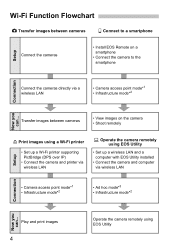
...Connect the camera to a smartphone Setup Connect the cameras • Install EOS Remote on the camera • Shoot remotely Setup l Print images using a Wi-Fi printer • Set up a wireless LAN and a computer with EOS Utility installed • Connect the camera and computer via a wireless LAN... mode*2 • Ad hoc mode*3 • Infrastructure mode*2 Connection Now you can ... Play and print images 4 Operate the camera remotely using EOS Utility • Set up a Wi-Fi printer supporting PictBridge (DPS over IP) • Connect the camera and printer via wireless LAN D...
...Connect the camera to a smartphone Setup Connect the cameras • Install EOS Remote on the camera • Shoot remotely Setup l Print images using a Wi-Fi printer • Set up a wireless LAN and a computer with EOS Utility installed • Connect the camera and computer via a wireless LAN... mode*2 • Ad hoc mode*3 • Infrastructure mode*2 Connection Now you can ... Play and print images 4 Operate the camera remotely using EOS Utility • Set up a Wi-Fi printer supporting PictBridge (DPS over IP) • Connect the camera and printer via wireless LAN D...
Instruction Manual
Page 5
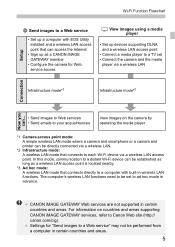
...• Set up a computer with EOS Utility installed and a wireless LAN access point that can access the Internet • Sign up devices supporting DLNA and a wireless LAN access point • Connect a media player to a TV set to Canon Web site (http:// canon.com/cig). For information on the camera... directly to a distant Wi-Fi device can be performed from a computer in certain countries and areas. 5 Settings for Web service access View images using a media player • Set up as a wireless LAN access point is located nearby. *3 Ad hoc mode: A wireless LAN mode that connects...
...• Set up a computer with EOS Utility installed and a wireless LAN access point that can access the Internet • Sign up devices supporting DLNA and a wireless LAN access point • Connect a media player to a TV set to Canon Web site (http:// canon.com/cig). For information on the camera... directly to a distant Wi-Fi device can be performed from a computer in certain countries and areas. 5 Settings for Web service access View images using a media player • Set up as a wireless LAN access point is located nearby. *3 Ad hoc mode: A wireless LAN mode that connects...
Instruction Manual
Page 6
... their respective owners. in the United States and other countries. WPS used as described below. : Warnings to prevent potential problems during operation. : Supplemental information to basic operation. In addition, Canon cannot be held liable for any loss or damage from erroneous wireless ...LAN settings for using the camera. Wi-Fi Certified, WPA, WPA2, and the Wi-Fi Certified logo are...
... their respective owners. in the United States and other countries. WPS used as described below. : Warnings to prevent potential problems during operation. : Supplemental information to basic operation. In addition, Canon cannot be held liable for any loss or damage from erroneous wireless ...LAN settings for using the camera. Wi-Fi Certified, WPA, WPA2, and the Wi-Fi Certified logo are...
Instruction Manual
Page 7
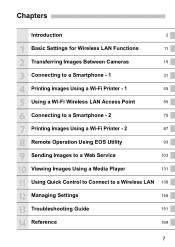
...19 3 Connecting to a Smartphone - 1 31 4 Printing Images Using a Wi-Fi Printer - 1 45 5 Using a Wi-Fi Wireless LAN Access Point 55 6 Connecting to a Smartphone - 2 75 7 Printing Images Using a Wi-Fi Printer - 2 87 8 Remote Operation Using EOS Utility 93 9 Sending Images to a Web Service 103 10 ...Viewing Images Using a Media Player 131 11 Using Quick Control to Connect to a Wireless LAN 139 12 Managing ...
...19 3 Connecting to a Smartphone - 1 31 4 Printing Images Using a Wi-Fi Printer - 1 45 5 Using a Wi-Fi Wireless LAN Access Point 55 6 Connecting to a Smartphone - 2 75 7 Printing Images Using a Wi-Fi Printer - 2 87 8 Remote Operation Using EOS Utility 93 9 Sending Images to a Web Service 103 10 ...Viewing Images Using a Media Player 131 11 Using Quick Control to Connect to a Wireless LAN 139 12 Managing ...
Instruction Manual
Page 8
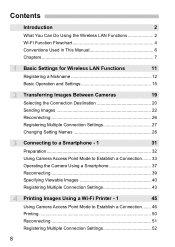
... Wireless LAN Functions 2 Wi-Fi Function Flowchart 4 Conventions Used in This Manual 6 Chapters 7 1 Basic Settings for Wireless LAN Functions 11 Registering a Nickname 12 Basic Operation and Settings 15 2 ... 22 Reconnecting 26 Registering Multiple Connection Settings 27 Changing Setting Names 28 3 Connecting to a Smartphone - 1 31 Preparation 32 Using Camera Access Point Mode to Establish a Connection ....... 33 Operating the Camera Using a Smartphone 37 Reconnecting 39 Specifying Viewable Images 40 Registering Multiple Connection Settings 43 4 Printing Images...
... Wireless LAN Functions 2 Wi-Fi Function Flowchart 4 Conventions Used in This Manual 6 Chapters 7 1 Basic Settings for Wireless LAN Functions 11 Registering a Nickname 12 Basic Operation and Settings 15 2 ... 22 Reconnecting 26 Registering Multiple Connection Settings 27 Changing Setting Names 28 3 Connecting to a Smartphone - 1 31 Preparation 32 Using Camera Access Point Mode to Establish a Connection ....... 33 Operating the Camera Using a Smartphone 37 Reconnecting 39 Specifying Viewable Images 40 Registering Multiple Connection Settings 43 4 Printing Images...
Instruction Manual
Page 9
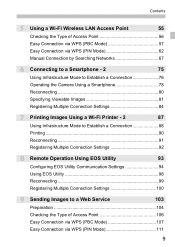
... Mode to Establish a Connection 88 Printing 90 Reconnecting 91 Registering Multiple Connection Settings 92 8 Remote Operation Using EOS Utility 93 Configuring EOS Utility Communication Settings 94 Using EOS Utility 98 Reconnecting 99 Registering Multiple Connection Settings 100 9 Sending Images to a Web Service 103 Preparation 104 Checking the Type of Access Point 106 Easy ...
... Mode to Establish a Connection 88 Printing 90 Reconnecting 91 Registering Multiple Connection Settings 92 8 Remote Operation Using EOS Utility 93 Configuring EOS Utility Communication Settings 94 Using EOS Utility 98 Reconnecting 99 Registering Multiple Connection Settings 100 9 Sending Images to a Web Service 103 Preparation 104 Checking the Type of Access Point 106 Easy ...
Instruction Manual
Page 10
... Player 131 Configuring Media Player Communication Settings 132 Displaying Images on a TV set 133 Reconnecting 135 Registering Multiple Connection Settings 136 11 Using Quick Control to Connect to a Wireless LAN 139 Connecting from Quick Control 140 Connecting from a Playback Screen 141 12 Managing Settings 145 Checking/Changing Settings ...
... Player 131 Configuring Media Player Communication Settings 132 Displaying Images on a TV set 133 Reconnecting 135 Registering Multiple Connection Settings 136 11 Using Quick Control to Connect to a Wireless LAN 139 Connecting from Quick Control 140 Connecting from a Playback Screen 141 12 Managing Settings 145 Checking/Changing Settings ...

Instruction Manual
Page 11
Basic Settings for Wireless LAN Functions This chapter describes settings necessary for using the camera's wireless LAN functions. 11
Basic Settings for Wireless LAN Functions This chapter describes settings necessary for using the camera's wireless LAN functions. 11
Instruction Manual
Page 15
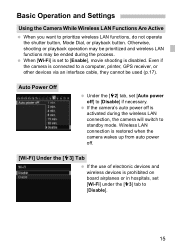
... or playback button. Even if the camera is prohibited on board airplanes or in hospitals, set to standby mode. Basic Operation and Settings Using the Camera While Wireless LAN Functions Are Active When you want to [Disable]. 15 Wireless LAN connection is restored when the camera wakes up ... auto power off is activated during the process. If the camera's auto power off . [Wi-Fi] Under the [53] Tab If the use of electronic devices and wireless devices is connected to [Disable] if necessary. Otherwise, shooting or playback operation may be prioritized and wireless LAN functions ...
... or playback button. Even if the camera is prohibited on board airplanes or in hospitals, set to standby mode. Basic Operation and Settings Using the Camera While Wireless LAN Functions Are Active When you want to [Disable]. 15 Wireless LAN connection is restored when the camera wakes up ... auto power off is activated during the process. If the camera's auto power off . [Wi-Fi] Under the [53] Tab If the use of electronic devices and wireless devices is connected to [Disable] if necessary. Otherwise, shooting or playback operation may be prioritized and wireless LAN functions ...
Instruction Manual
Page 17
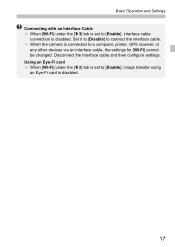
Set it to [Disable] to connect the interface cable. Using an Eye-Fi card When [Wi-Fi] under the [53] tab is set to [Enable], image transfer using an Eye-Fi card is connected to a computer, printer, GPS receiver, or any other devices via an interface cable, the settings for [Wi-Fi] cannot be changed. Disconnect the interface cable and then configure settings. When the camera is disabled. 17 Basic Operation and Settings Connecting with an Interface Cable When [Wi-Fi] under the [53] tab is set to [Enable], interface cable connection is disabled.
Set it to [Disable] to connect the interface cable. Using an Eye-Fi card When [Wi-Fi] under the [53] tab is set to [Enable], image transfer using an Eye-Fi card is connected to a computer, printer, GPS receiver, or any other devices via an interface cable, the settings for [Wi-Fi] cannot be changed. Disconnect the interface cable and then configure settings. When the camera is disabled. 17 Basic Operation and Settings Connecting with an Interface Cable When [Wi-Fi] under the [53] tab is set to [Enable], interface cable connection is disabled.
Instruction Manual
Page 21
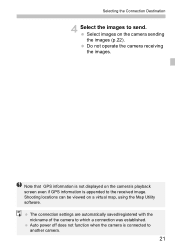
Select images on a virtual map, using the Map Utility software. The connection settings are automatically saved/registered with the nickname of the camera to send. Shooting locations can be viewed on ...
Select images on a virtual map, using the Map Utility software. The connection settings are automatically saved/registered with the nickname of the camera to send. Shooting locations can be viewed on ...
Instruction Manual
Page 29
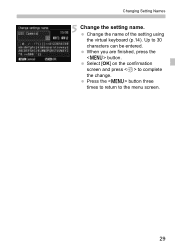
Change the name of the setting using the virtual keyboard (p.14). Select [OK] on the confirmation screen and press to the menu screen. 29 When you are finished, press the button. Changing Setting Names 5 Change the setting name. Press the button three times to return to complete the change. Up to 30 characters can be entered.
Change the name of the setting using the virtual keyboard (p.14). Select [OK] on the confirmation screen and press to the menu screen. 29 When you are finished, press the button. Changing Setting Names 5 Change the setting name. Press the button three times to return to complete the change. Up to 30 characters can be entered.
Instruction Manual
Page 31
You can also use the smartphone to perform remote shooting. 31 Connecting to a Smartphone - 1 Connecting the camera to a smartphone lets you use the smartphone to view, manage, and receive images stored in the camera.
You can also use the smartphone to perform remote shooting. 31 Connecting to a Smartphone - 1 Connecting the camera to a smartphone lets you use the smartphone to view, manage, and receive images stored in the camera.
Instruction Manual
Page 32
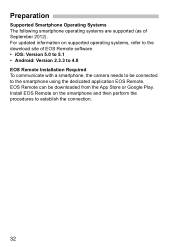
...updated information on the smartphone and then perform the procedures to the smartphone using the dedicated application EOS Remote. EOS Remote can be connected to establish the connection. 32 Install EOS Remote on supported operating systems, refer to the download site of September... Preparation Supported Smartphone Operating Systems The following smartphone operating systems are supported (as of EOS Remote software. • iOS: Version 5.0 to 5.1 • Android: Version 2.3.3 to 4.0 EOS Remote Installation Required To communicate with a smartphone, the camera needs to be downloaded ...
...updated information on the smartphone and then perform the procedures to the smartphone using the dedicated application EOS Remote. EOS Remote can be connected to establish the connection. 32 Install EOS Remote on supported operating systems, refer to the download site of September... Preparation Supported Smartphone Operating Systems The following smartphone operating systems are supported (as of EOS Remote software. • iOS: Version 5.0 to 5.1 • Android: Version 2.3.3 to 4.0 EOS Remote Installation Required To communicate with a smartphone, the camera needs to be downloaded ...
Instruction Manual
Page 33
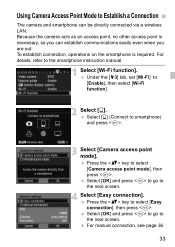
Select [OK] and press to go to the next screen. Using Camera Access Point Mode to Establish a Connection The camera and smartphone can establish communications easily even when you can be directly connected via a wireless LAN. ...
Select [OK] and press to go to the next screen. Using Camera Access Point Mode to Establish a Connection The camera and smartphone can establish communications easily even when you can be directly connected via a wireless LAN. ...
Instruction Manual
Page 34
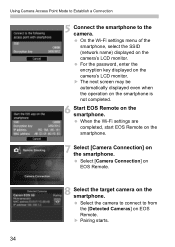
...LCD monitor. X The next screen may be automatically displayed even when the operation on the smartphone is not completed. 6 Start EOS Remote on EOS Remote. Select the camera to connect to the camera. For the password, enter the encryption key displayed on the smartphone. When ...the Wi-Fi settings are completed, start EOS Remote on the smartphone. 7 Select [Camera Connection] on the camera's LCD monitor. Using Camera Access Point Mode to Establish a Connection 5 Connect the smartphone to from the [Detected Cameras] ...
...LCD monitor. X The next screen may be automatically displayed even when the operation on the smartphone is not completed. 6 Start EOS Remote on EOS Remote. Select the camera to connect to the camera. For the password, enter the encryption key displayed on the smartphone. When ...the Wi-Fi settings are completed, start EOS Remote on the smartphone. 7 Select [Camera Connection] on the camera's LCD monitor. Using Camera Access Point Mode to Establish a Connection 5 Connect the smartphone to from the [Detected Cameras] ...
Instruction Manual
Page 35
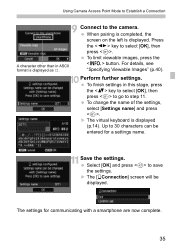
... further settings. X The [qConnection] screen will be entered for communicating with a smartphone are now complete. 35 To finish settings in ASCII format is displayed as 8. Using Camera Access Point Mode to Establish a Connection 9 Connect to step 11. To limit viewable images, press the A character other than in this stage, press the...
... further settings. X The [qConnection] screen will be entered for communicating with a smartphone are now complete. 35 To finish settings in ASCII format is displayed as 8. Using Camera Access Point Mode to Establish a Connection 9 Connect to step 11. To limit viewable images, press the A character other than in this stage, press the...
Instruction Manual
Page 36
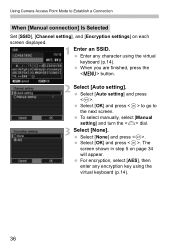
... Select [None]. The screen shown in step 5 on each screen displayed. 1 Enter an SSID. Select [OK] and press . Select [None] and press . Using Camera Access Point Mode to the next screen. Select [OK] and press to go to Establish a Connection When [Manual connection] Is Selected Set [SSID], [Channel... setting], and [Encryption settings] on page 34 will appear. Enter any encryption key using the virtual keyboard (p.14). When you are finished, press the button. 2 Select [Auto setting]. Select [Auto setting] and press .
... Select [None]. The screen shown in step 5 on each screen displayed. 1 Enter an SSID. Select [OK] and press . Select [None] and press . Using Camera Access Point Mode to the next screen. Select [OK] and press to go to Establish a Connection When [Manual connection] Is Selected Set [SSID], [Channel... setting], and [Encryption settings] on page 34 will appear. Enter any encryption key using the virtual keyboard (p.14). When you are finished, press the button. 2 Select [Auto setting]. Select [Auto setting] and press .


