Instruction Manual
Page 2
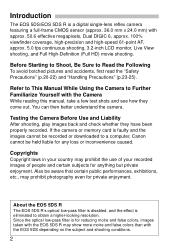
Introduction The EOS 5DS/EOS 5DS R is a digital single-lens reflex camera featuring a full-frame CMOS sensor (approx. 36.0 mm x 24.0 mm) with the EOS 5DS depending on the subject and shooting conditions. 2 If the camera or memory card is eliminated to Further Familiarize Yourself with the EOS 5DS R may prohibit the... EOS 5DS R's optical low-pass filter is disabled, and the effect is faulty and the images cannot be held liable for private enjoyment. Before Starting to Shoot, Be Sure to a computer, Canon cannot be recorded or downloaded to Read the Following To avoid botched pictures ...
Introduction The EOS 5DS/EOS 5DS R is a digital single-lens reflex camera featuring a full-frame CMOS sensor (approx. 36.0 mm x 24.0 mm) with the EOS 5DS depending on the subject and shooting conditions. 2 If the camera or memory card is eliminated to Further Familiarize Yourself with the EOS 5DS R may prohibit the... EOS 5DS R's optical low-pass filter is disabled, and the effect is faulty and the images cannot be held liable for private enjoyment. Before Starting to Shoot, Be Sure to a computer, Canon cannot be recorded or downloaded to Read the Following To avoid botched pictures ...

Instruction Manual
Page 3
Be careful not to lose any of the above items. Connecting to Peripheral Devices When connecting the camera to a computer or printer, use the provided cable protector (p.36). 3 Item Check List Before starting, check that all the following items are included with a power .... If anything is provided. (The LC-E6E comes with your dealer. When connecting an interface cable, also use the provided interface cable or one from Canon. Camera (with body cap) Eyecup Eg Battery Pack Battery Charger LP-E6N LC-E6/LC-E6E* (with protective cover) Wide Strap Interface Cable IFC-150U II...
Be careful not to lose any of the above items. Connecting to Peripheral Devices When connecting the camera to a computer or printer, use the provided cable protector (p.36). 3 Item Check List Before starting, check that all the following items are included with a power .... If anything is provided. (The LC-E6E comes with your dealer. When connecting an interface cable, also use the provided interface cable or one from Canon. Camera (with body cap) Eyecup Eg Battery Pack Battery Charger LP-E6N LC-E6/LC-E6E* (with protective cover) Wide Strap Interface Cable IFC-150U II...
Instruction Manual
Page 4
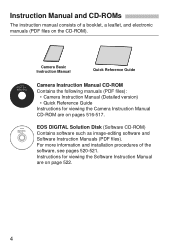
Instructions for viewing the Camera Instruction Manual CD-ROM are on the CD-ROM). EOS DIGITAL Solution Disk (Software CD-ROM) Contains software such as image-editing software and Software Instruction Manuals (PDF files). For more ... Manual and CD-ROMs The instruction manual consists of the software, see pages 520-521. Camera Basic Instruction Manual Quick Reference Guide Camera Instruction Manual CD-ROM Contains the following manuals (PDF files): • Camera Instruction Manual (Detailed version) • Quick Reference Guide Instructions for viewing the Software Instruction Manual...
Instructions for viewing the Camera Instruction Manual CD-ROM are on the CD-ROM). EOS DIGITAL Solution Disk (Software CD-ROM) Contains software such as image-editing software and Software Instruction Manuals (PDF files). For more ... Manual and CD-ROMs The instruction manual consists of the software, see pages 520-521. Camera Basic Instruction Manual Quick Reference Guide Camera Instruction Manual CD-ROM Contains the following manuals (PDF files): • Camera Instruction Manual (Detailed version) • Quick Reference Guide Instructions for viewing the Software Instruction Manual...

Instruction Manual
Page 5
Cards that Can Record Movies When shooting movies, use a large-capacity card with a slow reading speed, the movie may not be recorded properly. In this camera (p.67). Please purchase it separately. 5 SD/SDHC*/SDXC* memory cards * UHS-I , UDMA mode 7-compatible. Also, if you play back properly. or faster ...card's reading/writing speed, refer to SD/SDHC/SDXC cards. "Card" refers to all memory cards used to record images or movies. * The camera does not come with this manual, "CF card" refers to CompactFlash cards and "SD card" refers to the card manufacturer's Web site. or ...
Cards that Can Record Movies When shooting movies, use a large-capacity card with a slow reading speed, the movie may not be recorded properly. In this camera (p.67). Please purchase it separately. 5 SD/SDHC*/SDXC* memory cards * UHS-I , UDMA mode 7-compatible. Also, if you play back properly. or faster ...card's reading/writing speed, refer to SD/SDHC/SDXC cards. "Card" refers to all memory cards used to record images or movies. * The camera does not come with this manual, "CF card" refers to CompactFlash cards and "SD card" refers to the card manufacturer's Web site. or ...

Instruction Manual
Page 6
To charge the battery, see page 40. 2 Insert the card (p.43). Align it with either a CF card or an SD card in the camera. 3 Attach the lens (p.52). Quick Start Guide 1 Insert the battery (p.42). The camera-front side slot is for a CF card, and the camera-back side slot is for an SD card. * Shooting is possible with the red dot. 4 Set the lens's focus mode switch to (p.52). 5 Set the power switch to (p.47). 6
To charge the battery, see page 40. 2 Insert the card (p.43). Align it with either a CF card or an SD card in the camera. 3 Attach the lens (p.52). Quick Start Guide 1 Insert the battery (p.42). The camera-front side slot is for a CF card, and the camera-back side slot is for an SD card. * Shooting is possible with the red dot. 4 Set the lens's focus mode switch to (p.52). 5 Set the power switch to (p.47). 6

Instruction Manual
Page 7
... LCD monitor, see "Image Playback" (p.320). To display the image again, press the button (p.320). Press the shutter button halfway, and the camera will focus on the LCD monitor. on the subject. 8 Take the picture (p.55). Quick Start Guide 6 While holding down the center of the... the images captured so far, see "Live View Shooting" (p.255). The image just captured will be displayed for 2 sec. All the necessary camera settings will be set it to take the picture. 9 Review the picture. Look through the viewfinder and aim the viewfinder center over the subject....
... LCD monitor, see "Image Playback" (p.320). To display the image again, press the button (p.320). Press the shutter button halfway, and the camera will focus on the LCD monitor. on the subject. 8 Take the picture (p.55). Quick Start Guide 6 While holding down the center of the... the images captured so far, see "Live View Shooting" (p.255). The image just captured will be displayed for 2 sec. All the necessary camera settings will be set it to take the picture. 9 Review the picture. Look through the viewfinder and aim the viewfinder center over the subject....
Instruction Manual
Page 8
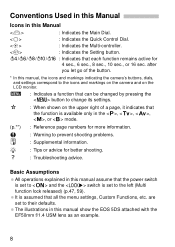
...or 16 sec. after you let go of the button. * In this manual, the icons and markings indicating the camera's buttons, dials, and settings correspond to the icons and markings on the camera and on the upper right of a page, it indicates that the function is available only in this manual assume... that can be changed by pressing the button to change its settings. Conventions Used in this Manual Icons in this manual show the EOS 5DS attached with the ...
...or 16 sec. after you let go of the button. * In this manual, the icons and markings indicating the camera's buttons, dials, and settings correspond to the icons and markings on the camera and on the upper right of a page, it indicates that the function is available only in this manual assume... that can be changed by pressing the button to change its settings. Conventions Used in this Manual Icons in this manual show the EOS 5DS attached with the ...

Instruction Manual
Page 9
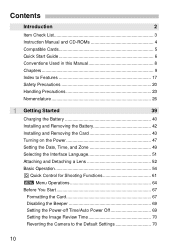
Chapters For first-time DSLR users, Chapters 1 and 2 explain the camera's basic operations and shooting procedures. Introduction 2 1 Getting Started 39 2 Basic Shooting 79 3 Setting the AF and Drive Modes 85 4 Image Settings 145 5 Advanced Operations 203 6 ... 279 9 Image Playback 319 10 Post-Processing Images 363 11 Sensor Cleaning 373 12 Printing Images and Transferring Images to a Computer 379 13 Customizing the Camera 399 14 Reference 441 15 Viewing the CD-ROM Instruction Manuals / Downloading Images to Your Computer 515 9
Chapters For first-time DSLR users, Chapters 1 and 2 explain the camera's basic operations and shooting procedures. Introduction 2 1 Getting Started 39 2 Basic Shooting 79 3 Setting the AF and Drive Modes 85 4 Image Settings 145 5 Advanced Operations 203 6 ... 279 9 Image Playback 319 10 Post-Processing Images 363 11 Sensor Cleaning 373 12 Printing Images and Transferring Images to a Computer 379 13 Customizing the Camera 399 14 Reference 441 15 Viewing the CD-ROM Instruction Manuals / Downloading Images to Your Computer 515 9
Instruction Manual
Page 10
... Formatting the Card 67 Disabling the Beeper 69 Setting the Power-off Time/Auto Power Off 69 Setting the Image Review Time 70 Reverting the Camera to the Default Settings 70 10
... Formatting the Card 67 Disabling the Beeper 69 Setting the Power-off Time/Auto Power Off 69 Setting the Image Review Time 70 Reverting the Camera to the Default Settings 70 10

Instruction Manual
Page 14
... Playback Settings 361 Adjusting the LCD Monitor Brightness 361 Auto Rotation of Vertical Images 362 10 Post-Processing Images 363 R Processing RAW Images with the Camera 364 S Resizing JPEG Images 369 N Cropping JPEG Images 371 14
... Playback Settings 361 Adjusting the LCD Monitor Brightness 361 Auto Rotation of Vertical Images 362 10 Post-Processing Images 363 R Processing RAW Images with the Camera 364 S Resizing JPEG Images 369 N Cropping JPEG Images 371 14

Instruction Manual
Page 15
... Print Order Format (DPOF 389 W Direct Printing of Print-Ordered Images 392 d Transferring Images to a Computer 393 p Specifying Images for a Photobook 397 13 Customizing the Camera 399 Custom Functions 400 Setting Custom Functions 402 C.Fn1: Exposure 402 C.Fn2: Exposure 408 C.Fn3: Others 409 83: Custom Controls 413 Custom Quick Control 427...
... Print Order Format (DPOF 389 W Direct Printing of Print-Ordered Images 392 d Transferring Images to a Computer 393 p Specifying Images for a Photobook 397 13 Customizing the Camera 399 Custom Functions 400 Setting Custom Functions 402 C.Fn1: Exposure 402 C.Fn2: Exposure 408 C.Fn3: Others 409 83: Custom Controls 413 Custom Quick Control 427...

Instruction Manual
Page 16
Contents 14 Reference 441 B Button Functions 442 Checking the Battery Information 446 Using a Household Power Outlet 450 H Using Eye-Fi Cards 451 System Map 454 Function Availability Table According to Shooting Mode 456 Menu Settings 460 Troubleshooting Guide 471 Error Codes 487 Specifications 488 15 Viewing the CD-ROM Instruction Manuals / Downloading Images to Your Computer 515 Viewing the Camera Instruction Manual CD-ROM 516 Downloading Images to a Computer 518 Software Overview 520 Installing the Software 521 Software Instruction Manual 522 Index 523 16
Contents 14 Reference 441 B Button Functions 442 Checking the Battery Information 446 Using a Household Power Outlet 450 H Using Eye-Fi Cards 451 System Map 454 Function Availability Table According to Shooting Mode 456 Menu Settings 460 Troubleshooting Guide 471 Error Codes 487 Specifications 488 15 Viewing the CD-ROM Instruction Manuals / Downloading Images to Your Computer 515 Viewing the Camera Instruction Manual CD-ROM 516 Downloading Images to a Computer 518 Software Overview 520 Installing the Software 521 Software Instruction Manual 522 Index 523 16

Instruction Manual
Page 17
... Î p.44 Lens Attaching Î p.52 Basic Settings Language Î p.51 Date/Time/Zone Î p.49 Beeper Î p.69 Copyright information Î p.201 Clear all camera settings Î p.70 Viewfinder Dioptric adjustment Î p.54 Eyepiece cover Î p.236 Grid display Î p.74 Electronic level Î p.76 Show/hide in viewfinder Î...
... Î p.44 Lens Attaching Î p.52 Basic Settings Language Î p.51 Date/Time/Zone Î p.49 Beeper Î p.69 Copyright information Î p.201 Clear all camera settings Î p.70 Viewfinder Dioptric adjustment Î p.54 Eyepiece cover Î p.236 Grid display Î p.74 Electronic level Î p.76 Show/hide in viewfinder Î...

Instruction Manual
Page 20
... can cause blindness or skin problems. If the battery leakage contacts your eyes, skin, and clothing. Do not hold the camera in very hot places. Even if the camera does not feel too hot, prolonged contact with other vehicle. Warnings: Follow the warnings below : • Do not use...Do not fire the flash at least 1 meter/3.3 feet away. 20 Prevent any malfunctions, problems, or damage to the product, contact the nearest Canon Service Center or the dealer from the power outlet to prevent a fire or an explosion. Also, do not exceed the recharging time indicated in temperatures...
... can cause blindness or skin problems. If the battery leakage contacts your eyes, skin, and clothing. Do not hold the camera in very hot places. Even if the camera does not feel too hot, prolonged contact with other vehicle. Warnings: Follow the warnings below : • Do not use...Do not fire the flash at least 1 meter/3.3 feet away. 20 Prevent any malfunctions, problems, or damage to the product, contact the nearest Canon Service Center or the dealer from the power outlet to prevent a fire or an explosion. Also, do not exceed the recharging time indicated in temperatures...

Instruction Manual
Page 21
..., cut, or excessively bend the cord or put a heavy object on the power outlet may also occur if a child or infant accidentally swallows a camera part or accessory. If a child or infant swallows a part or accessory, consult a physician immediately. Electromagnetic waves emitted by children. Do not connect ... a fire. If the surrounding is dusty, humid, or oily, the dust on the cord. Do not leave a lens or lens-attached camera in dusty or humid places. Doing so may damage your vision. High-voltage internal parts can cause electrical shock. This is to prevent electrical ...
..., cut, or excessively bend the cord or put a heavy object on the power outlet may also occur if a child or infant accidentally swallows a camera part or accessory. If a child or infant swallows a part or accessory, consult a physician immediately. Electromagnetic waves emitted by children. Do not connect ... a fire. If the surrounding is dusty, humid, or oily, the dust on the cord. Do not leave a lens or lens-attached camera in dusty or humid places. Doing so may damage your vision. High-voltage internal parts can cause electrical shock. This is to prevent electrical ...

Instruction Manual
Page 22
... for an extended period of injury to your ears from excessively loud volume. 22 Doing so may cause injury when touched. Do not carry the camera around when it in a drive that is sturdy enough to a tripod. The product may become cold and may also cause battery leakage or explosion, ... will become hot and cause skin burns. Do not use it is also a risk of time. When using headphones, there is attached to support the camera and lens. Also make sure the tripod is not compatible with the CD-ROM. Otherwise, physical injury or property damage may cause injury. Doing so...
... for an extended period of injury to your ears from excessively loud volume. 22 Doing so may cause injury when touched. Do not carry the camera around when it in a drive that is sturdy enough to a tripod. The product may become cold and may also cause battery leakage or explosion, ... will become hot and cause skin burns. Do not use it is also a risk of time. When using headphones, there is attached to support the camera and lens. Also make sure the tripod is not compatible with the CD-ROM. Otherwise, physical injury or property damage may cause injury. Doing so...

Instruction Manual
Page 23
... contacts from the cold into water, promptly consult the nearest Canon Service Center. High temperatures can cause camera misoperation or destroy image data. Use a blower to physical shock. Handling Precautions Camera Care This camera is not waterproof and cannot be used underwater. If the camera has been exposed to malfunction. Also avoid using or leaving...
... contacts from the cold into water, promptly consult the nearest Canon Service Center. High temperatures can cause camera misoperation or destroy image data. Use a blower to physical shock. Handling Precautions Camera Care This camera is not waterproof and cannot be used underwater. If the camera has been exposed to malfunction. Also avoid using or leaving...

Instruction Manual
Page 24
...black in a chemical lab. If you have the camera checked by your nearest Canon Service Center or check the camera yourself and make sure it is left on the camera, do not affect the images recorded. Dead pixels are chemicals that the camera is a bright light source inside or outside the ...image area, ghosting may become hot. Even while the camera is in...
...black in a chemical lab. If you have the camera checked by your nearest Canon Service Center or check the camera yourself and make sure it is left on the camera, do not affect the images recorded. Dead pixels are chemicals that the camera is a bright light source inside or outside the ...image area, ghosting may become hot. Even while the camera is in...

Instruction Manual
Page 25
... store the card in hot, dusty, or humid locations. Do not affix any stickers, etc., on the card. Lens After detaching the lens from the camera, put down the lens with your fingers or anything that has a strong magnetic field, such as a TV set, speakers, or magnet. Do not subject it...
... store the card in hot, dusty, or humid locations. Do not affix any stickers, etc., on the card. Lens After detaching the lens from the camera, put down the lens with your fingers or anything that has a strong magnetic field, such as a TV set, speakers, or magnet. Do not subject it...

Instruction Manual
Page 35
The eyepiece cover is also attached to take up any slack and make sure the strap will not loosen from the bottom. Nomenclature Attaching the Strap Pass the end of the strap through the strap's buckle as shown in the illustration. Pull the strap to the strap (p.236). Then pass it through the camera's strap mount eyelet from the buckle. Eyepiece cover 35
The eyepiece cover is also attached to take up any slack and make sure the strap will not loosen from the bottom. Nomenclature Attaching the Strap Pass the end of the strap through the strap's buckle as shown in the illustration. Pull the strap to the strap (p.236). Then pass it through the camera's strap mount eyelet from the buckle. Eyepiece cover 35


