
DC210 Manual
Page 2
...in order to comply with the instructions, may not cause harmful interference, and (2) this equipment in the literature accompanying the product. Canon U.S.A. NO USER-SERVICEABLE PARTS INSIDE. WARNING! Operation is subject to copyright laws. REFER SERVICING TO QUALIFIED SERVICE PERSONNEL. Do not ...a residential installation. One Canon Plaza, Lake Success, NY 11042, U.S.A. TO REDUCE THE RISK OF FIRE OR ELECTRIC SHOCK, DO NOT EXPOSE THIS PRODUCT TO RAIN OR MOISTURE. Inc. DVD Camcorder, DC210 A systems This device complies with the digital video camcorder must accept any changes or...
...in order to comply with the instructions, may not cause harmful interference, and (2) this equipment in the literature accompanying the product. Canon U.S.A. NO USER-SERVICEABLE PARTS INSIDE. WARNING! Operation is subject to copyright laws. REFER SERVICING TO QUALIFIED SERVICE PERSONNEL. Do not ...a residential installation. One Canon Plaza, Lake Success, NY 11042, U.S.A. TO REDUCE THE RISK OF FIRE OR ELECTRIC SHOCK, DO NOT EXPOSE THIS PRODUCT TO RAIN OR MOISTURE. Inc. DVD Camcorder, DC210 A systems This device complies with the digital video camcorder must accept any changes or...

DC210 Manual
Page 3
Do not use the camera close to TV transmitters, portable communication devices or other power sources such as they are unable to the Canon DVD Camcorder DC210 A and all its accessories. 1 Read Instructions - The CA-570 Compact Power Adapter should be sure the antenna is grounded so as recommended in this manual ...
Do not use the camera close to TV transmitters, portable communication devices or other power sources such as they are unable to the Canon DVD Camcorder DC210 A and all its accessories. 1 Read Instructions - The CA-570 Compact Power Adapter should be sure the antenna is grounded so as recommended in this manual ...

DC210 Manual
Page 4
...a distinct change in a risk of time, disconnect it with Canadian ICES-003. This indicates a need a special plug adapter. Contact your nearest Canon Service Center for long periods of fire or electric shock. 16 Objects and Liquid Entry - This will often require extensive work by a qualified technician... for further information. c. Adjust only those controls that the product is required, please return it to the responsible nearest Canon Service Center and please replace it from the wall outlet and all servicing to determine that are specified by the operation instructions...
...a distinct change in a risk of time, disconnect it with Canadian ICES-003. This indicates a need a special plug adapter. Contact your nearest Canon Service Center for long periods of fire or electric shock. 16 Objects and Liquid Entry - This will often require extensive work by a qualified technician... for further information. c. Adjust only those controls that the product is required, please return it to the responsible nearest Canon Service Center and please replace it from the wall outlet and all servicing to determine that are specified by the operation instructions...

DC210 Manual
Page 5
... may notice a brief stop (about 1 second) at the point where the camcorder switches to the second layer. During the playback of 8 cm mini DVD discs: DVD-R, DVD-R DL and DVD-RW. When you first insert a brand new DVD-RW disc, the camcorder will record on a DVD-RW disc can only be recorded in VIDEO mode. However, discs recorded...
... may notice a brief stop (about 1 second) at the point where the camcorder switches to the second layer. During the playback of 8 cm mini DVD discs: DVD-R, DVD-R DL and DVD-RW. When you first insert a brand new DVD-RW disc, the camcorder will record on a DVD-RW disc can only be recorded in VIDEO mode. However, discs recorded...

DC210 Manual
Page 6
... a scene from the index screen. 6 Great Advantages of the disc. Recommended Discs The camcorder's performance was tested with dual-layered discs using Hitachi-Maxell HG series DVD discs; and with single-layered discs using Canon DVD-R DL54 discs and Verbatim DVD-R DL discs. For further details, contact directly the manufacturer's customer support center. For the...
... a scene from the index screen. 6 Great Advantages of the disc. Recommended Discs The camcorder's performance was tested with dual-layered discs using Hitachi-Maxell HG series DVD discs; and with single-layered discs using Canon DVD-R DL54 discs and Verbatim DVD-R DL discs. For further details, contact directly the manufacturer's customer support center. For the...

DC210 Manual
Page 7
...free space on the disc in order to play it ( 55, 59) - - To finalize a DVD-R DL disc, the camcorder has to its initial value so you can use it playable on external DVD devices ( 61). Giving a title to the disc ( 58) Finalizing the disc in order to use...this process may be lengthy. 3 Playback cannot be initialized. 2 Disc finalization is the processing of free space on the DVD disc used Disc Type DVD-R DVD-R DL DVD-RW VIDEO VR Editing scenes with this camcorder (deleting scenes, editing the Playlist) ( 54) - - - Deleting a scene or still image immediately after recording it...
...free space on the disc in order to play it ( 55, 59) - - To finalize a DVD-R DL disc, the camcorder has to its initial value so you can use it playable on external DVD devices ( 61). Giving a title to the disc ( 58) Finalizing the disc in order to use...this process may be lengthy. 3 Playback cannot be initialized. 2 Disc finalization is the processing of free space on the DVD disc used Disc Type DVD-R DVD-R DL DVD-RW VIDEO VR Editing scenes with this camcorder (deleting scenes, editing the Playlist) ( 54) - - - Deleting a scene or still image immediately after recording it...

DC210 Manual
Page 8
... Setting the Date and Time 27 Basic Functions Recording Shooting Video 28 Selecting the Aspect Ratio of contents Introduction How to select a DVD disc 5 About this Manual About the Joystick and the Joystick Guide 11 About the Power Switch 12 About the Operating Modes 12 ...Getting Started Charging the Battery Pack 20 Inserting and Removing a Disc 22 Preparing the Camcorder 23 Adjusting the LCD Screen 24 Using the Menus Selecting a FUNC. Menu 36 Setup Menus 37 Camera Setup (Digital Zoom, Image Stabilizer, etc 37 Disc Operations (Photomovie, Finalize, etc 39 Still Image Operations...
... Setting the Date and Time 27 Basic Functions Recording Shooting Video 28 Selecting the Aspect Ratio of contents Introduction How to select a DVD disc 5 About this Manual About the Joystick and the Joystick Guide 11 About the Power Switch 12 About the Operating Modes 12 ...Getting Started Charging the Battery Pack 20 Inserting and Removing a Disc 22 Preparing the Camcorder 23 Adjusting the LCD Screen 24 Using the Menus Selecting a FUNC. Menu 36 Setup Menus 37 Camera Setup (Digital Zoom, Image Stabilizer, etc 37 Disc Operations (Photomovie, Finalize, etc 39 Still Image Operations...

DC210 Manual
Page 9
...into Photomovie Scenes 60 Playing Back the Disc on an External Device Finalizing the Disc 61 Playing Back your Disc on a DVD Player or a Computer's DVD Drive .........62 Unfinalizing the Disc - Introduction 9 Recording Programs Using the Recording Programs 43 Flexible Recording: Changing the Aperture and...Recording Options Selecting the Size and Quality of Messages 70 Do's and Don'ts Handling Precautions 72 Maintenance/Others 74 Using the Camcorder Abroad 75 Troubleshooting 66 List of Still Images 49 Automatic Focus Priority 50 Other Functions On-Screen Displays 50 Self Timer ......
...into Photomovie Scenes 60 Playing Back the Disc on an External Device Finalizing the Disc 61 Playing Back your Disc on a DVD Player or a Computer's DVD Drive .........62 Unfinalizing the Disc - Introduction 9 Recording Programs Using the Recording Programs 43 Flexible Recording: Changing the Aperture and...Recording Options Selecting the Size and Quality of Messages 70 Do's and Don'ts Handling Precautions 72 Maintenance/Others 74 Using the Camcorder Abroad 75 Troubleshooting 66 List of Still Images 49 Automatic Focus Priority 50 Other Functions On-Screen Displays 50 Self Timer ......
DC210 Manual
Page 11
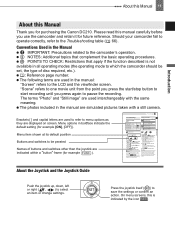
...an item or change settings. The default setting is not available in all operating modes (the operating mode to which the camcorder should be perated Names of buttons and switches other than the joystick are indicated within a "button" frame (for daylight ...press ( ). Please read this Manual Thank you changed the language by the icon . to the camcorder's operation. Conventions Used in boldface indicate the default setting (for purchasing the Canon DC210. Menu options in the Manual IMPORTANT: Precautions related to close the menu. The displays and that appear...
...an item or change settings. The default setting is not available in all operating modes (the operating mode to which the camcorder should be perated Names of buttons and switches other than the joystick are indicated within a "button" frame (for daylight ...press ( ). Please read this Manual Thank you changed the language by the icon . to the camcorder's operation. Conventions Used in boldface indicate the default setting (for purchasing the Canon DC210. Menu options in the Manual IMPORTANT: Precautions related to close the menu. The displays and that appear...

DC210 Manual
Page 12
... the operating mode between recording (CAMERA - Push the joystick ( ) toward MODE and release it. About the Power Switch In addition to turning the camcorder on the disc 30 Viewing still images from the disc 33 red indicator) and playback (PLAY - green indicator). In the manual, indicates that a ...this Manual The functions assigned to the joystick change the operating mode: From the ON position, slide down to ON. Depending on the camcorder: Hold the lock button pressed down and move the power switch down the power switch momentarily toward [NEXT] to display/hide the joystick...
... the operating mode between recording (CAMERA - Push the joystick ( ) toward MODE and release it. About the Power Switch In addition to turning the camcorder on the disc 30 Viewing still images from the disc 33 red indicator) and playback (PLAY - green indicator). In the manual, indicates that a ...this Manual The functions assigned to the joystick change the operating mode: From the ON position, slide down to ON. Depending on the camcorder: Hold the lock button pressed down and move the power switch down the power switch momentarily toward [NEXT] to display/hide the joystick...

DC210 Manual
Page 13
.... "Dolby" and the double-D symbol are trademarks of Dolby Laboratories. • Other names and products not mentioned above may be trademarks or registered trademarks of DVD Format/Logo Licensing Corporation. • Manufactured under license from Dolby Laboratories. Introduction
.... "Dolby" and the double-D symbol are trademarks of Dolby Laboratories. • Other names and products not mentioned above may be trademarks or registered trademarks of DVD Format/Logo Licensing Corporation. • Manufactured under license from Dolby Laboratories. Introduction

DC210 Manual
Page 14
...keep the model number and date of purchase of your new Canon product on Canon new products and promotions. Write down the number and other information here and retain this information in case of theft. Date of Purchase: Model Name: DC210 A Purchased From: Serial No.: Dealer Address: Dealer Phone ...information on file to this book as loss or theft. Register your product online at the battery attachment unit of the camcorder. 14 Getting to Know the Camcorder Getting to aid identification in the event of an insurance claim such as a permanent record of your purchase to Know...
...keep the model number and date of purchase of your new Canon product on Canon new products and promotions. Write down the number and other information here and retain this information in case of theft. Date of Purchase: Model Name: DC210 A Purchased From: Serial No.: Dealer Address: Dealer Phone ...information on file to this book as loss or theft. Register your product online at the battery attachment unit of the camcorder. 14 Getting to Know the Camcorder Getting to aid identification in the event of an insurance claim such as a permanent record of your purchase to Know...

DC210 Manual
Page 15
Components Guide Left side view Right Side View Getting to Know the Camcorder 15 DISP. button ( 25, 36) QUICK START button and standby lamp ( 31) AV terminal ( 64) Terminal cover BATT. (battery release) switch ( 20) RESET button ( 66) Serial number Battery attachment unit ( 20) Lens cover switch ( 28, 30) ( open, closed) Disc compartment cover ( 22) Grip belt ( 23) DC IN terminal ( 20) Stereo microphone Names of buttons and switches other than the joystick are indicated within a "button" frame (for example FUNC. ). Introduction Front view button ( 51) FUNC.
Components Guide Left side view Right Side View Getting to Know the Camcorder 15 DISP. button ( 25, 36) QUICK START button and standby lamp ( 31) AV terminal ( 64) Terminal cover BATT. (battery release) switch ( 20) RESET button ( 66) Serial number Battery attachment unit ( 20) Lens cover switch ( 28, 30) ( open, closed) Disc compartment cover ( 22) Grip belt ( 23) DC IN terminal ( 20) Stereo microphone Names of buttons and switches other than the joystick are indicated within a "button" frame (for example FUNC. ). Introduction Front view button ( 51) FUNC.

DC210 Manual
Page 16
16 Getting to Know the Camcorder Back view Top view Bottom view PLAY mode indicator (green) ( 12) Joystick ( 11) CAMERA mode indicator (red) ( 12) LCD screen ( 24) (fast reverse) button ( 33) / Zoom out W (wide-angle) button ( 31) (fast forward) button ( 33) / Zoom in T (telephoto) button ( 31) / (play/pause)...) indicator ( 20) Start/stop button ( 28) Power switch ( 12) OPEN (disc cover) switch ( 22) Grip belt ( 23) Mode switch ( 43) Zoom lever ( 31) PHOTO button ( 30) Speaker ( 33) Tripod socket ( 29) Strap mount Names of buttons and switches other than the joystick are indicated within a...
16 Getting to Know the Camcorder Back view Top view Bottom view PLAY mode indicator (green) ( 12) Joystick ( 11) CAMERA mode indicator (red) ( 12) LCD screen ( 24) (fast reverse) button ( 33) / Zoom out W (wide-angle) button ( 31) (fast forward) button ( 33) / Zoom in T (telephoto) button ( 31) / (play/pause)...) indicator ( 20) Start/stop button ( 28) Power switch ( 12) OPEN (disc cover) switch ( 22) Grip belt ( 23) Mode switch ( 43) Zoom lever ( 31) PHOTO button ( 30) Speaker ( 33) Tripod socket ( 29) Strap mount Names of buttons and switches other than the joystick are indicated within a...
DC210 Manual
Page 17
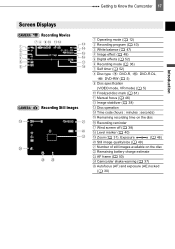
... Displays Recording Movies Recording Still Images Getting to Know the Camcorder 17 Operating mode ( 12) Recording program ( 43) White balance ( 47) Image effect ( 48) Digital effects ( 52) Recording mode ( 36) Self timer ( 52) Disc type DVD-R, DVD-RW ( 5) DVD-R DL, Disc specification (VIDEO mode, VR mode) ...Recording reminder Wind screen off ( 38) Level marker ( 40) Zoom ( 31), Exposure ( 46) Still image quality/size ( 49) Number of still images available on the disc Remaining battery charge estimate AF frame ( 50) Camcorder shake warning ( 37) Autofocus (AF) and exposure (AE) ...
... Displays Recording Movies Recording Still Images Getting to Know the Camcorder 17 Operating mode ( 12) Recording program ( 43) White balance ( 47) Image effect ( 48) Digital effects ( 52) Recording mode ( 36) Self timer ( 52) Disc type DVD-R, DVD-RW ( 5) DVD-R DL, Disc specification (VIDEO mode, VR mode) ...Recording reminder Wind screen off ( 38) Level marker ( 40) Zoom ( 31), Exposure ( 46) Still image quality/size ( 49) Number of still images available on the disc Remaining battery charge estimate AF frame ( 50) Camcorder shake warning ( 37) Autofocus (AF) and exposure (AE) ...

DC210 Manual
Page 18
... starts flashing in red replace the battery pack with a fully charged one. • When you start recording. 18 Getting to Know the Camcorder Disc operation Record, Record pause, Playback, Playback pause, Fast playback, Fast reverse playback, Slow playback, Slow reverse playback Remaining recording time When... is no more disc space available, " END" will be displayed and the recording will always be indicated accurately. Recording reminder The camcorder counts from 1 to avoid scenes that are used, the actual battery charge may turn off without displaying " ". • Depending on...
... starts flashing in red replace the battery pack with a fully charged one. • When you start recording. 18 Getting to Know the Camcorder Disc operation Record, Record pause, Playback, Playback pause, Fast playback, Fast reverse playback, Slow playback, Slow reverse playback Remaining recording time When... is no more disc space available, " END" will be displayed and the recording will always be indicated accurately. Recording reminder The camcorder counts from 1 to avoid scenes that are used, the actual battery charge may turn off without displaying " ". • Depending on...

DC210 Manual
Page 19
Getting to Know the Camcorder 19 Playing Movies (During Playback) Disc operation Playback time (hours : minutes : seconds) Scene number Data code ( 51) Introduction Viewing Still Images Image number ( 41) Current image / Total number of images Histogram ( 51) Still image quality/size ( 49) Date and time of recording Recording program ( 43) Manual focus ( 46) White balance ( 47) Manual exposure ( 46) Image effect ( 48) Image size ( 49) File size Aperture value Shutter speed ( 44)
Getting to Know the Camcorder 19 Playing Movies (During Playback) Disc operation Playback time (hours : minutes : seconds) Scene number Data code ( 51) Introduction Viewing Still Images Image number ( 41) Current image / Total number of images Histogram ( 51) Still image quality/size ( 49) Date and time of recording Recording program ( 43) Manual focus ( 46) White balance ( 47) Manual exposure ( 46) Image effect ( 48) Image size ( 49) File size Aperture value Shutter speed ( 44)
DC210 Manual
Page 20
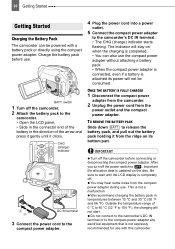
... in the connector end of 0 °C to 40 °C (32 °F to 104 °F), the charging will not be powered with this camcorder. Outside the temperature range of the battery in temperatures between 10 °C and 30 °C (50 °F and 86 °F). CHG (charge)...directly using the compact power adapter. After you turn off . 20 Getting Started Preparations Getting Started Getting Started Charging the Battery Pack The camcorder can also use the compact power adapter without attaching a battery pack. • When the compact power adapter is connected, even if ...
... in the connector end of 0 °C to 40 °C (32 °F to 104 °F), the charging will not be powered with this camcorder. Outside the temperature range of the battery in temperatures between 10 °C and 30 °C (50 °F and 86 °F). CHG (charge)...directly using the compact power adapter. After you turn off . 20 Getting Started Preparations Getting Started Getting Started Charging the Battery Pack The camcorder can also use the compact power adapter without attaching a battery pack. • When the compact power adapter is connected, even if ...

DC210 Manual
Page 21
.... 65 min. Playback Time 140 min. 165 min. 175 min. The charging time will decrease. U.S.A. NOTES The CHG (charge) indicator also serves as start/stop, zooming, power on : Battery fully charged. Flashes approx. once per second: Battery over 50% charged. LCD [NORMAL] 110 min. 60 min. 125 min. 65 min. 140...
.... 65 min. Playback Time 140 min. 165 min. 175 min. The charging time will decrease. U.S.A. NOTES The CHG (charge) indicator also serves as start/stop, zooming, power on : Battery fully charged. Flashes approx. once per second: Battery over 50% charged. LCD [NORMAL] 110 min. 60 min. 125 min. 65 min. 140...

DC210 Manual
Page 22
Before inserting the disc be asked to set the camcorder in mode. 2 Slide OPEN fully in .) mini DVD discs marked with the recording side facing down (single sided discs - WHEN USING DVD-R/DVD-R DL DISCS You can start recording. WHEN USING A DVD-RW You need to check that case, you can start the disc...the disc surface. If necessary, use a soft lens-cleaning cloth to return and select a different disc specification. Retract the grip belt under the camcorder so it will not get in the way of the disc cover. 3 Insert the disc and press its center firmly until it clicks in ...
Before inserting the disc be asked to set the camcorder in mode. 2 Slide OPEN fully in .) mini DVD discs marked with the recording side facing down (single sided discs - WHEN USING DVD-R/DVD-R DL DISCS You can start recording. WHEN USING A DVD-RW You need to check that case, you can start the disc...the disc surface. If necessary, use a soft lens-cleaning cloth to return and select a different disc specification. Retract the grip belt under the camcorder so it will not get in the way of the disc cover. 3 Insert the disc and press its center firmly until it clicks in ...
