
Quick Start Guide Instructions
Page 2
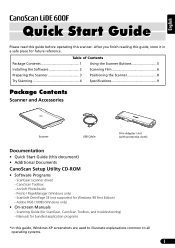
... Contents Package Contents 1 Using the Scanner Buttons 5 Installing the Software 2 Scanning Film 6 Preparing the Scanner 3 Positioning the Scanner 8 Try Scanning 4 Specifications 9 Package Contents Scanner and Accessories Scanner USB Cable Film Adapter Unit (with protective cloth) Documentation • Quick Start Guide (this scanner. Adobe RGB (1998) (Windows only) • On-screen Manuals - CanoScan Toolbox - English Quick Start Guide...
... Contents Package Contents 1 Using the Scanner Buttons 5 Installing the Software 2 Scanning Film 6 Preparing the Scanner 3 Positioning the Scanner 8 Try Scanning 4 Specifications 9 Package Contents Scanner and Accessories Scanner USB Cable Film Adapter Unit (with protective cloth) Documentation • Quick Start Guide (this scanner. Adobe RGB (1998) (Windows only) • On-screen Manuals - CanoScan Toolbox - English Quick Start Guide...
Quick Start Guide Instructions
Page 3
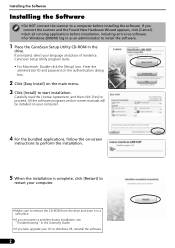
...Software Installing the Software • Do NOT connect the scanner to a computer before installation, including anti-virus software. • For Windows 2000/XP, log in as an administrator to install the software. 1 Place the CanoScan Setup Utility CD-ROM in the Scanning Guide. •... Make sure to restart your language and place of residence. Carefully read the License Agreement, and then click [Yes] to start installation. CanoScan Setup Utility program starts. • For Macintosh: Double-click the [Setup] icon. Enter the administrator ID and password on the authentication ...
...Software Installing the Software • Do NOT connect the scanner to a computer before installation, including anti-virus software. • For Windows 2000/XP, log in as an administrator to install the software. 1 Place the CanoScan Setup Utility CD-ROM in the Scanning Guide. •... Make sure to restart your language and place of residence. Carefully read the License Agreement, and then click [Yes] to start installation. CanoScan Setup Utility program starts. • For Macintosh: Double-click the [Setup] icon. Enter the administrator ID and password on the authentication ...
Quick Start Guide Instructions
Page 4
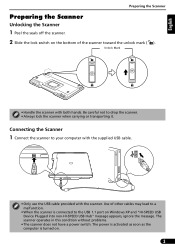
... • Only use the USB cable provided with both hands. Unlock Mark • Handle the scanner with the scanner. English Preparing the Scanner Preparing the Scanner Unlocking the Scanner 1 Peel the seals off the scanner. 2 Slide the lock switch on the bottom of other cables may lead to a malfunction. &#... ignore the message. Be careful not to the USB 1.1 port on . 3 Use of the scanner toward the unlock mark ( ). The scanner operates in this condition without problems. • The scanner does not have a power switch. The power is activated as soon as the computer is connected ...
... • Only use the USB cable provided with both hands. Unlock Mark • Handle the scanner with the scanner. English Preparing the Scanner Preparing the Scanner Unlocking the Scanner 1 Peel the seals off the scanner. 2 Slide the lock switch on the bottom of other cables may lead to a malfunction. &#... ignore the message. Be careful not to the USB 1.1 port on . 3 Use of the scanner toward the unlock mark ( ). The scanner operates in this condition without problems. • The scanner does not have a power switch. The power is activated as soon as the computer is connected ...
Quick Start Guide Instructions
Page 5
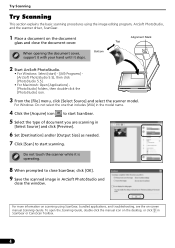
...[Scan] to close ScanGear, click [OK]. 9 Save the scanned image in ScanGear or CanoScan Toolbox. 4 For more information on scanning using the image editing program, ArcSoft PhotoStudio, and the scanner driver, ScanGear. 1 Place a document on the document glass and close the window. Bottom...[PhotoStudio] folders, then double-click the [PhotoStudio] icon. 3 From the [File] menu, click [Select Source] and select the scanner model. Try Scanning Try Scanning This section explains the basic scanning procedures using ScanGear, bundled applications, and troubleshooting, see the on the ...
...[Scan] to close ScanGear, click [OK]. 9 Save the scanned image in ScanGear or CanoScan Toolbox. 4 For more information on scanning using the image editing program, ArcSoft PhotoStudio, and the scanner driver, ScanGear. 1 Place a document on the document glass and close the window. Bottom...[PhotoStudio] folders, then double-click the [PhotoStudio] icon. 3 From the [File] menu, click [Select Source] and select the scanner model. Try Scanning Try Scanning This section explains the basic scanning procedures using ScanGear, bundled applications, and troubleshooting, see the on the ...
Quick Start Guide Instructions
Page 6
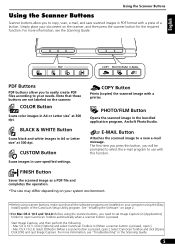
...and save scanned images in [Applications] folder) to open CanoScan Toolbox automatically when a scanner button is pressed. The first time you press this function. English Using the Scanner Buttons Using the Scanner Buttons Scanner buttons allow you to easily create PDF files according to your...more information, see the Scanning Guide. BLACK & WHITE Button Scans black and white images in [When a scanner button is pressed, open :]. - Select CanoScan Toolbox and click [Open]. COLOR Button Scans color images in the bundled application program, ArcSoft PhotoStudio. PHOTO/...
...and save scanned images in [Applications] folder) to open CanoScan Toolbox automatically when a scanner button is pressed. The first time you press this function. English Using the Scanner Buttons Using the Scanner Buttons Scanner buttons allow you to easily create PDF files according to your...more information, see the Scanning Guide. BLACK & WHITE Button Scans black and white images in [When a scanner button is pressed, open :]. - Select CanoScan Toolbox and click [Open]. COLOR Button Scans color images in the bundled application program, ArcSoft PhotoStudio. PHOTO/...
Quick Start Guide Instructions
Page 7
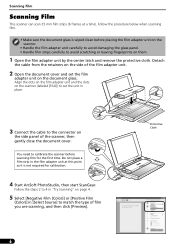
... Handle the film adapter unit carefully to avoid damaging the glass panel. • Handle film strips carefully to avoid scratching or leaving fingerprints on the scanner (labeled [FAU]) to set the film adapter unit on the side of film you are scanning, and then click [Preview]. 6 Protective Cloth Do... and the dots on them. 1 Open the film adapter unit by the center latch and remove the protective cloth. Scanning Film Scanning Film This scanner can scan 35 mm film strips (6 frames at this point as it is wiped clean before scanning film for calibration. 4 Start ArcSoft PhotoStudio, ...
... Handle the film adapter unit carefully to avoid damaging the glass panel. • Handle film strips carefully to avoid scratching or leaving fingerprints on the scanner (labeled [FAU]) to set the film adapter unit on the side of film you are scanning, and then click [Preview]. 6 Protective Cloth Do... and the dots on them. 1 Open the film adapter unit by the center latch and remove the protective cloth. Scanning Film Scanning Film This scanner can scan 35 mm film strips (6 frames at this point as it is wiped clean before scanning film for calibration. 4 Start ArcSoft PhotoStudio, ...
Quick Start Guide Instructions
Page 8
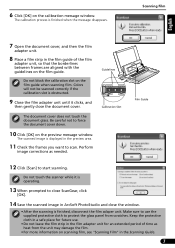
... if the calibration slot is finished, disconnect the film adaper unit. Guidelines Calibration Slot Film Guide 12 Click [Scan] to scan. Do not touch the scanner while it is operating. 13 When prompted to force the document cover down. 10 Click [OK] on the film guide when scanning film. Be careful...
... if the calibration slot is finished, disconnect the film adaper unit. Guidelines Calibration Slot Film Guide 12 Click [Scan] to scan. Do not touch the scanner while it is operating. 13 When prompted to force the document cover down. 10 Click [OK] on the film guide when scanning film. Be careful...
Quick Start Guide Instructions
Page 9
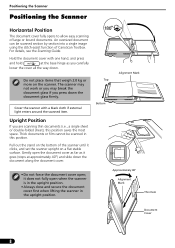
...can be scanned in the upright position. For details, see the Scanning Guide. Approximately 40q Alignment Mark Thin Item Document Cover 8 Cover the scanner with one hand, and press and hold at approximately 40q) and slide down . it does not fully open ; Do not place items... lower the cover all the way down the document along the document cover. Positioning the Scanner Positioning the Scanner Horizontal Position The document cover fully opens to allow easy scanning of CanoScan Toolbox. Thick documents or film cannot be scanned section by section into a single image ...
...can be scanned in the upright position. For details, see the Scanning Guide. Approximately 40q Alignment Mark Thin Item Document Cover 8 Cover the scanner with one hand, and press and hold at approximately 40q) and slide down . it does not fully open ; Do not place items... lower the cover all the way down the document along the document cover. Positioning the Scanner Positioning the Scanner Horizontal Position The document cover fully opens to allow easy scanning of CanoScan Toolbox. Thick documents or film cannot be scanned section by section into a single image ...
Quick Start Guide Instructions
Page 10
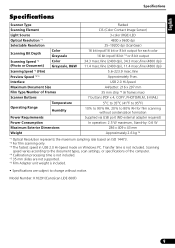
Model Number: K10291(CanoScan LiDE 600F) 9 Interface USB 2.0 Hi-Speed Maximum Document Size Film Type/Number ... types, scan settings, or specifications of Frames A4/Letter: 216 x 297 mm 35 mm strip *5 (6 frames max) Scanner Buttons Operating Range Temperature Humidity 7 buttons (PDF x 4, COPY, PHOTO/FILM, E-MAIL) 5qC to 35qC (41qF to...film scanning only. *3 The fastest speed in USB 2.0 Hi-Speed mode on Windows PC. English Specifications Specifications Scanner Type Flatbed Scanning Element CIS (Color Contact Image Sensor) Light Source Optical Resolution *1 3-color (RGB) LED ...
Model Number: K10291(CanoScan LiDE 600F) 9 Interface USB 2.0 Hi-Speed Maximum Document Size Film Type/Number ... types, scan settings, or specifications of Frames A4/Letter: 216 x 297 mm 35 mm strip *5 (6 frames max) Scanner Buttons Operating Range Temperature Humidity 7 buttons (PDF x 4, COPY, PHOTO/FILM, E-MAIL) 5qC to 35qC (41qF to...film scanning only. *3 The fastest speed in USB 2.0 Hi-Speed mode on Windows PC. English Specifications Specifications Scanner Type Flatbed Scanning Element CIS (Color Contact Image Sensor) Light Source Optical Resolution *1 3-color (RGB) LED ...


