
User Manual
Page 1
Keep the manual in place for future reference 中文 Appendix External view ENGLISH Digital Cinema Lens CN-E14.5-60mm T2.6 L S CN-E14.5-60mm T2.6 L SP OPERATION MANUAL Read this operation manual before using the product.
Keep the manual in place for future reference 中文 Appendix External view ENGLISH Digital Cinema Lens CN-E14.5-60mm T2.6 L S CN-E14.5-60mm T2.6 L SP OPERATION MANUAL Read this operation manual before using the product.

User Manual
Page 14
ENGLISH ENGLISH GENERAL SAFETY INFORMATION.......2 Product Configuration 4 Names of Parts 5 F.B. (Back Focus) Adjustment 6 Available Accessories 8 Dimensions of Parts 10 Specifications 11 Appendix External view apx. 2 The English version is the operation manual for counties other than Japan.
ENGLISH ENGLISH GENERAL SAFETY INFORMATION.......2 Product Configuration 4 Names of Parts 5 F.B. (Back Focus) Adjustment 6 Available Accessories 8 Dimensions of Parts 10 Specifications 11 Appendix External view apx. 2 The English version is the operation manual for counties other than Japan.
User Manual
Page 15
... injury. 2. If any operations or adjustments not mentioned in this operation manual, contact Canon's representative or the dealer who originally supplied the lens. If it can operate the product properly. This operation manual uses the following symbols and terms to identify hazards to perform any of accidents. CAUTION 1. When the lens must be used until these mountings becomes loose, the lens may result in...
... injury. 2. If any operations or adjustments not mentioned in this operation manual, contact Canon's representative or the dealer who originally supplied the lens. If it can operate the product properly. This operation manual uses the following symbols and terms to identify hazards to perform any of accidents. CAUTION 1. When the lens must be used until these mountings becomes loose, the lens may result in...
User Manual
Page 16
... undertake servicing or repair of use , and the environment. If the lens becomes damp because of a product if it is recommended. For further information on the lens surface using this operation manual, contact your Canon dealer or your Canon sales representative. Note that Canon may be unable to remove moisture that results from improper operation of Canon Inc. 3 Always attach the lens cap (or hood cap) and the dust cap before...
... undertake servicing or repair of use , and the environment. If the lens becomes damp because of a product if it is recommended. For further information on the lens surface using this operation manual, contact your Canon dealer or your Canon sales representative. Note that Canon may be unable to remove moisture that results from improper operation of Canon Inc. 3 Always attach the lens cap (or hood cap) and the dust cap before...
User Manual
Page 17
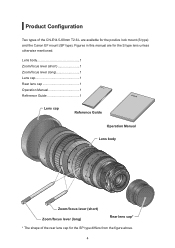
Product Configuration Two types of the rear lens cap for the positive lock mount (S type) and the Canon EF mount (SP type). Lens body 1 Zoom/focus lever (short 1 Zoom/focus lever (long 1 Lens cap 1 Rear lens cap 1 Operation Manual 1 Reference Guide 1 Lens cap Reference Guide Operation Manual Lens body Zoom/focus lever (short) Zoom/focus lever (long) Rear lens cap* * The shape of the CN-E14.5-60mm T2.6 L are for the S type lens unless otherwise mentioned. Figures in this manual are available for the SP type differs from the figure above. 4
Product Configuration Two types of the rear lens cap for the positive lock mount (S type) and the Canon EF mount (SP type). Lens body 1 Zoom/focus lever (short 1 Zoom/focus lever (long 1 Lens cap 1 Rear lens cap 1 Operation Manual 1 Reference Guide 1 Lens cap Reference Guide Operation Manual Lens body Zoom/focus lever (short) Zoom/focus lever (long) Rear lens cap* * The shape of the CN-E14.5-60mm T2.6 L are for the S type lens unless otherwise mentioned. Figures in this manual are available for the SP type differs from the figure above. 4
User Manual
Page 18
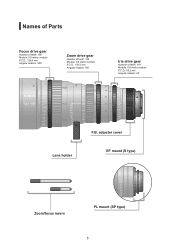
Names of Parts Focus drive gear Number of teeth: 158 Module: 0.8 metric module P.C.D.: 126.4 mm Angular rotation: 300˃ Zoom drive gear Number of teeth: 129 Module: 0.8 metric module P.C.D.: 103.2 mm Angular rotation: 160˃ Iris drive gear Number of teeth: 119 Module: 0.8 metric module P.C.D.: 95.2 mm Angular rotation: 63˃ Lens holder F.B. adjuster cover EF mount (S type) Zoom/focus levers PL mount (SP type) 5
Names of Parts Focus drive gear Number of teeth: 158 Module: 0.8 metric module P.C.D.: 126.4 mm Angular rotation: 300˃ Zoom drive gear Number of teeth: 129 Module: 0.8 metric module P.C.D.: 103.2 mm Angular rotation: 160˃ Iris drive gear Number of teeth: 119 Module: 0.8 metric module P.C.D.: 95.2 mm Angular rotation: 63˃ Lens holder F.B. adjuster cover EF mount (S type) Zoom/focus levers PL mount (SP type) 5
User Manual
Page 19
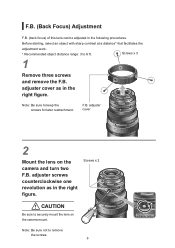
... remove the screws. 6 360 degrees adjuster cover 2 Mount the lens on the camera mount. adjuster screws counterclockwise one revolution as in the following procedures. Note: Be sure not to keep the screws for later reattachment. Screws x 2 CAUTION Be sure to 6 ft. Before starting, select an object with sharp contrast at a distance* that facilitates the adjustment work. * Recommended object distance...
... remove the screws. 6 360 degrees adjuster cover 2 Mount the lens on the camera mount. adjuster screws counterclockwise one revolution as in the following procedures. Note: Be sure not to keep the screws for later reattachment. Screws x 2 CAUTION Be sure to 6 ft. Before starting, select an object with sharp contrast at a distance* that facilitates the adjustment work. * Recommended object distance...
User Manual
Page 20
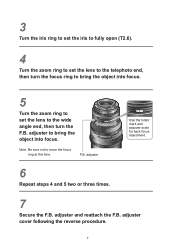
adjuster to bring the object into focus. 5 Turn the zoom ring to set the lens to the telephoto end, then turn the F.B. Note: Be sure not to move the focus ring at this time. Use the index mark and adjuster scale for back focus adjustment. 7 Secure the F.B. adjuster 6 Repeat steps 4 and 5 two or three times. F.B. 3 Turn the iris ring to set the iris to fully open (T2.6). 4 Turn the zoom ring to set the lens to the wide angle end, then turn the focus ring to bring the object into focus. adjuster and reattach the F.B. adjuster cover following the reverse procedure. 7
adjuster to bring the object into focus. 5 Turn the zoom ring to set the lens to the telephoto end, then turn the F.B. Note: Be sure not to move the focus ring at this time. Use the index mark and adjuster scale for back focus adjustment. 7 Secure the F.B. adjuster 6 Repeat steps 4 and 5 two or three times. F.B. 3 Turn the iris ring to set the iris to fully open (T2.6). 4 Turn the zoom ring to set the lens to the wide angle end, then turn the focus ring to bring the object into focus. adjuster and reattach the F.B. adjuster cover following the reverse procedure. 7
User Manual
Page 21
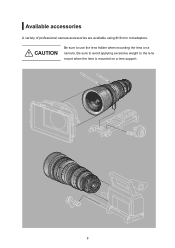
Be sure to avoid applying excessive weight to use the lens holder when mounting the lens on a lens support. 8 CAUTION Be sure to the lens mount when the lens is mounted on a camera. Available accessories A variety of professional camera accessories are available using Φ19 mm rod adaptors.
Be sure to avoid applying excessive weight to use the lens holder when mounting the lens on a lens support. 8 CAUTION Be sure to the lens mount when the lens is mounted on a camera. Available accessories A variety of professional camera accessories are available using Φ19 mm rod adaptors.
User Manual
Page 22
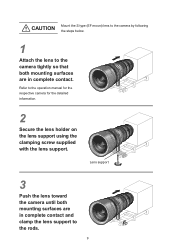
Lens support 3 Push the lens toward the camera until both mounting surfaces are in complete contact. Refer to the operation manual for the respective camera for the detailed information. 2 Secure the lens holder on the lens support using the clamping screw supplied with the lens support. CAUTION Mount the S type (EF mount) lens to the camera by following the steps below. 1 Attach the lens to the camera tightly so that both mounting surfaces are in complete contact and clamp the lens support to the rods. 9
Lens support 3 Push the lens toward the camera until both mounting surfaces are in complete contact. Refer to the operation manual for the respective camera for the detailed information. 2 Secure the lens holder on the lens support using the clamping screw supplied with the lens support. CAUTION Mount the S type (EF mount) lens to the camera by following the steps below. 1 Attach the lens to the camera tightly so that both mounting surfaces are in complete contact and clamp the lens support to the rods. 9
User Manual
Page 23
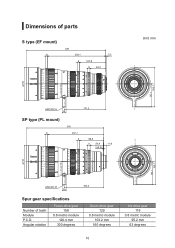
Angular rotation Focus drive gear 158 0.8 metric module 126.4 mm 300 degrees Zoom drive gear 129 0.8 metric module 103.2 mm 160 degrees Iris drive gear 119 0.8 metric module 95.2 mm 63 degrees 10 Dimensions of parts S type (EF mount) Unit: mm SP type (PL mount) Spur gear specifications Number of teeth Module P.C.D.
Angular rotation Focus drive gear 158 0.8 metric module 126.4 mm 300 degrees Zoom drive gear 129 0.8 metric module 103.2 mm 160 degrees Iris drive gear 119 0.8 metric module 95.2 mm 63 degrees 10 Dimensions of parts S type (EF mount) Unit: mm SP type (PL mount) Spur gear specifications Number of teeth Module P.C.D.

User Manual
Page 24
... at wide angle end 15.4 x 8.6 cm at telephoto end EOS C500 71.2 x 37.5 cm at wide angle end 16.4 x 8.6 cm at M.O.D. The lens is compatible with cameras that have a 35-mm full-size sensor or an APS-H sensor. 11 Specifications CN-E14.5-60mm T2.6 L S CN-E14.5-60mm T2.6 L SP Lens Mount Canon EF PL Focal Length 14.5 to 60 mm Maximum T-stop T2.6 (f = 14.5 to 60) Iris Blade 11 pieces Super 35mm Coverage Image Circle...
... at wide angle end 15.4 x 8.6 cm at telephoto end EOS C500 71.2 x 37.5 cm at wide angle end 16.4 x 8.6 cm at M.O.D. The lens is compatible with cameras that have a 35-mm full-size sensor or an APS-H sensor. 11 Specifications CN-E14.5-60mm T2.6 L S CN-E14.5-60mm T2.6 L SP Lens Mount Canon EF PL Focal Length 14.5 to 60 mm Maximum T-stop T2.6 (f = 14.5 to 60) Iris Blade 11 pieces Super 35mm Coverage Image Circle...
User Manual
Page 25
Therefore, when using the zoom mode of the finder or other means, and shoot a sufficient number of test images before performing focus operations. 12 In addition, this tendency increases for movies. When shooting images, carefully check the focusing condition using both types of lens together, adjust the color balance (redo the white balance etc.) as necessary. • In general, the depth of field...
Therefore, when using the zoom mode of the finder or other means, and shoot a sufficient number of test images before performing focus operations. 12 In addition, this tendency increases for movies. When shooting images, carefully check the focusing condition using both types of lens together, adjust the color balance (redo the white balance etc.) as necessary. • In general, the depth of field...
User Manual
Page 40
... http://pro.usa.canon.com/support (855) CINE-EOS (855-246-3367) (USA Only) ASIA ASIA and HONG KONG, S.A.R. Canon Inc. 30-2, Shimomaruko 3-chome, Ohta-ku, Tokyo 146-8501, Japan AMERICAS CANADA Canon Canada, Inc. http://www.canon.ca/pro Professional Product Support/le soutien des produits professionnels (800) 667-2666 SOUTH & SOUTHEAST ASIA Canon Singapore Pte. Ltd. http://www...
... http://pro.usa.canon.com/support (855) CINE-EOS (855-246-3367) (USA Only) ASIA ASIA and HONG KONG, S.A.R. Canon Inc. 30-2, Shimomaruko 3-chome, Ohta-ku, Tokyo 146-8501, Japan AMERICAS CANADA Canon Canada, Inc. http://www.canon.ca/pro Professional Product Support/le soutien des produits professionnels (800) 667-2666 SOUTH & SOUTHEAST ASIA Canon Singapore Pte. Ltd. http://www...

User Manual
Page 41
*B-IM-20214A* CANON INC. 30-2, Shimomaruko 3-chome, Ohta-ku, Tokyo 146-8501, Japan Subject to change without notice. 地址 :100005 89 15 层 修订 : 2013. 4. 1 Pub No. B-IM-20214A 2013.04 CANON INC.
*B-IM-20214A* CANON INC. 30-2, Shimomaruko 3-chome, Ohta-ku, Tokyo 146-8501, Japan Subject to change without notice. 地址 :100005 89 15 层 修订 : 2013. 4. 1 Pub No. B-IM-20214A 2013.04 CANON INC.


