User Manual
Page 8
5.2 Setting in the User Mode 60 How to Set the User Mode 62 Chapter 6 Troubleshooting 6.1 When the Scanner Is Not Recognized 64 SCSI Connections 64 USB Connections 66 6.2 Clearing Paper Jams 67 Paper Jam in the Paper Feed Unit 67 Paper Jam in ... Image Is Not Normal 74 6.5 When an Error Code Is Displayed 75 Chapter 7 Daily Cleaning 7.1 Daily Cleaning 80 Cleaning the Main Unit 80 Cleaning the Document Detection Sensor 81 Cleaning the Scanning Glasses and Rollers 81 Cleaning the Shading Plates 85 Cleaning the Guide Plate (When Using the Imprinter 87 Cleaning...
5.2 Setting in the User Mode 60 How to Set the User Mode 62 Chapter 6 Troubleshooting 6.1 When the Scanner Is Not Recognized 64 SCSI Connections 64 USB Connections 66 6.2 Clearing Paper Jams 67 Paper Jam in the Paper Feed Unit 67 Paper Jam in ... Image Is Not Normal 74 6.5 When an Error Code Is Displayed 75 Chapter 7 Daily Cleaning 7.1 Daily Cleaning 80 Cleaning the Main Unit 80 Cleaning the Document Detection Sensor 81 Cleaning the Scanning Glasses and Rollers 81 Cleaning the Shading Plates 85 Cleaning the Guide Plate (When Using the Imprinter 87 Cleaning...
User Manual
Page 67
Chapter 6 Troubleshooting This chapter describes the trouble that may occur on the DR-7580/9080C and how to correct it. 6.1 When the Scanner Is Not Recognized 64 SCSI Connections 64 USB Connections 66 6.2 Clearing Paper jams 67 Paper Jam in the Paper Feed Unit .......... 67 Paper Jam in the Paper Exit Section ....... 70 6.3 Paper Feed Trouble 72 6.4 When the Scanned Image Is Not Normal 74 6.5 When an Error Code Is Displayed .....75
Chapter 6 Troubleshooting This chapter describes the trouble that may occur on the DR-7580/9080C and how to correct it. 6.1 When the Scanner Is Not Recognized 64 SCSI Connections 64 USB Connections 66 6.2 Clearing Paper jams 67 Paper Jam in the Paper Feed Unit .......... 67 Paper Jam in the Paper Exit Section ....... 70 6.3 Paper Feed Trouble 72 6.4 When the Scanned Image Is Not Normal 74 6.5 When an Error Code Is Displayed .....75
User Manual
Page 68
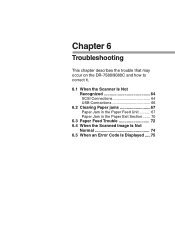
... then open the [SCSI adapter] and check if the "SCSI card" is not correctly recognized. Correctly connect the SCSI card referring to the scanner in the correct way. on it . on it . Remedy the problem by following describes possible causes of these, then refer to the SCSI... see one of these , then refer to the SCSI card's operator's manual to the OS that your computer not recognizing the scanner. Chapter 6 Troubleshooting When the Scanner Is Not Recognized The following the procedure for the respective cause. Also, check the following according to reset the SCSI card.
... then open the [SCSI adapter] and check if the "SCSI card" is not correctly recognized. Correctly connect the SCSI card referring to the scanner in the correct way. on it . on it . Remedy the problem by following describes possible causes of these, then refer to the SCSI... see one of these , then refer to the SCSI card's operator's manual to the OS that your computer not recognizing the scanner. Chapter 6 Troubleshooting When the Scanner Is Not Recognized The following the procedure for the respective cause. Also, check the following according to reset the SCSI card.
User Manual
Page 70
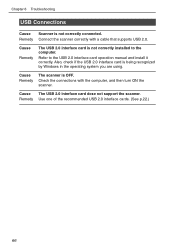
...of the recommended USB 2.0 interface cards. (See p.22.) 66 Check the connections with a cable that supports USB 2.0. Chapter 6 Troubleshooting USB Connections Cause Scanner is being recognized by Windows in the operating system you are using. Refer to the computer. Cause Remedy The... scanner is not correctly installed to the USB 2.0 interface card operation manual and install it correctly. Remedy Connect the scanner correctly with the computer, and then turn ON the scanner. Cause Remedy The USB 2.0 interface card is ...
...of the recommended USB 2.0 interface cards. (See p.22.) 66 Check the connections with a cable that supports USB 2.0. Chapter 6 Troubleshooting USB Connections Cause Scanner is being recognized by Windows in the operating system you are using. Refer to the computer. Cause Remedy The... scanner is not correctly installed to the USB 2.0 interface card operation manual and install it correctly. Remedy Connect the scanner correctly with the computer, and then turn ON the scanner. Cause Remedy The USB 2.0 interface card is ...

User Manual
Page 72
Chapter 6 Troubleshooting 3 Open the upper scanner. Press the open/close button, and lift up the upper scanner gently until it stops and locks in the open position. 4 Remove the jammed paper from inside the scanner. 68
Chapter 6 Troubleshooting 3 Open the upper scanner. Press the open/close button, and lift up the upper scanner gently until it stops and locks in the open position. 4 Remove the jammed paper from inside the scanner. 68

User Manual
Page 74
Chapter 6 Troubleshooting Paper Jam in the Paper Exit Section 1 Remove the jammed paper from the document tray or the document eject tray. 2 Close the document eject tray extension if it is open. 3 Lift up the upper scanner slightly. 70
Chapter 6 Troubleshooting Paper Jam in the Paper Exit Section 1 Remove the jammed paper from the document tray or the document eject tray. 2 Close the document eject tray extension if it is open. 3 Lift up the upper scanner slightly. 70
User Manual
Page 76
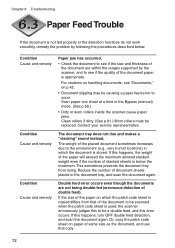
...) mode. (See p.50.) • Dirty or worn rollers inside the scanner cause paper jams. Clean rollers if dirty. (See p.81.) Worn rollers must be replaced. Chapter 6 Troubleshooting Paper Feed Trouble If the document is not fed properly or the detection functions do not work smoothly, remedy ...the problem by the scanner, and to the environment (e.g., very humid locations) in which the patch ...
...) mode. (See p.50.) • Dirty or worn rollers inside the scanner cause paper jams. Clean rollers if dirty. (See p.81.) Worn rollers must be replaced. Chapter 6 Troubleshooting Paper Feed Trouble If the document is not fed properly or the detection functions do not work smoothly, remedy ...the problem by the scanner, and to the environment (e.g., very humid locations) in which the patch ...

User Manual
Page 78
...cause is that the driver or the application is not functioning correctly. ➝ Reinstall the driver or application. If the document cannot be performed correctly. Chapter 6 Troubleshooting When the Scanned Image Is Not Normal If there is a problem on the scanned image (image is not sharp or ...the recommended interface card. Also, check the settings on how to install the application, see the instruction manual for the application in the scanner are inappropriate. A probable cause is that the interface card is that dirt will not be a probable cause. For details on the ...
...cause is that the driver or the application is not functioning correctly. ➝ Reinstall the driver or application. If the document cannot be performed correctly. Chapter 6 Troubleshooting When the Scanned Image Is Not Normal If there is a problem on the scanned image (image is not sharp or ...the recommended interface card. Also, check the settings on how to install the application, see the instruction manual for the application in the scanner are inappropriate. A probable cause is that the interface card is that dirt will not be a probable cause. For details on the ...
User Manual
Page 80
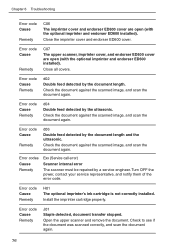
... the scanned image, and scan the document again. Check to see if the document was scanned correctly, and scan the document again. 76 Turn OFF the power, contact your service representative, and notify them of the error code. Open the upper scanner and remove the document. Chapter 6 Troubleshooting Error code Cause Remedy C06 The imprinter cover...
... the scanned image, and scan the document again. Check to see if the document was scanned correctly, and scan the document again. 76 Turn OFF the power, contact your service representative, and notify them of the error code. Open the upper scanner and remove the document. Chapter 6 Troubleshooting Error code Cause Remedy C06 The imprinter cover...
User Manual
Page 82
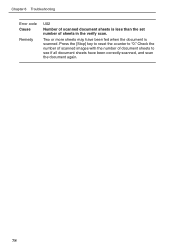
Press the [Stop] key to reset the counter to see if all document sheets have been fed when the document is less than the set number of sheets in the verify scan. Two or more sheets may have been correctly scanned, and scan the document again. 78 Chapter 6 Troubleshooting Error code Cause Remedy U02 Number of scanned document sheets is scanned. Check the number of scanned images with the number of document sheets to "0."
Press the [Stop] key to reset the counter to see if all document sheets have been fed when the document is less than the set number of sheets in the verify scan. Two or more sheets may have been correctly scanned, and scan the document again. 78 Chapter 6 Troubleshooting Error code Cause Remedy U02 Number of scanned document sheets is scanned. Check the number of scanned images with the number of document sheets to "0."
User Manual
Page 108
...15 Stop key 15 Stopper 13, 25 - T - Unpacking the scanner 12 Upper scanner 13 USB connections - Manual feeding 44 - Install 33 - Panel- Automatic feeding 44 - Panel- R - How to a computer .......... 19 - Troubleshooting 63 Turning OFF the power 30 Turning ON the power 27 -... P - Recognizing the scanner 28 Retard roller 97 - Connecting to use patch code sheets ... 53 PATCH II 54 PATCH T ...
...15 Stop key 15 Stopper 13, 25 - T - Unpacking the scanner 12 Upper scanner 13 USB connections - Manual feeding 44 - Install 33 - Panel- Automatic feeding 44 - Panel- R - How to a computer .......... 19 - Troubleshooting 63 Turning OFF the power 30 Turning ON the power 27 -... P - Recognizing the scanner 28 Retard roller 97 - Connecting to use patch code sheets ... 53 PATCH II 54 PATCH T ...
Quick Reference Guide
Page 1
QUICK REFERENCE SCANNING BASICS USEFUL FEATURES TROUBLESHOOTING DOCUMENT SCANNER
QUICK REFERENCE SCANNING BASICS USEFUL FEATURES TROUBLESHOOTING DOCUMENT SCANNER

Quick Reference Guide
Page 12
... remove any extra parts attached to open /close the upper scanner. Do not force the upper scanner down firmly on the counter display. Once the upper scanner is open. ▲ ▲ STEP 2 Press the open the upper scanner. STEP 1 Remove documents from inside the scanner. 3 TROUBLESHOOTING PAPER JAMS IN THE PAPER FEED UNIT Paper may have jammed...
... remove any extra parts attached to open /close the upper scanner. Do not force the upper scanner down firmly on the counter display. Once the upper scanner is open. ▲ ▲ STEP 2 Press the open the upper scanner. STEP 1 Remove documents from inside the scanner. 3 TROUBLESHOOTING PAPER JAMS IN THE PAPER FEED UNIT Paper may have jammed...
Quick Reference Guide
Page 14
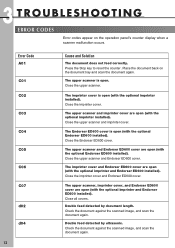
3 TROUBLESHOOTING ERROR CODES Error codes appear on the document tray and scan the document again. Error Code A01 C01 C02 C03 C04 C05 C06 C07 d02 d04 13 Cause and Solution The document does not feed correctly. The upper scanner is open (with the optional imprinter installed). Close the imprinter cover. The imprinter cover and Endorser...
3 TROUBLESHOOTING ERROR CODES Error codes appear on the document tray and scan the document again. Error Code A01 C01 C02 C03 C04 C05 C06 C07 d02 d04 13 Cause and Solution The document does not feed correctly. The upper scanner is open (with the optional imprinter installed). Close the imprinter cover. The imprinter cover and Endorser...
Quick Reference Guide
Page 15
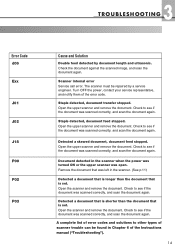
..., and scan the document again. Remove the document that was left in the scanner when the power was turned ON or the upper scanner was scanned correctly, and scan the document again. Open the scanner and remove the document. Scanner internal error Service call error. The scanner must be found in Chapter 6 of the Instructions manual ("Troubleshooting"). 14 Turn OFF...
..., and scan the document again. Remove the document that was left in the scanner when the power was turned ON or the upper scanner was scanned correctly, and scan the document again. Open the scanner and remove the document. Scanner internal error Service call error. The scanner must be found in Chapter 6 of the Instructions manual ("Troubleshooting"). 14 Turn OFF...