User Manual
Page 8
... Displayed 75 Chapter 7 Daily Cleaning 7.1 Daily Cleaning 80 Cleaning the Main Unit 80 Cleaning the Document Detection Sensor 81 Cleaning the Scanning Glasses and Rollers 81 Cleaning the Shading Plates 85 Cleaning the Guide Plate (When Using the Imprinter 87 Cleaning the... the Rollers 88 When to Replace Rollers 88 Resetting the Counter 89 Installing and Removing the Rollers 91 ◆ Installing and Removing Pickup Rollers 92 ◆ Installing and Removing Feed Rollers 94 ◆ Installing and Removing Retard Rollers 97 Specifications 100 Specifications for the Scanner 100 ...
... Displayed 75 Chapter 7 Daily Cleaning 7.1 Daily Cleaning 80 Cleaning the Main Unit 80 Cleaning the Document Detection Sensor 81 Cleaning the Scanning Glasses and Rollers 81 Cleaning the Shading Plates 85 Cleaning the Guide Plate (When Using the Imprinter 87 Cleaning the... the Rollers 88 When to Replace Rollers 88 Resetting the Counter 89 Installing and Removing the Rollers 91 ◆ Installing and Removing Pickup Rollers 92 ◆ Installing and Removing Feed Rollers 94 ◆ Installing and Removing Retard Rollers 97 Specifications 100 Specifications for the Scanner 100 ...
User Manual
Page 10
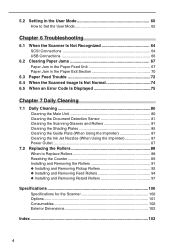
... or dusty locations. Never attempt to disconnect the cord from the scanner. Doing so might cause a fire or electrical shock. ■ Never place heavy objects on the scanner connector with moving parts, especially the rollers that feed the scanner. Such objects may tip or fall over , and cause an injury...be injured unexpectedly. Doing so might result in a malfunction. 6 If you accidentally spill liquid or drop a metal object into the scanner. CAUTION ■ To avoid damage to stop the scanner. ■ Be very careful when you are loading a document or removing a paper jam.
... or dusty locations. Never attempt to disconnect the cord from the scanner. Doing so might cause a fire or electrical shock. ■ Never place heavy objects on the scanner connector with moving parts, especially the rollers that feed the scanner. Such objects may tip or fall over , and cause an injury...be injured unexpectedly. Doing so might result in a malfunction. 6 If you accidentally spill liquid or drop a metal object into the scanner. CAUTION ■ To avoid damage to stop the scanner. ■ Be very careful when you are loading a document or removing a paper jam.
User Manual
Page 17
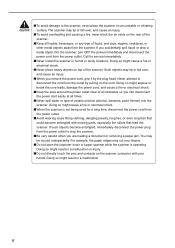
...document you are going to clean the rollers or if paper becomes jammed. (See p.70.) Document Tray Extension/ Extension Wire Pull this tray. Operation Panel (See p.15.) Document Guide Set the paper guide for the width of each part. Power Switch (See p.27.) Upper Scanner Open the upper scanner... to scan. Do not open the imprinter cover when the optional imprinter is not installed. CAUTION 13 Before you connect the DR-7580/9080C, take a few minutes to familiarize yourself with the main parts. ◆ Front View Document Eject Tray ...
...document you are going to clean the rollers or if paper becomes jammed. (See p.70.) Document Tray Extension/ Extension Wire Pull this tray. Operation Panel (See p.15.) Document Guide Set the paper guide for the width of each part. Power Switch (See p.27.) Upper Scanner Open the upper scanner... to scan. Do not open the imprinter cover when the optional imprinter is not installed. CAUTION 13 Before you connect the DR-7580/9080C, take a few minutes to familiarize yourself with the main parts. ◆ Front View Document Eject Tray ...
User Manual
Page 46
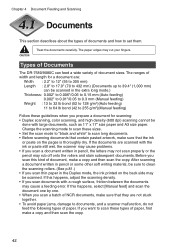
... off onto the rollers and stain subsequent documents. If the documents are : Width : 2.2" to 12" (55 to 305 mm) Length : 2.8" to 17.0" (70 to 432 mm) (Documents up to 255 g/m2)(Manual feeding) Follow these types of width and length for a document are scanned with the ink or paste still wet, the scanner may cause a feeding...
... off onto the rollers and stain subsequent documents. If the documents are : Width : 2.2" to 12" (55 to 305 mm) Length : 2.8" to 17.0" (70 to 432 mm) (Documents up to 255 g/m2)(Manual feeding) Follow these types of width and length for a document are scanned with the ink or paste still wet, the scanner may cause a feeding...

User Manual
Page 48
...procedure until scanning begins, the count only mode for counting the number of sheets, and the patch code sheet for scanning a document varies depending on the scanner. CAUTION ■ Avoid wearing loose fitting clothing, dangling jewelry, long ties, or even long hair that feed the paper.... If such objects become entangled with moving parts, especially the rollers that could become entangled, immediately disconnect the power plug from the computer after the document is placed in the scanner. ● Panel-Feeding (See p.46.) This feeding mode is selected from ...
...procedure until scanning begins, the count only mode for counting the number of sheets, and the patch code sheet for scanning a document varies depending on the scanner. CAUTION ■ Avoid wearing loose fitting clothing, dangling jewelry, long ties, or even long hair that feed the paper.... If such objects become entangled with moving parts, especially the rollers that could become entangled, immediately disconnect the power plug from the computer after the document is placed in the scanner. ● Panel-Feeding (See p.46.) This feeding mode is selected from ...
User Manual
Page 76
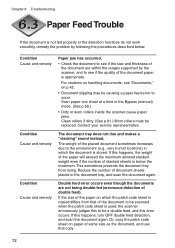
... Bypass (manual) mode. (See p.50.) • Dirty or worn rollers inside the scanner cause paper jams. Clean rollers if dirty. (See p.81.) Worn rollers must be causing a paper feed error to see "Documents," on which the document is copied differs from rising. This sometimes prevents the document tray from that copy. 72 Condition Cause and remedy Condition...
... Bypass (manual) mode. (See p.50.) • Dirty or worn rollers inside the scanner cause paper jams. Clean rollers if dirty. (See p.81.) Worn rollers must be causing a paper feed error to see "Documents," on which the document is copied differs from rising. This sometimes prevents the document tray from that copy. 72 Condition Cause and remedy Condition...

User Manual
Page 78
...the brightness is set too high. If the above remedies do not rectify the problem, contact your service representative. 74 If the document cannot be scanned correctly even if the scan conditions are inappropriate. For details on how to install the application, see the instruction ... on the image), one of the following and take the appropriate action. ● The scanning glasses or rollers in the scanner are dirty. If the scanning glasses or rollers in the scanner are dirty, that brightness is not compatible. A probable cause is that the interface card is set too ...
...the brightness is set too high. If the above remedies do not rectify the problem, contact your service representative. 74 If the document cannot be scanned correctly even if the scan conditions are inappropriate. For details on how to install the application, see the instruction ... on the image), one of the following and take the appropriate action. ● The scanning glasses or rollers in the scanner are dirty. If the scanning glasses or rollers in the scanner are dirty, that brightness is not compatible. A probable cause is that the interface card is set too ...
User Manual
Page 83
Chapter 7 Daily Cleaning This chapter describes daily cleaning of the scanner. 7.1 Daily Cleaning 80 Cleaning the Main Unit 80 Cleaning the Document Detection Sensor 81 Cleaning the Scanning Glasses and Rollers 81 Cleaning the Shading Plates 85 Cleaning the Guide Plate (When Using the Imprinter 87 Cleaning the Ink Jet Nozzles (When Using the Imprinter 87 Power Outlet 87 7.2 Replacing the Rollers 88 When to Replace the Rollers 88 Resetting the Counter 89 Installing and Removing the Rollers ........ 91
Chapter 7 Daily Cleaning This chapter describes daily cleaning of the scanner. 7.1 Daily Cleaning 80 Cleaning the Main Unit 80 Cleaning the Document Detection Sensor 81 Cleaning the Scanning Glasses and Rollers 81 Cleaning the Shading Plates 85 Cleaning the Guide Plate (When Using the Imprinter 87 Cleaning the Ink Jet Nozzles (When Using the Imprinter 87 Power Outlet 87 7.2 Replacing the Rollers 88 When to Replace the Rollers 88 Resetting the Counter 89 Installing and Removing the Rollers ........ 91
User Manual
Page 85
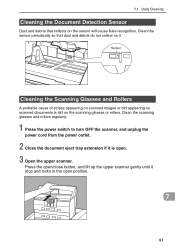
... power switch to turn OFF the scanner, and unplug the power cord from the power outlet. 2 Close the document eject tray extension if it is dirt on the scanning glasses or rollers. Press the open/close button, and lift up the upper scanner gently until it . Clean the sensor...sensor will cause false recognition. Sensor Cleaning the Scanning Glasses and Rollers A probable cause of stripes appearing on scanned images or dirt appearing on scanned documents is open. 3 Open the upper scanner. 7.1 Daily Cleaning Cleaning the Document Detection Sensor Dust and debris that dust and debris do not ...
... power switch to turn OFF the scanner, and unplug the power cord from the power outlet. 2 Close the document eject tray extension if it is dirt on the scanning glasses or rollers. Press the open/close button, and lift up the upper scanner gently until it . Clean the sensor...sensor will cause false recognition. Sensor Cleaning the Scanning Glasses and Rollers A probable cause of stripes appearing on scanned images or dirt appearing on scanned documents is open. 3 Open the upper scanner. 7.1 Daily Cleaning Cleaning the Document Detection Sensor Dust and debris that dust and debris do not ...

User Manual
Page 87
Feeding Rollers Pickup Rollers Feed Rollers Platen Rollers Retard Rollers 6 Remove the pickup roller, retard roller, and feed roller. (See "Installing and Removing the Rollers," on p.91.) 7 Use cloth from which all the water has been wrung out to wipe off the rollers. 7 83 Rollers are located at the positions indicated in the figure below. 7.1 Daily Cleaning 5 Wipe the rollers with a firmly wrung cloth moistened with water.
Feeding Rollers Pickup Rollers Feed Rollers Platen Rollers Retard Rollers 6 Remove the pickup roller, retard roller, and feed roller. (See "Installing and Removing the Rollers," on p.91.) 7 Use cloth from which all the water has been wrung out to wipe off the rollers. 7 83 Rollers are located at the positions indicated in the figure below. 7.1 Daily Cleaning 5 Wipe the rollers with a firmly wrung cloth moistened with water.

User Manual
Page 88
... (feeding of two or more document pages) occurs frequently in spite of your service representative. 84 If this happens, replace the rollers. Contact your having cleaned the rollers, a probable cause is roller friction. Chapter 7 Daily Cleaning 8 Replace the rollers that you hear it . Make sure that you press the upper scanner down firmly on both sides...
... (feeding of two or more document pages) occurs frequently in spite of your service representative. 84 If this happens, replace the rollers. Contact your having cleaned the rollers, a probable cause is roller friction. Chapter 7 Daily Cleaning 8 Replace the rollers that you hear it . Make sure that you press the upper scanner down firmly on both sides...
User Manual
Page 89
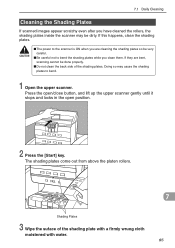
7.1 Daily Cleaning Cleaning the Shading Plates If scanned images appear scratchy even after you have cleaned the rollers, the shading plates inside the scanner may cause the shading plates to the scanner is ON when you clean them. If they are cleaning the shading plates so be very careful. ■ Be ... be dirty. The shading plates come out from above the platen rollers. 7 Shading Plates 3 Wipe the suface of the shading plates. If this happens, clean the shading plates. Press the open/close button, and lift up the upper scanner gently until it stops and locks in the open position. 2 ...
7.1 Daily Cleaning Cleaning the Shading Plates If scanned images appear scratchy even after you have cleaned the rollers, the shading plates inside the scanner may cause the shading plates to the scanner is ON when you clean them. If they are cleaning the shading plates so be very careful. ■ Be ... be dirty. The shading plates come out from above the platen rollers. 7 Shading Plates 3 Wipe the suface of the shading plates. If this happens, clean the shading plates. Press the open/close button, and lift up the upper scanner gently until it stops and locks in the open position. 2 ...
User Manual
Page 92
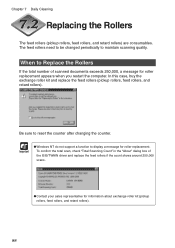
... rollers need to be changed periodically to reset the counter after changing the counter. To confirm the total scan, check "Total Scanning Count" in the "About" dialog box of scanned documents exceeds 250,000, a message for roller replacement. In this case, buy the exchange roller kit and replace the feed rollers (pickup rollers, feed rollers, and retard rollers...
... rollers need to be changed periodically to reset the counter after changing the counter. To confirm the total scan, check "Total Scanning Count" in the "About" dialog box of scanned documents exceeds 250,000, a message for roller replacement. In this case, buy the exchange roller kit and replace the feed rollers (pickup rollers, feed rollers, and retard rollers...

User Manual
Page 93
7.2 Replacing the Rollers Resetting the Counter Do the following procedure to reset the counter after replacing the feed rollers. 1 Click the [Start] button, and then click [Settings]-[Control Panel]. 2 Double click on the [Scanners and Cameras] icon ● Windows NT do not display the "Scanners and Cameras" icon. ● The displayed dialog box differs depending on which Windows operating system Note you are using. 7 89
7.2 Replacing the Rollers Resetting the Counter Do the following procedure to reset the counter after replacing the feed rollers. 1 Click the [Start] button, and then click [Settings]-[Control Panel]. 2 Double click on the [Scanners and Cameras] icon ● Windows NT do not display the "Scanners and Cameras" icon. ● The displayed dialog box differs depending on which Windows operating system Note you are using. 7 89

User Manual
Page 95
... pickup, feed, or retard rollers. Pickup Rollers Feed Rollers Retard Rollers 7 91 7.2 Replacing the Rollers Installing and Removing the Rollers Follow the procedure shown below to remove and install the rollers when you remove or install the rollers. Leaving the power turned ON may damage them. CAUTION ■ Turn OFF the power to the scanner and unplug the power...
... pickup, feed, or retard rollers. Pickup Rollers Feed Rollers Retard Rollers 7 91 7.2 Replacing the Rollers Installing and Removing the Rollers Follow the procedure shown below to remove and install the rollers when you remove or install the rollers. Leaving the power turned ON may damage them. CAUTION ■ Turn OFF the power to the scanner and unplug the power...

User Manual
Page 96
Chapter 7 Daily Cleaning ◆ Installing and Removing Pickup Rollers 1 Open the upper scanner. 2 Open the roller cover. 3 Open the roller holder and remove the pickup rollers. 4 Position the square axle of the pickup roller on the left and insert the new pickup rollers. 92
Chapter 7 Daily Cleaning ◆ Installing and Removing Pickup Rollers 1 Open the upper scanner. 2 Open the roller cover. 3 Open the roller holder and remove the pickup rollers. 4 Position the square axle of the pickup roller on the left and insert the new pickup rollers. 92

User Manual
Page 97
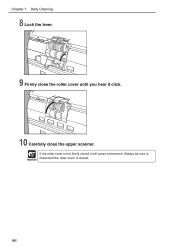
7.2 Replacing the Rollers 5 Firmly close the roller holder until you hear it click. 6 Firmly close the roller cover until you hear it will cause a feed error. Important Always be sure to check that the roller holder and roller cover are not firmly closed . 7 93 If the roller holder and roller cover are closed it click. 7 Carefully close the upper scanner.
7.2 Replacing the Rollers 5 Firmly close the roller holder until you hear it click. 6 Firmly close the roller cover until you hear it will cause a feed error. Important Always be sure to check that the roller holder and roller cover are not firmly closed . 7 93 If the roller holder and roller cover are closed it click. 7 Carefully close the upper scanner.

User Manual
Page 98
Chapter 7 Daily Cleaning ◆ Installing and Removing Feed Rollers 1 Open the upper scanner. 2 Open the roller cover. 3 Pull the lever that locks the feed rollers in place towards you. 4 Slide the feed rollers to the right, and then pull them towards you. 94
Chapter 7 Daily Cleaning ◆ Installing and Removing Feed Rollers 1 Open the upper scanner. 2 Open the roller cover. 3 Pull the lever that locks the feed rollers in place towards you. 4 Slide the feed rollers to the right, and then pull them towards you. 94

User Manual
Page 99
5 Remove the feed rollers. 7.2 Replacing the Rollers 6 Place the new feed rollers on the pin. 7 Set the feed rollers in place (q), and align the notch in the roller's axle with the shaft on the scanner (w). 7 95
5 Remove the feed rollers. 7.2 Replacing the Rollers 6 Place the new feed rollers on the pin. 7 Set the feed rollers in place (q), and align the notch in the roller's axle with the shaft on the scanner (w). 7 95
User Manual
Page 100
If the roller cover is closed it click. 10 Carefully close the upper scanner. Chapter 7 Daily Cleaning 8 Lock the lever. 9 Firmly close the roller cover until you hear it will cause a feed error. Always be sure to Important check that the roller cover is not firmly closed . 96
If the roller cover is closed it click. 10 Carefully close the upper scanner. Chapter 7 Daily Cleaning 8 Lock the lever. 9 Firmly close the roller cover until you hear it will cause a feed error. Always be sure to Important check that the roller cover is not firmly closed . 96


