User Manual
Page 8
...Displayed 75 Chapter 7 Daily Cleaning 7.1 Daily Cleaning 80 Cleaning the Main Unit 80 Cleaning the Document Detection Sensor 81 Cleaning the Scanning Glasses and Rollers 81 Cleaning the Shading Plates 85 Cleaning the Guide Plate (When Using the Imprinter 87 Cleaning ... the Rollers 88 When to Replace Rollers 88 Resetting the Counter 89 Installing and Removing the Rollers 91 ◆ Installing and Removing Pickup Rollers 92 ◆ Installing and Removing Feed Rollers 94 ◆ Installing and Removing Retard Rollers 97 Specifications 100 Specifications for the Scanner 100 Options...
...Displayed 75 Chapter 7 Daily Cleaning 7.1 Daily Cleaning 80 Cleaning the Main Unit 80 Cleaning the Document Detection Sensor 81 Cleaning the Scanning Glasses and Rollers 81 Cleaning the Shading Plates 85 Cleaning the Guide Plate (When Using the Imprinter 87 Cleaning ... the Rollers 88 When to Replace Rollers 88 Resetting the Counter 89 Installing and Removing the Rollers 91 ◆ Installing and Removing Pickup Rollers 92 ◆ Installing and Removing Feed Rollers 94 ◆ Installing and Removing Retard Rollers 97 Specifications 100 Specifications for the Scanner 100 Options...

User Manual
Page 87
7.1 Daily Cleaning 5 Wipe the rollers with a firmly wrung cloth moistened with water. Rollers are located at the positions indicated in the figure below. Feeding Rollers Pickup Rollers Feed Rollers Platen Rollers Retard Rollers 6 Remove the pickup roller, retard roller, and feed roller. (See "Installing and Removing the Rollers," on p.91.) 7 Use cloth from which all the water has been wrung out to wipe off the rollers. 7 83
7.1 Daily Cleaning 5 Wipe the rollers with a firmly wrung cloth moistened with water. Rollers are located at the positions indicated in the figure below. Feeding Rollers Pickup Rollers Feed Rollers Platen Rollers Retard Rollers 6 Remove the pickup roller, retard roller, and feed roller. (See "Installing and Removing the Rollers," on p.91.) 7 Use cloth from which all the water has been wrung out to wipe off the rollers. 7 83
User Manual
Page 92
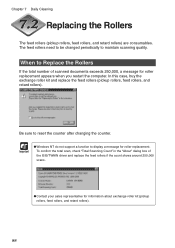
..." dialog box of scanned documents exceeds 250,000, a message for roller replacement appears when you restart the computer. The feed rollers need to be changed periodically to reset the counter after changing the counter. Be sure to maintain scanning quality. Chapter 7 Daily Cleaning Replacing the Rollers The feed rollers (pickup rollers, feed rollers, and retard rollers) are consumables. In...
..." dialog box of scanned documents exceeds 250,000, a message for roller replacement appears when you restart the computer. The feed rollers need to be changed periodically to reset the counter after changing the counter. Be sure to maintain scanning quality. Chapter 7 Daily Cleaning Replacing the Rollers The feed rollers (pickup rollers, feed rollers, and retard rollers) are consumables. In...

User Manual
Page 95
Pickup Rollers Feed Rollers Retard Rollers 7 91 Forcing the rollers into position may result in an electrical shock. ■ When removing or replacing the rollers be careful to not use too much force. 7.2 Replacing the Rollers Installing and Removing the Rollers Follow the procedure shown below to remove and install the rollers when you need to the scanner and unplug the...
Pickup Rollers Feed Rollers Retard Rollers 7 91 Forcing the rollers into position may result in an electrical shock. ■ When removing or replacing the rollers be careful to not use too much force. 7.2 Replacing the Rollers Installing and Removing the Rollers Follow the procedure shown below to remove and install the rollers when you need to the scanner and unplug the...

User Manual
Page 101
7.2 Replacing the Rollers ◆ Installing and Removing Retard Rollers 1 Open the upper scanner. 2 Remove the roller cover. 3 Lift the roller clamp lever (q) and slide it to the left (w). 7 97
7.2 Replacing the Rollers ◆ Installing and Removing Retard Rollers 1 Open the upper scanner. 2 Remove the roller cover. 3 Lift the roller clamp lever (q) and slide it to the left (w). 7 97

User Manual
Page 102
Chapter 7 Daily Cleaning 4 Move the retard rollers to the left and remove them. 5 Set the new retard rollers in place, and align the notch in the roller's axle with the shaft on the scanner. 6 Slide the roller clamp lever to the right, and push it into the hole in the retard rollers. 98
Chapter 7 Daily Cleaning 4 Move the retard rollers to the left and remove them. 5 Set the new retard rollers in place, and align the notch in the roller's axle with the shaft on the scanner. 6 Slide the roller clamp lever to the right, and push it into the hole in the retard rollers. 98

User Manual
Page 103
... the hook is completely latched and the roller cover is loose, the document tray will catch on it causing the scanner to not operate correctly. ■ Never clean the scanner with any kind of the scanner to clamp the retard rollers in place. 8 Put back the roller cover. 9 Carefully close the upper scanner. Doing so might cause a fire and...
... the hook is completely latched and the roller cover is loose, the document tray will catch on it causing the scanner to not operate correctly. ■ Never clean the scanner with any kind of the scanner to clamp the retard rollers in place. 8 Put back the roller cover. 9 Carefully close the upper scanner. Doing so might cause a fire and...
User Manual
Page 108
... ... 53 PATCH II 54 PATCH T 54 Power cord 23 Power cord connector 14 Power switch 13, 27 - Panel- Recognizing the scanner 28 Retard roller 97 - U - Operating environment 18 USB connector 14 User mode 60 - - Manual feeding 44 - Connecting to use the software 36... - Install 33 - Unpacking the scanner 12 Upper scanner 13 USB connections - Operating environment 18 SCSI connector 14 Setup disc 12 Skew detection ...
... ... 53 PATCH II 54 PATCH T 54 Power cord 23 Power cord connector 14 Power switch 13, 27 - Panel- Recognizing the scanner 28 Retard roller 97 - U - Operating environment 18 USB connector 14 User mode 60 - - Manual feeding 44 - Connecting to use the software 36... - Install 33 - Unpacking the scanner 12 Upper scanner 13 USB connections - Operating environment 18 SCSI connector 14 Setup disc 12 Skew detection ...
Quick Reference Guide
Page 11
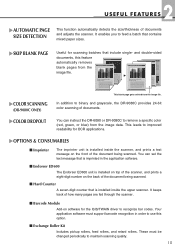
... this option. ■ Exchange Roller Kit Includes pickup rollers, feed rollers, and retard rollers. Your application software must be accounted for the transportation of the document being scanned. Our diversified range of documents and adjusts the scanner. iners. OPTIONS & CONSUMABLES ..., reefer, asnudbsoipdeianriecso.ntAasiniesrsv.isDibrylefreight containers come in this feature automatically removes blank pages from a Metropolis location; You can instruct the DR-6080 or DR-9080C to the Industrial Park; 2 U S E F U L F E AT U R E S AUTOMATIC PAGE SIZE DETECTION This...
... this option. ■ Exchange Roller Kit Includes pickup rollers, feed rollers, and retard rollers. Your application software must be accounted for the transportation of the document being scanned. Our diversified range of documents and adjusts the scanner. iners. OPTIONS & CONSUMABLES ..., reefer, asnudbsoipdeianriecso.ntAasiniesrsv.isDibrylefreight containers come in this feature automatically removes blank pages from a Metropolis location; You can instruct the DR-6080 or DR-9080C to the Industrial Park; 2 U S E F U L F E AT U R E S AUTOMATIC PAGE SIZE DETECTION This...


