
DC310/DC320 Instruction Manual
Page 2
...radio frequency energy and, if not installed and use in accordance with the digital video camcorder must accept any changes or modifications to the equipment unless otherwise specified in the manual. Inc. Tel No. (516)328-5600 CAUTION: TO PREVENT ELECTRIC SHOCK, MATCH...with arrowhead symbol, within the product's enclosure, that interference will not occur in Subpart B of Part 15 of the equipment. Canon U.S.A. One Canon Plaza, Lake Success, NY 11042, U.S.A. NO USER-SERVICEABLE PARTS INSIDE. REFER SERVICING TO QUALIFIED SERVICE PERSONNEL. Important Introduction Usage Instructions...
...radio frequency energy and, if not installed and use in accordance with the digital video camcorder must accept any changes or modifications to the equipment unless otherwise specified in the manual. Inc. Tel No. (516)328-5600 CAUTION: TO PREVENT ELECTRIC SHOCK, MATCH...with arrowhead symbol, within the product's enclosure, that interference will not occur in Subpart B of Part 15 of the equipment. Canon U.S.A. One Canon Plaza, Lake Success, NY 11042, U.S.A. NO USER-SERVICEABLE PARTS INSIDE. REFER SERVICING TO QUALIFIED SERVICE PERSONNEL. Important Introduction Usage Instructions...

DC310/DC320 Instruction Manual
Page 3
... maintenance instructions should be walked on an unstable cart, stand, tripod, bracket or table. Do not use accessories not recommended in this manual. 6 Accessories - If you are not sure of the type of the lead-in rainy/moist situations. 9 Placing or Moving - This...indicated on the product and in this manual as to grounding electrodes, and requirements for future reference. 3 Heed Warnings - They may be retained for the grounding electrode. If the plug still fails to fit, contact your electrician to the Canon DVD Camcorder DC320/DC310 A and all its accessories...
... maintenance instructions should be walked on an unstable cart, stand, tripod, bracket or table. Do not use accessories not recommended in this manual. 6 Accessories - If you are not sure of the type of the lead-in rainy/moist situations. 9 Placing or Moving - This...indicated on the product and in this manual as to grounding electrodes, and requirements for future reference. 3 Heed Warnings - They may be retained for the grounding electrode. If the plug still fails to fit, contact your electrician to the Canon DVD Camcorder DC320/DC310 A and all its accessories...

DC310/DC320 Instruction Manual
Page 6
However, to be sure, always refer to the instruction manual of the external device and make sure it on a DVD player. Discs that have not been tested by Canon may result in incorrect recording/playback or in damage to record or play it is compatible before you play ...disc. 6 Note that were recorded, initialized or finalized with this camcorder DVD discs that attempting to the camcorder or in a breeze. Playback on external devices Make sure to play back your recordings on a DVD player and share your nearest Canon office. For a summary, you can result in not being ...
However, to be sure, always refer to the instruction manual of the external device and make sure it on a DVD player. Discs that have not been tested by Canon may result in incorrect recording/playback or in damage to record or play it is compatible before you play ...disc. 6 Note that were recorded, initialized or finalized with this camcorder DVD discs that attempting to the camcorder or in a breeze. Playback on external devices Make sure to play back your recordings on a DVD player and share your nearest Canon office. For a summary, you can result in not being ...

DC310/DC320 Instruction Manual
Page 8
... a DVD Disc 6 Advantages of Using DVDs 11 About this Manual 12 Getting to Know the Camcorder 12 Supplied Accessories 13 Components Guide 15 Screen Displays Preparations 18 Getting Started 18 Charging the Battery Pack 19 Preparing the Accessories 20 Basic Operation of the Camcorder 20 Power Switch 21 Operating Modes 21 Joystick and...
... a DVD Disc 6 Advantages of Using DVDs 11 About this Manual 12 Getting to Know the Camcorder 12 Supplied Accessories 13 Components Guide 15 Screen Displays Preparations 18 Getting Started 18 Charging the Battery Pack 19 Preparing the Accessories 20 Basic Operation of the Camcorder 20 Power Switch 21 Operating Modes 21 Joystick and...

DC310/DC320 Instruction Manual
Page 9
...) 37 Additional Functions 37 : Special Scene Recording Programs 39 Flexible Recording: Changing the Shutter Speed 40 LCD Video Light 40 Self Timer 41 Manual Focus Adjustment 42 Manual Exposure Adjustment 42 White Balance 43 Image Effects 44 Digital Effects 45 Managing Scenes and the Disc 45 Creating a Playlist 46 Moving Scenes in...
...) 37 Additional Functions 37 : Special Scene Recording Programs 39 Flexible Recording: Changing the Shutter Speed 40 LCD Video Light 40 Self Timer 41 Manual Focus Adjustment 42 Manual Exposure Adjustment 42 White Balance 43 Image Effects 44 Digital Effects 45 Managing Scenes and the Disc 45 Creating a Playlist 46 Moving Scenes in...
DC310/DC320 Instruction Manual
Page 11
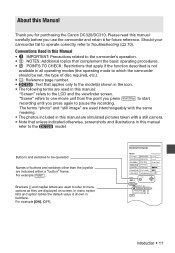
...a "button" frame. Brackets [ ] and capital letters are used in this manual: "Screen" refers to the model(s) shown in boldface. Conventions Used in this Manual • IMPORTANT: Precautions related to the camcorder's operation. • NOTES: Additional topics that complement the basic operating procedures. &#...is not available in this manual refer to the model. For example [ON], [OFF]. Please read this manual carefully before you use the camcorder and retain it for purchasing the Canon DC320/DC310. For example FUNC. . About this Manual Thank you for future reference....
...a "button" frame. Brackets [ ] and capital letters are used in this manual: "Screen" refers to the model(s) shown in boldface. Conventions Used in this Manual • IMPORTANT: Precautions related to the camcorder's operation. • NOTES: Additional topics that complement the basic operating procedures. &#...is not available in this manual refer to the model. For example [ON], [OFF]. Please read this manual carefully before you use the camcorder and retain it for purchasing the Canon DC320/DC310. For example FUNC. . About this Manual Thank you for future reference....

DC310/DC320 Instruction Manual
Page 15
... ( 42) Image effect ( 43) LCD video light ( 40) Digital effects ( 44) Recording mode ( 31) Disc type DVD-R, DVD-RW ( 5) DVD-R DL, Finalized disc mark ( 48) Manual focus ( 41) Image stabilizer ( 65) Disc operation Time code/Playback time (hours : minutes : seconds) Remaining recording time on the disc Remaining battery charge ( 17) Wind...
... ( 42) Image effect ( 43) LCD video light ( 40) Digital effects ( 44) Recording mode ( 31) Disc type DVD-R, DVD-RW ( 5) DVD-R DL, Finalized disc mark ( 48) Manual focus ( 41) Image stabilizer ( 65) Disc operation Time code/Playback time (hours : minutes : seconds) Remaining recording time on the disc Remaining battery charge ( 17) Wind...

DC310/DC320 Instruction Manual
Page 16
... ( 42) Image effect ( 43) LCD video light ( 40) Digital effects ( 44) Drive mode ( 56) Still image quality/size ( 52) Manual focus ( 41) Number of still images available on the memory card Self timer ( 40) AF frame ( 57) Joystick guide ( 21) Focus/exposure automatically... set and locked ( 51) Camcorder shake warning ( 65) Image number ( 17) Current image / Total number of images Histogram ( 58) Date and time of recording Image protection mark ( 58) Manual exposure ( 42) Image size ( 52) File size Aperture value ( 39)...
... ( 42) Image effect ( 43) LCD video light ( 40) Digital effects ( 44) Drive mode ( 56) Still image quality/size ( 52) Manual focus ( 41) Number of still images available on the memory card Self timer ( 40) AF frame ( 57) Joystick guide ( 21) Focus/exposure automatically... set and locked ( 51) Camcorder shake warning ( 65) Image number ( 17) Current image / Total number of images Histogram ( 58) Date and time of recording Image protection mark ( 58) Manual exposure ( 42) Image size ( 52) File size Aperture value ( 39)...

DC310/DC320 Instruction Manual
Page 21
...explained are given, the function is available in the operating mode shown and indicates that the function is not available. Operating Modes The camcorder's operating mode is determined by the icon . In the illustrations of this is indicated by the switch and the position of the guide..., these positions may be empty or show a different icon than those relevant to save the settings or confirm an action. On menu screens, this manual, positions other than the one on a 51 memory card (movies) Playing movies from a disc 34 (Green) (still images) Viewing still images ...
...explained are given, the function is available in the operating mode shown and indicates that the function is not available. Operating Modes The camcorder's operating mode is determined by the icon . In the illustrations of this is indicated by the switch and the position of the guide..., these positions may be empty or show a different icon than those relevant to save the settings or confirm an action. On menu screens, this manual, positions other than the one on a 51 memory card (movies) Playing movies from a disc 34 (Green) (still images) Viewing still images ...

DC310/DC320 Instruction Manual
Page 23
... from the left side column when you first open directly the setup menus screen. • In the index screen (DVD-RW discs in this Manual In this manual, the arrow is an example of settings. 4 Select ( ) the setting you want to save the setting. 6 Press FUNC. . The title of Preparations • 23...
... from the left side column when you first open directly the setup menus screen. • In the index screen (DVD-RW discs in this Manual In this manual, the arrow is an example of settings. 4 Select ( ) the setting you want to save the setting. 6 Press FUNC. . The title of Preparations • 23...
DC310/DC320 Instruction Manual
Page 29
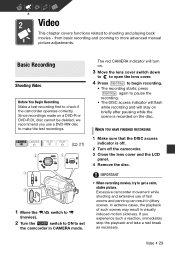
... red CAMERA indicator will stay on briefly after pausing while the scene is off. 2 Turn off the camcorder. 3 Close the lens cover and the LCD panel. 4 Remove the disc. Excessive camcorder movement while shooting and extensive use a DVD-RW disc to make the test recordings. ( 21) 1...may result in jittery scenes. Basic Recording Basic Recording Shooting Video Before You Begin Recording Make a test recording first to more advanced manual picture adjustments. IMPORTANT • When recording movies, try to shooting and playing back movies - press Start/Stop again to begin ...
... red CAMERA indicator will stay on briefly after pausing while the scene is off. 2 Turn off the camcorder. 3 Close the lens cover and the LCD panel. 4 Remove the disc. Excessive camcorder movement while shooting and extensive use a DVD-RW disc to make the test recordings. ( 21) 1...may result in jittery scenes. Basic Recording Basic Recording Shooting Video Before You Begin Recording Make a test recording first to more advanced manual picture adjustments. IMPORTANT • When recording movies, try to shooting and playing back movies - press Start/Stop again to begin ...

DC310/DC320 Instruction Manual
Page 33
... standby mode, the following actions while in standby mode (while the standby lamp is on when it . Manual exposure adjustment returns to full wide angle W. • The camcorder will shut off if left in order to check it enters the standby mode. 2 When you can play back the last ...scene recorded in standby mode for 10 minutes, regardless of time until the camcorder is ready to start recording within approx. 1 second*, ensuring you do not miss important shooting opportunities. * The exact time required until Even in...
... standby mode, the following actions while in standby mode (while the standby lamp is on when it . Manual exposure adjustment returns to full wide angle W. • The camcorder will shut off if left in order to check it enters the standby mode. 2 When you can play back the last ...scene recorded in standby mode for 10 minutes, regardless of time until the camcorder is ready to start recording within approx. 1 second*, ensuring you do not miss important shooting opportunities. * The exact time required until Even in...

DC310/DC320 Instruction Manual
Page 38
...appear on the screen. - Autofocus may leave a trailing afterimage. - Check the image on cloudy days or in other modes. To avoid camcorder shake, we recommend using a tripod. [ PORTRAIT] The camcorder uses a large aperture, achieving a focus on the subject while blurring other distracting details. [ SPORTS] Use this mode to record sports scenes... places. Moving subjects may not work as well as the shutter speed slows down. 38 • Video In such case, adjust the focus manually. • [ SNOW]/[ BEACH] - The subject may become overexposed on the screen. • [ FIREWORKS] -
...appear on the screen. - Autofocus may leave a trailing afterimage. - Check the image on cloudy days or in other modes. To avoid camcorder shake, we recommend using a tripod. [ PORTRAIT] The camcorder uses a large aperture, achieving a focus on the subject while blurring other distracting details. [ SPORTS] Use this mode to record sports scenes... places. Moving subjects may not work as well as the shutter speed slows down. 38 • Video In such case, adjust the focus manually. • [ SNOW]/[ BEACH] - The subject may become overexposed on the screen. • [ FIREWORKS] -

DC310/DC320 Instruction Manual
Page 41
...; Night scenes ( 21) POINTS TO CHECK Adjust the zoom before you operate the zoom or the joystick ( ), changes to "MF" and the camcorder returns to manual focusing mode. 3 Push the joystick ( ) toward [NEXT] to display it ( ) toward for a closer focal distance. • Pushing the ... Push the joystick ( ) toward for more than 2 seconds. • appears. • Pushing the joystick ( ) toward [FOCUS] again will return the camcorder to autofocus. 4 Push the joystick ( ) toward [FOCUS]. Mode switch: FOCUS NEXT 1 If the joystick guide does not appear on the following subjects. "...
...; Night scenes ( 21) POINTS TO CHECK Adjust the zoom before you operate the zoom or the joystick ( ), changes to "MF" and the camcorder returns to manual focusing mode. 3 Push the joystick ( ) toward [NEXT] to display it ( ) toward for a closer focal distance. • Pushing the ... Push the joystick ( ) toward for more than 2 seconds. • appears. • Pushing the joystick ( ) toward [FOCUS] again will return the camcorder to autofocus. 4 Push the joystick ( ) toward [FOCUS]. Mode switch: FOCUS NEXT 1 If the joystick guide does not appear on the following subjects. "...

DC310/DC320 Instruction Manual
Page 42
...image as required. • The adjustment range and the length of the exposure adjustment indicator will cancel the exposure lock and return the camcorder to lock and save the exposure setting. Use this , you operate the zoom during exposure lock, the brightness of the picture. &#...press to display it . 2 Push the joystick ( ) toward [NEXT] to automatic exposure. 4 Push the joystick ( ) toward [EXP]. If you can manually adjust the exposure. ( 21) POINTS TO CHECK Mode switch: (except for the Special Scene recording programs) Options [ AUTO] Default value Settings are...
...image as required. • The adjustment range and the length of the exposure adjustment indicator will cancel the exposure lock and return the camcorder to lock and save the exposure setting. Use this , you operate the zoom during exposure lock, the brightness of the picture. &#...press to display it . 2 Push the joystick ( ) toward [NEXT] to automatic exposure. 4 Push the joystick ( ) toward [EXP]. If you can manually adjust the exposure. ( 21) POINTS TO CHECK Mode switch: (except for the Special Scene recording programs) Options [ AUTO] Default value Settings are...

DC310/DC320 Instruction Manual
Page 49
... on a Finalized Disc 1 Turn on the TV and DVD player. 2 Insert the finalized disc in VIDEO mode - - Unfinalize a disc to the instruction manual and help modules of your DVD playback software. Restrictions after it on DVD players compatible with your DVD device you need to have DVD playback... DL you want to play it was finalized. ( 21) POINTS TO CHECK Disc type: DVD-RW • VIDEO mode • Finalized Power the camcorder using the compact power adapter or a fully charged battery pack. ON A DVD PLAYER NOTES • DVD-RW discs recorded in order to play the ...
... on a Finalized Disc 1 Turn on the TV and DVD player. 2 Insert the finalized disc in VIDEO mode - - Unfinalize a disc to the instruction manual and help modules of your DVD playback software. Restrictions after it on DVD players compatible with your DVD device you need to have DVD playback... DL you want to play it was finalized. ( 21) POINTS TO CHECK Disc type: DVD-RW • VIDEO mode • Finalized Power the camcorder using the compact power adapter or a fully charged battery pack. ON A DVD PLAYER NOTES • DVD-RW discs recorded in order to play the ...
DC310/DC320 Instruction Manual
Page 51
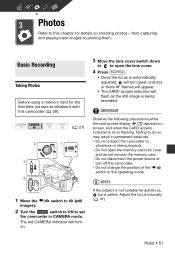
... time, be sure to initialize it with this chapter for details on shooting photos - The red CAMERA indicator will turn off the camcorder. - Do not subject the camcorder to printing them. NOTES If the subject is being recorded. Do not open the lens cover. 4 Press Start/Stop . •...the memory card slot cover and do so may result in CAMERA mode. Failing to this camcorder ( 59). ( 21) 1 Move the / switch to (still images). 2 Turn the switch to ON to set the camcorder in permanent data loss. - from capturing and playing back images to vibrations or strong impacts....
... time, be sure to initialize it with this chapter for details on shooting photos - The red CAMERA indicator will turn off the camcorder. - Do not subject the camcorder to printing them. NOTES If the subject is being recorded. Do not open the lens cover. 4 Press Start/Stop . •...the memory card slot cover and do so may result in CAMERA mode. Failing to this camcorder ( 59). ( 21) 1 Move the / switch to (still images). 2 Turn the switch to ON to set the camcorder in permanent data loss. - from capturing and playing back images to vibrations or strong impacts....

DC310/DC320 Instruction Manual
Page 59
...memory card will be erased and the memory card can be recovered. You can also use the following functions and features of the camcorder can be used either for shooting video or for the first time, or to erase all the still images on them was already... ( 41) • Manual exposure adjustment ( 42) • White balance ( 42) • Image effects ( 43) • Digital effects ( 44) Photos • 59 Initializing the Memory Card Initialize memory cards when you use them with this camcorder for taking photos. The following functions... All the image files will erase all data ...
...memory card will be erased and the memory card can be recovered. You can also use the following functions and features of the camcorder can be used either for shooting video or for the first time, or to erase all the still images on them was already... ( 41) • Manual exposure adjustment ( 42) • White balance ( 42) • Image effects ( 43) • Digital effects ( 44) Photos • 59 Initializing the Memory Card Initialize memory cards when you use them with this camcorder for taking photos. The following functions... All the image files will erase all data ...

DC310/DC320 Instruction Manual
Page 60
...it into a DPOF-compatible printer that allows you to specify the still images and information to 998 still images. Refer to the printer's instruction manual for Printing (Print Order) FUNC. ( 22) FUNC. [ PRINT ORDER] Press : The image selection screen appears. Selecting Still Images for the...the print order symbol . 3 Set ( ) the number of copies desired and press . You can print images on the camcorder's memory card by inserting the camcorder's memory card into the memory card slot of a printer compatible with DPOF (Digital Print Order Format). You can set print ...
...it into a DPOF-compatible printer that allows you to specify the still images and information to 998 still images. Refer to the printer's instruction manual for Printing (Print Order) FUNC. ( 22) FUNC. [ PRINT ORDER] Press : The image selection screen appears. Selecting Still Images for the...the print order symbol . 3 Set ( ) the number of copies desired and press . You can print images on the camcorder's memory card by inserting the camcorder's memory card into the memory card slot of a printer compatible with DPOF (Digital Print Order Format). You can set print ...

DC310/DC320 Instruction Manual
Page 61
Open the LCD panel to the instruction manual of the connected device. Connection Diagram Turn off all the devices when making the connection and refer also to access. Connecting to a TV or VCR ... Stereo Video Cable (supplied) Yellow White Red VIDEO AUDIO L R External Connections • 61 External Connections This chapter explains step-by-step how to connect your camcorder to the camcorder. Terminal on the camcorder Connecting cable 1 Output connection (signal flow ) to a TV or VCR with AV terminals.
Open the LCD panel to the instruction manual of the connected device. Connection Diagram Turn off all the devices when making the connection and refer also to access. Connecting to a TV or VCR ... Stereo Video Cable (supplied) Yellow White Red VIDEO AUDIO L R External Connections • 61 External Connections This chapter explains step-by-step how to connect your camcorder to the camcorder. Terminal on the camcorder Connecting cable 1 Output connection (signal flow ) to a TV or VCR with AV terminals.

