User Manual
Page 1
PRINTED IN JAPAN ENGLISH The Components Guide Preparations Shooting Playback/Erasing Menus and Settings Printing Basic Downloading Images to a Computer Camera User Guide Please Read This First This guide explains how to prepare the camera and use its basic features. CDI-E293-010 XX06XXX © 2006 CANON INC.
PRINTED IN JAPAN ENGLISH The Components Guide Preparations Shooting Playback/Erasing Menus and Settings Printing Basic Downloading Images to a Computer Camera User Guide Please Read This First This guide explains how to prepare the camera and use its basic features. CDI-E293-010 XX06XXX © 2006 CANON INC.
User Manual
Page 2
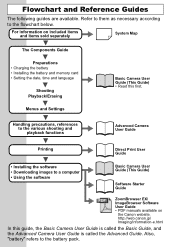
...battery pack. For information on the Canon website. Flowchart and Reference Guides The following guides are available. Also, "battery" refers to the flowchart below. Handling precautions, references to the various shooting and playback functions Advanced Camera User Guide Printing Direct Print User ...Shooting Playback/Erasing Menus and Settings Basic Camera User Guide (This Guide) • Read this guide, the Basic Camera User Guide is called the Basic Guide, and the Advanced Camera User Guide is called the Advanced Guide. http://web.canon.jp/ Imaging/information-e.html In this...
...battery pack. For information on the Canon website. Flowchart and Reference Guides The following guides are available. Also, "battery" refers to the flowchart below. Handling precautions, references to the various shooting and playback functions Advanced Camera User Guide Printing Direct Print User ...Shooting Playback/Erasing Menus and Settings Basic Camera User Guide (This Guide) • Read this guide, the Basic Camera User Guide is called the Basic Guide, and the Advanced Camera User Guide is called the Advanced Guide. http://web.canon.jp/ Imaging/information-e.html In this...

User Manual
Page 3
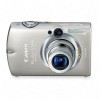
The Components Guide The Components Guide „ Front View Attaching the Wrist Strap* Wrist Strap Mount Microphone (Advanced Guide pp. 42, 86) AF-assist Beam (Advanced Guide p. 24) Red-Eye Reduction Lamp (Advanced Guide p. 33) Self-Timer Lamp (p. 16) Viewfinder Window (Advanced Guide p. 18) Flash (p. 14) Lens * When carrying the camera by the strap, be careful not to swing the camera or catch it on other items. 1
The Components Guide The Components Guide „ Front View Attaching the Wrist Strap* Wrist Strap Mount Microphone (Advanced Guide pp. 42, 86) AF-assist Beam (Advanced Guide p. 24) Red-Eye Reduction Lamp (Advanced Guide p. 33) Self-Timer Lamp (p. 16) Viewfinder Window (Advanced Guide p. 18) Flash (p. 14) Lens * When carrying the camera by the strap, be careful not to swing the camera or catch it on other items. 1

User Manual
Page 7
Never do the following circumstances. These actions may corrupt image data. • Shake or jolt the camera • Shut off the power, or open the memory card slot/battery cover „ Right Indicator Green: Ready to shoot Blinking Green... Orange: Ready to shoot (flash on) Blinking Orange: Ready to shoot (camera shake warning) „ Left Indicator Yellow: Macro mode/infinity mode/AF lock mode Blinking Yellow: Focusing difficulty (camera beeps once) The Components Guide 5 Indicators The camera indicators light or flash under the following while an indicator is flashing green....
Never do the following circumstances. These actions may corrupt image data. • Shake or jolt the camera • Shut off the power, or open the memory card slot/battery cover „ Right Indicator Green: Ready to shoot Blinking Green... Orange: Ready to shoot (flash on) Blinking Orange: Ready to shoot (camera shake warning) „ Left Indicator Yellow: Macro mode/infinity mode/AF lock mode Blinking Yellow: Focusing difficulty (camera beeps once) The Components Guide 5 Indicators The camera indicators light or flash under the following while an indicator is flashing green....

User Manual
Page 9
... inserting it in the direction of the arrow ( ) and hold it clicks into place. 2. To remove the battery, push the battery lock in the camera. Slide the lock release switch in the direction of the arrow ( ), and open the memory card slot/battery cover ( ). 2. Insert the memory card... until it backward may cause the camera to fail to recognize the memory card or to malfunction. Î See the Advanced Guide: Handling the Memory Card (p. 123). Î See the Advanced...
... inserting it in the direction of the arrow ( ) and hold it clicks into place. 2. To remove the battery, push the battery lock in the camera. Slide the lock release switch in the direction of the arrow ( ), and open the memory card slot/battery cover ( ). 2. Insert the memory card... until it backward may cause the camera to fail to recognize the memory card or to malfunction. Î See the Advanced Guide: Handling the Memory Card (p. 123). Î See the Advanced...

User Manual
Page 10
You can use SD memory cards, SDHC memory cards and MultiMediaCards with this guide. 8 These cards are collectively called memory cards in until you hear a click, then release it. „ To Remove the Memory Card Use a finger to push the memory card in this camera.
You can use SD memory cards, SDHC memory cards and MultiMediaCards with this guide. 8 These cards are collectively called memory cards in until you hear a click, then release it. „ To Remove the Memory Card Use a finger to push the memory card in this camera.
User Manual
Page 11
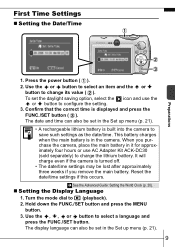
... the World Clock (p. 20). „ Setting the Display Language 1. The display language can also be lost after approximately three weeks if you purchase the camera, place the main battery in the Set up menu (p. 21). 9 Confirm that the correct time is turned off. • The date/time settings ...you remove the main battery. Preparations First Time Settings „ Setting the Date/Time 1. This battery charges when the main battery is built into the camera to configure the setting. 3. The date and time can also be set in the Set up menu (p. 21). • A rechargeable lithium battery ...
... the World Clock (p. 20). „ Setting the Display Language 1. The display language can also be lost after approximately three weeks if you purchase the camera, place the main battery in the Set up menu (p. 21). 9 Confirm that the correct time is turned off. • The date/time settings ...you remove the main battery. Preparations First Time Settings „ Setting the Date/Time 1. This battery charges when the main battery is built into the camera to configure the setting. 3. The date and time can also be set in the Set up menu (p. 21). • A rechargeable lithium battery ...
User Manual
Page 12
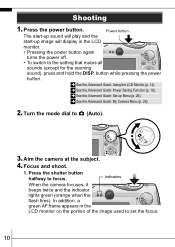
... the subject. 4. Indicators When the camera focuses, it beeps twice and the indicator lights green (orange when the flash fires). In addition, a green AF frame appears in the LCD monitor. • ... DISP. Press the power button. Power button The start-up sound will play and the start-up Menu (p. 26). Î See the Advanced Guide: My Camera Menu (p. 28). 2. button while pressing the power button. Î See the Advanced Guide: Using the LCD Monitor (p. 12). Î See the Advanced Guide: Power Saving...
... the subject. 4. Indicators When the camera focuses, it beeps twice and the indicator lights green (orange when the flash fires). In addition, a green AF frame appears in the LCD monitor. • ... DISP. Press the power button. Power button The start-up sound will play and the start-up Menu (p. 26). Î See the Advanced Guide: My Camera Menu (p. 28). 2. button while pressing the power button. Î See the Advanced Guide: Using the LCD Monitor (p. 12). Î See the Advanced Guide: Power Saving...
User Manual
Page 14
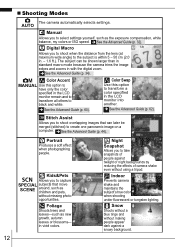
... transform all others to transform a color specified in with the digital zoom. Î See the Advanced Guide (p. 34). Indoor Prevents camera shake and maintains the subject's true color when shooting under fluorescent or tungsten lighting. Foliage Shoots trees and leaves-such as the exposure ... a tripod. Snow Shoots without a blue tinge and without making people appear dark against twilight or night backgrounds by reducing the effects of camera shake even without missing photo opportunities. Digital Macro Allows you to the subject is within 5 - 50 cm (2.0 in vivid colors. 12...
... transform all others to transform a color specified in with the digital zoom. Î See the Advanced Guide (p. 34). Indoor Prevents camera shake and maintains the subject's true color when shooting under fluorescent or tungsten lighting. Foliage Shoots trees and leaves-such as the exposure ... a tripod. Snow Shoots without a blue tinge and without making people appear dark against twilight or night backgrounds by reducing the effects of camera shake even without missing photo opportunities. Digital Macro Allows you to the subject is within 5 - 50 cm (2.0 in vivid colors. 12...
User Manual
Page 15
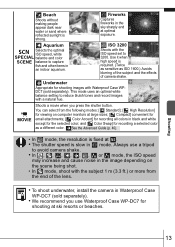
... recording a selected color as ISO 1600.) Avoids blurring of the subject and the effects of the lens. • To shoot underwater, install the camera in the image depending on computer monitors at optimal exposure. Shooting 13 MOVIE Shoots a movie when you use a tripod to 3200. Use it when... Accent] for recording all colors in black and white except for shooting images with the subject 1 m (3.3 ft.) or more from the end of camera shake. Beach Shoots without making people appear dark near water or sand where reflected sunlight is fixed at ski resorts or beaches. ISO 3200 Shoots...
... recording a selected color as ISO 1600.) Avoids blurring of the subject and the effects of the lens. • To shoot underwater, install the camera in the image depending on computer monitors at optimal exposure. Shooting 13 MOVIE Shoots a movie when you use a tripod to 3200. Use it when... Accent] for recording all colors in black and white except for shooting images with the subject 1 m (3.3 ft.) or more from the end of camera shake. Beach Shoots without making people appear dark near water or sand where reflected sunlight is fixed at ski resorts or beaches. ISO 3200 Shoots...
User Manual
Page 16
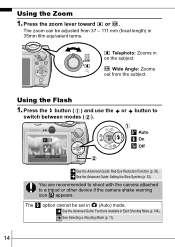
You are recommended to shoot with the camera attached to switch between modes ( ). The option cannot be adjusted from the subject. Auto On Off Î See the Advanced Guide: Red-Eye Reduction Function (p. ...; See the Advanced Guide: Functions Available in on the subject. Press the button ( ) and use the or button to a tripod or other device if the camera shake warning icon appears.
You are recommended to shoot with the camera attached to switch between modes ( ). The option cannot be adjusted from the subject. Auto On Off Î See the Advanced Guide: Red-Eye Reduction Function (p. ...; See the Advanced Guide: Functions Available in on the subject. Press the button ( ) and use the or button to a tripod or other device if the camera shake warning icon appears.

User Manual
Page 18
...; 2 sec. When [Shots] is set to more than 1, the self-timer sound only beeps before the first shot. *1 This may differ depending on your My Camera settings (Advanced Guide p. 104). *2 Default setting. *3 Default setting is set to 2 or more sec., the self-timer sound begins to display , or ( ). • When the...
...; 2 sec. When [Shots] is set to more than 1, the self-timer sound only beeps before the first shot. *1 This may differ depending on your My Camera settings (Advanced Guide p. 104). *2 Default setting. *3 Default setting is set to 2 or more sec., the self-timer sound begins to display , or ( ). • When the...
User Manual
Page 19
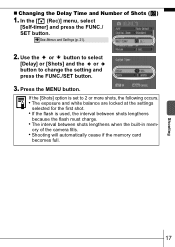
..., select [Self-timer] and press the FUNC./ SET button. Î See Menus and Settings (p. 21). 2. Shooting „ Changing the Delay Time and Number of the camera fills. • Shooting will automatically cease if the memory card becomes full. 17 If the [Shots] option is set to change the setting and press...
..., select [Self-timer] and press the FUNC./ SET button. Î See Menus and Settings (p. 21). 2. Shooting „ Changing the Delay Time and Number of the camera fills. • Shooting will automatically cease if the memory card becomes full. 17 If the [Shots] option is set to change the setting and press...
User Manual
Page 22
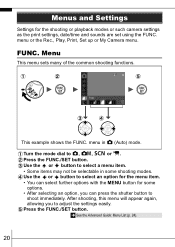
.... After shooting, this menu will appear again, allowing you can select further options with the MENU button for the shooting or playback modes or such camera settings as the print settings, date/time and sounds are set using the FUNC. Menus and Settings Settings for some shooting modes. menu or the... Rec., Play, Print, Set up or My Camera menu. Use the or button to adjust the settings easily. Use the or button to select an option for the menu item. • You can...
.... After shooting, this menu will appear again, allowing you can select further options with the MENU button for the shooting or playback modes or such camera settings as the print settings, date/time and sounds are set using the FUNC. Menus and Settings Settings for some shooting modes. menu or the... Rec., Play, Print, Set up or My Camera menu. Use the or button to adjust the settings easily. Use the or button to select an option for the menu item. • You can...

User Manual
Page 23
... by an ellipsis (...) can only be set with these menus. (Rec.) Menu (Set up) Menu (My Camera) Menu You can switch between menus. Use the or button to confirm the setting. Press the FUNC./SET button...be selectable in (Auto) mode. • In playback mode, the Play, Print, Set up and My Camera menus display. Use the or button to switch between menus. • You can also use the zoom lever ... selected. • This example shows the Rec. Rec., Play, Print, Set up and My Camera Menus Convenient settings for shooting, playback or printing can be set after pressing the FUNC./SET button to...
... by an ellipsis (...) can only be set with these menus. (Rec.) Menu (Set up) Menu (My Camera) Menu You can switch between menus. Use the or button to confirm the setting. Press the FUNC./SET button...be selectable in (Auto) mode. • In playback mode, the Play, Print, Set up and My Camera menus display. Use the or button to switch between menus. • You can also use the zoom lever ... selected. • This example shows the Rec. Rec., Play, Print, Set up and My Camera Menus Convenient settings for shooting, playback or printing can be set after pressing the FUNC./SET button to...
User Manual
Page 24
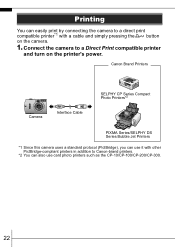
...printers such as the CP-10/CP-100/CP-200/CP-300. 22 Canon Brand Printers Camera Interface Cable SELPHY CP Series Compact Photo Printers*2 PIXMA Series/SELPHY DS Series Bubble Jet Printers *1 Since this camera uses a standard protocol (PictBridge), you can also use it with a cable... and simply pressing the button on the printer's power. Printing You can easily print by connecting the camera to a direct print compatible printer*1 with other PictBridge...
...printers such as the CP-10/CP-100/CP-200/CP-300. 22 Canon Brand Printers Camera Interface Cable SELPHY CP Series Compact Photo Printers*2 PIXMA Series/SELPHY DS Series Bubble Jet Printers *1 Since this camera uses a standard protocol (PictBridge), you can also use it with a cable... and simply pressing the button on the printer's power. Printing You can easily print by connecting the camera to a direct print compatible printer*1 with other PictBridge...
User Manual
Page 25
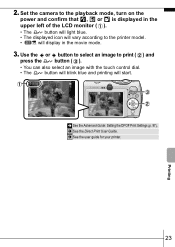
2. Set the camera to the playback mode, turn on the power and confirm that , or is displayed in the upper left of the LCD monitor ( ). • The button ...
2. Set the camera to the playback mode, turn on the power and confirm that , or is displayed in the upper left of the LCD monitor ( ). • The button ...

User Manual
Page 26
...See the Software Starter Guide for details. 24 Downloading Images to a Computer The following methods can be used to download images recorded by the camera to a computer. Some methods, depending on the OS used, may not be used with all the operating systems listed above. z z ...Computer System Requirements •Basic Guide (p. 25) •Software Starter Guide Connecting the Camera to a Computer •Basic Guide (p. 27) Downloading Images to Computer Connection Supplied Software Install It Downloading Method Computer Procedure...
...See the Software Starter Guide for details. 24 Downloading Images to a Computer The following methods can be used to download images recorded by the camera to a computer. Some methods, depending on the OS used, may not be used with all the operating systems listed above. z z ...Computer System Requirements •Basic Guide (p. 25) •Software Starter Guide Connecting the Camera to a Computer •Basic Guide (p. 27) Downloading Images to Computer Connection Supplied Software Install It Downloading Method Computer Procedure...
User Manual
Page 27
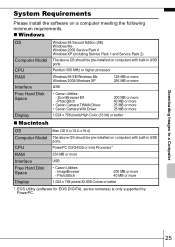
...or more 1,024 x 768 pixels/32,000 Colors or better * EOS Utility (software for EOS DIGITAL series cameras) is only supported by PowerPC. 25 PhotoStitch • Canon Camera TWAIN Driver • Canon Camera WIA Driver 200 MB or more 40 MB or more 25 MB or more 25 MB or more Free ...Hard Disk Space Display • Canon Utilities - ZoomBrowser EX - Pentium 500 MHz or higher processor RAM Interface Windows 98...
...or more 1,024 x 768 pixels/32,000 Colors or better * EOS Utility (software for EOS DIGITAL series cameras) is only supported by PowerPC. 25 PhotoStitch • Canon Camera TWAIN Driver • Canon Camera WIA Driver 200 MB or more 40 MB or more 25 MB or more 25 MB or more Free ...Hard Disk Space Display • Canon Utilities - ZoomBrowser EX - Pentium 500 MHz or higher processor RAM Interface Windows 98...
User Manual
Page 28
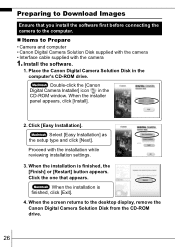
... Disk in the CD-ROM window. Proceed with the camera 1. Double-click the [Canon Digital Camera Installer] icon in the computer's CD-ROM drive. Select [Easy Installation] as the setup type and click [Next]. When the installation is ... the computer. „ Items to the desktop display, remove the Canon Digital Camera Solution Disk from the CD-ROM drive. 26 When the screen returns to Prepare • Camera and computer • Canon Digital Camera Solution Disk supplied with the camera • Interface cable supplied with the installation while reviewing installation settings. 3. ...
... Disk in the CD-ROM window. Proceed with the camera 1. Double-click the [Canon Digital Camera Installer] icon in the computer's CD-ROM drive. Select [Easy Installation] as the setup type and click [Next]. When the installation is ... the computer. „ Items to the desktop display, remove the Canon Digital Camera Solution Disk from the CD-ROM drive. 26 When the screen returns to Prepare • Camera and computer • Canon Digital Camera Solution Disk supplied with the camera • Interface cable supplied with the installation while reviewing installation settings. 3. ...


