
User Manual
Page 6
... White Balance Correction 88 Preventing Camera Shake 90 5 Handy Features 93 Handy Features 94 Silencing the Beeper 94 CF Card Reminder 94 Setting the Image Review Time 94 Set the Auto Power-off Time 95 Setting the LCD Monitor Brightness 95 File Numbering Method 96 Auto Rotate of Vertical Images 98...
... White Balance Correction 88 Preventing Camera Shake 90 5 Handy Features 93 Handy Features 94 Silencing the Beeper 94 CF Card Reminder 94 Setting the Image Review Time 94 Set the Auto Power-off Time 95 Setting the LCD Monitor Brightness 95 File Numbering Method 96 Auto Rotate of Vertical Images 98...
User Manual
Page 15
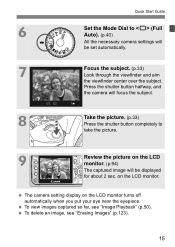
... subject. (p.33) Look through the viewfinder and aim the viewfinder center over the subject. Quick Start Guide 6 Set the Mode Dial to take the picture. 9 Review the picture on the LCD monitor. (p.94) The captured image will be displayed for about 2 sec.
... subject. (p.33) Look through the viewfinder and aim the viewfinder center over the subject. Quick Start Guide 6 Set the Mode Dial to take the picture. 9 Review the picture on the LCD monitor. (p.94) The captured image will be displayed for about 2 sec.
User Manual
Page 94
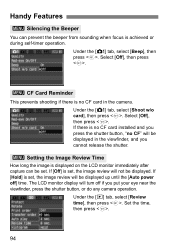
... tab, select [Beep], then press . If [Hold] is achieved or during self-timer operation. The LCD monitor display will be set , the image review will be displayed. Handy Features 3 Silencing the Beeper You can be displayed in the camera. Select [Off], then press . 3 CF Card Reminder This prevents... the viewfinder, press the shutter button, or do any camera operation. If [Off] is no CF" will turn off ] time. Under the [x] tab, select [Review time], then press . If there is set . Select [Off], then press . Set the time, then press . 94 Under the [z] tab, select [Shoot w/o...
... tab, select [Beep], then press . If [Hold] is achieved or during self-timer operation. The LCD monitor display will be set , the image review will be displayed. Handy Features 3 Silencing the Beeper You can be displayed in the camera. Select [Off], then press . 3 CF Card Reminder This prevents... the viewfinder, press the shutter button, or do any camera operation. If [Off] is no CF" will turn off ] time. Under the [x] tab, select [Review time], then press . If there is set . Select [Off], then press . Set the time, then press . 94 Under the [z] tab, select [Shoot w/o...
User Manual
Page 95
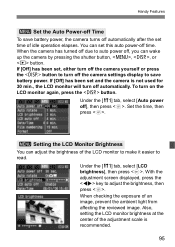
... to turn on the LCD monitor again, press the button. You can adjust the brightness of an image, prevent the ambient light from affecting the reviewed image. Handy Features 3 Set the Auto Power-off Time To save battery power. When checking the exposure of the LCD monitor to make it easier...
... to turn on the LCD monitor again, press the button. You can adjust the brightness of an image, prevent the ambient light from affecting the reviewed image. Handy Features 3 Set the Auto Power-off Time To save battery power. When checking the exposure of the LCD monitor to make it easier...
User Manual
Page 98
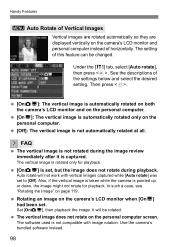
... such a case, see "Rotating the Image" on the camera's LCD monitor when [OnD] had been set , but the image does not rotate during the image review immediately after it is set . Set [OnPD], then playback the image. The setting of this feature can be rotated. See the descriptions of horizontally. Auto...
... such a case, see "Rotating the Image" on the camera's LCD monitor when [OnD] had been set , but the image does not rotate during the image review immediately after it is set . Set [OnPD], then playback the image. The setting of this feature can be rotated. See the descriptions of horizontally. Auto...
User Manual
Page 106
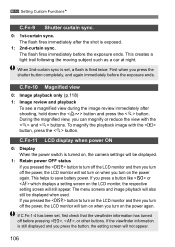
C.Fn-10 Magnified view 0: Image playback only (p.118) 1: Image review and playback To see a magnified view during the image review immediately after the shot is exposed. 1: 2nd-curtain sync. To magnify the playback image with the and buttons. This helps to turn off the LCD ...
C.Fn-10 Magnified view 0: Image playback only (p.118) 1: Image review and playback To see a magnified view during the image review immediately after the shot is exposed. 1: 2nd-curtain sync. To magnify the playback image with the and buttons. This helps to turn off the LCD ...
User Manual
Page 118
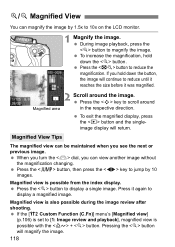
... on the LCD monitor. 1 Magnify the image. Press the button, then press the key to jump by 1.5x to [1: Image review and playback], magnified view is also possible during the image review after shooting. Press the key to reduce until it reaches the size before it again to reduce the magnification. Press...
... on the LCD monitor. 1 Magnify the image. Press the button, then press the key to jump by 1.5x to [1: Image review and playback], magnified view is also possible during the image review after shooting. Press the key to reduce until it reaches the size before it again to reduce the magnification. Press...
User Manual
Page 156
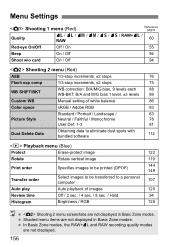
... images to be printed (DPOF) 144 149 Transfer order Select images to be transferred to a personal computer 107 Auto play Auto playback of images 120 Review time Off / 2 sec. / 4 sec. / 8 sec. / Hold 94 Histogram Brightness / RGB 125 Shooting 2 menu screen/tabs are not displayed in Basic Zone modes...
... images to be printed (DPOF) 144 149 Transfer order Select images to be transferred to a personal computer 107 Auto play Auto playback of images 120 Review time Off / 2 sec. / 4 sec. / 8 sec. / Hold 94 Histogram Brightness / RGB 125 Shooting 2 menu screen/tabs are not displayed in Basic Zone modes...

User Manual
Page 163
... turn the power switch off and on the TV screen. If the same error keeps occurring, there may resolve the problem. Troubleshooting Guide Image Review & Operation The image cannot be a problem. If an error code appears right after shooting, the picture might not have been captured. Write ...down the error code and consult your nearest Canon Service Center. If error 02 (CF card problem) is displayed. If the image has been erase-protected, it cannot be erased. (p.122)...
... turn the power switch off and on the TV screen. If the same error keeps occurring, there may resolve the problem. Troubleshooting Guide Image Review & Operation The image cannot be a problem. If an error code appears right after shooting, the picture might not have been captured. Write ...down the error code and consult your nearest Canon Service Center. If error 02 (CF card problem) is displayed. If the image has been erase-protected, it cannot be erased. (p.122)...

User Manual
Page 177
... Auto 40 Function Availability Table 158 H Highlight alert 124 Histogram 125 Brightness / RGB I Image Auto playback 120 Auto rotate 98 Erase 123 Histogram 125 Image review time 94 Transfer to personal computer ... 107 Index display 116 Jump display 117 Magnified view 118 Manual rotate 119 Playback 50, 115 Protect 122 Shooting...
... Auto 40 Function Availability Table 158 H Highlight alert 124 Histogram 125 Brightness / RGB I Image Auto playback 120 Auto rotate 98 Erase 123 Histogram 125 Image review time 94 Transfer to personal computer ... 107 Index display 116 Jump display 117 Magnified view 118 Manual rotate 119 Playback 50, 115 Protect 122 Shooting...


