
DC100 Instruction Manual
Page 3
... TV transmitters, particular attention to instructions in the operating instructions should be moved with a polarized 2-prong plug (a plug having one way. Do not use accessories should be sure the antenna is a safety feature. Water and Moisture - The product may cause picture interference, or product, be operated only.... Polarization - Follow Instructions - Pay 7. so as recommended polarized plug. Regarding other 13. The CA-570 Compact refers to the Canon DVD Camcorder DC100 Power Adapter should be routed so that they to fit, contact your obsolete outlet.
... TV transmitters, particular attention to instructions in the operating instructions should be moved with a polarized 2-prong plug (a plug having one way. Do not use accessories should be sure the antenna is a safety feature. Water and Moisture - The product may cause picture interference, or product, be operated only.... Polarization - Follow Instructions - Pay 7. so as recommended polarized plug. Regarding other 13. The CA-570 Compact refers to the Canon DVD Camcorder DC100 Power Adapter should be routed so that they to fit, contact your obsolete outlet.
DC100 Instruction Manual
Page 6
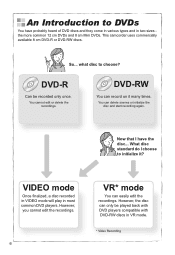
... again. So... VIDEO mode Once finalized, a disc recorded in VIDEO mode will play in VR mode. * Video Recording You can easily edit the recordings. This camcorder uses commercially available 8 cm DVD-R or DVD-RW discs. DVD-RW You can only be recorded only once. You cannot edit or delete the recordings. An...
... again. So... VIDEO mode Once finalized, a disc recorded in VIDEO mode will play in VR mode. * Video Recording You can easily edit the recordings. This camcorder uses commercially available 8 cm DVD-R or DVD-RW discs. DVD-RW You can only be recorded only once. You cannot edit or delete the recordings. An...
DC100 Instruction Manual
Page 7
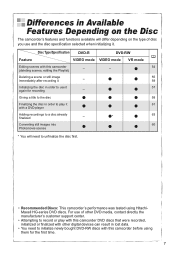
... finalized - * 63 Converting still images into 60 Photomovie scenes * You will need to unfinalize the disc first. • Recommended Discs: This camcorder's performance was tested using them for recording - 57 Giving a title to the disc 58 Finalizing the disc in order to play with this... camcorder DVD discs that were recorded, initialized or finalized with other digital devices can result in order to use and the disc specification selected when initializing it. Disc Type/Specification DVD-R DVD-RW ...
... finalized - * 63 Converting still images into 60 Photomovie scenes * You will need to unfinalize the disc first. • Recommended Discs: This camcorder's performance was tested using them for recording - 57 Giving a title to the disc 58 Finalizing the disc in order to play with this... camcorder DVD discs that were recorded, initialized or finalized with other digital devices can result in order to use and the disc specification selected when initializing it. Disc Type/Specification DVD-R DVD-RW ...
DC100 Instruction Manual
Page 8
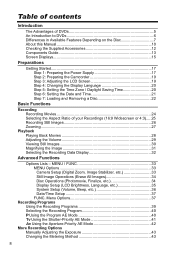
... Recording Programs 39 Selecting the Recording Program 40 Using the Program AE Mode 40 Using the Shutter-Priority AE Mode 41 Using the Aperture-Priority AE Mode 42 More Recording Options Manually Adjusting the Exposure 43 Changing the Metering Method 43 8 MENU / FUNC... Checking the Supplied Accessories 12 Components Guide 13 Screen Displays 15 Preparations Getting Started 17 Step 1: Preparing the Power Supply 17 Step 2: Preparing the Camcorder 19 Step 3: Adjusting the LCD Screen 19 Step 4: Changing the Display Language 20 Step 5: Setting the Time Zone / Daylight Saving Time 20 ...
... Recording Programs 39 Selecting the Recording Program 40 Using the Program AE Mode 40 Using the Shutter-Priority AE Mode 41 Using the Aperture-Priority AE Mode 42 More Recording Options Manually Adjusting the Exposure 43 Changing the Metering Method 43 8 MENU / FUNC... Checking the Supplied Accessories 12 Components Guide 13 Screen Displays 15 Preparations Getting Started 17 Step 1: Preparing the Power Supply 17 Step 2: Preparing the Camcorder 19 Step 3: Adjusting the LCD Screen 19 Step 4: Changing the Display Language 20 Step 5: Setting the Time Zone / Daylight Saving Time 20 ...
DC100 Instruction Manual
Page 10
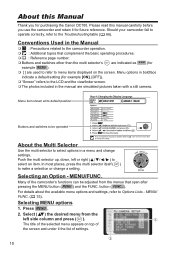
...) to select options in the manual are used to refer to make a selection or change settings. Selecting MENU options 1. About this manual carefully before you for purchasing the Canon DC100. Please read this Manual Thank you use the camcorder and retain it the list of settings. ...10 Should your camcorder fail to operate correctly, refer to Options Lists - button ( FUNC. ). MENU...
...) to select options in the manual are used to refer to make a selection or change settings. Selecting MENU options 1. About this manual carefully before you for purchasing the Canon DC100. Please read this Manual Thank you use the camcorder and retain it the list of settings. ...10 Should your camcorder fail to operate correctly, refer to Options Lists - button ( FUNC. ). MENU...
DC100 Instruction Manual
Page 11
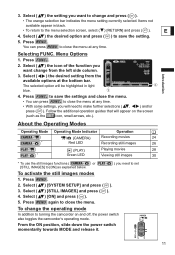
...• The orange selection bar indicates the menu setting currently selected. The selected option will appear on and off, the power switch also toggles the camcorder's operating mode. Items not available appear in light blue. 4. Press MENU . Select ( ) the setting you want to the menu selection screen,...CAMERA) Recording movies 24 * Red LED Recording still images 26 (PLAY) Playing movies 28 * Green LED Viewing still images 30 * To use the still images functions ( or [STILL IMAGES] to close the menu. Menu Options 1. From the ON position, slide down the power ...
...• The orange selection bar indicates the menu setting currently selected. The selected option will appear on and off, the power switch also toggles the camcorder's operating mode. Items not available appear in light blue. 4. Press MENU . Select ( ) the setting you want to the menu selection screen,...CAMERA) Recording movies 24 * Red LED Recording still images 26 (PLAY) Playing movies 28 * Green LED Viewing still images 30 * To use the still images functions ( or [STILL IMAGES] to close the menu. Menu Options 1. From the ON position, slide down the power ...

DC100 Instruction Manual
Page 16
... images Still image size Data code ( 32) 16 Remaining battery charge • When " " starts flashing in green. • Depending on the conditions under which the camcorder and the battery pack are used, the actual battery charge may not be indicated accurately.
... images Still image size Data code ( 32) 16 Remaining battery charge • When " " starts flashing in green. • Depending on the conditions under which the camcorder and the battery pack are used, the actual battery charge may not be indicated accurately.
DC100 Instruction Manual
Page 17
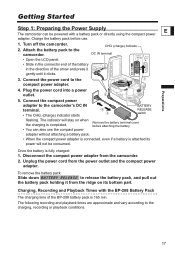
... power outlet and the compact power adapter. Charging, Recording and Playback Times with a battery pack or directly using the compact power adapter. Connect the power cord to the camcorder's DC IN terminal. • The CHG. (charge) indicator starts BATTERY RELEASE switch flashing. Once the battery is...to the charging, recording or playback conditions. 17 The following recording and playback times are approximate and vary according to the camcorder. CHG. (charge) indicator DC IN terminal • Open the LCD panel. • Slide in the connector end of the battery in the direction...
... power outlet and the compact power adapter. Charging, Recording and Playback Times with a battery pack or directly using the compact power adapter. Connect the power cord to the camcorder's DC IN terminal. • The CHG. (charge) indicator starts BATTERY RELEASE switch flashing. Once the battery is...to the charging, recording or playback conditions. 17 The following recording and playback times are approximate and vary according to the camcorder. CHG. (charge) indicator DC IN terminal • Open the LCD panel. • Slide in the connector end of the battery in the direction...

DC100 Instruction Manual
Page 18
Recording Time 80 min. 80 min. 75 min. 95 min. 90 min. 90 min. 105 min. 100 min. 95 min. Typical Recording Time* 45 min. 45 min. 40 min. 50 min. 50 min. 45 min. 50 min. 50 min. 50 min. Outside ... might need. The charging time will vary depending on /off. Turn off the camcorder before connecting or disconnecting the power adapter. Do not connect to the camcorder's DC IN terminal or to voltage converters for use with repeated operations such as those on : Battery fully charged. Recording Mode Viewfinder XP LCD...
Recording Time 80 min. 80 min. 75 min. 95 min. 90 min. 90 min. 105 min. 100 min. 95 min. Typical Recording Time* 45 min. 45 min. 40 min. 50 min. 50 min. 45 min. 50 min. 50 min. 50 min. Outside ... might need. The charging time will vary depending on /off. Turn off the camcorder before connecting or disconnecting the power adapter. Do not connect to the camcorder's DC IN terminal or to voltage converters for use with repeated operations such as those on : Battery fully charged. Recording Mode Viewfinder XP LCD...

DC100 Instruction Manual
Page 19
...the panel by 180 degrees toward the lens (allowing the subject to monitor the LCD screen while you use the viewfinder E and adjust the dioptric adjustment lever as necessary. 3. Turn on the camcorder. 2. Step 3: Adjusting the LCD Screen MENU button 180° Preparations 90° Subject can ...; You can rotate the panel downward by 180 degrees is also useful if you can reach the zoom lever with your index finger, and the start/ stop button with the self-timer. Press MENU . 2. Step 2: Preparing the Camcorder 1. Adjust the viewfinder. Keep the LCD panel closed to close...
...the panel by 180 degrees toward the lens (allowing the subject to monitor the LCD screen while you use the viewfinder E and adjust the dioptric adjustment lever as necessary. 3. Turn on the camcorder. 2. Step 3: Adjusting the LCD Screen MENU button 180° Preparations 90° Subject can ...; You can rotate the panel downward by 180 degrees is also useful if you can reach the zoom lever with your index finger, and the start/ stop button with the self-timer. Press MENU . 2. Step 2: Preparing the Camcorder 1. Adjust the viewfinder. Keep the LCD panel closed to close...

DC100 Instruction Manual
Page 21
... date and time setting may be lost. Select the time zone referring to close the menu and start the clock. When you do not use the camcorder for about 3 months, the built-in lithium battery ( 72) and set the time zone, date and time, you do not need to reset the...
... date and time setting may be lost. Select the time zone referring to close the menu and start the clock. When you do not use the camcorder for about 3 months, the built-in lithium battery ( 72) and set the time zone, date and time, you do not need to reset the...

DC100 Instruction Manual
Page 33
...refer to [OFF]. If " " (camcorder shake warning) appears, we recommend stabilizing the camcorder, for faster zooms. The fastest zoom speed can be used with the [ NIGHT] recording program ( ) or with insufficient lighting. The camcorder uses shutter speeds down to 1/30 (1/15 when recording ...FUNC. E MENU Options Camera Setup (Digital Zoom, Image Stabilizer, etc.) CAMERA SETUP A.SL SHUTTER. [ ON], [ OFF] The camcorder automatically uses slow shutter speeds to obtain brighter recordings in light blue from 25x up to 100x and dark blue from 100x up to . Advanced Functions...
...refer to [OFF]. If " " (camcorder shake warning) appears, we recommend stabilizing the camcorder, for faster zooms. The fastest zoom speed can be used with the [ NIGHT] recording program ( ) or with insufficient lighting. The camcorder uses shutter speeds down to 1/30 (1/15 when recording ...FUNC. E MENU Options Camera Setup (Digital Zoom, Image Stabilizer, etc.) CAMERA SETUP A.SL SHUTTER. [ ON], [ OFF] The camcorder automatically uses slow shutter speeds to obtain brighter recordings in light blue from 25x up to 100x and dark blue from 100x up to . Advanced Functions...

DC100 Instruction Manual
Page 38
...; Depending on the recording mode, you might occasionally notice a brief stop of the picture or sound at the point where the scene changes. The camcorder uses a variable bit rate (VBR) when encoding the video data so the actual recording times will appear only when you a longer recording time; Move a scene ( 54...
...; Depending on the recording mode, you might occasionally notice a brief stop of the picture or sound at the point where the scene changes. The camcorder uses a variable bit rate (VBR) when encoding the video data so the actual recording times will appear only when you a longer recording time; Move a scene ( 54...

DC100 Instruction Manual
Page 39
...Priority AE ( 41) Aperture-Priority AE ( 42) Portrait The camcorder uses a large aperture, achieving a focus on a sunny beach. Snow Use this mode to record spotlit scenes. Sports Use this mode to record in vibrant colors. Sunset Use this mode to record on the subject while blurring other settings automatically... you to record sports scenes such as tennis or golf. Spotlight Use this mode to just point and shoot. Fireworks Use this mode to record sunsets in bright ski resorts. Beach Use this mode to record in poorly lit places. Advanced Functions Recording Programs...
...Priority AE ( 41) Aperture-Priority AE ( 42) Portrait The camcorder uses a large aperture, achieving a focus on a sunny beach. Snow Use this mode to record spotlit scenes. Sports Use this mode to record in vibrant colors. Sunset Use this mode to record on the subject while blurring other settings automatically... you to record sports scenes such as tennis or golf. Spotlight Use this mode to just point and shoot. Fireworks Use this mode to record sunsets in bright ski resorts. Beach Use this mode to record in poorly lit places. Advanced Functions Recording Programs...

DC100 Instruction Manual
Page 47
Use this setting for outdoor scenes. [ DAYLIGHT] For recording outdoors on a bright day. [ SHADE] For recording in until stops flashing. 2. Desired option* * To set by the camcorder. Depending on the light source, may not be better than with [ FLUORESCENT] or [ FLUORESCENT H]. Mode switch: ( 37) AUTO...set the custom white balance: - If the color looks unnatural, adjust it off the digital zoom. The camcorder retains the custom white balance setting even if you turn it using [ AUTO] or [ SET]. When you select [ SET]: 1. Reset the white balance when the ...
Use this setting for outdoor scenes. [ DAYLIGHT] For recording outdoors on a bright day. [ SHADE] For recording in until stops flashing. 2. Desired option* * To set by the camcorder. Depending on the light source, may not be better than with [ FLUORESCENT] or [ FLUORESCENT H]. Mode switch: ( 37) AUTO...set the custom white balance: - If the color looks unnatural, adjust it off the digital zoom. The camcorder retains the custom white balance setting even if you turn it using [ AUTO] or [ SET]. When you select [ SET]: 1. Reset the white balance when the ...

DC100 Instruction Manual
Page 61
You do so can interrupt the process and result in permanent data loss. Always power the camcorder using this camcorder. To view your still images on a DVD player you will need to finalize the disc to play the disc you recorded on a table or to ... started may not be able to initialize the disc, edit your recordings or add new recordings to the disc. Do not finalize with the camcorder discs that were not recorded using the compact power adapter. Failing to do not need to unfinalize the disc first. 61 Do not move the...
You do so can interrupt the process and result in permanent data loss. Always power the camcorder using this camcorder. To view your still images on a DVD player you will need to finalize the disc to play the disc you recorded on a table or to ... started may not be able to initialize the disc, edit your recordings or add new recordings to the disc. Do not finalize with the camcorder discs that were not recorded using the compact power adapter. Failing to do not need to unfinalize the disc first. 61 Do not move the...

DC100 Instruction Manual
Page 63
...the following actions while the operation is displayed. The operation cannot be unfinalized with this camcorder can be started may result in permanent data loss. Always power the camcorder using this camcorder. DVD-RW in VIDEO mode DVD-RW in VIDEO mode - Close the menu only ...During the disc unfinalization a progress bar is in VIDEO mode. Do not move the camcorder. - Disc type: DVD-RW initialized in VIDEO mode. Be sure to high temperature, let the camcorder cool off before starting the procedure. Failing to the [DISC OPERATIONS] menu. Disc Finalization...
...the following actions while the operation is displayed. The operation cannot be unfinalized with this camcorder can be started may result in permanent data loss. Always power the camcorder using this camcorder. DVD-RW in VIDEO mode DVD-RW in VIDEO mode - Close the menu only ...During the disc unfinalization a progress bar is in VIDEO mode. Do not move the camcorder. - Disc type: DVD-RW initialized in VIDEO mode. Be sure to high temperature, let the camcorder cool off before starting the procedure. Failing to the [DISC OPERATIONS] menu. Disc Finalization...

DC100 Instruction Manual
Page 64
...the connections. 2. On a TV: Set the input selector to the yellow VIDEO terminal. 3. On a VCR: Set the input selector to the camcorder's AV terminal and the terminals on a TV Screen ConnectingtoaTVandVCR Selecting the Type of TV To change the aspect ratio of the TV manually. 64 ...Connect the STV-250N Stereo Video Cable to LINE (IN). We recommend powering the camcorder using the compact power adapter. TV sets compatible with 4:3 aspect ratio ( 37). Connection Diagram Signal flow STV-250N Stereo Video Cable (Supplied)...
...the connections. 2. On a TV: Set the input selector to the yellow VIDEO terminal. 3. On a VCR: Set the input selector to the camcorder's AV terminal and the terminals on a TV Screen ConnectingtoaTVandVCR Selecting the Type of TV To change the aspect ratio of the TV manually. 64 ...Connect the STV-250N Stereo Video Cable to LINE (IN). We recommend powering the camcorder using the compact power adapter. TV sets compatible with 4:3 aspect ratio ( 37). Connection Diagram Signal flow STV-250N Stereo Video Cable (Supplied)...

DC100 Instruction Manual
Page 65
... cassette and set the device to turn off the screen displays or select the data that will be displayed instead ( 32). This camcorder: Stop playback. We recommend powering the camcorder using the compact power adapter. By default, the on a TV Screen ( 64). Recording to a VCR You can select to record pause...
... cassette and set the device to turn off the screen displays or select the data that will be displayed instead ( 32). This camcorder: Stop playback. We recommend powering the camcorder using the compact power adapter. By default, the on a TV Screen ( 64). Recording to a VCR You can select to record pause...
DC100 Instruction Manual
Page 74
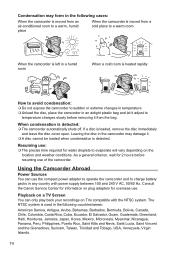
...a general criterion, wait for water droplets to evaporate will vary depending on TVs compatible with power supply between 100 and 240 V AC, 50/60 Hz. Using the Camcorder Abroad Power Sources You can only play back your recordings on the location and weather conditions. If a disc... for information on a TV Screen You can use . The NTSC system is detected. When condensation is detected: The camcorder automatically shuts off. Consult the Canon Service Center for overseas use the compact power adapter to operate the camcorder and to charge battery packs in the following ...
...a general criterion, wait for water droplets to evaporate will vary depending on TVs compatible with power supply between 100 and 240 V AC, 50/60 Hz. Using the Camcorder Abroad Power Sources You can only play back your recordings on the location and weather conditions. If a disc... for information on a TV Screen You can use . The NTSC system is detected. When condensation is detected: The camcorder automatically shuts off. Consult the Canon Service Center for overseas use the compact power adapter to operate the camcorder and to charge battery packs in the following ...

