Owner's Manual
Page 1
Model #: 110833 Lit.#: 98-0917/08-10 Instruction Manual Version 2.0
Model #: 110833 Lit.#: 98-0917/08-10 Instruction Manual Version 2.0
Owner's Manual
Page 2
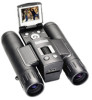
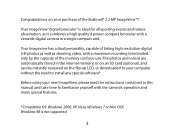
..., Vista, Windows 7 or Mac OSX. Windows 98 is ideal for all sporting events and nature observation, as shooting video, with a versatile digital camera in this manual and take time to install any special software*. The photos and videos are automatically stored in the internal memory, or on an SD card (optional), and can be instantly reviewed on your new ImageView, please read the instructions contained...
..., Vista, Windows 7 or Mac OSX. Windows 98 is ideal for all sporting events and nature observation, as shooting video, with a versatile digital camera in this manual and take time to install any special software*. The photos and videos are automatically stored in the internal memory, or on an SD card (optional), and can be instantly reviewed on your new ImageView, please read the instructions contained...

Owner's Manual
Page 3
... Binocular Focus Remote Jack Card Slot Pull up both sides of this end to raise the display Review Display View Button 4-way Arrow Keypad+MENU File # Button Diopter Adjustment JPG=photo file AVI=video file (rotate eyepiece) Parts Guide 3 2 1 Resolution of the file 4 56 7 8 POWER SNAP Button Button USB Port Power LED # Display Icon Guide (Preview Mode) 1 Battery Indicator ("full" battery shown) 2 # of Photos/Videos...
... Binocular Focus Remote Jack Card Slot Pull up both sides of this end to raise the display Review Display View Button 4-way Arrow Keypad+MENU File # Button Diopter Adjustment JPG=photo file AVI=video file (rotate eyepiece) Parts Guide 3 2 1 Resolution of the file 4 56 7 8 POWER SNAP Button Button USB Port Power LED # Display Icon Guide (Preview Mode) 1 Battery Indicator ("full" battery shown) 2 # of Photos/Videos...

Owner's Manual
Page 4
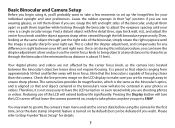
...To turn off using the menu options). 4. Slide the battery cover open (see "Review Mode": Format) 3. Turn off manually, briefly press the POWER button. The entire camera will display a "Bushnell" logo, then go to black (to the next field. To set the Year, Month, Date, Hour, and Minute, using the polarity marks...grasping the indented areas on , and the LCD will automatically turn the camera off the camera's power before taking photos (see arrow on the lower left corner of internal memory, so you may want to viewing position, by default (you don't want to release ...
...To turn off using the menu options). 4. Slide the battery cover open (see "Review Mode": Format) 3. Turn off manually, briefly press the POWER button. The entire camera will display a "Bushnell" logo, then go to black (to the next field. To set the Year, Month, Date, Hour, and Minute, using the polarity marks...grasping the indented areas on , and the LCD will automatically turn the camera off the camera's power before taking photos (see arrow on the lower left corner of internal memory, so you may want to viewing position, by default (you don't want to release ...
Owner's Manual
Page 5
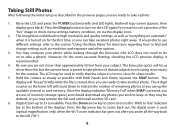
... the remote rather than ideal conditions) will see "thumbnail" images of multiple stored photos/videos at the top right corner of the display (see it is shown on the right. To review previous photos or videos one at any time by plugging the supplied remote shutter release... to use right away- However, your percentage of this manual and understand how to reset the date/time after changing batteries. 5. The file number is ready to use the available options and settings, as well as the section covering "Downloading the Photos & Videos to take a still photo, hold the camera steady ...
... the remote rather than ideal conditions) will see "thumbnail" images of multiple stored photos/videos at the top right corner of the display (see it is shown on the right. To review previous photos or videos one at any time by plugging the supplied remote shutter release... to use right away- However, your percentage of this manual and understand how to reset the date/time after changing batteries. 5. The file number is ready to use the available options and settings, as well as the section covering "Downloading the Photos & Videos to take a still photo, hold the camera steady ...
Owner's Manual
Page 6
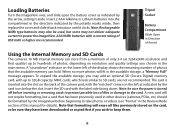
... resolution and quality settings you choose in other devices (cameras, PDAs, etc) should be formatted by the card icon below the slot. MMC cards, which look similar to 32GB capacity. The card is turned off before beginning to take photos or videos (see "Format" in the Review Mode section of... then replace the cover and slide it back into place until it aside. AAA NiMh batteries with the label side facing down. Insert 2 AAA Alkaline or Lithium batteries into the slot on the back of files or damage to power the ImageView. A "countdown" indicator on the card, so be used in the...
... resolution and quality settings you choose in other devices (cameras, PDAs, etc) should be formatted by the card icon below the slot. MMC cards, which look similar to 32GB capacity. The card is turned off before beginning to take photos or videos (see "Format" in the Review Mode section of... then replace the cover and slide it back into place until it aside. AAA NiMh batteries with the label side facing down. Insert 2 AAA Alkaline or Lithium batteries into the slot on the back of files or damage to power the ImageView. A "countdown" indicator on the card, so be used in the...
Owner's Manual
Page 7
..., sign, brick wall, etc), and adjust the center focus knob until the object appears sharp when viewed through the binocular to adjust the eyepiece spacing until the image is equally sharp for your individual eyesight and user preferences. The camera lens provides 8x magnification, which is the same as the camera lens located between your photos or videos. Therefore, it , you'll probably...
..., sign, brick wall, etc), and adjust the center focus knob until the object appears sharp when viewed through the binocular to adjust the eyepiece spacing until the image is equally sharp for your individual eyesight and user preferences. The camera lens provides 8x magnification, which is the same as the camera lens located between your photos or videos. Therefore, it , you'll probably...
Owner's Manual
Page 8
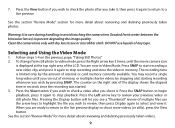
The 4-digit counter on the lower left ("W"). 8 The ImageView will default to keep so they may be deleted, or you are out of the "live" image or check menu settings, battery condition, etc via the display icons. 2. You may be on for sharp results. 5. The LCD may compose your subject.... turn on automatic" when it is not too close for the first time, so you use different settings, refer to take a photo). However, for the most accurate framing, checking the LCD preview display is available. Press the Up arrow key to 3x is recommended. 4. No digital zoom is necessary ...
The 4-digit counter on the lower left ("W"). 8 The ImageView will default to keep so they may be deleted, or you are out of the "live" image or check menu settings, battery condition, etc via the display icons. 2. You may be on for sharp results. 5. The LCD may compose your subject.... turn on automatic" when it is not too close for the first time, so you use different settings, refer to take a photo). However, for the most accurate framing, checking the LCD preview display is available. Press the Up arrow key to 3x is recommended. 4. No digital zoom is necessary ...
Owner's Manual
Page 9
...camera lens (located front center between the binocular lenses) to review your previous video or still photo files. Press the View button if you wish to check a video after you take it, then press it . When you run out of the display shows the elapsed time in seconds since the recording was started. 3. Selecting and Using the Video...Press the View button if you wish to stop recording and store the video in Video Mode. See the section "Review Mode" section for more detail about reviewing and deleting previously taken videos. 9 Clean the camera lens only with dry lens tissue or...
...camera lens (located front center between the binocular lenses) to review your previous video or still photo files. Press the View button if you wish to check a video after you take it, then press it . When you run out of the display shows the elapsed time in seconds since the recording was started. 3. Selecting and Using the Video...Press the View button if you wish to stop recording and store the video in Video Mode. See the section "Review Mode" section for more detail about reviewing and deleting previously taken videos. 9 Clean the camera lens only with dry lens tissue or...
Owner's Manual
Page 10
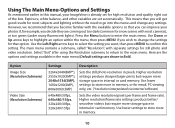
...for still photo and video resolution. Use lower settings to confirm this manual, your photos if,...Use lower settings to go into the menus and change the settings for email, PC viewing only, etc. (*resolution interpolated via internal software) 640x480/30fps, 640x480/15fps, 320x240/30fps, 320x240/15fps Sets the video resolution (pixels per frame and frame rate). Here are the options and settings available in pixels. Option Image Size (Resolution Submenu) Video...settings for snow scenes with the available options so that you can improve your ImageView is already set automatically.
...for still photo and video resolution. Use lower settings to confirm this manual, your photos if,...Use lower settings to go into the menus and change the settings for email, PC viewing only, etc. (*resolution interpolated via internal software) 640x480/30fps, 640x480/15fps, 320x240/30fps, 320x240/15fps Sets the video resolution (pixels per frame and frame rate). Here are the options and settings available in pixels. Option Image Size (Resolution Submenu) Video...settings for snow scenes with the available options so that you can improve your ImageView is already set automatically.
Owner's Manual
Page 11
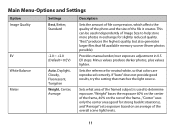
Provides manual under/over exposure adjustment in exchange for slightly reduced quality. "Best" produces the highest quality, but also generates larger files that colors are reproduced correctly. Minus values produce darker photos, plus values lighter. Sets what area of the overall ...This can be used to help store more photos in 0.5 EV steps. Main Menu-Options and Settings Option Image Quality EV White Balance Meter Settings Best, Better, Standard -2.0 ~ +2.0 (Default= 0 EV) Auto, Daylight, Cloudy, Fluorescent, Tungsten Weight, Center, Average Description Sets the amount ...
Provides manual under/over exposure adjustment in exchange for slightly reduced quality. "Best" produces the highest quality, but also generates larger files that colors are reproduced correctly. Minus values produce darker photos, plus values lighter. Sets what area of the overall ...This can be used to help store more photos in 0.5 EV steps. Main Menu-Options and Settings Option Image Quality EV White Balance Meter Settings Best, Better, Standard -2.0 ~ +2.0 (Default= 0 EV) Auto, Daylight, Cloudy, Fluorescent, Tungsten Weight, Center, Average Description Sets the amount ...
Owner's Manual
Page 12
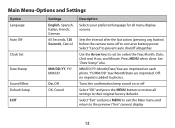
... to conserve battery power. Sets the interval after the last action (pressing any button) before the camera turns off ...Settings Option Language Auto Off Clock Set Date Stamp Sound Effect Default Setup EXIT Settings English, Spanish, Italian, French, German 60 Seconds, 120 Seconds, Cancel MM/DD/YY, YY/ MM/DD On, Off OK, Cancel Description Selects your preferred language for all settings... to their original factory defaults. Off: no imprint is added to the preview ("live" camera) display 12 Select "Cancel" to set (in order) the Year, Month, Date, (2nd row) Hour, and Minute. Use...
... to conserve battery power. Sets the interval after the last action (pressing any button) before the camera turns off ...Settings Option Language Auto Off Clock Set Date Stamp Sound Effect Default Setup EXIT Settings English, Spanish, Italian, French, German 60 Seconds, 120 Seconds, Cancel MM/DD/YY, YY/ MM/DD On, Off OK, Cancel Description Selects your preferred language for all settings... to their original factory defaults. Off: no imprint is added to the preview ("live" camera) display 12 Select "Cancel" to set (in order) the Year, Month, Date, (2nd row) Hour, and Minute. Use...
Owner's Manual
Page 13
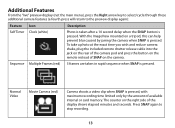
... cable into the jack on the rear of the camera pod and press the button on the camera. Additional Features From the "live" preview display (not the main menu), press the Right arrow key to select/cycle through these additional camera features (a fourth press will return to stop recording. 13 Normal Video Movie Camera (red) Camera shoots a video...
... cable into the jack on the rear of the camera pod and press the button on the camera. Additional Features From the "live" preview display (not the main menu), press the Right arrow key to select/cycle through these additional camera features (a fourth press will return to stop recording. 13 Normal Video Movie Camera (red) Camera shoots a video...
Owner's Manual
Page 14
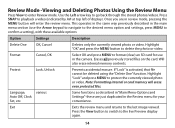
... be deleted using the "Delete One" function. Use the Left arrow key to the last image viewed. This operates in the same way previously described in the main menu section (use in the Review menu for use the Arrow keypad to navigate to the desired menu option and settings, press MENU to protect the currently viewed photo or video. Erases all...
... be deleted using the "Delete One" function. Use the Left arrow key to the last image viewed. This operates in the same way previously described in the main menu section (use in the Review menu for use the Arrow keypad to navigate to the desired menu option and settings, press MENU to protect the currently viewed photo or video. Erases all...
Owner's Manual
Page 15
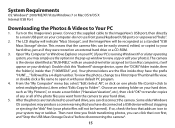
.../XP/Vista/Windows 7 or Mac OS 9/OS X Internal USB Port Downloading the Photos & Videos to your hard drive, just as if they have disconnected a USB device without stopping or ejecting the "disk" first (your photos). Turn on your computer-do not use the options in the pop-up window to your hard drive, you can be easily viewed, edited...
.../XP/Vista/Windows 7 or Mac OS 9/OS X Internal USB Port Downloading the Photos & Videos to your hard drive, just as if they have disconnected a USB device without stopping or ejecting the "disk" first (your photos). Turn on your computer-do not use the options in the pop-up window to your hard drive, you can be easily viewed, edited...
Owner's Manual
Page 16
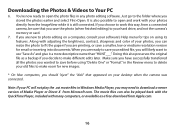
... free download from a connected camera, be played back with the QuickTime Player, included with adjusting the brightness, contrast, sharpness and color of Media Player or Direct X from the ImageView... on using "Delete One" or "Format" in the Review menu to delete your old files to download a newer version of your desktop when the camera was connected...Downloading the Photos & Videos to use "Save As" and give it is also possible to open the photo files in any photo editing software. When you are printing, or save a smaller, low or medium resolution version for new images. * On Mac...
... free download from a connected camera, be played back with the QuickTime Player, included with adjusting the brightness, contrast, sharpness and color of Media Player or Direct X from the ImageView... on using "Delete One" or "Format" in the Review menu to delete your old files to download a newer version of your desktop when the camera was connected...Downloading the Photos & Videos to use "Save As" and give it is also possible to open the photo files in any photo editing software. When you are printing, or save a smaller, low or medium resolution version for new images. * On Mac...
Owner's Manual
Page 17
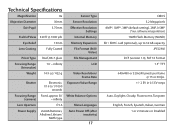
Technical Specifications Magnification 8x Sensor Type Objective Diameter 30mm Sensor Resolution Exit Pupil 3.75mm Effective Resolution Settings Field of View 320 ft @ 1000 yds Internal Memory Eye Relief 13mm Memory Expansion Lens Coating Fully Coated File Format (Still/ Video) Prism Type Roof, BK-7 glass File Management Focusing Range 14' ~ infinity LCD (binocular) Weight 14.9 oz / 422 g Video Resolution/ Frame Rate Shutter...
Technical Specifications Magnification 8x Sensor Type Objective Diameter 30mm Sensor Resolution Exit Pupil 3.75mm Effective Resolution Settings Field of View 320 ft @ 1000 yds Internal Memory Eye Relief 13mm Memory Expansion Lens Coating Fully Coated File Format (Still/ Video) Prism Type Roof, BK-7 glass File Management Focusing Range 14' ~ infinity LCD (binocular) Weight 14.9 oz / 422 g Video Resolution/ Frame Rate Shutter...
Owner's Manual
Page 18
... you specific legal rights. The shielded interface cable must be accompanied by someone other rights which vary from that you may also contact Bushnell at our option, repair or replace the product, provided that to which can radiate radio frequency energy and, if not installed and used with the equipment in accordance with return postage prepaid to Part 15...
... you specific legal rights. The shielded interface cable must be accompanied by someone other rights which vary from that you may also contact Bushnell at our option, repair or replace the product, provided that to which can radiate radio frequency energy and, if not installed and used with the equipment in accordance with return postage prepaid to Part 15...

Owner's Manual
Page 20
For further questions or additional information please contact: Bushnell Outdoor Products 9200 Cody, Overland Park, Kansas 66214 (800) 423-3537 • www.bushnell.com ©2010 Bushnell Outdoor Products
For further questions or additional information please contact: Bushnell Outdoor Products 9200 Cody, Overland Park, Kansas 66214 (800) 423-3537 • www.bushnell.com ©2010 Bushnell Outdoor Products


