Instruction Manual
Page 1
TROPHY CAM™ INSTRUCTION MANUAL Model#s: 119436 / 119446 / 119456 Lit# 98-1517 / 4-11
TROPHY CAM™ INSTRUCTION MANUAL Model#s: 119436 / 119446 / 119456 Lit# 98-1517 / 4-11
Instruction Manual
Page 10
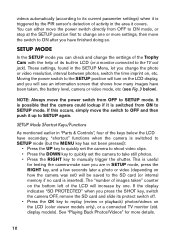
... SD card and slide its protect switch off. • Press the OK key to replay (review or playback) photos/videos on the LCD (color viewer models only), or a connected TV monitor (std. NOTE: Always move the power switch directly from OFF to ON after you are in the SETUP Menu, let... internal memory if no card is switched from ON to SETUP mode. It is possible that shows how many images have finished doing so. display models). If this occurs, simply move the switch to SETUP mode. This is useful for more settings, then move the switch to manually trigger the shutter...
... SD card and slide its protect switch off. • Press the OK key to replay (review or playback) photos/videos on the LCD (color viewer models only), or a connected TV monitor (std. NOTE: Always move the power switch directly from OFF to ON after you are in the SETUP Menu, let... internal memory if no card is switched from ON to SETUP mode. It is possible that shows how many images have finished doing so. display models). If this occurs, simply move the switch to SETUP mode. This is useful for more settings, then move the switch to manually trigger the shutter...

Instruction Manual
Page 11
Fig. 3: SETUP Information Screen (standard display model shown) Image Size (Resolution) Still Photo Mode Time Stamp Field Scan On SD Card Status Battery Level Date:Month-Day-Year Time Hour:Minute:Second # of Photos Taken Remaining Photo Capacity Audio Rec On Video Mode Video Resolution Available Video Recording Time 11
Fig. 3: SETUP Information Screen (standard display model shown) Image Size (Resolution) Still Photo Mode Time Stamp Field Scan On SD Card Status Battery Level Date:Month-Day-Year Time Hour:Minute:Second # of Photos Taken Remaining Photo Capacity Audio Rec On Video Mode Video Resolution Available Video Recording Time 11
Instruction Manual
Page 12
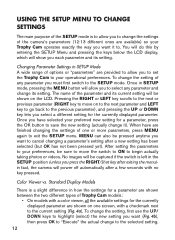
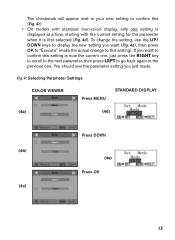
Changing Parameter Settings in how the settings for a parameter are shown between the two different types of Trophy Cam models: • On models with no key pressed. To change its setting. Color Viewer vs. Pressing the RIGHT or LEFT key scrolls to the next or previous parameter (...RIGHT key to move the switch to ON to begin actually taking photos or videos. Standard Display Models There is a slight difference in SETUP Mode A wide range of options or "parameters" are finished changing the settings of one screen, with a checkmark next ...
Changing Parameter Settings in how the settings for a parameter are shown between the two different types of Trophy Cam models: • On models with no key pressed. To change its setting. Color Viewer vs. Pressing the RIGHT or LEFT key scrolls to the next or previous parameter (...RIGHT key to move the switch to ON to begin actually taking photos or videos. Standard Display Models There is a slight difference in SETUP Mode A wide range of options or "parameters" are finished changing the settings of one screen, with a checkmark next ...
Instruction Manual
Page 13
The checkmark will appear next to your new setting to confirm this (Fig. 4c). • On models with the current setting for the parameter when it is displayed at a time, starting with standard (non-color) display, only one . To change the setting, ...
The checkmark will appear next to your new setting to confirm this (Fig. 4c). • On models with the current setting for the parameter when it is displayed at a time, starting with standard (non-color) display, only one . To change the setting, ...
Instruction Manual
Page 14
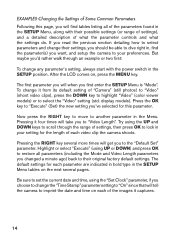
The first parameter you will get you to the "Default Set" parameter. display models). Press the OK key to "Execute" (Set) the new setting you first enter the SETUP Menu is "Mode". The default settings for each video clip ... (or range of settings), and a detailed description of "Camera" (still photos) to "Video" (shoot video clips), press the DOWN key to highlight "Video" (color viewer models) or to their original factory default settings. Pressing the RIGHT key several pages.
The first parameter you will get you to the "Default Set" parameter. display models). Press the OK key to "Execute" (Set) the new setting you first enter the SETUP Menu is "Mode". The default settings for each video clip ... (or range of settings), and a detailed description of "Camera" (still photos) to "Video" (shoot video clips), press the DOWN key to highlight "Video" (color viewer models) or to their original factory default settings. Pressing the RIGHT key several pages.
Instruction Manual
Page 19
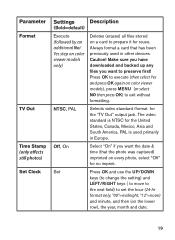
...TV Out Time Stamp (only affects still photos) Set Clock Settings Description (Bold=default) Execute (followed by an additional No/ Yes step on color viewer models only) Deletes (erases) all files stored on a card to preserve first! Make sure you have downloaded and backed up any files you want to ... & time (that has been previously used primarily in other devices. Caution! Press OK to execute (then select Yes and press OK again on color viewer models), press MENU (or select NO then press OK) to set the hour (24-hr format only, "00"=midnight, "12"=noon) and minute, and then ...
...TV Out Time Stamp (only affects still photos) Set Clock Settings Description (Bold=default) Execute (followed by an additional No/ Yes step on color viewer models only) Deletes (erases) all files stored on a card to preserve first! Make sure you have downloaded and backed up any files you want to ... & time (that has been previously used primarily in other devices. Caution! Press OK to execute (then select Yes and press OK again on color viewer models), press MENU (or select NO then press OK) to set the hour (24-hr format only, "00"=midnight, "12"=noon) and minute, and then ...
Instruction Manual
Page 22
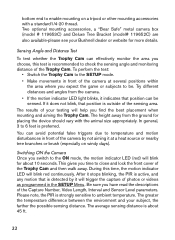
... within the area where you expect the game or subjects to be sensed. The greater the temperature difference between the environment and your Bushnell dealer or website for about 45 ft. 22 bottom end to enable mounting on windy days). Two optional mounting accessories, a "Bear... Safe" metal camera box (model # 119653C) and Deluxe Tree Bracket (model# 119652C) are also available-please see your subject, the farther the possible sensing distance. If it will blink for more details...
... within the area where you expect the game or subjects to be sensed. The greater the temperature difference between the environment and your Bushnell dealer or website for about 45 ft. 22 bottom end to enable mounting on windy days). Two optional mounting accessories, a "Bear... Safe" metal camera box (model # 119653C) and Deluxe Tree Bracket (model# 119652C) are also available-please see your subject, the farther the possible sensing distance. If it will blink for more details...
Instruction Manual
Page 23
.... Once connected, the card reader works the same way as described below-please read that section if you . Reviewing Images on the Trophy Cam LCD (Models with correct polarity and is the power level is sufficient? • Does the SD card have sufficient available space and is its writeprotection (lock) switch...
.... Once connected, the card reader works the same way as described below-please read that section if you . Reviewing Images on the Trophy Cam LCD (Models with correct polarity and is the power level is sufficient? • Does the SD card have sufficient available space and is its writeprotection (lock) switch...