Users Manual - English
Page 4
CONTENTS 1. SEWING BASICS 26 SEWING ...26 General sewing procedure ...26 Selecting stitching ...27 Starting to sew ...28 Thread tension ...29 USEFUL SEWING TIPS ...30 Trial sewing ...30 Changing the sewing direction ...30 Sewing curves ...30 Sewing thick fabrics ...30 Sewing thin ...10 Sewing speed controller (for models equipped with the start/stop button 10 Changing the needle stop position ...10 THREADING THE MACHINE 11 Winding the bobbin ...11 Lower threading ...14 Upper threading ...16 Drawing up the lower thread ...19 REPLACING THE NEEDLE 20 Needle precautions ...20 Needle types and...
CONTENTS 1. SEWING BASICS 26 SEWING ...26 General sewing procedure ...26 Selecting stitching ...27 Starting to sew ...28 Thread tension ...29 USEFUL SEWING TIPS ...30 Trial sewing ...30 Changing the sewing direction ...30 Sewing curves ...30 Sewing thick fabrics ...30 Sewing thin ...10 Sewing speed controller (for models equipped with the start/stop button 10 Changing the needle stop position ...10 THREADING THE MACHINE 11 Winding the bobbin ...11 Lower threading ...14 Upper threading ...16 Drawing up the lower thread ...19 REPLACING THE NEEDLE 20 Needle precautions ...20 Needle types and...
Users Manual - English
Page 6
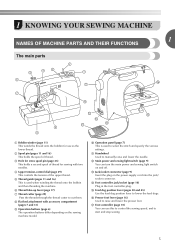
...and 16) This is used when winding the thread onto the bobbin and then threading the machine. n Foot controller jack/socket (page 10) Plug in the foot controller plug. d Upper tension-control dial (page 29) This controls the tension of thread. l Main power and sewing light switch (page ...lever to cut them. 1 KNOWING YOUR SEWING MACHINE 1 NAMES OF MACHINE PARTS AND THEIR FUNCTIONS The main parts a Bobbin winder (page 11) This winds the thread onto the bobbin for sewing with accessory compartment (pages 7 and 31) i Operation buttons (page 6) The operation buttons differ depending ...
...and 16) This is used when winding the thread onto the bobbin and then threading the machine. n Foot controller jack/socket (page 10) Plug in the foot controller plug. d Upper tension-control dial (page 29) This controls the tension of thread. l Main power and sewing light switch (page ...lever to cut them. 1 KNOWING YOUR SEWING MACHINE 1 NAMES OF MACHINE PARTS AND THEIR FUNCTIONS The main parts a Bobbin winder (page 11) This winds the thread onto the bobbin for sewing with accessory compartment (pages 7 and 31) i Operation buttons (page 6) The operation buttons differ depending ...

Users Manual - English
Page 12
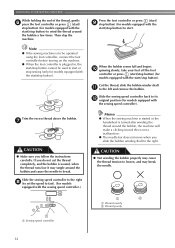
...SFB: XA5539-151) that comes with this sewing machine. Pass the thread around the pre-tension disk. Turn the bobbin clockwise, by hand, until the spring on the shaft slides into the groove of the bobbin. 1 2 a Spring on the shaft b Groove of thread on this machine. Actual ...the thread through the hole on the spool pin. e 11 Only use the bobbin that comes with this pin. a Pre-tension disk b Bobbin winder shaft c Bobbin CAUTION ● Only use bobbins from other bobbins may tangle on c the bobbin from the inside of the same type (part code: SA156, SFB: XA5539-151...
...SFB: XA5539-151) that comes with this sewing machine. Pass the thread around the pre-tension disk. Turn the bobbin clockwise, by hand, until the spring on the shaft slides into the groove of the bobbin. 1 2 a Spring on the shaft b Groove of thread on this machine. Actual ...the thread through the hole on the spool pin. e 11 Only use the bobbin that comes with this pin. a Pre-tension disk b Bobbin winder shaft c Bobbin CAUTION ● Only use bobbins from other bobbins may tangle on c the bobbin from the inside of the same type (part code: SA156, SFB: XA5539-151...
Users Manual - English
Page 13
...controller or press (start/stop button) (for models equipped with the start /stop button). Trim the excess thread above the bobbin. Cut the thread, slide the bobbin winder shaft k to break. KNOWING YOUR SEWING MACHINE While holding the end of the thread, gently f press the foot ... models equipped with the sewing speed controller). CAUTION ● Not winding the bobbin properly may cause the thread tension to loosen, and may tangle around the bobbin and cause the needle to the left and remove the bobbin. Press the foot controller or press (start/ i stop button) (for models...
...controller or press (start/stop button) (for models equipped with the start /stop button). Trim the excess thread above the bobbin. Cut the thread, slide the bobbin winder shaft k to break. KNOWING YOUR SEWING MACHINE While holding the end of the thread, gently f press the foot ... models equipped with the sewing speed controller). CAUTION ● Not winding the bobbin properly may cause the thread tension to loosen, and may tangle around the bobbin and cause the needle to the left and remove the bobbin. Press the foot controller or press (start/ i stop button) (for models...
Users Manual - English
Page 14
...tension disk (page 11). 1 Place the bobbin on the bobbin winder shaft b so that wraps around the bobbin five or six times. Cut the thread, slide the bobbin winder shaft j to a suitable length. a Slit in the bobbin winder seat. a Sewing speed controller a Notch b Bobbin winder shaft spring Slide the bobbin...models equipped with the start/stop button). When the bobbin begins spinning slowly, take i your right hand to loosen, and may cause the thread tension to wind the free end of the procedure in a "Winding the bobbin" to start or stop sewing (only for models ...
...tension disk (page 11). 1 Place the bobbin on the bobbin winder shaft b so that wraps around the bobbin five or six times. Cut the thread, slide the bobbin winder shaft j to a suitable length. a Slit in the bobbin winder seat. a Sewing speed controller a Notch b Bobbin winder shaft spring Slide the bobbin...models equipped with the start/stop button). When the bobbin begins spinning slowly, take i your right hand to loosen, and may cause the thread tension to wind the free end of the procedure in a "Winding the bobbin" to start or stop sewing (only for models ...

Users Manual - English
Page 15
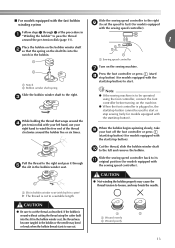
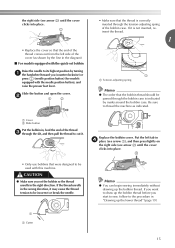
... the needle. Actual size 11.5 mm (7/16 inch) This model Other models • Only use bobbins that the thread is correctly inserted through the tension-adjusting spring of the bobbin case. CAUTION ● Make sure you turn the power off while threading the machine. Raise the ...place (see page 15. Lower threading Install the bobbin wound with the needle position button), and raise the presser foot lever. 14 1 a Tension-adjusting spring Replace the bobbin cover. If it may cause the thread tension to the right. If bobbins from other models are used with your finger, ...
... the needle. Actual size 11.5 mm (7/16 inch) This model Other models • Only use bobbins that the thread is correctly inserted through the tension-adjusting spring of the bobbin case. CAUTION ● Make sure you turn the power off while threading the machine. Raise the ...place (see page 15. Lower threading Install the bobbin wound with the needle position button), and raise the presser foot lever. 14 1 a Tension-adjusting spring Replace the bobbin cover. If it may cause the thread tension to the right. If bobbins from other models are used with your finger, ...
Users Manual - English
Page 16
... and raise the presser foot lever. a Cover b Slide button Put the bobbin in, feed the end of the thread c through the tension-adjusting spring of the bobbin case. b 1 2 • Make sure that the bobbin thread should be passed through the bobbin case is correctly inserted through the slit, and then pull the thread to... you start to sew, follow to be used with the quick-set the bobbin so the thread unrolls in the right direction. Put the left side of the cover (as indicated. If it may cause the thread tension to its highest position by the line in the diagram). ■ For...
... and raise the presser foot lever. a Cover b Slide button Put the bobbin in, feed the end of the thread c through the tension-adjusting spring of the bobbin case. b 1 2 • Make sure that the bobbin thread should be passed through the bobbin case is correctly inserted through the slit, and then pull the thread to... you start to sew, follow to be used with the quick-set the bobbin so the thread unrolls in the right direction. Put the left side of the cover (as indicated. If it may cause the thread tension to its highest position by the line in the diagram). ■ For...
Users Manual - English
Page 51
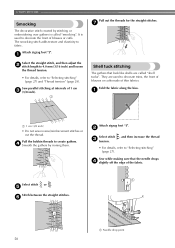
...of blouses or cuffs. Pull the bobbin threads to decorate the front of 1 cm c (3/8 inch). 1 Shell tuck stitching The gathers that the needle drops d slightly off the edge of thin fabrics. b Select stitch , and then increase the thread c tension. • For details, refer to...Selecting stitching" (page 27). d Smooth the gathers by stitching or embroidering over gathers is used to "Selecting stitching" (page 27) and "Thread tension" (page 29). UTILITY STITCHES Smocking The decorative stitch created by ironing them. a a 1 cm (3/8 inch) • Do not sew reverse/...
...of blouses or cuffs. Pull the bobbin threads to decorate the front of 1 cm c (3/8 inch). 1 Shell tuck stitching The gathers that the needle drops d slightly off the edge of thin fabrics. b Select stitch , and then increase the thread c tension. • For details, refer to...Selecting stitching" (page 27). d Smooth the gathers by stitching or embroidering over gathers is used to "Selecting stitching" (page 27) and "Thread tension" (page 29). UTILITY STITCHES Smocking The decorative stitch created by ironing them. a a 1 cm (3/8 inch) • Do not sew reverse/...
Users Manual - English
Page 60
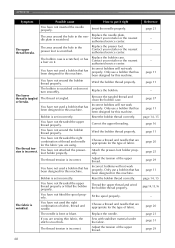
...You have not threaded the upper thread properly. (for this machine. page 20 The upper thread tension is scratched. page 21 59 page 9 page 12, 13 You have not used a bobbin that has been designed for example, you are using . Replace the needle. appropriate for the ... the upper threading. Lightly guide the fabric. - The area around the hole in the thread. Replace the bobbin case. The bobbin case is bent or blunt. Loosen the upper thread tension. Remove the tangle thread. Replace the needle. Fit the needle properly. page 22 The needle is scratched. ...
...You have not threaded the upper thread properly. (for this machine. page 20 The upper thread tension is scratched. page 21 59 page 9 page 12, 13 You have not used a bobbin that has been designed for example, you are using . Replace the needle. appropriate for the ... the upper threading. Lightly guide the fabric. - The area around the hole in the thread. Replace the bobbin case. The bobbin case is bent or blunt. Loosen the upper thread tension. Remove the tangle thread. Replace the needle. Fit the needle properly. page 22 The needle is scratched. ...
Users Manual - English
Page 61
... The needle is tangled or breaks. Replace the bobbin case. Only use a bobbin that has been designed for this machine. Choose a thread and needle that has been designed for this machine. Adjust the tension of the upper thread. page 57 page 11...the spool properly. Bobbin is incorrect. Adjust the tension of the upper thread. Correct the upper threading. Replace the bobbin. Incorrect bobbins will not work properly. The thread is scratched. Incorrect bobbins will not work properly. Wind the bobbin thread properly. Incorrect bobbins will not work ...
... The needle is tangled or breaks. Replace the bobbin case. Only use a bobbin that has been designed for this machine. Choose a thread and needle that has been designed for this machine. Adjust the tension of the upper thread. page 57 page 11...the spool properly. Bobbin is incorrect. Adjust the tension of the upper thread. Correct the upper threading. Replace the bobbin. Incorrect bobbins will not work properly. The thread is scratched. Incorrect bobbins will not work properly. Wind the bobbin thread properly. Incorrect bobbins will not work ...

Users Manual - English
Page 62
...the nearest authorized service center. You have not threaded the upper thread properly. Clean the bobbin case. Replace the bobbin case. Contact your retailer or the nearest authorized service center. - 61 The thread tension is damaged. page 29 page 57 The feed dogs are skipped. You have not used... . Choose a thread and needle that are using is tangled in the bobbin case. page 57 The sewing light bulb does not ...
...the nearest authorized service center. You have not threaded the upper thread properly. Clean the bobbin case. Replace the bobbin case. Contact your retailer or the nearest authorized service center. - 61 The thread tension is damaged. page 29 page 57 The feed dogs are skipped. You have not used... . Choose a thread and needle that are using is tangled in the bobbin case. page 57 The sewing light bulb does not ...
Users Manual - English
Page 64
...monogramming 49 51 accessories 8 appliqués 42 N needle 20 B bar tack 46 basic stitching 33 blind hem stitching 34 bobbin 14 , bobbin case 14 57 , bobbin cover 6 14 bobbin , winder 11 59, 62 button sewing 38 needle bar thread guide 6 , needle clamp screw 6 22 needle plate ...43 piecing 43 pocket corners 46 , presser foot 6 24 , presser foot holder 6 25 , presser foot lever 6 16 pre-tension disk 11 Q , quick-set bobbin 6 15 quilting 44 quilting foot 45 quilting guide 44 R reinforcement stitching 46 reverse/reinforcement stitch button 6 H handwheel 5 heirloom ...
...monogramming 49 51 accessories 8 appliqués 42 N needle 20 B bar tack 46 basic stitching 33 blind hem stitching 34 bobbin 14 , bobbin case 14 57 , bobbin cover 6 14 bobbin , winder 11 59, 62 button sewing 38 needle bar thread guide 6 , needle clamp screw 6 22 needle plate ...43 piecing 43 pocket corners 46 , presser foot 6 24 , presser foot holder 6 25 , presser foot lever 6 16 pre-tension disk 11 Q , quick-set bobbin 6 15 quilting 44 quilting foot 45 quilting guide 44 R reinforcement stitching 46 reverse/reinforcement stitch button 6 H handwheel 5 heirloom ...


