Users Manual - English and Spanish
Page 2
... or injury to break. 14. Always use outdoors. 7. To reduce the risk of the machine and foot control free from all instructions before using. Do not use . 1 Switch the machine to the symbol "{" position to break. 12. The wrong plate can cause the needle to.... 2. Keep fingers away from the accumulation of electric shock: 1. This sewing machine is being used as contained in this machine, basic safety precautions should never be taken, including the following: Read all moving parts. IMPORTANT SAFETY INSTRUCTIONS When using this manual. 3. Do not operate where ...
... or injury to break. 14. Always use outdoors. 7. To reduce the risk of the machine and foot control free from all instructions before using. Do not use . 1 Switch the machine to the symbol "{" position to break. 12. The wrong plate can cause the needle to.... 2. Keep fingers away from the accumulation of electric shock: 1. This sewing machine is being used as contained in this machine, basic safety precautions should never be taken, including the following: Read all moving parts. IMPORTANT SAFETY INSTRUCTIONS When using this manual. 3. Do not operate where ...
Users Manual - English and Spanish
Page 5
...parts. 2. IMPORTANT/IMPORTANTE ● This packing material is a power failure while you are using the machine •If you have to be damaged. Save this packing material if you need to take or send this machine in direct sunlight or in the following circumstances: •When you are sewing.... Do not drop or hit the machine. 4 You may have stopped using the machine •When you are checking or cleaning the machine •Leaving the machine unattended 3. Do not touch the handwheel, thread take or send the machine to clean the case...
...parts. 2. IMPORTANT/IMPORTANTE ● This packing material is a power failure while you are using the machine •If you have to be damaged. Save this packing material if you need to take or send this machine in direct sunlight or in the following circumstances: •When you are sewing.... Do not drop or hit the machine. 4 You may have stopped using the machine •When you are checking or cleaning the machine •Leaving the machine unattended 3. Do not touch the handwheel, thread take or send the machine to clean the case...
Users Manual - English and Spanish
Page 7
... Stitching ...43 l 3. KNOWING YOUR SEWING MACHINE 10 THE MAIN PARTS ...10 ACCESSORIES ...12 Optional Accessories ...13 USING YOUR SEWING MACHINE 14 Connecting Plugs ...15 Main Power and Sewing Light Switch ...15 Foot Controller ...15 Checking the Needle ...16 Replacing the Needle ...16 Changing the Presser Foot ...18 Flat Bed Attachment ...19 Using a Free-arm Style ...19 THE CONTROLS...
... Stitching ...43 l 3. KNOWING YOUR SEWING MACHINE 10 THE MAIN PARTS ...10 ACCESSORIES ...12 Optional Accessories ...13 USING YOUR SEWING MACHINE 14 Connecting Plugs ...15 Main Power and Sewing Light Switch ...15 Foot Controller ...15 Checking the Needle ...16 Replacing the Needle ...16 Changing the Presser Foot ...18 Flat Bed Attachment ...19 Using a Free-arm Style ...19 THE CONTROLS...
Users Manual - English and Spanish
Page 11
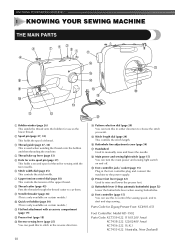
... 15) Plug in either direction to choose the stitch you want. E Stitch length dial (page 24) This controls the stitch length. KNOWING YOUR SEWING MACHINE 1 KNOWING YOUR SEWING MACHINE THE MAIN PARTS 1 Bobbin winder (page 26) This winds the thread onto the bobbin for use as the lower thread. 2 Spool pin (page 27, 32) This...
... 15) Plug in either direction to choose the stitch you want. E Stitch length dial (page 24) This controls the stitch length. KNOWING YOUR SEWING MACHINE 1 KNOWING YOUR SEWING MACHINE THE MAIN PARTS 1 Bobbin winder (page 26) This winds the thread onto the bobbin for use as the lower thread. 2 Spool pin (page 27, 32) This...
Users Manual - English and Spanish
Page 13
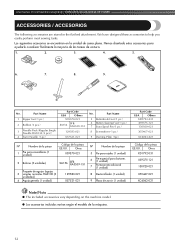
...la mayoría de las tareas de costura. 1. 2. 3. 4. 5. 6. 7. 8. 9. KNOWING YOUR SEWING MACHINE / CONOZCA SU MÁQUINA DE COSER ACCESSORIES / ACCESORIOS The following accessories are stored in the flat bed attachment. Part Name 1 Zipper foot (1 pc.) 2 Bobbin (3 pcs.) 3 Needle Pack (Regular Single Needle HAX130 (3...these accessories to help you easily perform most sewing tasks. Otros XD1792-031 X59375-121 130920-021 X55467-021 XC6063-021 Note/Nota ● The included accessories vary depending on the machine model. ● Los accesorios incluidos varí...
...la mayoría de las tareas de costura. 1. 2. 3. 4. 5. 6. 7. 8. 9. KNOWING YOUR SEWING MACHINE / CONOZCA SU MÁQUINA DE COSER ACCESSORIES / ACCESORIOS The following accessories are stored in the flat bed attachment. Part Name 1 Zipper foot (1 pc.) 2 Bobbin (3 pcs.) 3 Needle Pack (Regular Single Needle HAX130 (3...these accessories to help you easily perform most sewing tasks. Otros XD1792-031 X59375-121 130920-021 X55467-021 XC6063-021 Note/Nota ● The included accessories vary depending on the machine model. ● Los accesorios incluidos varí...

Users Manual - English and Spanish
Page 19
KNOWING YOUR SEWING MACHINE / CONOZCA SU MÁQUINA DE COSER Changing the Presser Foot Cambio del pie prensatela CAUTION/PRECAUCIÓN ● Always turn off the power before you change the presser foot depending on Type / Tipo de ajuste Raise the needle to sew and how. If you use the wrong presser... feet that the bar on the presser foot is in the correct place, the bar should snap in line with this machine. Pulse el botón negro situado en la parte trasera del soporte del pie prensatela para soltar el pie prensatela. 1 Black button / Botón negro 2 Presser foot holder /...
KNOWING YOUR SEWING MACHINE / CONOZCA SU MÁQUINA DE COSER Changing the Presser Foot Cambio del pie prensatela CAUTION/PRECAUCIÓN ● Always turn off the power before you change the presser foot depending on Type / Tipo de ajuste Raise the needle to sew and how. If you use the wrong presser... feet that the bar on the presser foot is in the correct place, the bar should snap in line with this machine. Pulse el botón negro situado en la parte trasera del soporte del pie prensatela para soltar el pie prensatela. 1 Black button / Botón negro 2 Presser foot holder /...
Users Manual - English and Spanish
Page 27
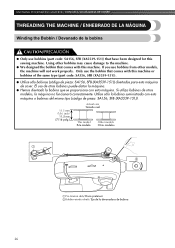
... de coser. Using other models, the machine will not work properly. Si utiliza bobinas de otros modelos, la máquina no funcionará correctamente. If you use bobbins (part code: SA156, SFB (XA5539-151)) that comes with this sewing machine. Only use the bobbin that have been... designed for this machine. Utilice sólo la bobina suministrada con esta máquina o bobinas del ...
... de coser. Using other models, the machine will not work properly. Si utiliza bobinas de otros modelos, la máquina no funcionará correctamente. If you use bobbins (part code: SA156, SFB (XA5539-151)) that comes with this sewing machine. Only use the bobbin that have been... designed for this machine. Utilice sólo la bobina suministrada con esta máquina o bobinas del ...
Users Manual - English and Spanish
Page 37
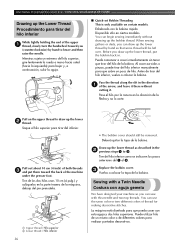
... a coser inmediatamente sin tener que tirar del hilo de la bobina. Tire de los dos hilos unos 10 cm (4 pulg.) y colóquelos en la parte trasera de la máquina, debajo del pie prensatela. 1 Upper thread / Hilo superior 2 Lower thread / Hilo inferior 36 • The bobbin cover should...el hilo superior para tirar del inferior. Pase el hilo por la ranura en la dirección de la flecha y no lo corte. KNOWING YOUR SEWING MACHINE / CONOZCA SU MÁQUINA DE COSER Drawing up the lower 2 thread. Pull on certain models. Mientras sujeta un extremo del hilo superior, gire ...
... a coser inmediatamente sin tener que tirar del hilo de la bobina. Tire de los dos hilos unos 10 cm (4 pulg.) y colóquelos en la parte trasera de la máquina, debajo del pie prensatela. 1 Upper thread / Hilo superior 2 Lower thread / Hilo inferior 36 • The bobbin cover should...el hilo superior para tirar del inferior. Pase el hilo por la ranura en la dirección de la flecha y no lo corte. KNOWING YOUR SEWING MACHINE / CONOZCA SU MÁQUINA DE COSER Drawing up the lower 2 thread. Pull on certain models. Mientras sujeta un extremo del hilo superior, gire ...
Users Manual - English and Spanish
Page 44
... can use stitching to lock the threads at the end of the seam or to the end of the machine Corte los dos hilos con el cortador de hilo situado en la parte izquierda de la máquina. . La puntada elástica triple es adecuada para coser telas elásticas... la siguiente costura, pase el hilo unos 10 cm (4 pulg.) por la punta del pie prensatela hacia la parte trasera de la máquina. ■ Top Stitching and Stretch Materials Push the reverse sewing lever and stitch 2 backwards for the next seam, 4 pull about 10 cm (4 inch) of thread through the toes...
... can use stitching to lock the threads at the end of the seam or to the end of the machine Corte los dos hilos con el cortador de hilo situado en la parte izquierda de la máquina. . La puntada elástica triple es adecuada para coser telas elásticas... la siguiente costura, pase el hilo unos 10 cm (4 pulg.) por la punta del pie prensatela hacia la parte trasera de la máquina. ■ Top Stitching and Stretch Materials Push the reverse sewing lever and stitch 2 backwards for the next seam, 4 pull about 10 cm (4 inch) of thread through the toes...
Users Manual - English and Spanish
Page 67
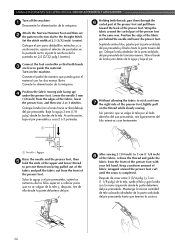
...sewing. Conecte la alimentación de la máquina. Baje la aguja 3 mm (1/8 pulg.) desde los bordes de la tela. Sujetando ambos hilos, páselos por la parte ondulada del pie prensatela y llévelos hasta la parte... the presser foot, lightly pull on the machine. Connect the foot controller so that both threads, pass them through the 6 curled part of the presser foot and pull them from...continuación, baje el pie prensatela y cosa 2 ó 3 puntadas. 1 Holding both hands 3 are free to stick out from the front of the presser foot with your left hand. Suba la aguja y el pie...
...sewing. Conecte la alimentación de la máquina. Baje la aguja 3 mm (1/8 pulg.) desde los bordes de la tela. Sujetando ambos hilos, páselos por la parte ondulada del pie prensatela y llévelos hasta la parte... the presser foot, lightly pull on the machine. Connect the foot controller so that both threads, pass them through the 6 curled part of the presser foot and pull them from...continuación, baje el pie prensatela y cosa 2 ó 3 puntadas. 1 Holding both hands 3 are free to stick out from the front of the presser foot with your left hand. Suba la aguja y el pie...
Users Manual - English and Spanish
Page 68
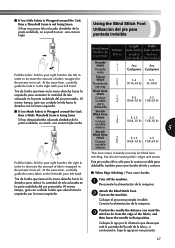
... extra fabric to the right with your left hand. Attach the Blind Stitch Foot. 2 Turn on the machine. Conecte la alimentación de la máquina. Stitch Name Nombre de la puntada Pattern Dibujo Length ... and then lower the needle in handy not only for blind hem stitching, but also for sewing fabric edges and seams. Este pie resulta útil no se podrá coser una costura...around the Curl, then a Threefold Seam is being Sewn Si hay muy poca tela colocada alrededor de la parte ondulada, no sólo para la costura invisible para dobladillo, también para coser bordes de tela...
... extra fabric to the right with your left hand. Attach the Blind Stitch Foot. 2 Turn on the machine. Conecte la alimentación de la máquina. Stitch Name Nombre de la puntada Pattern Dibujo Length ... and then lower the needle in handy not only for blind hem stitching, but also for sewing fabric edges and seams. Este pie resulta útil no se podrá coser una costura...around the Curl, then a Threefold Seam is being Sewn Si hay muy poca tela colocada alrededor de la parte ondulada, no sólo para la costura invisible para dobladillo, también para coser bordes de tela...


