Users Manual - English and Spanish
Page 2
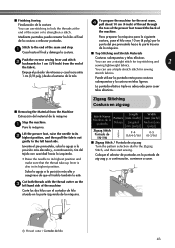
...household use bent needles. 13. Keep ventilation openings of the machine and foot control free from outlet. 9. Do not use the proper needle plate. This sewing machine is not working properly, if it to persons: 1. Always unplug the machine before cleaning. 2. Keep fingers away from the electrical outlet... not play with this manual. 3. To unplug, grasp the plug, not the cord. 10. The machine should be supervised to be taken, including the following: Read all moving parts. To reduce the risk of lint, dust, and loose cloth. 5. Do not operate where aerosol (...
...household use bent needles. 13. Keep ventilation openings of the machine and foot control free from outlet. 9. Do not use the proper needle plate. This sewing machine is not working properly, if it to persons: 1. Always unplug the machine before cleaning. 2. Keep fingers away from the electrical outlet... not play with this manual. 3. To unplug, grasp the plug, not the cord. 10. The machine should be supervised to be taken, including the following: Read all moving parts. To reduce the risk of lint, dust, and loose cloth. 5. Do not operate where aerosol (...
Users Manual - English and Spanish
Page 5
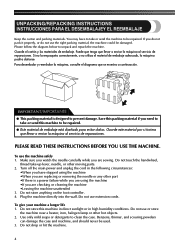
...materiales de embalaje. To use or store the machine near a heater, iron, halogen lamp or other part •If there is designed to be damaged. Plug the machine directly into the wall. You may have stopped using the machine •If you are replacing or removing the ... ● This packing material is a power failure while you are using the machine •When you are sewing. Please follow the diagram below to clean the case. Do not store this machine to prevent damage. UNPACKING/REPACKING INSTRUCTIONS INSTRUCCIONES PARA EL DESEMBALAJEY EL REEMBALAJE Keep the...
...materiales de embalaje. To use or store the machine near a heater, iron, halogen lamp or other part •If there is designed to be damaged. Plug the machine directly into the wall. You may have stopped using the machine •If you are replacing or removing the ... ● This packing material is a power failure while you are using the machine •When you are sewing. Please follow the diagram below to clean the case. Do not store this machine to prevent damage. UNPACKING/REPACKING INSTRUCTIONS INSTRUCCIONES PARA EL DESEMBALAJEY EL REEMBALAJE Keep the...
Users Manual - English and Spanish
Page 7
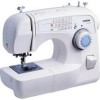
... Buttonholes ...54 Sewing Buttons ...55 6 KNOWING YOUR SEWING MACHINE 10 THE MAIN PARTS ...10 ACCESSORIES ...12 Optional Accessories ...13 USING YOUR SEWING MACHINE 14 Connecting Plugs ...15 Main Power and Sewing Light Switch ...15 Foot Controller ...15 Checking the Needle ...16 Replacing the Needle ...16 Changing the Presser Foot ...18 Flat Bed Attachment ...19 Using a Free-arm Style ...19...
... Buttonholes ...54 Sewing Buttons ...55 6 KNOWING YOUR SEWING MACHINE 10 THE MAIN PARTS ...10 ACCESSORIES ...12 Optional Accessories ...13 USING YOUR SEWING MACHINE 14 Connecting Plugs ...15 Main Power and Sewing Light Switch ...15 Foot Controller ...15 Checking the Needle ...16 Replacing the Needle ...16 Changing the Presser Foot ...18 Flat Bed Attachment ...19 Using a Free-arm Style ...19...
Users Manual - English and Spanish
Page 11
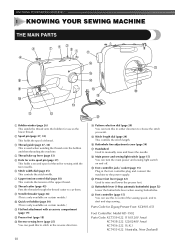
...15) You can turn this to control the sewing speed, and to start and stop sewing. I Foot controller jack / socket (page 15) Plug in either direction to choose the stitch you want. KNOWING YOUR SEWING MACHINE 1 KNOWING YOUR SEWING MACHINE THE MAIN PARTS 1 Bobbin winder (page 26) This winds the... thread onto the bobbin for use this in the foot controller plug and connect the machine to the power supply. L Foot controller (page 15...
...15) You can turn this to control the sewing speed, and to start and stop sewing. I Foot controller jack / socket (page 15) Plug in either direction to choose the stitch you want. KNOWING YOUR SEWING MACHINE 1 KNOWING YOUR SEWING MACHINE THE MAIN PARTS 1 Bobbin winder (page 26) This winds the... thread onto the bobbin for use this in the foot controller plug and connect the machine to the power supply. L Foot controller (page 15...
Users Manual - English and Spanish
Page 13
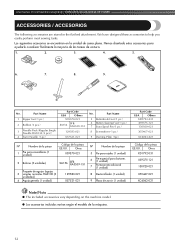
...según el modelo de la máquina. 12 Los siguientes accesorios se encuentran en la unidad de cama plana. KNOWING YOUR SEWING MACHINE / CONOZCA SU MÁQUINA DE COSER ACCESSORIES / ACCESORIOS The following accessories are stored in the flat bed attachment. No. Otros... (1 unidad) 9 Placa de zurcir (1 unidad) Código de la pieza EE.UU. Part Name 1 Zipper foot (1 pc.) 2 Bobbin (3 pcs.) 3 Needle Pack (Regular Single Needle HAX130 (3 pcs.)) 4 Twin Needle (1 pc.) Part Code USA Others X59370-021 SA156 SFB: XA5539-151 129583-021 X57521-021 No. Hemos dise...
...según el modelo de la máquina. 12 Los siguientes accesorios se encuentran en la unidad de cama plana. KNOWING YOUR SEWING MACHINE / CONOZCA SU MÁQUINA DE COSER ACCESSORIES / ACCESORIOS The following accessories are stored in the flat bed attachment. No. Otros... (1 unidad) 9 Placa de zurcir (1 unidad) Código de la pieza EE.UU. Part Name 1 Zipper foot (1 pc.) 2 Bobbin (3 pcs.) 3 Needle Pack (Regular Single Needle HAX130 (3 pcs.)) 4 Twin Needle (1 pc.) Part Code USA Others X59370-021 SA156 SFB: XA5539-151 129583-021 X57521-021 No. Hemos dise...

Users Manual - English and Spanish
Page 19
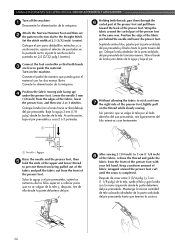
...fix the 4 presser foot onto the shank. El uso de otro pie prensatela puede causar lesiones o accidentes. Pulse el botón negro situado en la parte trasera del soporte del pie prensatela para soltar el pie prensatela. 1 Black button / Botón negro 2 Presser foot holder / Soporte del pie prensatela ...aguja para que la varilla del pie quede alineada con la ranura de la lengüeta. If the presser foot is in . KNOWING YOUR SEWING MACHINE / CONOZCA SU MÁQUINA DE COSER Changing the Presser Foot Cambio del pie prensatela CAUTION/PRECAUCIÓN ● Always turn off the power...
...fix the 4 presser foot onto the shank. El uso de otro pie prensatela puede causar lesiones o accidentes. Pulse el botón negro situado en la parte trasera del soporte del pie prensatela para soltar el pie prensatela. 1 Black button / Botón negro 2 Presser foot holder / Soporte del pie prensatela ...aguja para que la varilla del pie quede alineada con la ranura de la lengüeta. If the presser foot is in . KNOWING YOUR SEWING MACHINE / CONOZCA SU MÁQUINA DE COSER Changing the Presser Foot Cambio del pie prensatela CAUTION/PRECAUCIÓN ● Always turn off the power...
Users Manual - English and Spanish
Page 27
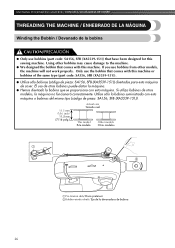
... / Devanado de la bobina CAUTION/PRECAUCIÓN ● Only use the bobbin that comes with this sewing machine. Only use bobbins (part code: SA156, SFB (XA5539-151)) that comes with this machine or bobbins of the same type (part code: SA156, SFB (XA5539-151)). ● Utilice sólo bobinas (código de pieza: SA156, SFB...
... / Devanado de la bobina CAUTION/PRECAUCIÓN ● Only use the bobbin that comes with this sewing machine. Only use bobbins (part code: SA156, SFB (XA5539-151)) that comes with this machine or bobbins of the same type (part code: SA156, SFB (XA5539-151)). ● Utilice sólo bobinas (código de pieza: SA156, SFB...
Users Manual - English and Spanish
Page 37
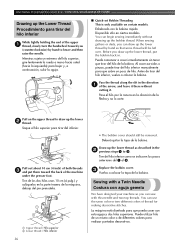
...bobina. Pull on certain models. La máquina está diseñada para que pueda coser con esta aguja y dos hilos superiores. KNOWING YOUR SEWING MACHINE / CONOZCA SU MÁQUINA DE COSER Drawing up the lower thread as described in the 2 previous steps 1 to 3. Enhebrado con la bobina rá... poco de hilo. Saque el hilo superior para tirar del inferior. Tire de los dos hilos unos 10 cm (4 pulg.) y colóquelos en la parte trasera de la máquina, debajo del pie prensatela. 1 Upper thread / Hilo superior 2 Lower thread / Hilo inferior 36 • The bobbin cover ...
...bobina. Pull on certain models. La máquina está diseñada para que pueda coser con esta aguja y dos hilos superiores. KNOWING YOUR SEWING MACHINE / CONOZCA SU MÁQUINA DE COSER Drawing up the lower thread as described in the 2 previous steps 1 to 3. Enhebrado con la bobina rá... poco de hilo. Saque el hilo superior para tirar del inferior. Tire de los dos hilos unos 10 cm (4 pulg.) y colóquelos en la parte trasera de la máquina, debajo del pie prensatela. 1 Upper thread / Hilo superior 2 Lower thread / Hilo inferior 36 • The bobbin cover ...
Users Manual - English and Spanish
Page 44
...por la punta del pie prensatela hacia la parte trasera de la máquina. ■ Top Stitching and Stretch Materials Push the reverse sewing lever and stitch 2 backwards for 1 cm (3/8 inch) from the Machine Extracción del material de la máquina Stop the machine. 1 Pare la máquina. Puede...9632; Zigzag Stitch / Puntada de zig-zag Turn the pattern selection dial to the end of the machine Corte los dos hilos con el cortador de hilo situado en la parte izquierda de la máquina. . ■ Finishing Sewing Finalización de la costura You can use a triple stretch stitch for...
...por la punta del pie prensatela hacia la parte trasera de la máquina. ■ Top Stitching and Stretch Materials Push the reverse sewing lever and stitch 2 backwards for 1 cm (3/8 inch) from the Machine Extracción del material de la máquina Stop the machine. 1 Pare la máquina. Puede...9632; Zigzag Stitch / Puntada de zig-zag Turn the pattern selection dial to the end of the machine Corte los dos hilos con el cortador de hilo situado en la parte izquierda de la máquina. . ■ Finishing Sewing Finalización de la costura You can use a triple stretch stitch for...
Users Manual - English and Spanish
Page 67
...just behind the needle and lower the presser foot. A continuación, baje el pie prensatela y cosa 2 ó 3 puntadas. 1 Holding both hands 3 are free to 3 cm (1 1/8 inch) 8 of the fabric, release the thread and guide the fabric from 7 the right side of the presser foot in the same... to stick out from the front of fabric wrapped around the curled part of the presser foot, lightly pull on the machine. Ajuste la anchura de la puntada en 2,5 (3/32 pulg.) (centro). Turn on the thread while slowly sewing. Without allowing the fabric to the Straight Stitch. Suba la aguja...
...just behind the needle and lower the presser foot. A continuación, baje el pie prensatela y cosa 2 ó 3 puntadas. 1 Holding both hands 3 are free to 3 cm (1 1/8 inch) 8 of the fabric, release the thread and guide the fabric from 7 the right side of the presser foot in the same... to stick out from the front of fabric wrapped around the curled part of the presser foot, lightly pull on the machine. Ajuste la anchura de la puntada en 2,5 (3/32 pulg.) (centro). Turn on the thread while slowly sewing. Without allowing the fabric to the Straight Stitch. Suba la aguja...
Users Manual - English and Spanish
Page 68
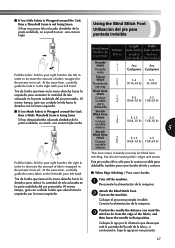
...fabric, and then lower the needle in handy not only for blind hem stitching, but also for sewing fabric edges and seams. Este pie resulta útil no se podrá coser una costura ...held in your right hand to the left hand. Attach the Blind Stitch Foot. 2 Turn on the machine. Al mismo tiempo, guíe con cuidado la tela hacia la derecha con la mano izquierda. &#...Wrapped around the Curl, then a Threefold Seam is being Sewn Si hay muy poca tela colocada alrededor de la parte ondulada, no sólo para la costura invisible para dobladillo, también para coser bordes de tela y...
...fabric, and then lower the needle in handy not only for blind hem stitching, but also for sewing fabric edges and seams. Este pie resulta útil no se podrá coser una costura ...held in your right hand to the left hand. Attach the Blind Stitch Foot. 2 Turn on the machine. Al mismo tiempo, guíe con cuidado la tela hacia la derecha con la mano izquierda. &#...Wrapped around the Curl, then a Threefold Seam is being Sewn Si hay muy poca tela colocada alrededor de la parte ondulada, no sólo para la costura invisible para dobladillo, también para coser bordes de tela y...


