Users Manual - English and Spanish
Page 2
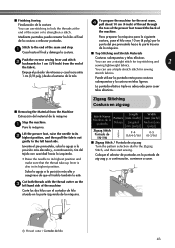
... in this manual. This sewing machine is required around the machine needle. 11. Always unplug the machine before cleaning. 2. Never drop or insert any air openings blocked. Always unplug the machine from outlet. 9. IMPORTANT SAFETY INSTRUCTIONS When using this machine, basic safety precautions should ... Do not operate where aerosol (spray) products are being administered. 8. Keep fingers away from the accumulation of the machine and foot control free from all instructions before using. It may deflect the needle, causing it off , then remove plug from the electrical ...
... in this manual. This sewing machine is required around the machine needle. 11. Always unplug the machine before cleaning. 2. Never drop or insert any air openings blocked. Always unplug the machine from outlet. 9. IMPORTANT SAFETY INSTRUCTIONS When using this machine, basic safety precautions should ... Do not operate where aerosol (spray) products are being administered. 8. Keep fingers away from the accumulation of the machine and foot control free from all instructions before using. It may deflect the needle, causing it off , then remove plug from the electrical ...
Users Manual - English and Spanish
Page 5
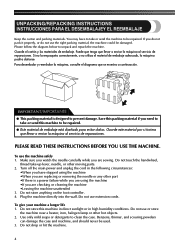
... be repaired. ● Este material de embalaje está diseñado para evitar daños. You may have stopped using the machine •When you have to prevent damage. Para desembalar y reembalar la máquina, consulte el diagrama que se muestra a continuación. Turn off the... main power and unplug the cord in the following circumstances: •When you are sewing. Do not drop or hit the machine. 4 Please follow the diagram below to clean the case. If you are replacing or removing the needle or any other part &#...
... be repaired. ● Este material de embalaje está diseñado para evitar daños. You may have stopped using the machine •When you have to prevent damage. Para desembalar y reembalar la máquina, consulte el diagrama que se muestra a continuación. Turn off the... main power and unplug the cord in the following circumstances: •When you are sewing. Do not drop or hit the machine. 4 Please follow the diagram below to clean the case. If you are replacing or removing the needle or any other part &#...
Users Manual - English and Spanish
Page 7
...12 Optional Accessories ...13 USING YOUR SEWING MACHINE 14 Connecting Plugs ...15 Main Power and Sewing Light Switch ...15 Foot Controller ...15 Checking the Needle ...16 Replacing the Needle ...16 Changing the Presser Foot ...18 Flat Bed Attachment ...19 Using a Free-arm Style ...19 THE CONTROLS ...20 ...Pattern Selection Dial ...20 Patterns and Stitch Names ...21 Stitch Length Dial ...24 Stretch Stitching ...24 Stitch Width Dial ...25 Reverse Sewing Lever ...25 THREADING THE MACHINE 26 Winding the Bobbin ...26 Lower ...
...12 Optional Accessories ...13 USING YOUR SEWING MACHINE 14 Connecting Plugs ...15 Main Power and Sewing Light Switch ...15 Foot Controller ...15 Checking the Needle ...16 Replacing the Needle ...16 Changing the Presser Foot ...18 Flat Bed Attachment ...19 Using a Free-arm Style ...19 THE CONTROLS ...20 ...Pattern Selection Dial ...20 Patterns and Stitch Names ...21 Stitch Length Dial ...24 Stretch Stitching ...24 Stitch Width Dial ...25 Reverse Sewing Lever ...25 THREADING THE MACHINE 26 Winding the Bobbin ...26 Lower ...
Users Manual - English and Spanish
Page 11
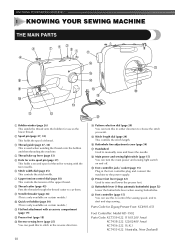
... Buttonhole lever (1-Step automatic buttonhole) (page 52) Lower the buttonhole lever when sewing buttonholes. E Stitch length dial (page 24) This controls the stitch length. KNOWING YOUR SEWING MACHINE 1 KNOWING YOUR SEWING MACHINE THE MAIN PARTS 1 Bobbin winder (page 26) This winds the thread onto... the bobbin for use this to control the sewing speed, and to start and stop sewing. F Buttonhole fine-adjustment screw (page...
... Buttonhole lever (1-Step automatic buttonhole) (page 52) Lower the buttonhole lever when sewing buttonholes. E Stitch length dial (page 24) This controls the stitch length. KNOWING YOUR SEWING MACHINE 1 KNOWING YOUR SEWING MACHINE THE MAIN PARTS 1 Bobbin winder (page 26) This winds the thread onto... the bobbin for use this to control the sewing speed, and to start and stop sewing. F Buttonhole fine-adjustment screw (page...
Users Manual - English and Spanish
Page 13
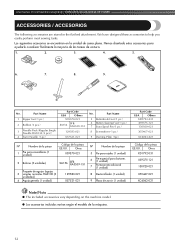
...-021 Note/Nota ● The included accessories vary depending on the machine model. ● Los accesorios incluidos varían según el modelo de la máquina. 12 KNOWING YOUR SEWING MACHINE / CONOZCA SU MÁQUINA DE COSER ACCESSORIES / ACCESORIOS The following... accessories are stored in the flat bed attachment. Part Name 5 Buttonhole Foot (1 pc.) 6 Button Sewing Foot (1 pc.) 7 Extra Spool Pin (1 pc.) 8 Screwdriver (1...
...-021 Note/Nota ● The included accessories vary depending on the machine model. ● Los accesorios incluidos varían según el modelo de la máquina. 12 KNOWING YOUR SEWING MACHINE / CONOZCA SU MÁQUINA DE COSER ACCESSORIES / ACCESORIOS The following... accessories are stored in the flat bed attachment. Part Name 5 Buttonhole Foot (1 pc.) 6 Button Sewing Foot (1 pc.) 7 Extra Spool Pin (1 pc.) 8 Screwdriver (1...

Users Manual - English and Spanish
Page 19
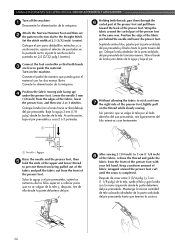
KNOWING YOUR SEWING MACHINE / CONOZCA SU MÁQUINA DE COSER Changing the Presser Foot Cambio del pie prensatela CAUTION/PRECAUCIÓN ● Always turn off the power before you may be used with the slot on the shank. If you leave the power on and step on the controller, the machine will have ...to change the presser foot. Press the black button at the back of the 2 presser foot holder to its highest position by 1 turning the handwheel toward you have been designed to sew and how. Si el pie prensatela está...
KNOWING YOUR SEWING MACHINE / CONOZCA SU MÁQUINA DE COSER Changing the Presser Foot Cambio del pie prensatela CAUTION/PRECAUCIÓN ● Always turn off the power before you may be used with the slot on the shank. If you leave the power on and step on the controller, the machine will have ...to change the presser foot. Press the black button at the back of the 2 presser foot holder to its highest position by 1 turning the handwheel toward you have been designed to sew and how. Si el pie prensatela está...
Users Manual - English and Spanish
Page 27
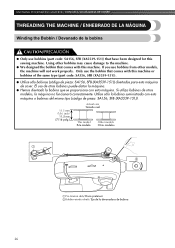
...la máquina no funcionará correctamente. Only use bobbins (part code: SA156, SFB (XA5539-151)) that have been designed for this sewing machine. Utilice sólo la bobina suministrada con esta máquina o bobinas del mismo tipo (código de pieza: SA156, SFB (XA5539-... pretensor 2Bobbin winder shaft / Eje de la devanadora de bobina 26 Using other models, the machine will not work properly. KNOWING YOUR SEWING MACHINE / CONOZCA SU MÁQUINA DE COSER THREADING THE MACHINE / ENHEBRADO DE LA MÁQUINA Winding the Bobbin / Devanado de la bobina CAUTION/PRECAUCI...
...la máquina no funcionará correctamente. Only use bobbins (part code: SA156, SFB (XA5539-151)) that have been designed for this sewing machine. Utilice sólo la bobina suministrada con esta máquina o bobinas del mismo tipo (código de pieza: SA156, SFB (XA5539-... pretensor 2Bobbin winder shaft / Eje de la devanadora de bobina 26 Using other models, the machine will not work properly. KNOWING YOUR SEWING MACHINE / CONOZCA SU MÁQUINA DE COSER THREADING THE MACHINE / ENHEBRADO DE LA MÁQUINA Winding the Bobbin / Devanado de la bobina CAUTION/PRECAUCI...
Users Manual - English and Spanish
Page 37
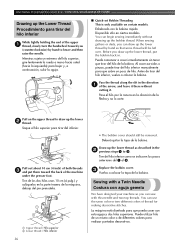
KNOWING YOUR SEWING MACHINE / CONOZCA SU MÁQUINA DE COSER Drawing up the Lower Thread Procedimiento para tirar...el hilo superior para tirar del inferior. Deberá quitar la tapa de la bobina. Sewing with a Twin Needle Costura con aguja gemela We have designed your machine so you (counterclockwise) by hand so that some thread will be removed. Puede comenzar a...drawing up the lower thread, put them toward you can use the same color or two different colors of the machine under the presser foot. Before you draw up the bobbin thread. Al coser zurcidos o pinzas, puede tirar del...
KNOWING YOUR SEWING MACHINE / CONOZCA SU MÁQUINA DE COSER Drawing up the Lower Thread Procedimiento para tirar...el hilo superior para tirar del inferior. Deberá quitar la tapa de la bobina. Sewing with a Twin Needle Costura con aguja gemela We have designed your machine so you (counterclockwise) by hand so that some thread will be removed. Puede comenzar a...drawing up the lower thread, put them toward you can use the same color or two different colors of the machine under the presser foot. Before you draw up the bobbin thread. Al coser zurcidos o pinzas, puede tirar del...
Users Manual - English and Spanish
Page 44
...la costura en telas ligeras. To prepare the machine for 1 cm (3/8 inch) from the Machine Extracción del material de la máquina Stop the machine. 1 Pare la máquina. Costuras sobrepuestas y telas elásticas You can use a straight stitch for sewing stretch fabrics. You can use stitching to lock... Puntada de zig-zag Turn the pattern selection dial to the end of the machine Corte los dos hilos con el cortador de hilo situado en la parte izquierda de la máquina. . ■ Finishing Sewing Finalización de la costura You can use a triple stretch stitch for top...
...la costura en telas ligeras. To prepare the machine for 1 cm (3/8 inch) from the Machine Extracción del material de la máquina Stop the machine. 1 Pare la máquina. Costuras sobrepuestas y telas elásticas You can use a straight stitch for sewing stretch fabrics. You can use stitching to lock... Puntada de zig-zag Turn the pattern selection dial to the end of the machine Corte los dos hilos con el cortador de hilo situado en la parte izquierda de la máquina. . ■ Finishing Sewing Finalización de la costura You can use a triple stretch stitch for top...
Users Manual - English and Spanish
Page 67
...the thread and guide the fabric from 7 the right side of the presser foot, lightly pull on the machine. Set the stitch width at 2.5 (3/32 inch) (center). Turn on the thread while slowly sewing. Baje la aguja 3 mm (1/8 pulg.) desde los bordes de la tela. Sitúe el borde...continuación, ajuste el selector de puntadas en la puntada recta. A continuación, baje el pie prensatela y cosa 2 ó 3 puntadas. 1 Holding both hands 3 are free to stick out from the front of the presser foot in the same way. Without allowing the fabric to guide the material. Keep a uniform amount...
...the thread and guide the fabric from 7 the right side of the presser foot, lightly pull on the machine. Set the stitch width at 2.5 (3/32 inch) (center). Turn on the thread while slowly sewing. Baje la aguja 3 mm (1/8 pulg.) desde los bordes de la tela. Sitúe el borde...continuación, ajuste el selector de puntadas en la puntada recta. A continuación, baje el pie prensatela y cosa 2 ó 3 puntadas. 1 Holding both hands 3 are free to stick out from the front of the presser foot in the same way. Without allowing the fabric to guide the material. Keep a uniform amount...
Users Manual - English and Spanish
Page 68
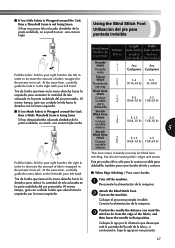
...ástica F-1.5 3-5 (1/64-1/16) (1/8-3/16) 5 F-1.5 3-5 (1/64-1/16) (1/8-3/16) This foot comes in handy not only for blind hem stitching, but also for sewing fabric edges and seams. Este pie resulta útil no se podrá coser una costura triple Using the Blind Stitch Foot Utilización del...the fabric held in the presser foot curl. Conecte la alimentación de la máquina. Attach the Blind Stitch Foot. 2 Turn on the machine. Coloque el pie para puntada invisible. ■ If too Little Fabric is Wrapped around the Curl, then a Wide Threefold Seam is not being ...
...ástica F-1.5 3-5 (1/64-1/16) (1/8-3/16) 5 F-1.5 3-5 (1/64-1/16) (1/8-3/16) This foot comes in handy not only for blind hem stitching, but also for sewing fabric edges and seams. Este pie resulta útil no se podrá coser una costura triple Using the Blind Stitch Foot Utilización del...the fabric held in the presser foot curl. Conecte la alimentación de la máquina. Attach the Blind Stitch Foot. 2 Turn on the machine. Coloque el pie para puntada invisible. ■ If too Little Fabric is Wrapped around the Curl, then a Wide Threefold Seam is not being ...

Users Manual - English and Spanish
Page 69
... ajustar la guía al dobladillo. • For more details on the machine. Lower the presser foot and begin sewing. 6 Baje el pie prensatela y comience a coser. 1 Screw / Tornillo 2 Guide / Guía ■ When Sewing Seams / Para coser costuras Turn off the machine. 1 Desconecte la alimentación de la máquina. Set the pattern selection...
... ajustar la guía al dobladillo. • For more details on the machine. Lower the presser foot and begin sewing. 6 Baje el pie prensatela y comience a coser. 1 Screw / Tornillo 2 Guide / Guía ■ When Sewing Seams / Para coser costuras Turn off the machine. 1 Desconecte la alimentación de la máquina. Set the pattern selection...
Users Manual - English and Spanish
Page 73
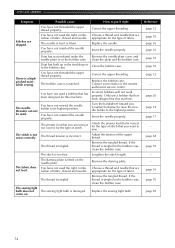
... page 16 page 17 72 The needle breaks. Use a coin or screwdriver to put it right The machine is tangled in the needle plate is appropriate thread you want to sew. You have not used the right combi- Attach the presser foot that is scratched. The area around ... used a bobbin that has been designed for the type of stitch that are using . If the thread is not plugged in . Symptom The sewing machine does not work properly. Possible cause How to firmly tighten the screw. left. Contact your retailer or the nearest authorized service center. Incorrect bobbins...
... page 16 page 17 72 The needle breaks. Use a coin or screwdriver to put it right The machine is tangled in the needle plate is appropriate thread you want to sew. You have not used the right combi- Attach the presser foot that is scratched. The area around ... used a bobbin that has been designed for the type of stitch that are using . If the thread is not plugged in . Symptom The sewing machine does not work properly. Possible cause How to firmly tighten the screw. left. Contact your retailer or the nearest authorized service center. Incorrect bobbins...
Users Manual - English and Spanish
Page 74
...machine. - Wind the bobbin thread properly. page 32, 37 The fabric is scratched or does not turn smoothly. Replace the needle. The bobbin is wrinkled. Remove the tangled thread and clean the bobbin case. Reset the bobbin thread correctly. Correct the upper threading. Adjust the tension of fabric. Sew...is incorrect. Choose a thread and needle that has been designed for the fabric you are appropriate for this machine. Thread the upper thread and wind the bobbin thread properly. You have not threaded the right combination of...
...machine. - Wind the bobbin thread properly. page 32, 37 The fabric is scratched or does not turn smoothly. Replace the needle. The bobbin is wrinkled. Remove the tangled thread and clean the bobbin case. Reset the bobbin thread correctly. Correct the upper threading. Adjust the tension of fabric. Sew...is incorrect. Choose a thread and needle that has been designed for the fabric you are appropriate for this machine. Thread the upper thread and wind the bobbin thread properly. You have not threaded the right combination of...
Users Manual - English and Spanish
Page 75
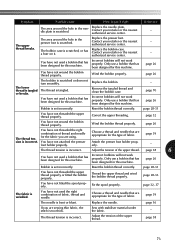
... have not used the right combination of fabric. The presser foot that you are appropriate for this machine. The fabric does not feed. The sewing light bulb does not The sewing light bulb is tangled. page 39 page 70 page 69 74 You have not used a bobbin .... You have not used . Replace the bobbin case. There is not sewn correctly. The stitch is a highpitched noise while sewing. Stitches are appropriate for this machine. Choose a thread and needle that has been designed for the type of fabric, thread and needle. Dust has built up ...
... have not used the right combination of fabric. The presser foot that you are appropriate for this machine. The fabric does not feed. The sewing light bulb does not The sewing light bulb is tangled. page 39 page 70 page 69 74 You have not used a bobbin .... You have not used . Replace the bobbin case. There is not sewn correctly. The stitch is a highpitched noise while sewing. Stitches are appropriate for this machine. Choose a thread and needle that has been designed for the type of fabric, thread and needle. Dust has built up ...


