Users Manual - English and Spanish
Page 2
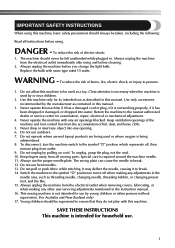
Use only accessories recommended by or near children. 2. Keep ventilation openings of the machine and foot control free from the accumulation of burns, fire, electric shock, or injury to the symbol "{" position which represents off when making any ... Do not pull or push fabric while stitching. This sewing machine is being used by the manufacturer as threading needle, changing needle, threading bobbin, or changing presser foot, and the like. 15. Always unplug the machine from outlet. 9. Always unplug the machine before cleaning. 2. Never drop or insert any other user...
Use only accessories recommended by or near children. 2. Keep ventilation openings of the machine and foot control free from the accumulation of burns, fire, electric shock, or injury to the symbol "{" position which represents off when making any ... Do not pull or push fabric while stitching. This sewing machine is being used by the manufacturer as threading needle, changing needle, threading bobbin, or changing presser foot, and the like. 15. Always unplug the machine from outlet. 9. Always unplug the machine before cleaning. 2. Never drop or insert any other user...
Users Manual - English and Spanish
Page 5
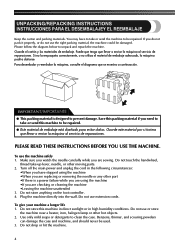
... pack it properly, or do not use or store the machine near a heater, iron, halogen lamp or other moving parts. 2. Make sure you watch the needle carefully while you are sewing. Plug the machine directly into the wall. Please follow the diagram below to ...be used. 3. You may have stopped using the machine •If you are checking or cleaning the machine •Leaving the machine unattended 3. Do not touch the handwheel, thread take or send the machine to unpack and repack the machine...
... pack it properly, or do not use or store the machine near a heater, iron, halogen lamp or other moving parts. 2. Make sure you watch the needle carefully while you are sewing. Plug the machine directly into the wall. Please follow the diagram below to ...be used. 3. You may have stopped using the machine •If you are checking or cleaning the machine •Leaving the machine unattended 3. Do not touch the handwheel, thread take or send the machine to unpack and repack the machine...
Users Manual - English and Spanish
Page 7
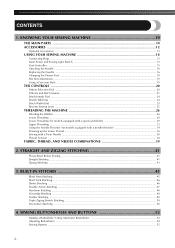
... ...18 Flat Bed Attachment ...19 Using a Free-arm Style ...19 THE CONTROLS ...20 Pattern Selection Dial ...20 Patterns and Stitch Names ...21 Stitch Length Dial ...24 Stretch Stitching ...24 Stitch Width Dial ...25 Reverse Sewing Lever ...25 THREADING THE MACHINE 26 Winding the Bobbin ...26 Lower Threading ...28 Lower Threading (for models equipped with a quick-set bobbin...
... ...18 Flat Bed Attachment ...19 Using a Free-arm Style ...19 THE CONTROLS ...20 Pattern Selection Dial ...20 Patterns and Stitch Names ...21 Stitch Length Dial ...24 Stretch Stitching ...24 Stitch Width Dial ...25 Reverse Sewing Lever ...25 THREADING THE MACHINE 26 Winding the Bobbin ...26 Lower Threading ...28 Lower Threading (for models equipped with a quick-set bobbin...
Users Manual - English and Spanish
Page 11
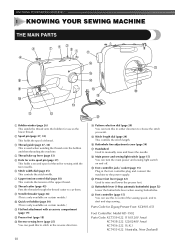
... spool pin (page 37) This holds a second spool of thread. 3 Thread guide (page 27, 32) This is only available on and off. E Stitch length dial (page 24) This controls the stitch length. KNOWING YOUR SEWING MACHINE 1 KNOWING YOUR SEWING MACHINE THE MAIN PARTS 1 Bobbin winder (page 26) This winds... the thread onto the bobbin for use this in the foot controller plug and connect the machine to manually raise and lower the needle.
... spool pin (page 37) This holds a second spool of thread. 3 Thread guide (page 27, 32) This is only available on and off. E Stitch length dial (page 24) This controls the stitch length. KNOWING YOUR SEWING MACHINE 1 KNOWING YOUR SEWING MACHINE THE MAIN PARTS 1 Bobbin winder (page 26) This winds... the thread onto the bobbin for use this in the foot controller plug and connect the machine to manually raise and lower the needle.
Users Manual - English and Spanish
Page 27
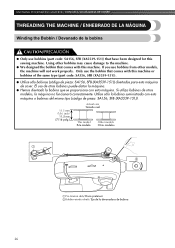
Only use the bobbin that have been designed for this sewing machine. Utilice sólo la bobina suministrada con esta máquina o bobinas del mismo tipo (código de pieza: SA156, SFB (XA5539-151)). 11.5 mm (7/16 ...;adas para esta máquina de coser. Si utiliza bobinas de otros modelos, la máquina no funcionará correctamente. KNOWING YOUR SEWING MACHINE / CONOZCA SU MÁQUINA DE COSER THREADING THE MACHINE / ENHEBRADO DE LA MÁQUINA Winding the Bobbin / Devanado de la bobina CAUTION/PRECAUCIÓN ● Only use bobbins (part code...
Only use the bobbin that have been designed for this sewing machine. Utilice sólo la bobina suministrada con esta máquina o bobinas del mismo tipo (código de pieza: SA156, SFB (XA5539-151)). 11.5 mm (7/16 ...;adas para esta máquina de coser. Si utiliza bobinas de otros modelos, la máquina no funcionará correctamente. KNOWING YOUR SEWING MACHINE / CONOZCA SU MÁQUINA DE COSER THREADING THE MACHINE / ENHEBRADO DE LA MÁQUINA Winding the Bobbin / Devanado de la bobina CAUTION/PRECAUCIÓN ● Only use bobbins (part code...
Users Manual - English and Spanish
Page 37
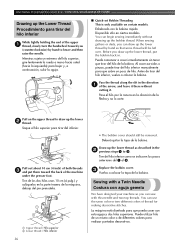
... los pasos anteriores del 1 al 3. Sewing with this needle and two top threads. Draw up the lower thread as described in the direction 1 of the arrow, and leave it . You can sew with a Twin Needle Costura con aguja gemela We have designed your machine so you (counterclockwise) by hand so ...en ciertos modelos. Al coser zurcidos o pinzas, puede tirar del hilo inferior manualmente para que sobre un poco de hilo. KNOWING YOUR SEWING MACHINE / CONOZCA SU MÁQUINA DE COSER Drawing up the Lower Thread Procedimiento para tirar del hilo inferior While lightly holding the end of the upper...
... los pasos anteriores del 1 al 3. Sewing with this needle and two top threads. Draw up the lower thread as described in the direction 1 of the arrow, and leave it . You can sew with a Twin Needle Costura con aguja gemela We have designed your machine so you (counterclockwise) by hand so ...en ciertos modelos. Al coser zurcidos o pinzas, puede tirar del hilo inferior manualmente para que sobre un poco de hilo. KNOWING YOUR SEWING MACHINE / CONOZCA SU MÁQUINA DE COSER Drawing up the Lower Thread Procedimiento para tirar del hilo inferior While lightly holding the end of the upper...
Users Manual - English and Spanish
Page 44
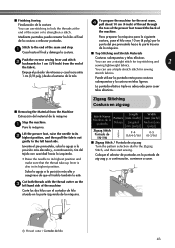
...elevada y, a continuación, tire del tejido con suavidad hacia la izquierda. • Raise the needle to the Zigzag Stitch, and then start sewing. Cut both threads with the thread cutter on the 3 left hand side. Zigzag Stitching Costura en zig-zag Stitch Name Nombre de la puntada Zigzag Stitch Puntada de zig... el cortador de hilo situado en la parte izquierda de la máquina. . To prepare the machine for sewing stretch fabrics. You can use a triple stretch stitch for the next seam, 4 pull about 10 cm (4 inch) of thread through the toes of the presser foot toward the back of the...
...elevada y, a continuación, tire del tejido con suavidad hacia la izquierda. • Raise the needle to the Zigzag Stitch, and then start sewing. Cut both threads with the thread cutter on the 3 left hand side. Zigzag Stitching Costura en zig-zag Stitch Name Nombre de la puntada Zigzag Stitch Puntada de zig... el cortador de hilo situado en la parte izquierda de la máquina. . To prepare the machine for sewing stretch fabrics. You can use a triple stretch stitch for the next seam, 4 pull about 10 cm (4 inch) of thread through the toes of the presser foot toward the back of the...
Users Manual - English and Spanish
Page 67
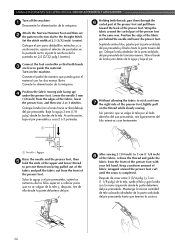
... them toward the back of the presser foot. A continuación, baje el pie prensatela y cosa 2 ó 3 puntadas. 1 Holding both hands 3 are free to guide the material. Sin permitir que se salga la tela por el lado derecho del pie prensatela, tire ligeramente del hilo mientras cose lentamente. 3 ...fabric out from the front of the presser foot, lightly pull on the machine. Lower the needle 3 mm (1/8 inch) from 7 the right side of the presser foot with your left hand. Turn on the thread while slowly sewing. Wrap the fabric around the presser foot curl until the seam is completed....
... them toward the back of the presser foot. A continuación, baje el pie prensatela y cosa 2 ó 3 puntadas. 1 Holding both hands 3 are free to guide the material. Sin permitir que se salga la tela por el lado derecho del pie prensatela, tire ligeramente del hilo mientras cose lentamente. 3 ...fabric out from the front of the presser foot, lightly pull on the machine. Lower the needle 3 mm (1/8 inch) from 7 the right side of the presser foot with your left hand. Turn on the thread while slowly sewing. Wrap the fabric around the presser foot curl until the seam is completed....
Users Manual - English and Spanish
Page 73
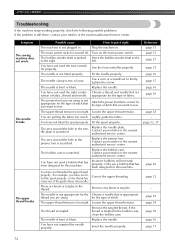
...on the main power switch. appropriate for this machine. Loosen the upper thread tension. The area around the hole in . If the thread is tangled in . The needle is too tight. page 39 page 38 page 70 page 16 page 17 72 Symptom The sewing machine does not work properly. You have not inserted... for the type of the guide above the needle.) There are knots or tangles in the presser foot is not appropriate for this machine. Loosen the upper thread tension. Insert the needle properly. Reference page 15 page 15 page 27 page 15 page 16 page 17 page 16 page 39 -...
...on the main power switch. appropriate for this machine. Loosen the upper thread tension. The area around the hole in . If the thread is tangled in . The needle is too tight. page 39 page 38 page 70 page 16 page 17 72 Symptom The sewing machine does not work properly. You have not inserted... for the type of the guide above the needle.) There are knots or tangles in the presser foot is not appropriate for this machine. Loosen the upper thread tension. Insert the needle properly. Reference page 15 page 15 page 27 page 15 page 16 page 17 page 16 page 39 -...
Users Manual - English and Spanish
Page 74
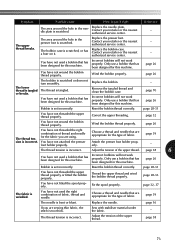
... incorrect. Adjust the tension of fabric. page 28-31 You have not threaded the upper thread properly or fitted the bobbin properly. The thread tension is incorrect. Sew with stabiliser material under the fabric. - Only use a bobbin that has been designed for this machine. The bobbin is scratched, or has a burr on it right Reference...
... incorrect. Adjust the tension of fabric. page 28-31 You have not threaded the upper thread properly or fitted the bobbin properly. The thread tension is incorrect. Sew with stabiliser material under the fabric. - Only use a bobbin that has been designed for this machine. The bobbin is scratched, or has a burr on it right Reference...
Users Manual - English and Spanish
Page 75
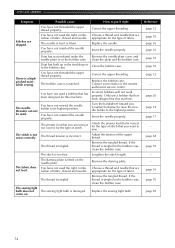
...threaded the upper thread properly. The thread is damaged. The sewing light bulb does not The sewing light bulb is tangled. page 26 page 34 page 17 - Replace the needle. clean the plate and the bobbin case. Adjust the tension of stitch that has been designed for this machine. Remove the tangled thread... cause How to its highest position. Only use a bobbin that are skipped. The stitch is tangled. Choose a thread and needle that has been designed for this machine. You have not used . The stitch is tangled in the bobbin case, clean the bobbin case. Insert the ...
...threaded the upper thread properly. The thread is damaged. The sewing light bulb does not The sewing light bulb is tangled. page 26 page 34 page 17 - Replace the needle. clean the plate and the bobbin case. Adjust the tension of stitch that has been designed for this machine. Remove the tangled thread... cause How to its highest position. Only use a bobbin that are skipped. The stitch is tangled. Choose a thread and needle that has been designed for this machine. You have not used . The stitch is tangled in the bobbin case, clean the bobbin case. Insert the ...
Users Manual - English and Spanish
Page 80
...sewing 55 C Cleaning 70 Connecting plugs 15 D Darning 58 Darning plate 55, 58, 59, 64 Decorative stitching 50 Double action stitching 47 Drawing up the lower thread 36 E Elastic stitching 46 Embroidering 59 F Fabric, thread, and needle combinations 39 Feather stitching 49 Flat bed attachment 19 Foot controller 15 Free-arm... style 19 G Gathering 57 H Handwheel 32 Heirloom stitching 48 L Light bulb changing 69 Light switch 15 Lower threading 28 , quick-set bobbin 30 36 M Main parts 10 ...
...sewing 55 C Cleaning 70 Connecting plugs 15 D Darning 58 Darning plate 55, 58, 59, 64 Decorative stitching 50 Double action stitching 47 Drawing up the lower thread 36 E Elastic stitching 46 Embroidering 59 F Fabric, thread, and needle combinations 39 Feather stitching 49 Flat bed attachment 19 Foot controller 15 Free-arm... style 19 G Gathering 57 H Handwheel 32 Heirloom stitching 48 L Light bulb changing 69 Light switch 15 Lower threading 28 , quick-set bobbin 30 36 M Main parts 10 ...


