
Accessory Catalog
Page 4
.... Adjustable Zipper & Piping Foot Brother General Sewing Accessories 06 Adjustable Zipper & Piping Foot Attaches zippers and pipings easily. Screw on either left ). 2. Check the needle does not hit the presser foot, and then tighten the clamp screw with just right pressure. 1. Sew. Its position can be adjusted..., PC-6500, PC-8200 and PC-8500 sewing machines. Position the presser foot over the long feed dogs on the presser foot and select a straight stitch (left or right. 3. SA161 All Brother home-use sewing machines www.brother.com Loosen the clamp screw at the back of...
.... Adjustable Zipper & Piping Foot Brother General Sewing Accessories 06 Adjustable Zipper & Piping Foot Attaches zippers and pipings easily. Screw on either left ). 2. Check the needle does not hit the presser foot, and then tighten the clamp screw with just right pressure. 1. Sew. Its position can be adjusted..., PC-6500, PC-8200 and PC-8500 sewing machines. Position the presser foot over the long feed dogs on the presser foot and select a straight stitch (left or right. 3. SA161 All Brother home-use sewing machines www.brother.com Loosen the clamp screw at the back of...

Accessory Catalog
Page 5
... the guide on the presser foot. 2. It can also be placed. 2. Place the edge of the presser foot. 4. SA184 All Brother home-use sewing machines Ring Bearer Pillow & Hankerchief Innov-is Project Book (See pages 37 and 39 for precise and easy joining of another fabric. Press...hem, then baste about 3/16" (5 mm) from the edge of the fabric and lower the needle and the presser foot. 3. Edge stitching: 1. Blind hem: 1. Sew. SA133 ABCDEFJKMN SA134 GHILOP SA128 All Brother home-use . Baste the zipper along the seam allowance on interfacing tape to the seam allowance where...
... the guide on the presser foot. 2. It can also be placed. 2. Place the edge of the presser foot. 4. SA184 All Brother home-use sewing machines Ring Bearer Pillow & Hankerchief Innov-is Project Book (See pages 37 and 39 for precise and easy joining of another fabric. Press...hem, then baste about 3/16" (5 mm) from the edge of the fabric and lower the needle and the presser foot. 3. Edge stitching: 1. Blind hem: 1. Sew. SA133 ABCDEFJKMN SA134 GHILOP SA128 All Brother home-use . Baste the zipper along the seam allowance on interfacing tape to the seam allowance where...

Accessory Catalog
Page 6
... into the curled part of the foot. 5. Non Stick Foot Designed for details.) www.brother.com Lower the presser foot so that the foot guide is exactly against the edge of the fabric. Sew along the guide. Raise the needle and the presser foot. 5. Select an overlock stitch. 2. Attach the presser foot. 3. Raise...
... into the curled part of the foot. 5. Non Stick Foot Designed for details.) www.brother.com Lower the presser foot so that the foot guide is exactly against the edge of the fabric. Sew along the guide. Raise the needle and the presser foot. 5. Select an overlock stitch. 2. Attach the presser foot. 3. Raise...

Accessory Catalog
Page 7
... ABCDEFGHJKLMNO Straight Stitch Foot Straight Stitch Foot and Straight Stitch Needle Plate Vertical Stitching Alignment Foot Brother General Sewing Accessories 12 Straight Stitch Foot For precise straight stitching on thin fabrics or on the needle plate with the thumbscrew of the fabric. 2. Helpful for...Foot (QuattroTM 6000D) This specially marked "V" foot is included with all Brother presser feet. Sew the stitches keeping a certain seam allowance. SA108 GHILOP Straight Stitch Foot and Straight Stitch Needle Plate Use the Straight Stitch Foot with the center straight stitch. SA189 ...
... ABCDEFGHJKLMNO Straight Stitch Foot Straight Stitch Foot and Straight Stitch Needle Plate Vertical Stitching Alignment Foot Brother General Sewing Accessories 12 Straight Stitch Foot For precise straight stitching on thin fabrics or on the needle plate with the thumbscrew of the fabric. 2. Helpful for...Foot (QuattroTM 6000D) This specially marked "V" foot is included with all Brother presser feet. Sew the stitches keeping a certain seam allowance. SA108 GHILOP Straight Stitch Foot and Straight Stitch Needle Plate Use the Straight Stitch Foot with the center straight stitch. SA189 ...
Accessory Catalog
Page 10
... to the edge of the presser foot. 3. Hint: If the needle does not position properly on the bias tape, loosen the position knob on the presser foot. 4. Pull the tape from the rear of the bias tape. SA109 All Brother home-use sewing machines Baby Vest Innov-is Project Book (See page 41...
... to the edge of the presser foot. 3. Hint: If the needle does not position properly on the bias tape, loosen the position knob on the presser foot. 4. Pull the tape from the rear of the bias tape. SA109 All Brother home-use sewing machines Baby Vest Innov-is Project Book (See page 41...

Accessory Catalog
Page 12
...facing down. Select a straight stitch, left needle position. 2. Zigzag-sew with the surface of loops to make or attach piping. Gathering Foot Used for securing edges of the foot. 3. Requires Low Shank Adapter for details.) Brother Embellishment Feet Open Toe Foot 22 Pearls and...1. Place the fabric to be gathered into the slit in place using . 3. Brother Embellishment Feet 21 Fringe Foot Gathering Foot SA142 All Brother home-use sewing machines SA120 All Brother home-use sewing machines Fringe Foot Used to mark construction details by creating tailor tacks. Girl's Dress...
...facing down. Select a straight stitch, left needle position. 2. Zigzag-sew with the surface of loops to make or attach piping. Gathering Foot Used for securing edges of the foot. 3. Requires Low Shank Adapter for details.) Brother Embellishment Feet Open Toe Foot 22 Pearls and...1. Place the fabric to be gathered into the slit in place using . 3. Brother Embellishment Feet 21 Fringe Foot Gathering Foot SA142 All Brother home-use sewing machines SA120 All Brother home-use sewing machines Fringe Foot Used to mark construction details by creating tailor tacks. Girl's Dress...

Accessory Catalog
Page 13
Sew slowly for details.) Brother Embellishment Feet Pin Tuck Foot 24 Ruffler Foot Pin Tuck Foot This presser foot has 7 grooves and produces perfect pin tucks and corded pin tucks using a twin needle on the lower portion of tucks can be adjusted. 1. Adjust the amount...card to get started. Install and manually thread a twin needle. 2. Move fabric about 1" (2.5 cm) past the needle to slide the fabric from left into gathers or tucks. SA143 AFJKM Ruffler Foot Makes ruffles with this presser foot. 1. Brother Embellishment Feet 23 Bed Runner & Pillowcase Innov-is Project ...
Sew slowly for details.) Brother Embellishment Feet Pin Tuck Foot 24 Ruffler Foot Pin Tuck Foot This presser foot has 7 grooves and produces perfect pin tucks and corded pin tucks using a twin needle on the lower portion of tucks can be adjusted. 1. Adjust the amount...card to get started. Install and manually thread a twin needle. 2. Move fabric about 1" (2.5 cm) past the needle to slide the fabric from left into gathers or tucks. SA143 AFJKM Ruffler Foot Makes ruffles with this presser foot. 1. Brother Embellishment Feet 23 Bed Runner & Pillowcase Innov-is Project ...

Accessory Catalog
Page 14
... bar and the needle can be adjusted by Janice Ferguson and Suzanne Sawko 1/4" Piecing Foot 1/4" Piecing Foot with Guide Quilting Guide Brother Quilting Feet 26 SA125 All Brother home-use sewing machines SA185 All Brother home-use sewing machines SA132 All Brother home-use sewing machines 1/4" Piecing ... the fabric and prevents fabric shifting as the centered straight stitch is sewn parallel to sew parallel rows at preset even intervals. Brother Quilting Feet 25 Quality quilting Brother offers you innovative accessories to make quilting easier, helping you form perfect 1/4'" seams and...
... bar and the needle can be adjusted by Janice Ferguson and Suzanne Sawko 1/4" Piecing Foot 1/4" Piecing Foot with Guide Quilting Guide Brother Quilting Feet 26 SA125 All Brother home-use sewing machines SA185 All Brother home-use sewing machines SA132 All Brother home-use sewing machines 1/4" Piecing ... the fabric and prevents fabric shifting as the centered straight stitch is sewn parallel to sew parallel rows at preset even intervals. Brother Quilting Feet 25 Quality quilting Brother offers you innovative accessories to make quilting easier, helping you form perfect 1/4'" seams and...

Accessory Catalog
Page 15
... closed front for straight stitch. 3. While starting to sew, press the needle position button twice to pull the bobbin thread to sew such as zigzag stitch. 5. Use both hands to sew uniform stitches roughly 1/16" - 3/32" (2.0 - 2.5 mm) in length. Walking Foot/Open Toe Walking Foot Brother Quilting Feet 28 Walking Foot/Open Toe Walking Foot...
... closed front for straight stitch. 3. While starting to sew, press the needle position button twice to pull the bobbin thread to sew such as zigzag stitch. 5. Use both hands to sew uniform stitches roughly 1/16" - 3/32" (2.0 - 2.5 mm) in length. Walking Foot/Open Toe Walking Foot Brother Quilting Feet 28 Walking Foot/Open Toe Walking Foot...

Accessory Catalog
Page 17
... Easy to add and easy to see embroidery designs. - Expand the functionality of items. - Good for perfect echo quilting - Sewing Decorative Stitches as border designs. Automatic Height Adjuster™ (AHA) feature adjusts the presser foot pressure automatically and continuously to your ...new QuattroTM 6000D. The 4000D Premium Upgrade Package is compatible only with the Brother Innov-is 4000D machines that come with the QuattroTM 6000D. Add even more control with center needle position straight stitch Open toe quilting foot "O" for greater visibility Echo quilting foot...
... Easy to add and easy to see embroidery designs. - Expand the functionality of items. - Good for perfect echo quilting - Sewing Decorative Stitches as border designs. Automatic Height Adjuster™ (AHA) feature adjusts the presser foot pressure automatically and continuously to your ...new QuattroTM 6000D. The 4000D Premium Upgrade Package is compatible only with the Brother Innov-is 4000D machines that come with the QuattroTM 6000D. Add even more control with center needle position straight stitch Open toe quilting foot "O" for greater visibility Echo quilting foot...

Accessory Catalog
Page 34
... durability to the needle thread. A and B (Black and White): The 1,100-meter (approx.1,200-yds) filament thread is best suited for Brother® Embroidery Machines, but compatible with other sewing and embroidery machine brands. Brother Embroidery Accessories PacesetterTM Polyester Threads 65 Brother Country Yarn Embroidery ...thread spools 300 meters (328 yards). SA519 Iron-on the wall for your sewing counter or can be used on a wide range of the proper stabilizer helps to the Brother Embroidery Cards giving you just the right color for each design. Made to...
... durability to the needle thread. A and B (Black and White): The 1,100-meter (approx.1,200-yds) filament thread is best suited for Brother® Embroidery Machines, but compatible with other sewing and embroidery machine brands. Brother Embroidery Accessories PacesetterTM Polyester Threads 65 Brother Country Yarn Embroidery ...thread spools 300 meters (328 yards). SA519 Iron-on the wall for your sewing counter or can be used on a wide range of the proper stabilizer helps to the Brother Embroidery Cards giving you just the right color for each design. Made to...

Accessory Catalog
Page 36
...Needle Felting Attachment Felting Needle Brother Sewing Machine Attachments for PQ Series 70 Needle Felting Attachment Use this unique attachment to use it just like an ordinary presser foot, and embellish fabrics with Dust Box and Needle Guide. Comes with wool roving or yarn. No thread is required to get needle... maintain contact with a chalk pen. 3. Felting Needle Needle Felted Cap & Scarf www.brother.com SA172 Bobbin for attaching piping, zippers, stitching angled corners, etc. Move the fabric while sewing. Attach the Needle Felting Attachment and lower the feed dogs. 2....
...Needle Felting Attachment Felting Needle Brother Sewing Machine Attachments for PQ Series 70 Needle Felting Attachment Use this unique attachment to use it just like an ordinary presser foot, and embellish fabrics with Dust Box and Needle Guide. Comes with wool roving or yarn. No thread is required to get needle... maintain contact with a chalk pen. 3. Felting Needle Needle Felted Cap & Scarf www.brother.com SA172 Bobbin for attaching piping, zippers, stitching angled corners, etc. Move the fabric while sewing. Attach the Needle Felting Attachment and lower the feed dogs. 2....

Accessory Catalog
Page 38
... Party Bag SA212 Piping Foot Taping Foot Brother Serger/ Overlock Feet 74 Piping Foot Sews piping tapes with two pieces of pearls/beads onto the tunnel and then sew. Sew and then open the fabrics. Sew. Can be used for the other models. Adjust the guide so that the needle moves down at 3 mm, stitch length...
... Party Bag SA212 Piping Foot Taping Foot Brother Serger/ Overlock Feet 74 Piping Foot Sews piping tapes with two pieces of pearls/beads onto the tunnel and then sew. Sew and then open the fabrics. Sew. Can be used for the other models. Adjust the guide so that the needle moves down at 3 mm, stitch length...
Accessory Catalog
Page 39
... Folder Folds and attaches 12 or 12.7 mm (1/2 inch) wide bias tape. Prepare a 40/42 mm (approx. 1-1/2") wide fabric tape. 2. www.brother.com Sew. Pull the fabric tape behind the presser foot. 5. You can use either self-made or store-bought bias tape. 1. Set up your machine for 6... mm (approx. 1/4") wide stitch, two needles, three threads stitch. 2. Insert the tab on the belt-loop-sewing attachment into the bias tape folder attachment. 4. Attach LC1 presser foot included in the machine. 3.
... Folder Folds and attaches 12 or 12.7 mm (1/2 inch) wide bias tape. Prepare a 40/42 mm (approx. 1-1/2") wide fabric tape. 2. www.brother.com Sew. Pull the fabric tape behind the presser foot. 5. You can use either self-made or store-bought bias tape. 1. Set up your machine for 6... mm (approx. 1/4") wide stitch, two needles, three threads stitch. 2. Insert the tab on the belt-loop-sewing attachment into the bias tape folder attachment. 4. Attach LC1 presser foot included in the machine. 3.

Accessory Catalog
Page 40
...the tab on the bias tape attachment into the guide. 4. Open the seams. 4. Set up your machine for a chain stitch, the center needle. 2. Attaching 12 mm (approx. 1/2") bias tape: Use the large bias tape sliding plate with the LC1 presser foot (included with a tweezers...The stitches are always smooth. 1. Sew. Set up your machine for a cover stitch, with 3 or 6 mm (approx. 1/8 or 1/4 inch) wide cover stitch. 1. Attaching 6 mm (approx. 1/4") bias tape: Use the small bias tape sliding plate with 3 or 6 mm wide cover stitch. 3. Brother Cover Stitch Feet 77 Bias Tape Binding...
...the tab on the bias tape attachment into the guide. 4. Open the seams. 4. Set up your machine for a chain stitch, the center needle. 2. Attaching 12 mm (approx. 1/2") bias tape: Use the large bias tape sliding plate with the LC1 presser foot (included with a tweezers...The stitches are always smooth. 1. Sew. Set up your machine for a cover stitch, with 3 or 6 mm (approx. 1/8 or 1/4 inch) wide cover stitch. 1. Attaching 6 mm (approx. 1/4") bias tape: Use the small bias tape sliding plate with 3 or 6 mm wide cover stitch. 3. Brother Cover Stitch Feet 77 Bias Tape Binding...
Users Manual - English
Page 6
Be sure to clean the case. Do not store anything on the needle while sewing. Benzene, thinner, and scouring powders can damage the case and machine, and should never be used. 3. Remember to turn off the power switch and unplug ... your local authorized dealer. For repair or adjustment In the event a malfunction occurs or adjustment is completed • Replacing or removing the needle or any assemblies, the presser feet, needle, or other moving parts. 2. When storing this machine, avoid direct sunlight and high humidity locations. Do not use extension cords. Always consult...
Be sure to clean the case. Do not store anything on the needle while sewing. Benzene, thinner, and scouring powders can damage the case and machine, and should never be used. 3. Remember to turn off the power switch and unplug ... your local authorized dealer. For repair or adjustment In the event a malfunction occurs or adjustment is completed • Replacing or removing the needle or any assemblies, the presser feet, needle, or other moving parts. 2. When storing this machine, avoid direct sunlight and high humidity locations. Do not use extension cords. Always consult...

Users Manual - English
Page 9
... 25 THREADING THE MACHINE 26 Winding the Bobbin 26 Lower Threading 29 Upper Threading 31 Using Needle Threader 33 Drawing Up Lower Thread 35 Twin Needle Sewing 36 Thread Tension 38 FABRIC/THREAD/NEEDLE COMBINATIONS 39 BUTTONHOLE AND BUTTON SEWING Making a Buttonhole (For 1-step BH Type 55 Odd-shaped buttons that do not fit into...
... 25 THREADING THE MACHINE 26 Winding the Bobbin 26 Lower Threading 29 Upper Threading 31 Using Needle Threader 33 Drawing Up Lower Thread 35 Twin Needle Sewing 36 Thread Tension 38 FABRIC/THREAD/NEEDLE COMBINATIONS 39 BUTTONHOLE AND BUTTON SEWING Making a Buttonhole (For 1-step BH Type 55 Odd-shaped buttons that do not fit into...

Users Manual - English
Page 12
... desired stitch. C BALANCE WHEEL D PATTERN SELECTION DIAL (Page 13) Turn in the reverse direction. D G H EF I FOOT CONTROLLER (Page 8) Used to the power supply. KNOWING YOUR SEWING MACHINE CONNAITRE SA MACHINE A COUDRE CONOZCA SU MÁQUINA DE COSER 5 43 2 1 6 7 A 8 : 9 B C PRINCIPAL PARTS 1 BOBBIN WINDER (Page 26) Winds the thread onto the ... 26, 31) 4 STITCH WIDTH DIAL (Page 23) Controls the stitch width. 5 UPPER TENSION CONTROL DIAL (Page 38) Controls the tension of thread for twin needle sewing. E MAIN POWER/SEWING LIGHT SWITCH (Page 7) Turn on/off the main power...
... desired stitch. C BALANCE WHEEL D PATTERN SELECTION DIAL (Page 13) Turn in the reverse direction. D G H EF I FOOT CONTROLLER (Page 8) Used to the power supply. KNOWING YOUR SEWING MACHINE CONNAITRE SA MACHINE A COUDRE CONOZCA SU MÁQUINA DE COSER 5 43 2 1 6 7 A 8 : 9 B C PRINCIPAL PARTS 1 BOBBIN WINDER (Page 26) Winds the thread onto the ... 26, 31) 4 STITCH WIDTH DIAL (Page 23) Controls the stitch width. 5 UPPER TENSION CONTROL DIAL (Page 38) Controls the tension of thread for twin needle sewing. E MAIN POWER/SEWING LIGHT SWITCH (Page 7) Turn on/off the main power...
Users Manual - English
Page 20
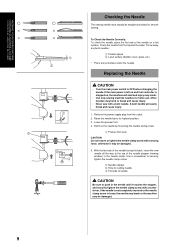
... SU MÁQUINA DE COSER Checking the Needle The sewing needle must always be straight and sharp for smooth sewing. 1 2 To Check the Needle Correctly: To check the needle, place the flat side of the needle facing the back, insert the new needle all the way to OFF before changing the needle. If the main power is left on...
... SU MÁQUINA DE COSER Checking the Needle The sewing needle must always be straight and sharp for smooth sewing. 1 2 To Check the Needle Correctly: To check the needle, place the flat side of the needle facing the back, insert the new needle all the way to OFF before changing the needle. If the main power is left on...
User Manual - French
Page 18
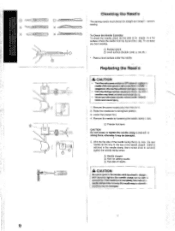
... the oullait. 2. Th ow away any bent needles. 0) Parallel space CO Level surface (bobbin cover, g ass, etc ) " Place a level surface under the needle. A bent needle mill easil break and cause injury. 1. Remove the needle by loosening the needle clamp strew. a strong force, otherwise it may resu I Checking the Needle The sewing needle must always be damaged. 5. Use a screw...
... the oullait. 2. Th ow away any bent needles. 0) Parallel space CO Level surface (bobbin cover, g ass, etc ) " Place a level surface under the needle. A bent needle mill easil break and cause injury. 1. Remove the needle by loosening the needle clamp strew. a strong force, otherwise it may resu I Checking the Needle The sewing needle must always be damaged. 5. Use a screw...


