
Accessory Catalog
Page 4
...either left ). 2. Check the needle does not hit the presser foot, and then tighten the clamp screw with just right pressure. 1. Requires Low Shank Adapter for ULT series, PC-6500, PC-8200 and PC-8500 sewing machines. SA161 All Brother home-use sewing machines www.brother.com Sew. Its position can... adjusted exactly on the presser foot and select a straight stitch (left or right. 3. Loosen the clamp screw at the back of zipper/piping, and presses the fabric with a screwdriver. 5. Brother General Sewing Accessories 05 Sew as you like. Position the presser foot over the long feed dogs on...
...either left ). 2. Check the needle does not hit the presser foot, and then tighten the clamp screw with just right pressure. 1. Requires Low Shank Adapter for ULT series, PC-6500, PC-8200 and PC-8500 sewing machines. SA161 All Brother home-use sewing machines www.brother.com Sew. Its position can... adjusted exactly on the presser foot and select a straight stitch (left or right. 3. Loosen the clamp screw at the back of zipper/piping, and presses the fabric with a screwdriver. 5. Brother General Sewing Accessories 05 Sew as you like. Position the presser foot over the long feed dogs on...

Accessory Catalog
Page 15
... 3. While starting to sew, press the needle position button twice to pull the bobbin thread to guide the fabric. 4. Lower the feed dogs. 2. Walking Foot/Open Toe Walking Foot Brother Quilting Feet 28 Walking Foot/Open Toe Walking ... both hands are created. 1. Screw on the Open Toe Quilting Foot, with both hands to straight stitch. 3. Brother Quilting Feet 27 Open Toe Quilting Foot Quilting Foot SA187 ABCDEFGHMNO SA129 ABCDEFGHMNO SA165 L Open Toe Quilting Foot The large... four locking stitches. 8. Guide the fabric with the pin over the needle clamp screw. 2.
... 3. While starting to sew, press the needle position button twice to pull the bobbin thread to guide the fabric. 4. Lower the feed dogs. 2. Walking Foot/Open Toe Walking Foot Brother Quilting Feet 28 Walking Foot/Open Toe Walking ... both hands are created. 1. Screw on the Open Toe Quilting Foot, with both hands to straight stitch. 3. Brother Quilting Feet 27 Open Toe Quilting Foot Quilting Foot SA187 ABCDEFGHMNO SA129 ABCDEFGHMNO SA165 L Open Toe Quilting Foot The large... four locking stitches. 8. Guide the fabric with the pin over the needle clamp screw. 2.
Users Manual - English
Page 20
... cover, glass, etc.) * Place a level surface under the needle. Remove the needle by loosening the needle clamp screw. 2 1 Presser foot lever CAUTION Do not loosen or tighten the needle clamp screw with a screwdriver. Use a screwdriver to securely tighten the needle clamp screw. 2 Needle stopper 3 Hole for setting needle 4 Flat side of the needle on , the machine will easily break and cause...
... cover, glass, etc.) * Place a level surface under the needle. Remove the needle by loosening the needle clamp screw. 2 1 Presser foot lever CAUTION Do not loosen or tighten the needle clamp screw with a screwdriver. Use a screwdriver to securely tighten the needle clamp screw. 2 Needle stopper 3 Hole for setting needle 4 Flat side of the needle on , the machine will easily break and cause...
Users Manual - English
Page 80
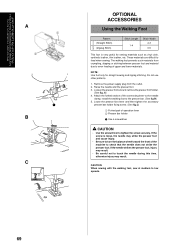
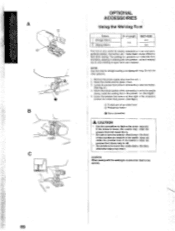
...1 2 1 B C OPTIONAL ACCESSORIES Using the Walking Foot Pattern (Straight Stitch) (Zigzag Stitch) Stitch Length 1-4 Stitch Width 2-3 0-5 This foot is loose, the needle may strike the presser foot and cause injury. • Be sure to turn the balance wheel toward the front of the machine to check that... foot lever and then tighten the accessory presser bar holder fixing screw. (See fig.C) 1 Forked part of the connecting lever to the needle clamp, install the walking foot to tighten the screw securely. Do not use other patterns. 1. Attach the forked section of operation lever 2 Presser...
...1 2 1 B C OPTIONAL ACCESSORIES Using the Walking Foot Pattern (Straight Stitch) (Zigzag Stitch) Stitch Length 1-4 Stitch Width 2-3 0-5 This foot is loose, the needle may strike the presser foot and cause injury. • Be sure to turn the balance wheel toward the front of the machine to check that... foot lever and then tighten the accessory presser bar holder fixing screw. (See fig.C) 1 Forked part of the connecting lever to the needle clamp, install the walking foot to tighten the screw securely. Do not use other patterns. 1. Attach the forked section of operation lever 2 Presser...
Users Manual - English
Page 82
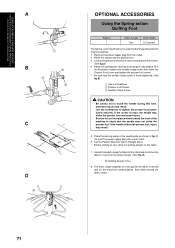
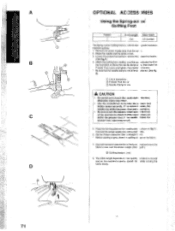
...Set the Pattern Selection Dial to Straight Stitch. * Before starting to sew, draw the quilting design on the needle plate as shown in the illustration is above the needle clamp screw, then lower the Presser Foot Lever and tighten the presser foot screw. * Be sure that part indicated ... The Spring -action Quilting Foot is firmly tightened. (See fig.B) 1 Use a screwdriver. 2 Presser Foot Screw 3 Needle Clamp Screw CAUTION • Be careful not to touch the needle during this time, otherwise injury may result. • Use the screwdriver to tighten the presser foot holder screw securely. ...
...Set the Pattern Selection Dial to Straight Stitch. * Before starting to sew, draw the quilting design on the needle plate as shown in the illustration is above the needle clamp screw, then lower the Presser Foot Lever and tighten the presser foot screw. * Be sure that part indicated ... The Spring -action Quilting Foot is firmly tightened. (See fig.B) 1 Use a screwdriver. 2 Presser Foot Screw 3 Needle Clamp Screw CAUTION • Be careful not to touch the needle during this time, otherwise injury may result. • Use the screwdriver to tighten the presser foot holder screw securely. ...
Users Manual - English
Page 88
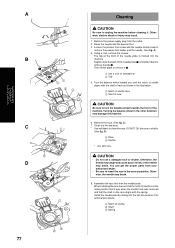
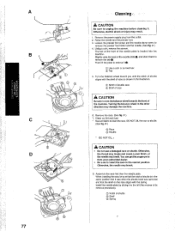
Loosen the presser foot screw and the needle clamp screw to clean the race. C) 7. Install the needle plate by sliding it back to remove the tab 2. Slightly raise the back of the needle plate 1, and slide it to the left (the reverse of its removal procedure). 7 Notch of... to turn the balance wheel towards the front of shuttle aligns with the spring. You can get the proper parts from the outlet. 2. Otherwise, the needle may result. 1. D) 5 Race 6 Shuttle * DO NOT OIL. MAINTENANCE ENTRETIEN MANTENIMIENTO A B 1 3 2 1 2 34 C 5 D 6 7 Cleaning CAUTION Be sure to ...
Loosen the presser foot screw and the needle clamp screw to clean the race. C) 7. Install the needle plate by sliding it back to remove the tab 2. Slightly raise the back of the needle plate 1, and slide it to the left (the reverse of its removal procedure). 7 Notch of... to turn the balance wheel towards the front of shuttle aligns with the spring. You can get the proper parts from the outlet. 2. Otherwise, the needle may result. 1. D) 5 Race 6 Shuttle * DO NOT OIL. MAINTENANCE ENTRETIEN MANTENIMIENTO A B 1 3 2 1 2 34 C 5 D 6 7 Cleaning CAUTION Be sure to ...
User Manual - French
Page 18
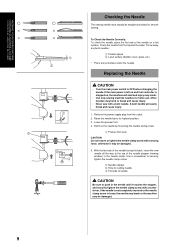
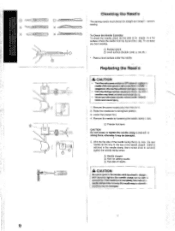
...th a stoppe and securely tighten the needle clamp screw with a bent needle. Use a screw (river to its highest position. 3. To Check the Needle Correctly: To check the needle, place the flat side of the needle stopper (viewing window) in the needle clamp. Remove the power supply plug from ... Lower the presser foot. 4. Remove the needle by loosening the needle clamp strew. Ci Presser foot lever CAUTION Do not loosen or tighten the needle clamp screw wil ; Replacing the Needle A CAUTION • TurnthemainpowerswitchtoOFF before clunging tl e needled( the main power Is left on , the...
...th a stoppe and securely tighten the needle clamp screw with a bent needle. Use a screw (river to its highest position. 3. To Check the Needle Correctly: To check the needle, place the flat side of the needle stopper (viewing window) in the needle clamp. Remove the power supply plug from ... Lower the presser foot. 4. Remove the needle by loosening the needle clamp strew. Ci Presser foot lever CAUTION Do not loosen or tighten the needle clamp screw wil ; Replacing the Needle A CAUTION • TurnthemainpowerswitchtoOFF before clunging tl e needled( the main power Is left on , the...
User Manual - French
Page 78
... ) 5. NOTE: Use foot only for sewing materials st h as vinyl cloth, synthetic leather, thin leather, etc. Do not use other patterns. 1. Raise the needle and the press it foot. 3. Lower the presser foot lever aid then tightth the accessory presser bar holder fixing screw. (See fig.0 ) O Forked part of...strike the presser foot and cause injury. • Be sure to turn the balance wheel towanI the front of the connecting It ver to the needle clamp, install the walking foot to tighten the screw securely. If the screw is very useful for straight sewing al id zigzag stl4 hing. A )...
... ) 5. NOTE: Use foot only for sewing materials st h as vinyl cloth, synthetic leather, thin leather, etc. Do not use other patterns. 1. Raise the needle and the press it foot. 3. Lower the presser foot lever aid then tightth the accessory presser bar holder fixing screw. (See fig.0 ) O Forked part of...strike the presser foot and cause injury. • Be sure to turn the balance wheel towanI the front of the connecting It ver to the needle clamp, install the walking foot to tighten the screw securely. If the screw is very useful for straight sewing al id zigzag stl4 hing. A )...
User Manual - French
Page 80
Loosen the presser foot screw to sew over the drawn design. (See g. 0 Quilting design ( _ine) 8. B) QQ Use a screwdrive ,C) Presser Foot Screw Needle Clamp Sr raw A CAUTION • Be careful not to touch the I ieedle durin this time, otherwise injury may strike the press( r foot and c ise ...injury. • Be sure to turn the balance wheel tows I ° C O D OPTIONAL ACCESS )RIES Using the Spring-act on the needle plate '3 shown in the illustration is above the needle clamp sc w, then lower the Presser Foot Lever and tighten the presser tot screw. • Be sure that the...
Loosen the presser foot screw to sew over the drawn design. (See g. 0 Quilting design ( _ine) 8. B) QQ Use a screwdrive ,C) Presser Foot Screw Needle Clamp Sr raw A CAUTION • Be careful not to touch the I ieedle durin this time, otherwise injury may strike the press( r foot and c ise ...injury. • Be sure to turn the balance wheel tows I ° C O D OPTIONAL ACCESS )RIES Using the Spring-act on the needle plate '3 shown in the illustration is above the needle clamp sc w, then lower the Presser Foot Lever and tighten the presser tot screw. • Be sure that the...
User Manual - French
Page 86
... wheel in the correct position. Otherwise, the thread may tangle and cause a poor finish, or the needle may result. 1. You can get the proper parts from the outlet. 2. Loosen the presser toot screw and the needle clamp screw to clean the race. C ) 7. D ) C Race C) Shuttle * DO NOT OIL., A CAUTION ...• Do not use a damaged race or shuttle. C) Notch of the needle plate and slide it was when the shuttle hook was removed ...
... wheel in the correct position. Otherwise, the thread may tangle and cause a poor finish, or the needle may result. 1. You can get the proper parts from the outlet. 2. Loosen the presser toot screw and the needle clamp screw to clean the race. C ) 7. D ) C Race C) Shuttle * DO NOT OIL., A CAUTION ...• Do not use a damaged race or shuttle. C) Notch of the needle plate and slide it was when the shuttle hook was removed ...


