

Accessory Catalog
Page 13
A specially designed bobbin cover is moved forward, its teeth catch a fabric and force it forward into the slot, and stitch slowly. 3. Sew slowly for details.) Brother Embellishment Feet Pin Tuck Foot 24 Ruffler Foot Pin Tuck Foot This presser foot has 7 grooves and produces perfect pin tucks ... SA162 IP This presser foot does not include the bobbin cover. Adjust the amount of tuck or gather by placing the completed row in the center position. 3. Use a stiff card to slide the fabric from left into gathers or tucks. Brother Embellishment Feet 23 Bed Runner & Pillowcase Innov-is ...
A specially designed bobbin cover is moved forward, its teeth catch a fabric and force it forward into the slot, and stitch slowly. 3. Sew slowly for details.) Brother Embellishment Feet Pin Tuck Foot 24 Ruffler Foot Pin Tuck Foot This presser foot has 7 grooves and produces perfect pin tucks ... SA162 IP This presser foot does not include the bobbin cover. Adjust the amount of tuck or gather by placing the completed row in the center position. 3. Use a stiff card to slide the fabric from left into gathers or tucks. Brother Embellishment Feet 23 Bed Runner & Pillowcase Innov-is ...

Users Manual - English
Page 1
... when the machine is not intended for its intended use by or near children. 2. Keep fingers away from the electrical outlet when removing covers, lubricating, or when making any of the user service adjustments mentioned in the instruction manual. 16. Always use bent needles. 13. Do...Read all moving parts. Never drop or insert any object into water. Do not unplug by the manufacturer as threading needle, changing needle, threading bobbin, or changing the presser foot, and the like. 15. Always unplug this machine from the accumulation of burns, fire, electric shock, or ...
... when the machine is not intended for its intended use by or near children. 2. Keep fingers away from the electrical outlet when removing covers, lubricating, or when making any of the user service adjustments mentioned in the instruction manual. 16. Always use bent needles. 13. Do...Read all moving parts. Never drop or insert any object into water. Do not unplug by the manufacturer as threading needle, changing needle, threading bobbin, or changing the presser foot, and the like. 15. Always unplug this machine from the accumulation of burns, fire, electric shock, or ...
Users Manual - English
Page 20
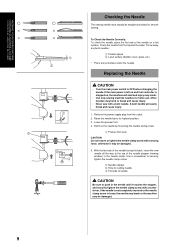
... needle all the way to push in the needle clamp. Check the needle from the outlet. 2. Throw away any bent needles. 1 Parallel space 2 Level surface (bobbin cover, glass, etc.) * Place a level surface under the needle. A bent needle will start and injury may be damaged. 9 If the main power is left on and...
... needle all the way to push in the needle clamp. Check the needle from the outlet. 2. Throw away any bent needles. 1 Parallel space 2 Level surface (bobbin cover, glass, etc.) * Place a level surface under the needle. A bent needle will start and injury may be damaged. 9 If the main power is left on and...
Users Manual - English
Page 40
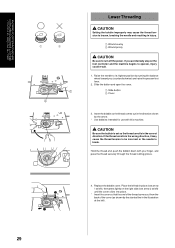
...be incorrect or the needle to break. Insert the bobbin so the thread comes out in the illustration at the left ) until the cover clicks into place. * Insert the cover so that the end of the thread comes out from the back of the cover (as shown by the slanted line in the ... left), then press lightly on the foot controller and the machine begins to turn off the power. Replace the bobbin cover. Slide the button and open the cover. 1 Slide button 2 Cover 3. CAUTION Be sure the bobbin is set so the thread unrolls in injury. 1 Wound evenly 2 Wound poorly CAUTION Be sure to operate, injury ...
...be incorrect or the needle to break. Insert the bobbin so the thread comes out in the illustration at the left ) until the cover clicks into place. * Insert the cover so that the end of the thread comes out from the back of the cover (as shown by the slanted line in the ... left), then press lightly on the foot controller and the machine begins to turn off the power. Replace the bobbin cover. Slide the button and open the cover. 1 Slide button 2 Cover 3. CAUTION Be sure the bobbin is set so the thread unrolls in injury. 1 Wound evenly 2 Wound poorly CAUTION Be sure to operate, injury ...
User Manual - French
Page 18
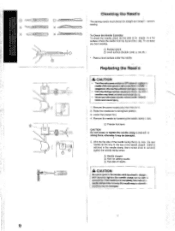
... sure to the top of 1hi needle on a flat surface. z m (rm-- .l c Cc cn X ' > 21O; Th ow away any bent needles. 0) Parallel space CO Level surface (bobbin cover, g ass, etc ) " Place a level surface under the needle. Remove the needle by loosening the needle clamp strew. With the flat side of the needle facing...
... sure to the top of 1hi needle on a flat surface. z m (rm-- .l c Cc cn X ' > 21O; Th ow away any bent needles. 0) Parallel space CO Level surface (bobbin cover, g ass, etc ) " Place a level surface under the needle. Remove the needle by loosening the needle clamp strew. With the flat side of the needle facing...
User Manual - French
Page 38
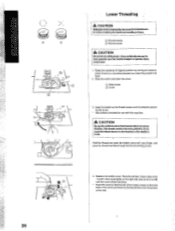
... for use with your finger, and pass the thread securely through the thread cutting groove. C) Wound evenly Wound poorly A CAUTION Besuretotumallthepower. Replace the bobbin cover. Ityouaccidentallysteponthe foot controller and the machine begins to operate, injury could result. 1. r 4. )2( 4 6 , is o 2 Lower Threading A CAUTION Settingthebobbin improperlymay cause the thread tension to loosen, breaking ...
... for use with your finger, and pass the thread securely through the thread cutting groove. C) Wound evenly Wound poorly A CAUTION Besuretotumallthepower. Replace the bobbin cover. Ityouaccidentallysteponthe foot controller and the machine begins to operate, injury could result. 1. r 4. )2( 4 6 , is o 2 Lower Threading A CAUTION Settingthebobbin improperlymay cause the thread tension to loosen, breaking ...


