
Users Manual - English
Page 6
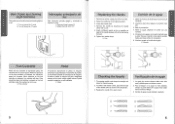
...with a coin. 5. Verificaci6n de la aguja 1. Insert a different needle as far as shown in use. ® Foot controller Pedal Al presionar ligeramente el pedal, la maquina funcionara a baja velocidad. Alaumentarla presion, se incrementa tambien la velocidad de la maquina. Al soltar el... 0 1 , •CZ .C ' Main Power and Sewing Light Switches This switch turns the main power and sewing light on or off. (i) Turn on the foot controller is bent or dull. co Encender (hacia la marca "I " mark) C) Turn off (toward the "0" mark) Interruptor principal y de luz Este interruptor permite ...
...with a coin. 5. Verificaci6n de la aguja 1. Insert a different needle as far as shown in use. ® Foot controller Pedal Al presionar ligeramente el pedal, la maquina funcionara a baja velocidad. Alaumentarla presion, se incrementa tambien la velocidad de la maquina. Al soltar el... 0 1 , •CZ .C ' Main Power and Sewing Light Switches This switch turns the main power and sewing light on or off. (i) Turn on the foot controller is bent or dull. co Encender (hacia la marca "I " mark) C) Turn off (toward the "0" mark) Interruptor principal y de luz Este interruptor permite ...
Users Manual - English
Page 10
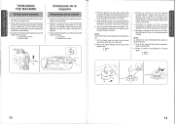
... la ranura de la canilla. 5. Change the Clutch Release Switch from the shaft. 8. While holding the end of the thread, gently depress the foot controller to the right. Continue winding the thread onto the bobbin by hand, until the spring on the shaft slides into the slit on the...Sujetando el extremo del hilo, presione suavemente elpedalpara que elhilo de vueltas alrededor de la canilla. Siga bobinando el hilo en la canilla presionando el pedal. Coloque un carrete de hilo en el eje horizontal previsto y mantengalo firmemente con un tope para que no de vueltas. Coloque la canilla en ...
... la ranura de la canilla. 5. Change the Clutch Release Switch from the shaft. 8. While holding the end of the thread, gently depress the foot controller to the right. Continue winding the thread onto the bobbin by hand, until the spring on the shaft slides into the slit on the...Sujetando el extremo del hilo, presione suavemente elpedalpara que elhilo de vueltas alrededor de la canilla. Siga bobinando el hilo en la canilla presionando el pedal. Coloque un carrete de hilo en el eje horizontal previsto y mantengalo firmemente con un tope para que no de vueltas. Coloque la canilla en ...
Users Manual - English
Page 15
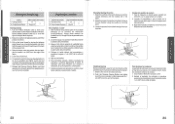
...usted(en elsentido contrario alde las manecillas de un reloi)y tire los hilos superior e inferiorhacia la parte atras delprensatelas. 4. Lower the presser foot and start sewing in the fabric. 2. Bajeelprensatelasyempiecea coserenla nueva direcci6n tal como ilustrado. Set the Pattern Selection Dial to 2 or 15 ... y posicione la aguja a 1 cm (3/8") de la orilla del tejido. 5. Suelte elpulsador de retroceso y vuelva a coser hacia adelante, presionando el pedal. Pare la maquina en donde quiera cambiar de direcciOn, con la aguja picada en el tejido. 2. Cosa hasta el final de la costura y pare...
...usted(en elsentido contrario alde las manecillas de un reloi)y tire los hilos superior e inferiorhacia la parte atras delprensatelas. 4. Lower the presser foot and start sewing in the fabric. 2. Bajeelprensatelasyempiecea coserenla nueva direcci6n tal como ilustrado. Set the Pattern Selection Dial to 2 or 15 ... y posicione la aguja a 1 cm (3/8") de la orilla del tejido. 5. Suelte elpulsador de retroceso y vuelva a coser hacia adelante, presionando el pedal. Pare la maquina en donde quiera cambiar de direcciOn, con la aguja picada en el tejido. 2. Cosa hasta el final de la costura y pare...


