
Users Manual - English
Page 3
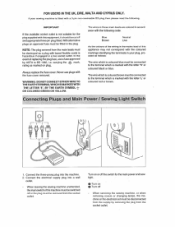
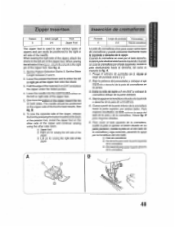
... machine is hazardous it should be cut off When servicing the sewing machine, or when removing covers or changing lamps, the machine or the electrical set must be fitted in your plug, proceed as marked on O Turn off and appropriate three pin plug fitted. FOR USERS IN THE UK, EIRE, MALTA...
... machine is hazardous it should be cut off When servicing the sewing machine, or when removing covers or changing lamps, the machine or the electrical set must be fitted in your plug, proceed as marked on O Turn off and appropriate three pin plug fitted. FOR USERS IN THE UK, EIRE, MALTA...

Users Manual - English
Page 16
...coser con la puntada seleccionada. Ajuslador de contrasts de la pantalla. (0 Selector de idioms. if Uutu ..4 ) When the machine is not properly set the machine to sew a buttonhole, but the buttonhole lever is slid to the right for a sewing guidance message on the display. 2. Using.... el mensaje 'BAJAR PALANCA PARA WALES' aparecera en la pantalla. The guidance message is required, a warning message appears on . When you set and a correction is shown three times, then the display will appear on that stitch. Using the LCD Contrast Adjuster Key Adjust the contrast of...
...coser con la puntada seleccionada. Ajuslador de contrasts de la pantalla. (0 Selector de idioms. if Uutu ..4 ) When the machine is not properly set the machine to sew a buttonhole, but the buttonhole lever is slid to the right for a sewing guidance message on the display. 2. Using.... el mensaje 'BAJAR PALANCA PARA WALES' aparecera en la pantalla. The guidance message is required, a warning message appears on . When you set and a correction is shown three times, then the display will appear on that stitch. Using the LCD Contrast Adjuster Key Adjust the contrast of...

Users Manual - English
Page 22
... machine will appear on the display to give you instructions about how to make the correction. 1. When the machine is not properly set and a correction is displayed. (3)Select the appropriate language by pressing the Akey(to change the languageinthe order shown ' above) or ...to change the language in reverse order). 17 (1)Apague elintemptorprincipal. (2)Mantenga las dos tedas de mensajes A y B presionadasy vuelva a encenderlamaquina. When you set the machine to sew a buttonhole, but the buttonhole lever is not pulled down , the message "RAISE BUTTONHOLE LEVER" will only allow you slide ...
... machine will appear on the display to give you instructions about how to make the correction. 1. When the machine is not properly set and a correction is displayed. (3)Select the appropriate language by pressing the Akey(to change the languageinthe order shown ' above) or ...to change the language in reverse order). 17 (1)Apague elintemptorprincipal. (2)Mantenga las dos tedas de mensajes A y B presionadasy vuelva a encenderlamaquina. When you set the machine to sew a buttonhole, but the buttonhole lever is not pulled down , the message "RAISE BUTTONHOLE LEVER" will only allow you slide ...
Users Manual - English
Page 23
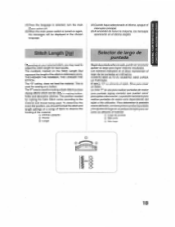
.... CUANTO MAS ALTO EL NUMERO, MAS LARGA LA PUNTADA. Stitch Length Dial Depending on you' selected stitch, you should first test the stitch and length settings on a scrap of fabric to observe the feeding of the stitch in making the Satin Stitch varies according to adjust the stitch length for sewing...
.... CUANTO MAS ALTO EL NUMERO, MAS LARGA LA PUNTADA. Stitch Length Dial Depending on you' selected stitch, you should first test the stitch and length settings on a scrap of fabric to observe the feeding of the stitch in making the Satin Stitch varies according to adjust the stitch length for sewing...
Users Manual - English
Page 28
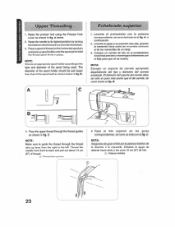
... than that of the spool being used. A. NOTA: Escoger un soporte de carrete apropiado dependiendo del tipo y diametro del carrete empleado. Eldiametro delsoporte delcarrete debe set solo un poco mas ancho que el del carrete, tal como ilustra la fig. I tit 4. NOTE: Make sure to guide the thread through the thread...
... than that of the spool being used. A. NOTA: Escoger un soporte de carrete apropiado dependiendo del tipo y diametro del carrete empleado. Eldiametro delsoporte delcarrete debe set solo un poco mas ancho que el del carrete, tal como ilustra la fig. I tit 4. NOTE: Make sure to guide the thread through the thread...
Users Manual - English
Page 35
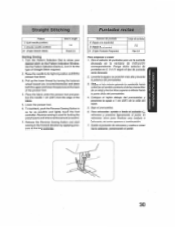
... deseado. 2. Svelte elpulsador de retroceso y vuelva a corer hacia adelante. Raise the needle to show your desired stitch on the Pattern Indication Window. presionando elpedal. 30 Set the Pattern Selection Dial to the foot controller. Levant&la aguja a supastel&mas alta ylevante la palanca delprensatelas. 3. Coloque el tejido debajo del prensatelas y posicione...
... deseado. 2. Svelte elpulsador de retroceso y vuelva a corer hacia adelante. Raise the needle to show your desired stitch on the Pattern Indication Window. presionando elpedal. 30 Set the Pattern Selection Dial to the foot controller. Levant&la aguja a supastel&mas alta ylevante la palanca delprensatelas. 3. Coloque el tejido debajo del prensatelas y posicione...
Users Manual - English
Page 39
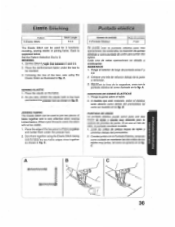
... deben ser del mismo color que el tejido. 2. Deje unos 6 mm (1/4') sin coser para esconderlos. Then, fold the edge of pants without the stitch showing. Set the Pattern Selection Dial to muestra la fig. D. dole la vuelta tat como indica la fig. B. a Pones el selector do punfadas en 7 6 10. 4. D. A. Doble el...
... deben ser del mismo color que el tejido. 2. Deje unos 6 mm (1/4') sin coser para esconderlos. Then, fold the edge of pants without the stitch showing. Set the Pattern Selection Dial to muestra la fig. D. dole la vuelta tat como indica la fig. B. a Pones el selector do punfadas en 7 6 10. 4. D. A. Doble el...
Users Manual - English
Page 41
...Place the reinforcement fabric under the presser fool. 2. A. Sew them under the tear to 9. Ponga la goma sobre el tejido. 2. MENDING 1. Set the Stitch Length Dial between F and 2.5. 2. INSERCION DE GOMAS ELASTICAS 1. Janie las orillas de ambos trozos do punted& F-2,5 Se puede usar la... puntada elastics pare tres operations: los remiendo,s. 0 insercien de games elasticas y como puntada de union pars junta: dos tejidos. Set the Pattern Selection Dial to be used , the stitch will not be visible. 1. Coloque una tele de retuerzo debajo de la pane a...
...Place the reinforcement fabric under the presser fool. 2. A. Sew them under the tear to 9. Ponga la goma sobre el tejido. 2. MENDING 1. Set the Stitch Length Dial between F and 2.5. 2. INSERCION DE GOMAS ELASTICAS 1. Janie las orillas de ambos trozos do punted& F-2,5 Se puede usar la... puntada elastics pare tres operations: los remiendo,s. 0 insercien de games elasticas y como puntada de union pars junta: dos tejidos. Set the Pattern Selection Dial to be used , the stitch will not be visible. 1. Coloque una tele de retuerzo debajo de la pane a...
Users Manual - English
Page 43
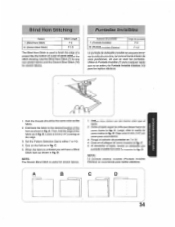
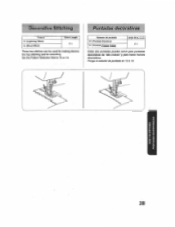
BUILT-IN STITCHES PUNTADAS INCORPORADAS 38 Ponga el selector de puntada en 13 6 14. Puntadas decorativas 114/10merode punmda 13 (Pentode EscaJere) 14 (Puntada &Won Doble) Largo demoted:, F-1 Estes dos puntadas pueden servir pare puntadas decoralivas de "arta castors" y pare hater !runes decorativos. Decorative Stitching Pattern 13 (Lightning Stitch) 14 (Bead Stitch) Stitch Length F-1 These two stitches can be used for making decora live top stitching and for smocking Set the Pattern Selection Dial to 13 or 14.
BUILT-IN STITCHES PUNTADAS INCORPORADAS 38 Ponga el selector de puntada en 13 6 14. Puntadas decorativas 114/10merode punmda 13 (Pentode EscaJere) 14 (Puntada &Won Doble) Largo demoted:, F-1 Estes dos puntadas pueden servir pare puntadas decoralivas de "arta castors" y pare hater !runes decorativos. Decorative Stitching Pattern 13 (Lightning Stitch) 14 (Bead Stitch) Stitch Length F-1 These two stitches can be used for making decora live top stitching and for smocking Set the Pattern Selection Dial to 13 or 14.

Users Manual - English
Page 44
... al comienzo. • Use hilos mss garesos de lo normal. 4. Cosa a to 15. 3. Anudelos cabos de loshilos delcomienzoy final de la costura por el roves. Set the Pattern Selection Dial to largo dolas orillas. L 1.5 mm StrOVUOdtIOONI StfOCCINI7d S3HOILLS 39 Finish by tying knots on the reverse side at the beginning and...
... al comienzo. • Use hilos mss garesos de lo normal. 4. Cosa a to 15. 3. Anudelos cabos de loshilos delcomienzoy final de la costura por el roves. Set the Pattern Selection Dial to largo dolas orillas. L 1.5 mm StrOVUOdtIOONI StfOCCINI7d S3HOILLS 39 Finish by tying knots on the reverse side at the beginning and...
Users Manual - English
Page 46
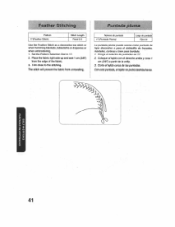
... SVC1V.I Pattern 17(Feather Stitch) Stitch Length Fixed 2.5 Use the Feather Stitch as a decora ive top stitch o when hemming blankets, tablecloths or draperies o when embroidering. 1. Set the Pattern Selection Dial to the stitching. Place the fabric right side up and seir1cm OM from unravelling. Corte el tejido cerca de las puntadas...
... SVC1V.I Pattern 17(Feather Stitch) Stitch Length Fixed 2.5 Use the Feather Stitch as a decora ive top stitch o when hemming blankets, tablecloths or draperies o when embroidering. 1. Set the Pattern Selection Dial to the stitching. Place the fabric right side up and seir1cm OM from unravelling. Corte el tejido cerca de las puntadas...
Users Manual - English
Page 53
Set the Stitch Length between 2 and 3. 2. Fold the edgeof thematerial2cm(3/4")andplace the zipper under the folded portion. 4. Sew from the bottom of the zipper toward the ... foot for best results. When sewing the right side of the zipper, attach the shank to the right pin of the zipper foot. See fig. Set the Pattern Selection Dial to cremallera. Lower the needle into the notch located either the left or right side of the zipper foot. 5. B. 6. Zipper foot...
Set the Stitch Length between 2 and 3. 2. Fold the edgeof thematerial2cm(3/4")andplace the zipper under the folded portion. 4. Sew from the bottom of the zipper toward the ... foot for best results. When sewing the right side of the zipper, attach the shank to the right pin of the zipper foot. See fig. Set the Pattern Selection Dial to cremallera. Lower the needle into the notch located either the left or right side of the zipper foot. 5. B. 6. Zipper foot...
Users Manual - English
Page 54
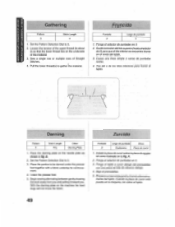
... de puntada 4 1. Tire del o de los hilos infedores pare fruncir el tejido. A. 2. Ponga el selector do puntadas en 3. 2. Set the Pattern Selection Dial to 3. 3. Begin sewing alternating between gently drawing the work away from you and pulling it toward you. A. 2. ... Darning Pattern 3 Stitch Length Any Other Darning Plato 1. Place the darning plate on the machine the feed dogs will not move the fabric. Set the Pattern Selection Dial to 3. 2. Lower the presser foot. 5. Ernpieceacoserempujandoytirandoaltemativa• mente del tejido. Ponga el selector do puntadas en 3. 3....
... de puntada 4 1. Tire del o de los hilos infedores pare fruncir el tejido. A. 2. Ponga el selector do puntadas en 3. 2. Set the Pattern Selection Dial to 3. 3. Begin sewing alternating between gently drawing the work away from you and pulling it toward you. A. 2. ... Darning Pattern 3 Stitch Length Any Other Darning Plato 1. Place the darning plate on the machine the feed dogs will not move the fabric. Set the Pattern Selection Dial to 3. 2. Lower the presser foot. 5. Ernpieceacoserempujandoytirandoaltemativa• mente del tejido. Ponga el selector do puntadas en 3. 3....
Users Manual - English
Page 56
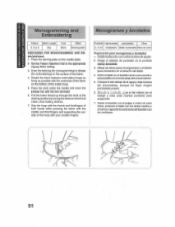
...ybajela bans del prensatelas, aunque no hays ningtin prensatetas puesto. 6. Instatelaplace dezurcirsobrelaplacedeagujas. 2. Girando to the appropriate Zigzag Stitch setting. 3. Draw the lettering (for monogramming) or design (for embroidering) on the needle plate. 2. Sujete elbastidor con ... Estireeltejido en elbastidorSanto comopuede y siesposibleconelrevesabajo deldrculointerior. 5. Place the darning plate on the surface of the fabric. 4. Set the Pattern Selection Dial to ruedecilla, pase elhilo inferiorpor el trabajo y cosa unas cuantas puntadas pare asegutarlo. 7. ...
...ybajela bans del prensatelas, aunque no hays ningtin prensatetas puesto. 6. Instatelaplace dezurcirsobrelaplacedeagujas. 2. Girando to the appropriate Zigzag Stitch setting. 3. Draw the lettering (for monogramming) or design (for embroidering) on the needle plate. 2. Sujete elbastidor con ... Estireeltejido en elbastidorSanto comopuede y siesposibleconelrevesabajo deldrculointerior. 5. Place the darning plate on the surface of the fabric. 4. Set the Pattern Selection Dial to ruedecilla, pase elhilo inferiorpor el trabajo y cosa unas cuantas puntadas pare asegutarlo. 7. ...
Users Manual - English
Page 64
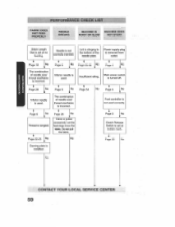
... 59 Page 55-56 Power supply plug is pulled excessively. Page 6 No Page 28 No Fabric is removed from outlet. Page 20 Darning plate is set at bobbin mark. No Page 5 No Clutch Release Switch is installed. PERFORMANCE CHECK LIST FABRIC DOES NOT FEED PROPERLY NEEDLE BREAKS MACHINE IS MACHINE DOES... NOISY OR SLOW NOT START Stitch Length Dial is not correctly inserted. IN° page 16 Needle is set at no feeding. page 28 Inferior needle is used correctly.
... 59 Page 55-56 Power supply plug is pulled excessively. Page 6 No Page 28 No Fabric is removed from outlet. Page 20 Darning plate is set at bobbin mark. No Page 5 No Clutch Release Switch is installed. PERFORMANCE CHECK LIST FABRIC DOES NOT FEED PROPERLY NEEDLE BREAKS MACHINE IS MACHINE DOES... NOISY OR SLOW NOT START Stitch Length Dial is not correctly inserted. IN° page 16 Needle is set at no feeding. page 28 Inferior needle is used correctly.


