
Users Manual - English
Page 3
... 28 7 Maintenance and Care of Your Machine 29 Cleaning 29 How to pull up lower thread 13 FREE-ARM SEWING 13 THREAD TENSION 14 Upper thread tension 14 Lower thread tension 14 PRESSURE ADJUSTER 16 2. Straight Stitching 17 How to start sewing 17 How to change the light bulb 9 UPPER (NEEDLE) THREAD 10...
... 28 7 Maintenance and Care of Your Machine 29 Cleaning 29 How to pull up lower thread 13 FREE-ARM SEWING 13 THREAD TENSION 14 Upper thread tension 14 Lower thread tension 14 PRESSURE ADJUSTER 16 2. Straight Stitching 17 How to start sewing 17 How to change the light bulb 9 UPPER (NEEDLE) THREAD 10...
Users Manual - English
Page 4
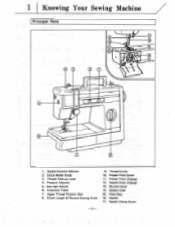
Thread Take-up Lever 4. Shuttle Hook 14. Feed Dog 16. Pressure Adjuster 5. Upper Thread Tension Dial 8. Bobbin Case 15. Sew-light Switch 6. Thread Cutter 10. Stitch Width Knob 3. Extension Table 7. Stitch Length & Reverse Sewing Knob 9. Presser Foot Screw 11. Needle Clamp Screw -2- Needle Position Selector 2. Needle Plate (Zigzag) 13. Needle 17. 1 Knowing Your Sewing Machine Principal Parts 10 11 15 12 0 0 0 2 5 IF I 1. Presser Foot (Zigzag) 12.
Thread Take-up Lever 4. Shuttle Hook 14. Feed Dog 16. Pressure Adjuster 5. Upper Thread Tension Dial 8. Bobbin Case 15. Sew-light Switch 6. Thread Cutter 10. Stitch Width Knob 3. Extension Table 7. Stitch Length & Reverse Sewing Knob 9. Presser Foot Screw 11. Needle Clamp Screw -2- Needle Position Selector 2. Needle Plate (Zigzag) 13. Needle 17. 1 Knowing Your Sewing Machine Principal Parts 10 11 15 12 0 0 0 2 5 IF I 1. Presser Foot (Zigzag) 12.
Users Manual - English
Page 12
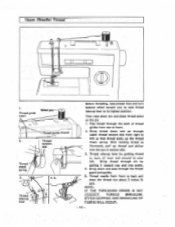
... from right to left . Thread take-up lever by pulling it toward you and into the eye in tension disc. 3. Thread take -up lever to front. 2. With holding thread as illustrated, pull up the thread check spring. Bring thread down and pass through slit ...
... from right to left . Thread take-up lever by pulling it toward you and into the eye in tension disc. 3. Thread take -up lever to front. 2. With holding thread as illustrated, pull up the thread check spring. Bring thread down and pass through slit ...
Users Manual - English
Page 13
Place an empty bobbin on the spool pin and take thread through bobbin winder tension disc. - 11 - Wind the thread a few times around the bobbin clockwise and push the bobbin toward you. Place thread spool on the bobbin winder pin. 3. ... the left and remove it. Lower (Bobbin) Thread HOW TO WIND BOBBIN ws. ~.1 I , knob 1. Bobbin stops winding when full. 6. Start the machine gently. 5. Bobbin winder tension disc 4. Loosen!, r Tighten C 0 Bobbin presser Stop motion H I 4 2.
Place an empty bobbin on the spool pin and take thread through bobbin winder tension disc. - 11 - Wind the thread a few times around the bobbin clockwise and push the bobbin toward you. Place thread spool on the bobbin winder pin. 3. ... the left and remove it. Lower (Bobbin) Thread HOW TO WIND BOBBIN ws. ~.1 I , knob 1. Bobbin stops winding when full. 6. Start the machine gently. 5. Bobbin winder tension disc 4. Loosen!, r Tighten C 0 Bobbin presser Stop motion H I 4 2.
Users Manual - English
Page 14
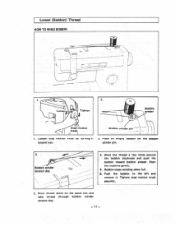
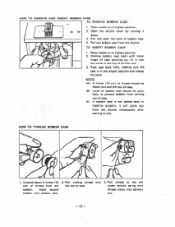
...in the proper position and release the latch. Unwind about 4 inches (10 cm) of thread from the shuttle. HOW TO THREAD BOBBIN CASE 0 - • 0 Tension spring , a o u, 1/4 • o.--.....--- .• 1. Pull trailing thread into delivery eye. - 12 - HOW TO REMOVE AND INSERT BOBBIN CASE TO REMOVE ... Pull thread to sew. downa.n0 Pull and open fully to prevent bobbin from the shuttle immediately after starting to the lef under tension spring until thread enters into the slot of case. (C) If bobbin case is in machine properly it into bobbin case. 2. NOTE:...
...in the proper position and release the latch. Unwind about 4 inches (10 cm) of thread from the shuttle. HOW TO THREAD BOBBIN CASE 0 - • 0 Tension spring , a o u, 1/4 • o.--.....--- .• 1. Pull trailing thread into delivery eye. - 12 - HOW TO REMOVE AND INSERT BOBBIN CASE TO REMOVE ... Pull thread to sew. downa.n0 Pull and open fully to prevent bobbin from the shuttle immediately after starting to the lef under tension spring until thread enters into the slot of case. (C) If bobbin case is in machine properly it into bobbin case. 2. NOTE:...
Users Manual - English
Page 16
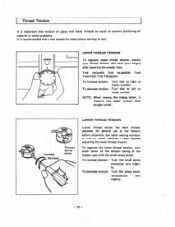
... to right to lower number. THE TIGHTER THE TENSION. ly. To regulate the lower thread tension, turn thread tension dial with the small screw driver. To decrease tension: Turn the screw coun- TENSION • aa 0 N. 0 UPPER THREAD TENSION To regulate upper thread tension, merely turn small screw on the tension spring of material or other problems. It is...
... to right to lower number. THE TIGHTER THE TENSION. ly. To regulate the lower thread tension, turn thread tension dial with the small screw driver. To decrease tension: Turn the screw coun- TENSION • aa 0 N. 0 UPPER THREAD TENSION To regulate upper thread tension, merely turn small screw on the tension spring of material or other problems. It is...
Users Manual - English
Page 17
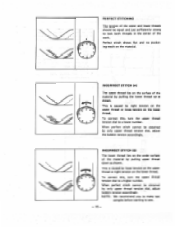
...higher number. e 0 INCORRECT STITCH (A) The upper thread lies on the material. PERFECT STITCHING The tension of the upper and lower threads should be obtained by only upper thread tension dial, adjust bobbin tension accordingly. I Perfect stitch shows flat and no puckering result on the surface of the material by tight...thread. NOTE: We recommend you to make test samples before starting to a lower number. To correct this , turn the upper thread tension dial to lock both threads in the center of the work. This is caused by pulling upper thread down as shown. This is ...
...higher number. e 0 INCORRECT STITCH (A) The upper thread lies on the material. PERFECT STITCHING The tension of the upper and lower threads should be obtained by only upper thread tension dial, adjust bobbin tension accordingly. I Perfect stitch shows flat and no puckering result on the surface of the material by tight...thread. NOTE: We recommend you to make test samples before starting to a lower number. To correct this , turn the upper thread tension dial to lock both threads in the center of the work. This is caused by pulling upper thread down as shown. This is ...

Users Manual - English
Page 20
... MACHINE 1. Leave about 4 inches (10 cm) of thread between toes of thin paper will help to its highest position. 3. Merely guide the material with gentle tension as tricot, crepes, knits, etc., we recommend that the thread take -up lever is at the highest position, and you support the material both threads...
... MACHINE 1. Leave about 4 inches (10 cm) of thread between toes of thin paper will help to its highest position. 3. Merely guide the material with gentle tension as tricot, crepes, knits, etc., we recommend that the thread take -up lever is at the highest position, and you support the material both threads...
Users Manual - English
Page 21
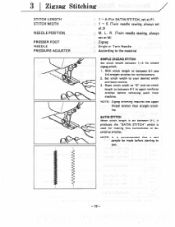
... "SATIN STITCH" which is used for making fine buttonholes or decorative stitches. Set stitch width to sew. - 19 - L. NOTE: Zigzag stitching requires less upper thread tension than straight stitching. SATIN STITCH When stitch length is recommended that a test sample be made before removing work from machine. 3 I Zigzag Stitching STITCH LENGTH STITCH...
... "SATIN STITCH" which is used for making fine buttonholes or decorative stitches. Set stitch width to sew. - 19 - L. NOTE: Zigzag stitching requires less upper thread tension than straight stitching. SATIN STITCH When stitch length is recommended that a test sample be made before removing work from machine. 3 I Zigzag Stitching STITCH LENGTH STITCH...
Users Manual - English
Page 26
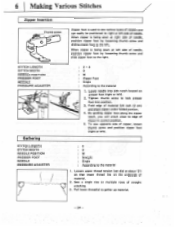
Tighten thumb screw to lock presser foot into side notch located on the underside of material. 2. Fold edge of straight stitching. 3. Loosen upper thread tension (set dial at about '2') so that lower thread lies on presser foot (right or left). 2. When zipper is being sewn at left . Lower needle into ...
Tighten thumb screw to lock presser foot into side notch located on the underside of material. 2. Fold edge of straight stitching. 3. Loosen upper thread tension (set dial at about '2') so that lower thread lies on presser foot (right or left). 2. When zipper is being sewn at left . Lower needle into ...
Users Manual - English
Page 34
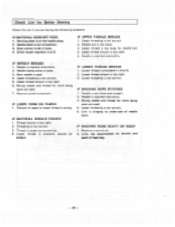
... 3. Wrong needle and thread for cloth being sewn are used . 4. Lints has accumulated on bobbin. IF UPPER THREAD BREAKS 1. Upper thread tension is too tight. 2. IF NEEDLE BREAKS 1. Upper threading is not correct. Lower threading is not correct. 5. Stop motion knob is not ...MATERIAL SHOULD PUCKER 1. Threading is wrong. Upper thread is used . 4. Tension of feed dog. - 32 - Lower thread tension is too tight. 6. IF MACHINE RUNS HEAVY OR NOISY 1. Check List for needle eye. 4. Upper thread tension is too tight. 3. Needle is not sharp and straight. 2. IF ...
... 3. Wrong needle and thread for cloth being sewn are used . 4. Lints has accumulated on bobbin. IF UPPER THREAD BREAKS 1. Upper thread tension is too tight. 2. IF NEEDLE BREAKS 1. Upper threading is not correct. Lower threading is not correct. 5. Stop motion knob is not ...MATERIAL SHOULD PUCKER 1. Threading is wrong. Upper thread is used . 4. Tension of feed dog. - 32 - Lower thread tension is too tight. 6. IF MACHINE RUNS HEAVY OR NOISY 1. Check List for needle eye. 4. Upper thread tension is too tight. 3. Needle is not sharp and straight. 2. IF ...
Users Manual - English
Page 36
... material, needle, thread Repacking the machine Reverse sewing knob Reverse itItchI ng Satin stitching Sew-I ight Stitch length knob Stitch width knob Straight stitching Thread tension Twin needle Upper (needle) thread Various control Zigzag stitching Zipper insertion . - 34 - 4 26 25 27 12 23 21 32 29 5 5 26 25 20 13 24...
... material, needle, thread Repacking the machine Reverse sewing knob Reverse itItchI ng Satin stitching Sew-I ight Stitch length knob Stitch width knob Straight stitching Thread tension Twin needle Upper (needle) thread Various control Zigzag stitching Zipper insertion . - 34 - 4 26 25 27 12 23 21 32 29 5 5 26 25 20 13 24...


