

Accessory Catalog
Page 15
...PC-6500, PC-8200 and PC-8500 sewing machines. Use the walking foot with the closed front for ULT series, PC-6500, PC-8200 and PC-8500 sewing machines. Brother Quilting Feet 27 Open Toe Quilting Foot Quilting Foot SA187 ABCDEFGHMNO SA129 ABCDEFGHMNO SA165 L Open Toe Quilting Foot...to sew, press the needle position button twice to pull the bobbin thread to be easily sewn. Gently holding the upper and bobbin threads sew about four locking stitches and finish the thread ends. Walking Foot/Open Toe Walking Foot Brother Quilting Feet 28 Walking Foot/Open Toe Walking Foot The feed dogs...
...PC-6500, PC-8200 and PC-8500 sewing machines. Use the walking foot with the closed front for ULT series, PC-6500, PC-8200 and PC-8500 sewing machines. Brother Quilting Feet 27 Open Toe Quilting Foot Quilting Foot SA187 ABCDEFGHMNO SA129 ABCDEFGHMNO SA165 L Open Toe Quilting Foot...to sew, press the needle position button twice to pull the bobbin thread to be easily sewn. Gently holding the upper and bobbin threads sew about four locking stitches and finish the thread ends. Walking Foot/Open Toe Walking Foot Brother Quilting Feet 28 Walking Foot/Open Toe Walking Foot The feed dogs...

Accessory Catalog
Page 34
... machine. Available in a 14-Pack and individual colors (sold in the 61 color set of thread per spool. Bobbin Threads Stabilizers and Water Water Soluble Stabilizers Brother Embroidery Accessories 66 Bobbin Threads Brother Bobbin Threads are also available (sold in the most intricate designs. C (White only): The 1,000-meter... or decorative stitches. Out metallic thread maintains its color, heat resistance and strength. It is also recommended for the Quattro™ 6000D, Duetta™ 4500D/Innov-is 4000D, 2500D, 1500D, 1200 series, PC and ULT series machines and the PE-400D...
... machine. Available in a 14-Pack and individual colors (sold in the 61 color set of thread per spool. Bobbin Threads Stabilizers and Water Water Soluble Stabilizers Brother Embroidery Accessories 66 Bobbin Threads Brother Bobbin Threads are also available (sold in the most intricate designs. C (White only): The 1,000-meter... or decorative stitches. Out metallic thread maintains its color, heat resistance and strength. It is also recommended for the Quattro™ 6000D, Duetta™ 4500D/Innov-is 4000D, 2500D, 1500D, 1200 series, PC and ULT series machines and the PE-400D...

Users Manual - English
Page 5
..., satin stitch patterns, cross stitch patterns, and more bothersome trial sewing. - no need to pull the bobbin thread up through the needle plate. - Prepare the bobbin thread for quilting and patchwork. - Attach the knee lifter to illustrated step-by-step instructions on the large LCD... display. - Machine sets thread tension automatically - A-4 Introduction On screen sewing advisor gives advice about sewing and general...
..., satin stitch patterns, cross stitch patterns, and more bothersome trial sewing. - no need to pull the bobbin thread up through the needle plate. - Prepare the bobbin thread for quilting and patchwork. - Attach the knee lifter to illustrated step-by-step instructions on the large LCD... display. - Machine sets thread tension automatically - A-4 Introduction On screen sewing advisor gives advice about sewing and general...
Users Manual - English
Page 8
... ..... 1-21 I Contents of Other Categories ........ 1-23 Using the Pattern Explanation Key....... 1-24 Bobbin Winding/Lower Threading ...... 1-25 I Winding the Bobbin During Sewing1-29 Setting the Bobbin 1-31 Upper Threading 1-32 I Using the Spool Net 1-37 I Vertical Spool Pin 1-37 Pulling Up the Bobbin Thread 1-38 Changing the Presser Foot 1-39 I Removing the Presser Foot 1-39 I Attaching the...
... ..... 1-21 I Contents of Other Categories ........ 1-23 Using the Pattern Explanation Key....... 1-24 Bobbin Winding/Lower Threading ...... 1-25 I Winding the Bobbin During Sewing1-29 Setting the Bobbin 1-31 Upper Threading 1-32 I Using the Spool Net 1-37 I Vertical Spool Pin 1-37 Pulling Up the Bobbin Thread 1-38 Changing the Presser Foot 1-39 I Removing the Presser Foot 1-39 I Attaching the...

Users Manual - English
Page 17
... the position for normal sewing. Use setting "3" for normal sewing 1 Feed dog position switch 6 - 7 - ..... Pull the flat bed attachment to the left to wind the bobbin thread during sewing, or when sewing with the twin needle (see page 3-61) or for other tubular pieces. I Supplemental Spool Pin CONTENTS Use this switch when...
... the position for normal sewing. Use setting "3" for normal sewing 1 Feed dog position switch 6 - 7 - ..... Pull the flat bed attachment to the left to wind the bobbin thread during sewing, or when sewing with the twin needle (see page 3-61) or for other tubular pieces. I Supplemental Spool Pin CONTENTS Use this switch when...
Users Manual - English
Page 21
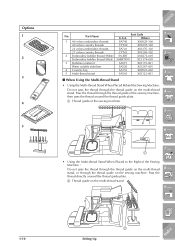
..., then pass the thread around the thread guide plate. 2 Thread guide on the multi-thread stand 8 - 9 - ?! 2 Index 1-10 Setting Up Others 1 40 colors embroidery threads SA740 X80928-100 40 colors country threads CYT40 X81078-102 22 colors embroidery threads SA741 X81276-102 21 colors country threads CYT41 X81269-102 2 Embroidery bobbin thread (White) SA-EBT XA8375-001 Embroidery bobbin thread (Black) SAEBT999...
..., then pass the thread around the thread guide plate. 2 Thread guide on the multi-thread stand 8 - 9 - ?! 2 Index 1-10 Setting Up Others 1 40 colors embroidery threads SA740 X80928-100 40 colors country threads CYT40 X81078-102 22 colors embroidery threads SA741 X81276-102 21 colors country threads CYT41 X81269-102 2 Embroidery bobbin thread (White) SA-EBT XA8375-001 Embroidery bobbin thread (Black) SAEBT999...
Users Manual - English
Page 24
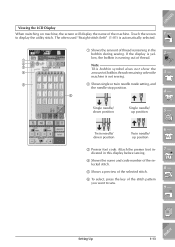
... mode setting, and the needle stop position. 4 - 6 Single needle/ down position Twin needle/ up position 5 - machine is running out of thread. 2 3 Note This bobbin symbol does not show the 4 amount of bobbin thread remaining when the 3 - Index Setting Up 1-13 CONTENTS Viewing the LCD Display When switching on machine, the screen will display the...
... mode setting, and the needle stop position. 4 - 6 Single needle/ down position Twin needle/ up position 5 - machine is running out of thread. 2 3 Note This bobbin symbol does not show the 4 amount of bobbin thread remaining when the 3 - Index Setting Up 1-13 CONTENTS Viewing the LCD Display When switching on machine, the screen will display the...

Users Manual - English
Page 42
...5. Index Setting Up 1-31 CAUTION Setting the bobbin improperly may cause the thread tension to be incorrect or the needle to break. 5 - 6 - 7 - 4. Raise the presser foot lever. 1 2. Note You can begin sewing without pulling up the bobbin thread (free motion embroidery) see the illustrated directions on... page 1-38. 9 - ?! Guide the thread through the groove, then pull the 1 thread toward you need to pull up the bobbin thread. Put the bobbin in the correct direction. Replace the bobbin cover. CONTENTS Setting the Bobbin Press ➜ ➜ ➜ in that ...
...5. Index Setting Up 1-31 CAUTION Setting the bobbin improperly may cause the thread tension to be incorrect or the needle to break. 5 - 6 - 7 - 4. Raise the presser foot lever. 1 2. Note You can begin sewing without pulling up the bobbin thread (free motion embroidery) see the illustrated directions on... page 1-38. 9 - ?! Guide the thread through the groove, then pull the 1 thread toward you need to pull up the bobbin thread. Put the bobbin in the correct direction. Replace the bobbin cover. CONTENTS Setting the Bobbin Press ➜ ➜ ➜ in that ...

Users Manual - English
Page 49
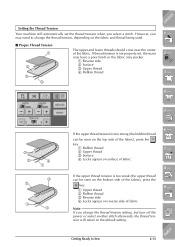
... pass it under the presser foot and pull it about 100 mm (3-4 inch) toward the back of the hole in the illustration. Replace the bobbin cover. 1 Upper thread 2 Bobbin thread 9 - ?! 1-38 Setting Up Index Pulling Up the Bobbin Thread There may be some sewing applications when you want to raise the needle. 6 5 - 6 - 3. While holding the upper...
... pass it under the presser foot and pull it about 100 mm (3-4 inch) toward the back of the hole in the illustration. Replace the bobbin cover. 1 Upper thread 2 Bobbin thread 9 - ?! 1-38 Setting Up Index Pulling Up the Bobbin Thread There may be some sewing applications when you want to raise the needle. 6 5 - 6 - 3. While holding the upper...
Users Manual - English
Page 56
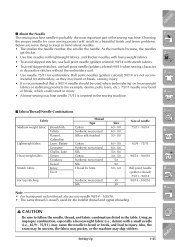
...embroidering on heavyweight fabrics or stabilizing products (for embroidery. Also, the seam may be used for the bobbin thread and upper threading. 5 - 6 - 7 - 8 - 9 - ?! CONTENTS I Fabric/Thread/Needle Combinations Fabric Medium weight fabric Lightweight fabric Heavyweight fabric Stretch fabric Broadcloth Taffeta Flannel, Gabardine Lawn, ...or break, and lead to injury. Ball point needles (golden colored) 90/14 are some things to follow the needle, thread, and fabric combinations listed in mind about needles. • The smaller the needle number, the smaller the needle. Using ...
...embroidering on heavyweight fabrics or stabilizing products (for embroidery. Also, the seam may be used for the bobbin thread and upper threading. 5 - 6 - 7 - 8 - 9 - ?! CONTENTS I Fabric/Thread/Needle Combinations Fabric Medium weight fabric Lightweight fabric Heavyweight fabric Stretch fabric Broadcloth Taffeta Flannel, Gabardine Lawn, ...or break, and lead to injury. Ball point needles (golden colored) 90/14 are some things to follow the needle, thread, and fabric combinations listed in mind about needles. • The smaller the needle number, the smaller the needle. Using ...

Users Manual - English
Page 58
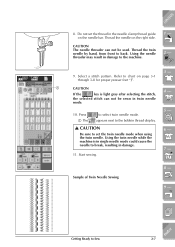
...Always use this lever to adjust sewing speed during sewing. 1 Slow 2 Fast Getting Ready to Sew 2-1 Index CONTENTS 1 - 2 - 3 - 4 - 5 - 6 - 7 - 8 - 9 - ?! Hold the fabric and thread ends in your hands away from moving parts while the machine is in the sewing start position. * The black button on the main power switch...on the left side of presser foot "J" should be displayed in the upper left hand, and turn the balance wheel to pull up the bobbin thread. 6. Keep your left corner of the correct presser foot will be pressed only if the fabric does not feed or when sewing thick ...
...Always use this lever to adjust sewing speed during sewing. 1 Slow 2 Fast Getting Ready to Sew 2-1 Index CONTENTS 1 - 2 - 3 - 4 - 5 - 6 - 7 - 8 - 9 - ?! Hold the fabric and thread ends in your hands away from moving parts while the machine is in the sewing start position. * The black button on the main power switch...on the left side of presser foot "J" should be displayed in the upper left hand, and turn the balance wheel to pull up the bobbin thread. 6. Keep your left corner of the correct presser foot will be pressed only if the fabric does not feed or when sewing thick ...

Users Manual - English
Page 59
...thread thicker than #30, nylon thread, or other decorative threads, use the thread cutter on the side of the machine. 8 - 9 - ?! 10.When the needle has stopped moving, raise the presser foot and remove the fabric. CONTENTS 7. If the warning displays, re-thread the machine immediately. Note This machine has a display to warn you when the bobbin thread... has run out. Do not press the "Thread Cutter" button after the threads have been cut.
...thread thicker than #30, nylon thread, or other decorative threads, use the thread cutter on the side of the machine. 8 - 9 - ?! 10.When the needle has stopped moving, raise the presser foot and remove the fabric. CONTENTS 7. If the warning displays, re-thread the machine immediately. Note This machine has a display to warn you when the bobbin thread... has run out. Do not press the "Thread Cutter" button after the threads have been cut.
Users Manual - English
Page 64
.... Refer to select twin needle mode. Press 1 The to chart on page 3-1 through 3-8 for proper presser foot "J". CONTENTS 6 1 8. Thread the twin needle by hand, from front to the bobbin thread display. appears next to back. CAUTION Be sure to Sew 2-7 Start sewing. 3 - 4 - 5 - 6 - 7 - Index Getting... Ready to set the thread in twin needle mode. 10. CAUTION If the key is in single needle mode...
.... Refer to select twin needle mode. Press 1 The to chart on page 3-1 through 3-8 for proper presser foot "J". CONTENTS 6 1 8. Thread the twin needle by hand, from front to the bobbin thread display. appears next to back. CAUTION Be sure to Sew 2-7 Start sewing. 3 - 4 - 5 - 6 - 7 - Index Getting... Ready to set the thread in twin needle mode. 10. CAUTION If the key is in single needle mode...
Users Manual - English
Page 70
... on reverse side of the fabric. If thread tension is not properly set the thread tension when you may pucker. 1 Reverse side 2 Surface 3 Upper thread 4 Bobbin thread 1 - 2 - 3 - 4 - 5 - 3 2 4 1 4 3 1 2 If the upper thread tension is too strong (the bobbin thread can be seen on the top side of the fabric), press the key. 1 Bobbin thread 2 Upper thread 3 Surface 4 Locks appear on surface of...
... on reverse side of the fabric. If thread tension is not properly set the thread tension when you may pucker. 1 Reverse side 2 Surface 3 Upper thread 4 Bobbin thread 1 - 2 - 3 - 4 - 5 - 3 2 4 1 4 3 1 2 If the upper thread tension is too strong (the bobbin thread can be seen on the top side of the fabric), press the key. 1 Bobbin thread 2 Upper thread 3 Surface 4 Locks appear on surface of...

Users Manual - English
Page 92
CONTENTS Basting 6 1. Index Sewing Utility Stitches 3-19 Note • If you should lift the presser foot, rotate the balance wheel, pull up the bobbin thread and pull a length of top and bobbin thread out from the rear of the machine. • You can set the stitch length between 5 mm (3/16 inch) and 30 mm (1-3/16...
CONTENTS Basting 6 1. Index Sewing Utility Stitches 3-19 Note • If you should lift the presser foot, rotate the balance wheel, pull up the bobbin thread and pull a length of top and bobbin thread out from the rear of the machine. • You can set the stitch length between 5 mm (3/16 inch) and 30 mm (1-3/16...

Users Manual - English
Page 101
.... This is 5.5 mm (7/32 inch). Piecing straight stitch "LEFT" Straight stitch for piecing. When using transparent nylon thread in the needle and bobbin thread matching the color of appliqué. 8 - Press the "Reverse/Reinforcement Stitch" button to keep the stitching from coming loose during construction of the key display, ...
.... This is 5.5 mm (7/32 inch). Piecing straight stitch "LEFT" Straight stitch for piecing. When using transparent nylon thread in the needle and bobbin thread matching the color of appliqué. 8 - Press the "Reverse/Reinforcement Stitch" button to keep the stitching from coming loose during construction of the key display, ...

Users Manual - English
Page 117
Set the stitch length to obtain the desired amount of gather, and then smooth the gathers by ironing them. 3-44 Sewing Utility Stitches Index Select a straight stitch pattern, and attach presser foot "J". Pull the bobbin threads to 4.0, loosen the upper thread tension, and sew the seams, leaving about 10 mm (3/8 inch) between the seams. 6 - 1 About 10 mm (3/8 inch) 7 - 8 - 1 9 - ?! 3. CONTENTS 1 - 2 - 3 - 4 - 5 - 2. Smocking Stitches Use smocking stitches for decorative sewing on clothes, etc. 1.
Set the stitch length to obtain the desired amount of gather, and then smooth the gathers by ironing them. 3-44 Sewing Utility Stitches Index Select a straight stitch pattern, and attach presser foot "J". Pull the bobbin threads to 4.0, loosen the upper thread tension, and sew the seams, leaving about 10 mm (3/8 inch) between the seams. 6 - 1 About 10 mm (3/8 inch) 7 - 8 - 1 9 - ?! 3. CONTENTS 1 - 2 - 3 - 4 - 5 - 2. Smocking Stitches Use smocking stitches for decorative sewing on clothes, etc. 1.

Users Manual - English
Page 120
Note Before sewing the straight stitch, rotate the balance wheel and pull up the bobbin thread, grasping the top and bobbin thread pull a length of thread out from the rear of the fabric, then pull the bobbin thread to 2.0. Note Be sure that the presser foot is selected. 1 - 2 - 3 - 4 - 5 - 6 - 7 - 2. Select a ...1 Index Sewing Utility Stitches 3-47 CONTENTS Tape or Elastic Attaching 1. Set the stitch length to 4.0 mm, and loosen the upper thread tension to gain the necessary gather. Sew 2 rows of straight stitches on the right side of the machine. (Be sure that ...
Note Before sewing the straight stitch, rotate the balance wheel and pull up the bobbin thread, grasping the top and bobbin thread pull a length of thread out from the rear of the fabric, then pull the bobbin thread to 2.0. Note Be sure that the presser foot is selected. 1 - 2 - 3 - 4 - 5 - 6 - 7 - 2. Select a ...1 Index Sewing Utility Stitches 3-47 CONTENTS Tape or Elastic Attaching 1. Set the stitch length to 4.0 mm, and loosen the upper thread tension to gain the necessary gather. Sew 2 rows of straight stitches on the right side of the machine. (Be sure that ...

Users Manual - English
Page 135
... switch to its original position. 1 Feed dog position switch 7 - 1 8 - From the wrong side of the fabric, pull the end of the bobbin thread to pull the upper thread through to check that the needle goes into each hole correctly. foot lever and move the fabric so that the needle goes into...The needle may break, leading to you. When sewing is finished. 1 - 6 CAUTION 2 - CONTENTS 4. Turn the balance wheel to the wrong side of the upper thread and start sewing. Make sure the needle does not strike the button during sewing. the next two holes, and sew them in the same way...
... switch to its original position. 1 Feed dog position switch 7 - 1 8 - From the wrong side of the fabric, pull the end of the bobbin thread to pull the upper thread through to check that the needle goes into each hole correctly. foot lever and move the fabric so that the needle goes into...The needle may break, leading to you. When sewing is finished. 1 - 6 CAUTION 2 - CONTENTS 4. Turn the balance wheel to the wrong side of the upper thread and start sewing. Make sure the needle does not strike the button during sewing. the next two holes, and sew them in the same way...

Users Manual - English
Page 136
Select . 6 - 7 - 8 - 9 - ?! Pull the two ends of the fabric. 3 - 4 - 5 - Eyelet Use this stitch pattern for making belt holes and other similar applications. 1. Index Sewing Utility Stitches 3-63 Pull the shank lever toward you before sewing. 1 Shank lever 1 - 2 - 2. Tie the ends of the bobbin thread from the beginning and end of sewing together on the wrong side of the upper thread between the button and the fabric, wind them around the shank, and then tie them firmly together. 3. CONTENTS I Attaching a Shank to the Button 6 1 1.
Select . 6 - 7 - 8 - 9 - ?! Pull the two ends of the fabric. 3 - 4 - 5 - Eyelet Use this stitch pattern for making belt holes and other similar applications. 1. Index Sewing Utility Stitches 3-63 Pull the shank lever toward you before sewing. 1 Shank lever 1 - 2 - 2. Tie the ends of the bobbin thread from the beginning and end of sewing together on the wrong side of the upper thread between the button and the fabric, wind them around the shank, and then tie them firmly together. 3. CONTENTS I Attaching a Shank to the Button 6 1 1.


