
Users Manual - English
Page 8
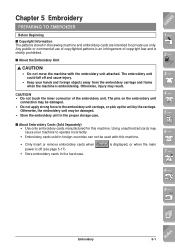
... YOU CAN DO WITH THIS MACHINE Special Features HOW TO USE THIS MANUAL Chapter 1 Setting Up PRINCIPAL PARTS AND THEIR OPERATION 1-1 Principal Parts 1-1 s Embroidery Unit 1-2 s Hard Case 1-2 s Embroidery Unit Storage Case ........ 1-2 s Operation Buttons 1-3 s Balance Wheel 1-4 s Presser Foot Lever 1-4 s Sewing Speed Controller 1-4 s Bobbin Winder Button 1-4 s Top Cover 1-5 s Supplemental Spool Pin 1-5 s Free Arm 1-5 s Feed Dog Position...
... YOU CAN DO WITH THIS MACHINE Special Features HOW TO USE THIS MANUAL Chapter 1 Setting Up PRINCIPAL PARTS AND THEIR OPERATION 1-1 Principal Parts 1-1 s Embroidery Unit 1-2 s Hard Case 1-2 s Embroidery Unit Storage Case ........ 1-2 s Operation Buttons 1-3 s Balance Wheel 1-4 s Presser Foot Lever 1-4 s Sewing Speed Controller 1-4 s Bobbin Winder Button 1-4 s Top Cover 1-5 s Supplemental Spool Pin 1-5 s Free Arm 1-5 s Feed Dog Position...
Users Manual - English
Page 11
... in a Pattern 6-17 ADJUSTING PATTERNS AFTER EDITING .. 6-18 COMBINING AND EDITING PATTERNS .. 6-20 SEWING COMBINED EMBROIDERY PATTERNS 6-28 ADJUSTING EDITED PATTERNS ........ 6-30 MEMORY FUNCTIONS 6-32 Saving Edited Patterns 6-32 s Saving a Pattern...- 3 - Chapter 7 MY CUSTOM STITCH Index DESIGNING THE STITCH 7-1 Index CLEANING THE MACHINE 8-2 s Cleaning the LCD Screen 8-2 s Cleaning the Machine Casing ......... 8-2 s Cleaning the Race and Shuttle ........ 8-2 CLEANING THE FLOPPY DISK DRIVE HEADS 8-4 Chapter 9 Troubleshooting ADJUSTING THE SCREEN 9-1 ADJUSTING THE TOUCH PANEL ...
... in a Pattern 6-17 ADJUSTING PATTERNS AFTER EDITING .. 6-18 COMBINING AND EDITING PATTERNS .. 6-20 SEWING COMBINED EMBROIDERY PATTERNS 6-28 ADJUSTING EDITED PATTERNS ........ 6-30 MEMORY FUNCTIONS 6-32 Saving Edited Patterns 6-32 s Saving a Pattern...- 3 - Chapter 7 MY CUSTOM STITCH Index DESIGNING THE STITCH 7-1 Index CLEANING THE MACHINE 8-2 s Cleaning the LCD Screen 8-2 s Cleaning the Machine Casing ......... 8-2 s Cleaning the Race and Shuttle ........ 8-2 CLEANING THE FLOPPY DISK DRIVE HEADS 8-4 Chapter 9 Troubleshooting ADJUSTING THE SCREEN 9-1 ADJUSTING THE TOUCH PANEL ...
Users Manual - English
Page 13
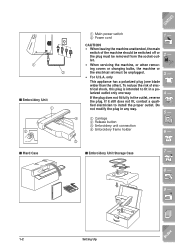
...If the plug does not fit fully in any way. 2 - 3 - 4 - 5 - 4 1 Carriage 2 Release button 3 Embroidery unit connection 4 Embroidery frame holder 6 - 3 s Embroidery Unit Storage Case 7 - 8 - 9 - ?! 1-2 Setting Up Index To reduce the risk of the machine should be switched off or the plug must...it still does not fit, contact a qualified electrician to fit in a polarized outlet only one blade wider than the other). 1 2 s Embroidery Unit 1 2 s Hard Case CONTENTS 1 Main power switch 2 Power cord 1 - Do not modify the plug in the outlet, reverse the plug. only This appliance has...
...If the plug does not fit fully in any way. 2 - 3 - 4 - 5 - 4 1 Carriage 2 Release button 3 Embroidery unit connection 4 Embroidery frame holder 6 - 3 s Embroidery Unit Storage Case 7 - 8 - 9 - ?! 1-2 Setting Up Index To reduce the risk of the machine should be switched off or the plug must...it still does not fit, contact a qualified electrician to fit in a polarized outlet only one blade wider than the other). 1 2 s Embroidery Unit 1 2 s Hard Case CONTENTS 1 Main power switch 2 Power cord 1 - Do not modify the plug in the outlet, reverse the plug. only This appliance has...
Users Manual - English
Page 176
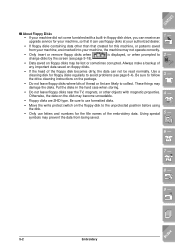
...with this machine. The embroidery unit could fall off (see page 5-17). • Store embroidery cards in the proper storage case. Otherwise, injury may be damaged. • Do not apply strong force to operate incorrectly. • Embroidery cards sold in foreign ...countries can not be damaged. • Store the embroidery unit in the hard case. CAUTION • Do not touch the inner connector of copyright law and is displayed, or when the main CONTENTS 1 - 2 - ...
...with this machine. The embroidery unit could fall off (see page 5-17). • Store embroidery cards in the proper storage case. Otherwise, injury may be damaged. • Do not apply strong force to operate incorrectly. • Embroidery cards sold in foreign ...countries can not be damaged. • Store the embroidery unit in the hard case. CAUTION • Do not touch the inner connector of copyright law and is displayed, or when the main CONTENTS 1 - 2 - ...
Users Manual - English
Page 177
...the screen (see page 8-4). Using special symbols may be read normally. Otherwise, the data on floppy disks. • If the head of the embroidery data. Always make a backup of any important data saved on the disk may become unreadable. • Floppy disks are likely to the unprotected .... • Only use floppy disks at your authorized dealer. • If floppy disks containing data other objects with a built-in the hard case when storing. • Do not leave floppy disks near the TV, magnets, or other than that it can use letters and numbers for floppy...
...the screen (see page 8-4). Using special symbols may be read normally. Otherwise, the data on floppy disks. • If the head of the embroidery data. Always make a backup of any important data saved on the disk may become unreadable. • Floppy disks are likely to the unprotected .... • Only use floppy disks at your authorized dealer. • If floppy disks containing data other objects with a built-in the hard case when storing. • Do not leave floppy disks near the TV, magnets, or other than that it can use letters and numbers for floppy...
Users Manual - English
Page 178
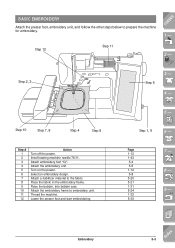
... 5-4 5-5 1-12 8 - 5-8 5-20 5-21 1-31 5-24 9 - 1-32 ?! 5-30 Embroidery 5-3 Index Step 2, 3 Step 6 3 - 4 - Turn on the power. Attach the embroidery frame to prepare the machine for embroidery. Step 1, 5 6 - Attach the embroidery unit. Lower the presser foot and start embroidering. 5 - Place the bobbin, into bobbin case. BASIC EMBROIDERY Attach the presser foot, embroidery unit, and follow the other steps below...
... 5-4 5-5 1-12 8 - 5-8 5-20 5-21 1-31 5-24 9 - 1-32 ?! 5-30 Embroidery 5-3 Index Step 2, 3 Step 6 3 - 4 - Turn on the power. Attach the embroidery frame to prepare the machine for embroidery. Step 1, 5 6 - Attach the embroidery unit. Lower the presser foot and start embroidering. 5 - Place the bobbin, into bobbin case. BASIC EMBROIDERY Attach the presser foot, embroidery unit, and follow the other steps below...

Users Manual - English
Page 182
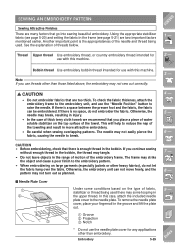
... , then press . CONTENTS 1 - 2 - 3 - 4 - 5 - ill 6_09 2. s Removing the Embroidery Unit 1. Otherwise, the frame may be damaged. 6 - 7 - 8 - 9 - ?! Remove the embroidery frame. Embroidery 5-7 Index CAUTION Always remove the embroidery frame before pressing . Turn off the main power switch. Otherwise, the machine may strike the embroidery foot, resulting in the storage case if this step is not done. CAUTION Be...
... , then press . CONTENTS 1 - 2 - 3 - 4 - 5 - ill 6_09 2. s Removing the Embroidery Unit 1. Otherwise, the frame may be damaged. 6 - 7 - 8 - 9 - ?! Remove the embroidery frame. Embroidery 5-7 Index CAUTION Always remove the embroidery frame before pressing . Turn off the main power switch. Otherwise, the machine may strike the embroidery foot, resulting in the storage case if this step is not done. CAUTION Be...
Users Manual - English
Page 204
..., check that are too thick. See the explanation of the toweling and result in injury. • In the case of thick terry cloth towels we recommend that go into sewing beautiful embroidery. SEWING AN EMBROIDERY PATTERN Sewing Attractive Finishes There are many factors that you place a piece of water soluble stabilizer on the...
..., check that are too thick. See the explanation of the toweling and result in injury. • In the case of thick terry cloth towels we recommend that go into sewing beautiful embroidery. SEWING AN EMBROIDERY PATTERN Sewing Attractive Finishes There are many factors that you place a piece of water soluble stabilizer on the...
Users Manual - English
Page 214
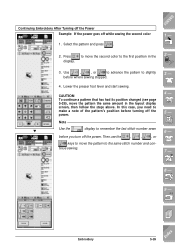
Continuing Embroidery After Turning off the Power Example: If the power goes off the power. 4 - 5 - Lower the presser foot lever and start sewing. Then use the , , , or ... the pattern's position before turning off while sewing the second color 1. Note w Use the display to the same stitch number and continue sewing. 7 - 8 - 9 - ?! Embroidery 5-39 Index In this case, you turn off the power. Press to move the pattern the same amount in the display. 2 - 3. Select the pattern and press . before where...
Continuing Embroidery After Turning off the Power Example: If the power goes off the power. 4 - 5 - Lower the presser foot lever and start sewing. Then use the , , , or ... the pattern's position before turning off while sewing the second color 1. Note w Use the display to the same stitch number and continue sewing. 7 - 8 - 9 - ?! Embroidery 5-39 Index In this case, you turn off the power. Press to move the pattern the same amount in the display. 2 - 3. Select the pattern and press . before where...
Users Manual - English
Page 312
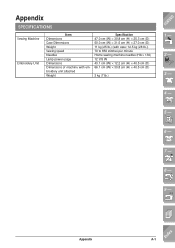
... Weight Sewing speed Needles Lamp power usage Dimensions Dimensions of machine with embroidery unit attached Weight Specification 47.0 cm (W) × 30.8 cm (H) × 25.3 cm (D) 50.0 cm (W) × 31.5 cm (H) × 27.0 cm (D) 11 kg (25 lb.) (with case: 12.5 kg (28 lb.)) 70 to 850 stitches per minute Home sewing machine...
... Weight Sewing speed Needles Lamp power usage Dimensions Dimensions of machine with embroidery unit attached Weight Specification 47.0 cm (W) × 30.8 cm (H) × 25.3 cm (D) 50.0 cm (W) × 31.5 cm (H) × 27.0 cm (D) 11 kg (25 lb.) (with case: 12.5 kg (28 lb.)) 70 to 850 stitches per minute Home sewing machine...

Users Manual - English
Page 314
... spacing 6-16 connecting characters 5-56 selecting for editing 6-5 Character spacing key 6-8, 6-16 Checking combined character/decorative stitch patterns 4-26 position of embroidery patterns 5-27 Cleaning floppy disk drive heads 8-4 LCD 8-2 machine casing 8-2 race and shuttle 8-2 Color changing color in character patterns 5-48, 6-17 changing thread color 6-13 Combining patterns character/decorative stitch...
... spacing 6-16 connecting characters 5-56 selecting for editing 6-5 Character spacing key 6-8, 6-16 Checking combined character/decorative stitch patterns 4-26 position of embroidery patterns 5-27 Cleaning floppy disk drive heads 8-4 LCD 8-2 machine casing 8-2 race and shuttle 8-2 Color changing color in character patterns 5-48, 6-17 changing thread color 6-13 Combining patterns character/decorative stitch...
Users Manual - English
Page 315
... that use appliqué 5-33 previewing the pattern 5-28 revising 5-44 retrieving saved patterns 5-53, 6-36 saving edited patterns 6-32 selecting 5-8 selecting for editing 6-2 types 5-8 Embroidery sheet 5-23 Embroidery unit 1-2, 5-1 attaching 5-5 removing 5-7 storage case 1-2 End key 6-8, 6-18 Error messages 9-10 Eyelet 3-63 sizes 3-64 F Fabric needle/fabric/thread combinations 1-45 setting in an...
... that use appliqué 5-33 previewing the pattern 5-28 revising 5-44 retrieving saved patterns 5-53, 6-36 saving edited patterns 6-32 selecting 5-8 selecting for editing 6-2 types 5-8 Embroidery sheet 5-23 Embroidery unit 1-2, 5-1 attaching 5-5 removing 5-7 storage case 1-2 End key 6-8, 6-18 Error messages 9-10 Eyelet 3-63 sizes 3-64 F Fabric needle/fabric/thread combinations 1-45 setting in an...
Users Manual - English
Page 316
... 5-26, 6-9 Multi color key 5-44, 5-48, 6-8 Multi-directional sewing 3-65 Multi-thread stand 1-10 MY CUSTOM STITCHTM 7-1 H Hard case 1-2 Heavyweight fabrics 1-45, 2-4 Heirloom 3-49 Hemstitching 3-49 Horizontal mirror image key character/decorative stitches 4-14, 4-16 embroidery 5-44, 5-46 embroidery edit 6-8 utility stitches 3-11 I Included accessories 1-8 K Key functions 1-14 editing character/decorative stitches 4-14...
... 5-26, 6-9 Multi color key 5-44, 5-48, 6-8 Multi-directional sewing 3-65 Multi-thread stand 1-10 MY CUSTOM STITCHTM 7-1 H Hard case 1-2 Heavyweight fabrics 1-45, 2-4 Heirloom 3-49 Hemstitching 3-49 Horizontal mirror image key character/decorative stitches 4-14, 4-16 embroidery 5-44, 5-46 embroidery edit 6-8 utility stitches 3-11 I Included accessories 1-8 K Key functions 1-14 editing character/decorative stitches 4-14...


