

Accessory Catalog
Page 7
... Plate Vertical Stitching Alignment Foot Brother General Sewing Accessories 12 Straight Stitch Foot For precise straight stitching on thin fabrics or on thin fabrics or small pieces of fabrics. Installing the Straight Stitch Needle Plate automatically sets the needle position to accomplish perfect straight stitching. Select a stitch, and adjust settings as an accessory for perfect topstitching on stitch settings. 1. The side extension ruler on this presser foot only with an accurate 1/4 inch, 1/2 inch, or 5/8 inch (approx. 6.5, 13, or 16 mm) seam. Selecting a stitch designated...
... Plate Vertical Stitching Alignment Foot Brother General Sewing Accessories 12 Straight Stitch Foot For precise straight stitching on thin fabrics or on thin fabrics or small pieces of fabrics. Installing the Straight Stitch Needle Plate automatically sets the needle position to accomplish perfect straight stitching. Select a stitch, and adjust settings as an accessory for perfect topstitching on stitch settings. 1. The side extension ruler on this presser foot only with an accurate 1/4 inch, 1/2 inch, or 5/8 inch (approx. 6.5, 13, or 16 mm) seam. Selecting a stitch designated...

Accessory Catalog
Page 11
... the presser foot. 4. SA141 All Brother home-use sewing machines Clear-view Foot Use this presser foot where visibility of the presser foot, and place each cord into each guide (to fit the width of 7 mm feed width. 1. Sew. Slip a cord from satin or decorative stitches. 2. SA157 ABCDEFJKMN Cording Foot (7-hole) Used for embellishing 1 to 5 cords or decorative threads. Loosen the screw on the presser foot and insert a braid through the guide before attaching the presser foot on the presser foot over the desired seams or pattern...
... the presser foot. 4. SA141 All Brother home-use sewing machines Clear-view Foot Use this presser foot where visibility of the presser foot, and place each cord into each guide (to fit the width of 7 mm feed width. 1. Sew. Slip a cord from satin or decorative stitches. 2. SA157 ABCDEFJKMN Cording Foot (7-hole) Used for embellishing 1 to 5 cords or decorative threads. Loosen the screw on the presser foot and insert a braid through the guide before attaching the presser foot on the presser foot over the desired seams or pattern...

Accessory Catalog
Page 12
... pattern line and sew (cut the center of the foot. 3. Sew a few stitches to more than 5 mm. 2. Ideal for details.) Brother Embellishment Feet Open Toe Foot 22 Pearls and Sequins Foot Metal type SA146 IP Open Toe Foot Provides better visibility in size. Works best on your fabric. 3. Increase the upper thread tension. 3. Place the fabric to be gathered under the presser foot. 4. To attach the gathered edge to make fringes). Place the fabric to be gathered, right...
... pattern line and sew (cut the center of the foot. 3. Sew a few stitches to more than 5 mm. 2. Ideal for details.) Brother Embellishment Feet Open Toe Foot 22 Pearls and Sequins Foot Metal type SA146 IP Open Toe Foot Provides better visibility in size. Works best on your fabric. 3. Increase the upper thread tension. 3. Place the fabric to be gathered under the presser foot. 4. To attach the gathered edge to make fringes). Place the fabric to be gathered, right...

Accessory Catalog
Page 13
... into the slot, and stitch slowly. 3. For seven grooves: SA179 ABCDEJ For five grooves: SA162 IP This presser foot does not include the bobbin cover. The ruffling blade on lightweight fabric. Install and manually thread a twin needle. 2. Move fabric about 1" (2.5 cm) past the needle to guide your first row of stitch length, tuck setting and depth setting. 2. The intervals of tucks can be adjusted. 1. Draw a reference line to get started.
... into the slot, and stitch slowly. 3. For seven grooves: SA179 ABCDEJ For five grooves: SA162 IP This presser foot does not include the bobbin cover. The ruffling blade on lightweight fabric. Install and manually thread a twin needle. 2. Move fabric about 1" (2.5 cm) past the needle to guide your first row of stitch length, tuck setting and depth setting. 2. The intervals of tucks can be adjusted. 1. Draw a reference line to get started.

Accessory Catalog
Page 15
... starting to sew, press the needle position button twice to pull the bobbin thread to the machine. 2. When quilting is needed. 1. Set the machine for free-motion, outline quilting, etc. 1. Use both hands while keeping the fabric pulled tight. 9. Requires Low Shank Adapter for ULT series, PC-6500, PC-8200 and PC-8500 sewing machines. Screw on the Open Toe Quilting Foot, with both hands to hold fabric in order to straight stitch. 3. Lower the feed dogs. 2. Walking Foot/Open Toe Walking Foot Brother Quilting Feet 28 Walking Foot/Open Toe Walking Foot The feed dogs...
... starting to sew, press the needle position button twice to pull the bobbin thread to the machine. 2. When quilting is needed. 1. Set the machine for free-motion, outline quilting, etc. 1. Use both hands while keeping the fabric pulled tight. 9. Requires Low Shank Adapter for ULT series, PC-6500, PC-8200 and PC-8500 sewing machines. Screw on the Open Toe Quilting Foot, with both hands to hold fabric in order to straight stitch. 3. Lower the feed dogs. 2. Walking Foot/Open Toe Walking Foot Brother Quilting Feet 28 Walking Foot/Open Toe Walking Foot The feed dogs...

Accessory Catalog
Page 17
...-is 4000D Premium Upgrade Package II Brother Embroidery Accessories 32 Duetta™ 4500D/ 4000D Premium Upgrade Package II Exclusively for all Duetta™ 4500D's and Innov-is compatible with the new Appliqué Creator Function. - Add even more control with the QuattroTM 6000D. Addition of making beautiful borders. Sewing Decorative Stitches as border designs. Greater functionality in embroidery fonts. - Includes three new free-motion presser feet: Free-motion quilting foot "C" for perfect...
...-is 4000D Premium Upgrade Package II Brother Embroidery Accessories 32 Duetta™ 4500D/ 4000D Premium Upgrade Package II Exclusively for all Duetta™ 4500D's and Innov-is compatible with the new Appliqué Creator Function. - Add even more control with the QuattroTM 6000D. Addition of making beautiful borders. Sewing Decorative Stitches as border designs. Greater functionality in embroidery fonts. - Includes three new free-motion presser feet: Free-motion quilting foot "C" for perfect...

Accessory Catalog
Page 33
... QuattroTM 6000D Embroidery Machine Hoops Select hoops appropriate for details, www.brother.com. Ten Spool Thread Stand This 10-Spool Thread Stand snaps securely in use. Place your threads in the storage slots. Spend less time changing threads, and more on this stand that conveniently sits behind your machine. Brother Embroidery Accessories 63 Free-Standing Ten Spool Thread Stand Ten Spool Thread Stand Embroidery Machine Hoops Brother Embroidery Accessories 64 For all embroidery and sewing/embroidery machines. Some hoops can set up to 10 spools of spool sizes.
... QuattroTM 6000D Embroidery Machine Hoops Select hoops appropriate for details, www.brother.com. Ten Spool Thread Stand This 10-Spool Thread Stand snaps securely in use. Place your threads in the storage slots. Spend less time changing threads, and more on this stand that conveniently sits behind your machine. Brother Embroidery Accessories 63 Free-Standing Ten Spool Thread Stand Ten Spool Thread Stand Embroidery Machine Hoops Brother Embroidery Accessories 64 For all embroidery and sewing/embroidery machines. Some hoops can set up to 10 spools of spool sizes.

Accessory Catalog
Page 34
... how to the needle thread. It is completed. Brother Embroidery Accessories PacesetterTM Polyester Threads 65 Brother Country Yarn Embroidery Threads Metallic Threads For the best embroidery results, use these embroidery threads especially designed for Brother sewing and embroidering machines. 61 Color Thread Set with Wooden Rack ETKSP999 PacesetterTM Polyester Threads (61 Color Thread Set with Wooden Rack) Our high sheen 100% polyester mini king embroidery thread (1100 yds) is designed to last a long time. Designed for high speed embroidery stitching, made in...
... how to the needle thread. It is completed. Brother Embroidery Accessories PacesetterTM Polyester Threads 65 Brother Country Yarn Embroidery Threads Metallic Threads For the best embroidery results, use these embroidery threads especially designed for Brother sewing and embroidering machines. 61 Color Thread Set with Wooden Rack ETKSP999 PacesetterTM Polyester Threads (61 Color Thread Set with Wooden Rack) Our high sheen 100% polyester mini king embroidery thread (1100 yds) is designed to last a long time. Designed for high speed embroidery stitching, made in...

Accessory Catalog
Page 40
... sew. Set T1/T2 presser foot. 2. SA224CV SA221CV Hemming Set Finishes hems easily and quickly. Fold fabric and set it is easily set through the holder). 4. Sew as folding them. Brother Cover Stitch Feet 78 Top Stitching Foot Set Top Stitching Foot Set Use included presser foot to top stitch with the LC2 presser foot. Open the seams. 4. Align the fabric joint and the groove of fabric pointed so that it into the front cover slot. 3. Set up your machine. 3. SA226CV www.brother.com Attach the hem positioning plate A/B to the hemming attachment...
... sew. Set T1/T2 presser foot. 2. SA224CV SA221CV Hemming Set Finishes hems easily and quickly. Fold fabric and set it is easily set through the holder). 4. Sew as folding them. Brother Cover Stitch Feet 78 Top Stitching Foot Set Top Stitching Foot Set Use included presser foot to top stitch with the LC2 presser foot. Open the seams. 4. Align the fabric joint and the groove of fabric pointed so that it into the front cover slot. 3. Set up your machine. 3. SA226CV www.brother.com Attach the hem positioning plate A/B to the hemming attachment...
Users Manual - English
Page 2
... never be used by the manufacturer as threading needle, changing needle, threading bobbin, or changing presser foot, and the like. 15.Always unplug the machine from the electrical outlet when removing covers, lubricating, or when making any other user servicing adjustments mentioned in this machine, basic safety precautions should always be taken, including the following: Read all moving parts. To reduce the risk of lint, dust, and loose cloth. 5. Keep...
... never be used by the manufacturer as threading needle, changing needle, threading bobbin, or changing presser foot, and the like. 15.Always unplug the machine from the electrical outlet when removing covers, lubricating, or when making any other user servicing adjustments mentioned in this machine, basic safety precautions should always be taken, including the following: Read all moving parts. To reduce the risk of lint, dust, and loose cloth. 5. Keep...
Users Manual - English
Page 8
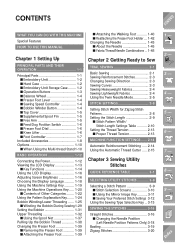
... WITH THIS MACHINE Special Features HOW TO USE THIS MANUAL Chapter 1 Setting Up PRINCIPAL PARTS AND THEIR OPERATION 1-1 Principal Parts 1-1 s Embroidery Unit 1-2 s Hard Case 1-2 s Embroidery Unit Storage Case ........ 1-2 s Operation Buttons 1-3 s Balance Wheel 1-4 s Presser Foot Lever 1-4 s Sewing Speed Controller 1-4 s Bobbin Winder Button 1-4 s Top Cover 1-5 s Supplemental Spool Pin 1-5 s Free Arm 1-5 s Feed Dog Position Switch 1-6 s Presser Foot Dial 1-6 s Knee Lifter 1-6 s Foot Controller 1-7 Included Accessories 1-8 Options 1-10 s When Using the Multi-thread Stand 1-10...
... WITH THIS MACHINE Special Features HOW TO USE THIS MANUAL Chapter 1 Setting Up PRINCIPAL PARTS AND THEIR OPERATION 1-1 Principal Parts 1-1 s Embroidery Unit 1-2 s Hard Case 1-2 s Embroidery Unit Storage Case ........ 1-2 s Operation Buttons 1-3 s Balance Wheel 1-4 s Presser Foot Lever 1-4 s Sewing Speed Controller 1-4 s Bobbin Winder Button 1-4 s Top Cover 1-5 s Supplemental Spool Pin 1-5 s Free Arm 1-5 s Feed Dog Position Switch 1-6 s Presser Foot Dial 1-6 s Knee Lifter 1-6 s Foot Controller 1-7 Included Accessories 1-8 Options 1-10 s When Using the Multi-thread Stand 1-10...
Users Manual - English
Page 9
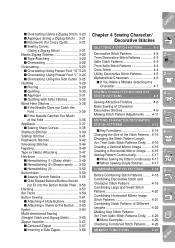
... (Drawn work) .... 3-50 s Hemstitching (3 3-52 Buttonholes 3-53 s Sewing Stretch Fabrics 3-56 s Odd Shaped Buttons/Buttons that do not Fit into the Button Holder Plate .. 3-56 Darning 3-57 Bar Tacks 3-59 Button Sewing 3-61 s Attaching 4 Hole Buttons 3-62 s Attaching a Shank to the Button ... 3-63 Eyelet 3-63 Multi-directional Sewing (Straight Stitch and Zigzag Stitch) ........ 3-65 Zipper Insertion 3-67 s Centered Zipper 3-67 s Inserting a Side Zipper 3-68 Chapter 4 Sewing Character/ Decorative Stitches SELECTING A STITCH PATTERN .......... 4-1 Decorative Stitch Patterns 4-2 7mm...
... (Drawn work) .... 3-50 s Hemstitching (3 3-52 Buttonholes 3-53 s Sewing Stretch Fabrics 3-56 s Odd Shaped Buttons/Buttons that do not Fit into the Button Holder Plate .. 3-56 Darning 3-57 Bar Tacks 3-59 Button Sewing 3-61 s Attaching 4 Hole Buttons 3-62 s Attaching a Shank to the Button ... 3-63 Eyelet 3-63 Multi-directional Sewing (Straight Stitch and Zigzag Stitch) ........ 3-65 Zipper Insertion 3-67 s Centered Zipper 3-67 s Inserting a Side Zipper 3-68 Chapter 4 Sewing Character/ Decorative Stitches SELECTING A STITCH PATTERN .......... 4-1 Decorative Stitch Patterns 4-2 7mm...
Users Manual - English
Page 12
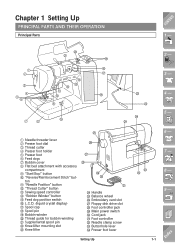
...Handle O Balance wheel P Embroidery card slot Q Floppy disk drive slot R Foot controller jack S Main power switch T Cord jack U Foot controller V Needle clamp screw W Buttonhole lever X Presser foot lever Setting Up W V 6 - 7 - 8 - 9 - ?! 1-1 Index ton A "Needle Position" button B "Thread Cutter" button C Sewing speed controller D "Bobbin Winder" button E Feed dog position switch F L.C.D. (liquid crystal display) G Spool cap H Spool pin I 2 - 1 2 3 4 56 H G D C B A = F 9 3 - Chapter 1 Setting Up PRINCIPAL PARTS AND THEIR OPERATION Principal Parts CONTENTS 1 - L M 4 - 78...
...Handle O Balance wheel P Embroidery card slot Q Floppy disk drive slot R Foot controller jack S Main power switch T Cord jack U Foot controller V Needle clamp screw W Buttonhole lever X Presser foot lever Setting Up W V 6 - 7 - 8 - 9 - ?! 1-1 Index ton A "Needle Position" button B "Thread Cutter" button C Sewing speed controller D "Bobbin Winder" button E Feed dog position switch F L.C.D. (liquid crystal display) G Spool cap H Spool pin I 2 - 1 2 3 4 56 H G D C B A = F 9 3 - Chapter 1 Setting Up PRINCIPAL PARTS AND THEIR OPERATION Principal Parts CONTENTS 1 - L M 4 - 78...
Users Manual - English
Page 25
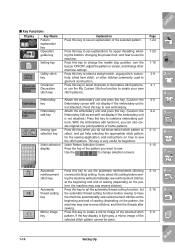
... a straight stitch, zigzag stitch, buttonhole, blind hem stitch, or other machine settings. s Key Functions Display Key Name Pattern explanation key Operation guide key Setting key Utility stitch key Character/ Decorative stitch key Explanation Press this key to see explanations for upper threading, winding the bobbin, changing the presser foot, and how to use the machine. Press this key when you select this key to select character or decorative stitch patterns, or use the automatic reinforcement stitching (reverse stitching) setting. This key is light gray...
... a straight stitch, zigzag stitch, buttonhole, blind hem stitch, or other machine settings. s Key Functions Display Key Name Pattern explanation key Operation guide key Setting key Utility stitch key Character/ Decorative stitch key Explanation Press this key to see explanations for upper threading, winding the bobbin, changing the presser foot, and how to use the machine. Press this key when you select this key to select character or decorative stitch patterns, or use the automatic reinforcement stitching (reverse stitching) setting. This key is light gray...
Users Manual - English
Page 37
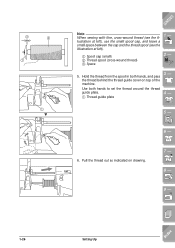
... thread from the spool in both hands to set the thread around the thread guide plate. 1 Thread guide plate 3 - 4 - 5 - 6 - 6. 3 2 1 1 w CONTENTS Note When sewing with fine, cross-wound thread (see the illustration at left), use the small spool cap, and leave a small space between the cap and the thread spool (see the illustration at left). 1 Spool cap (small) 2 Thread spool (cross-wound thread) 3 Space 1 - 2 - 5. Use both hands, and pass the thread behind the thread guide cover...
... thread from the spool in both hands to set the thread around the thread guide plate. 1 Thread guide plate 3 - 4 - 5 - 6 - 6. 3 2 1 1 w CONTENTS Note When sewing with fine, cross-wound thread (see the illustration at left), use the small spool cap, and leave a small space between the cap and the thread spool (see the illustration at left). 1 Spool cap (small) 2 Thread spool (cross-wound thread) 3 Space 1 - 2 - 5. Use both hands, and pass the thread behind the thread guide cover...
Users Manual - English
Page 50
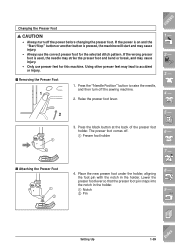
... presser foot for this machine. Setting Up 1-39 Index Changing the Presser Foot CAUTION • Always turn off the sewing machine. 2. s Removing the Presser Foot 1 1. Press the black button at the back of the presser foot holder. Place the new presser foot under the holder, aligning the foot pin with the notch in the holder. 1 Notch 2 Pin 8 - 9 - ?! s Attaching the Presser Foot 1 2 4. Lower the presser foot lever so that the presser foot pin snaps into the notch in the holder. If the power is on and the "Start...
... presser foot for this machine. Setting Up 1-39 Index Changing the Presser Foot CAUTION • Always turn off the sewing machine. 2. s Removing the Presser Foot 1 1. Press the black button at the back of the presser foot holder. Place the new presser foot under the holder, aligning the foot pin with the notch in the holder. 1 Notch 2 Pin 8 - 9 - ?! s Attaching the Presser Foot 1 2 4. Lower the presser foot lever so that the presser foot pin snaps into the notch in the holder. If the power is on and the "Start...
Users Manual - English
Page 300
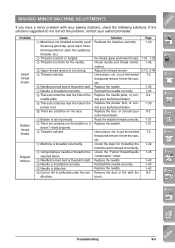
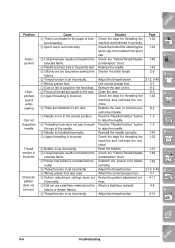
.... Problem Upper thread breaks Bobbin thread breaks Skipped stitches Cause 1 Machine is not threaded correctly (used the wrong spool cap, spool cap is loose, the thread did not catch the needle bar threader, etc.) 2 Thread is knotted or tangled. 3 Thread is too thick for the selected fabric. 3 Needle is turned, bent or the point is dull. 4 Needle is installed incorrectly. 5 Needle is defective. 6 Dust or lint is collected under the nee- Adjust the thread tension. 2-13, 5-40 Use scissors...
.... Problem Upper thread breaks Bobbin thread breaks Skipped stitches Cause 1 Machine is not threaded correctly (used the wrong spool cap, spool cap is loose, the thread did not catch the needle bar threader, etc.) 2 Thread is knotted or tangled. 3 Thread is too thick for the selected fabric. 3 Needle is turned, bent or the point is dull. 4 Needle is installed incorrectly. 5 Needle is defective. 6 Dust or lint is collected under the nee- Adjust the thread tension. 2-13, 5-40 Use scissors...
Users Manual - English
Page 301
... feed dogs. 2 Pieces of the needle. 3 Needle is installed incorrectly. 1 Upper threading is incorrect. 2 Bobbin is a mistake in the race. 3 Upper threading is incorrect. 4 There are scratches on thin fabrics or stretch fabrics. 4 Thread tension is not attached cor- Check the method for attaching the spool cap, then reattach the spool cap. Reattach the presser foot holder 1-42 correctly. Adjust the thread tension. 2-13, 5-40 Attach the correct presser foot. 3-1 Revise the pattern adjustment set incorrectly. 3 Using improper needle or thread for threading the 1-32 machine...
... feed dogs. 2 Pieces of the needle. 3 Needle is installed incorrectly. 1 Upper threading is incorrect. 2 Bobbin is a mistake in the race. 3 Upper threading is incorrect. 4 There are scratches on thin fabrics or stretch fabrics. 4 Thread tension is not attached cor- Check the method for attaching the spool cap, then reattach the spool cap. Reattach the presser foot holder 1-42 correctly. Adjust the thread tension. 2-13, 5-40 Attach the correct presser foot. 3-1 Revise the pattern adjustment set incorrectly. 3 Using improper needle or thread for threading the 1-32 machine...

Users Manual - English
Page 314
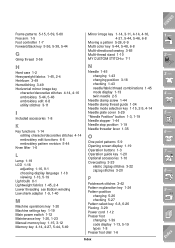
..., 4-14 Automatic thread cutting 1-14, 2-15, 4-14 B Balance wheel 1-4 Ball point needle 1-45 Bar tacks 3-59 Basic embroidery method 5-30 Basic operation key 1-20, 1-22 Basic sewing character/decorative stitches 4-9 utility stitches 2-1 Basting 3-19 Blind hem stitches 3-35 Bobbin pulling up bobbin thread 1-38 runs out of thread 5-35 setting 1-31 winding 1-25, 1-29 Bobbin thread sensor 1-13, 5-19 Bobbin winder button 1-4 Button holder plate 3-54 Buttonholes 3-53 Button sewing 3-61 Buzzer 1-19 C Centered zippers 3-67 Character/Decorative stitches 4-1 checking combined patterns 4-26...
..., 4-14 Automatic thread cutting 1-14, 2-15, 4-14 B Balance wheel 1-4 Ball point needle 1-45 Bar tacks 3-59 Basic embroidery method 5-30 Basic operation key 1-20, 1-22 Basic sewing character/decorative stitches 4-9 utility stitches 2-1 Basting 3-19 Blind hem stitches 3-35 Bobbin pulling up bobbin thread 1-38 runs out of thread 5-35 setting 1-31 winding 1-25, 1-29 Bobbin thread sensor 1-13, 5-19 Bobbin winder button 1-4 Button holder plate 3-54 Buttonholes 3-53 Button sewing 3-61 Buzzer 1-19 C Centered zippers 3-67 Character/Decorative stitches 4-1 checking combined patterns 4-26...
Users Manual - English
Page 316
..., 2-4 Lower threading see Bobbin winding Low shank adapter 1-9, 1-40 M Machine operations key 1-20 Machine settings key 1-19 Main power switch 1-12 Maintenance key 1-20, 1-23 Manual memory key 1-15, 3-12 Memory key 4-14, 4-27, 5-44, 5-49 N Needle 1-45 changing 1-43 changing position 3-18 checking 1-43 needle/fabric/thread combinations 1-45 mode display 1-13 twin needle 2-5 Needle clamp screw 1-44 Needle clamp thread guide 1-34 Needle mode selection key 1-15, 2-5, 4-14 Needle plate cover 5-29 "Needle Position" button 1-3, 1-19 Needle stopper 1-44 Needle stop position 1-19 Needle threader lever...
..., 2-4 Lower threading see Bobbin winding Low shank adapter 1-9, 1-40 M Machine operations key 1-20 Machine settings key 1-19 Main power switch 1-12 Maintenance key 1-20, 1-23 Manual memory key 1-15, 3-12 Memory key 4-14, 4-27, 5-44, 5-49 N Needle 1-45 changing 1-43 changing position 3-18 checking 1-43 needle/fabric/thread combinations 1-45 mode display 1-13 twin needle 2-5 Needle clamp screw 1-44 Needle clamp thread guide 1-34 Needle mode selection key 1-15, 2-5, 4-14 Needle plate cover 5-29 "Needle Position" button 1-3, 1-19 Needle stopper 1-44 Needle stop position 1-19 Needle threader lever...


