

Accessory Catalog
Page 7
...an accurate 1/4 inch, 1/2 inch, or 5/8 inch (approx. 6.5, 13, or 16 mm) seam. Stitch Guide Foot The scale in the presser foot can be used with all Brother presser feet. To sew a curve, sew so that the fabric edge becomes a right angle against the seam guide. 3. SA160...heavy fabrics together. 1. Make a cut about 2 cm (3/4'') long in Fall 2008. Helpful for perfect topstitching on selected machines. SA189 ABCDEFGHJKLMNO www.brother.com Use this foot lets you add creativity to create a beautiful finish without any adjustment on the top of the fabric. 2. Place the cut...
...an accurate 1/4 inch, 1/2 inch, or 5/8 inch (approx. 6.5, 13, or 16 mm) seam. Stitch Guide Foot The scale in the presser foot can be used with all Brother presser feet. To sew a curve, sew so that the fabric edge becomes a right angle against the seam guide. 3. SA160...heavy fabrics together. 1. Make a cut about 2 cm (3/4'') long in Fall 2008. Helpful for perfect topstitching on selected machines. SA189 ABCDEFGHJKLMNO www.brother.com Use this foot lets you add creativity to create a beautiful finish without any adjustment on the top of the fabric. 2. Place the cut...
Users Manual - English
Page 129
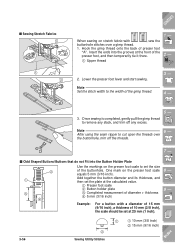
... mm (9/16 inch), a thickness of the presser foot, and then temporarily tie it there. 1 Upper thread 1 - 2 - 2. One mark on the presser foot scale to remove any excess. Add together the button diameter and its thickness, and then set the plate at the front of 10 mm (3/8 inch), the... 5 mm (3/16 inch). Note 6 - s Odd Shaped Buttons/Buttons that do not Fit into the grooves at the calculated value. 1 Presser foot scale 2 Button holder plate 3 Completed measurement of diameter + thickness 4 5 mm (3/16 inch) Example: For a button with , sew the buttonhole stitches over the ...
... mm (9/16 inch), a thickness of the presser foot, and then temporarily tie it there. 1 Upper thread 1 - 2 - 2. One mark on the presser foot scale to remove any excess. Add together the button diameter and its thickness, and then set the plate at the front of 10 mm (3/8 inch), the... 5 mm (3/16 inch). Note 6 - s Odd Shaped Buttons/Buttons that do not Fit into the grooves at the calculated value. 1 Presser foot scale 2 Button holder plate 3 Completed measurement of diameter + thickness 4 5 mm (3/16 inch) Example: For a button with , sew the buttonhole stitches over the ...

Users Manual - English
Page 130
... thread passes underneath the buttonhole foot. If there is a gap, the size of the darning. Index Attach buttonhole foot "A" and set the scale to the right). Sewing Utility Stitches 3-57 9 - ?! Select a stitch pattern. Note The maximum length of darning is no gap behind ... of the darning will not be correct. • Pass the thread underneath the presser foot. Check that there is 30 mm (1-3/16 inch). 1 Presser foot scale 2 Completed measurement 3 Width 7 mm (1/4 inch) 4 5 mm (3/16 inch) 6 - 7 - 8 - 3. Darning Use this stitch pattern for mending and other applications. ...
... thread passes underneath the buttonhole foot. If there is a gap, the size of the darning. Index Attach buttonhole foot "A" and set the scale to the right). Sewing Utility Stitches 3-57 9 - ?! Select a stitch pattern. Note The maximum length of darning is no gap behind ... of the darning will not be correct. • Pass the thread underneath the presser foot. Check that there is 30 mm (1-3/16 inch). 1 Presser foot scale 2 Completed measurement 3 Width 7 mm (1/4 inch) 4 5 mm (3/16 inch) 6 - 7 - 8 - 3. Darning Use this stitch pattern for mending and other applications. ...

Users Manual - English
Page 132
... the length of the bar tack you 9 - Set the fabric so that will not be between 5 mm (3/16 7 - 3 inch) and 10 mm (3/8 inch). 1 Presser foot scale 2 Completed measurement 3 5 mm (3/16 inch) 8 - CAUTION • Slide the outside frame of the foot marked "A". If the buttonhole foot is not slid back as far...
... the length of the bar tack you 9 - Set the fabric so that will not be between 5 mm (3/16 7 - 3 inch) and 10 mm (3/8 inch). 1 Presser foot scale 2 Completed measurement 3 5 mm (3/16 inch) 8 - CAUTION • Slide the outside frame of the foot marked "A". If the buttonhole foot is not slid back as far...