
Instruction Manual - English
Page 2
...Operation 3 Major components 3 Presser adjusting screw ---------- 3 Needle 4 Knee-operated presser foot lifter and zigzag width adjuster 5 Needle bar support clamping knob 6 Zigzag lever and stopper thumb screw 6 How to Use Each Part 7 Presser foot Needle plate Feed dog Accessories 7 7 8 ...... 9 Preparation...Preparation thread 10 Upper thread 14 Picking up the lower thread 15 Caution in sewing 16 The relation of fabrics, needle and threads 17 Sewing 18 Straight stitch 18 Tension control of straight stitch 20 Zigzag sewing 21 Applied sewing 23 ...
...Operation 3 Major components 3 Presser adjusting screw ---------- 3 Needle 4 Knee-operated presser foot lifter and zigzag width adjuster 5 Needle bar support clamping knob 6 Zigzag lever and stopper thumb screw 6 How to Use Each Part 7 Presser foot Needle plate Feed dog Accessories 7 7 8 ...... 9 Preparation...Preparation thread 10 Upper thread 14 Picking up the lower thread 15 Caution in sewing 16 The relation of fabrics, needle and threads 17 Sewing 18 Straight stitch 18 Tension control of straight stitch 20 Zigzag sewing 21 Applied sewing 23 ...
Instruction Manual - English
Page 3
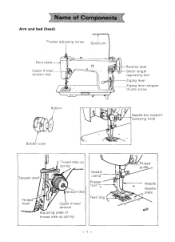
Name of Components Arm and bed (head) Presser adjusting screw Spool pin Fade plate Upper thread tension dial Reverse lever Stitch length regulating dial Zigzag lever Zigzag lever stopper thumb screw Bobbin Needle bar support clamping knob Bobbin case Tension stud Thread take-up spring Tension disc Thread hook 0 Upper thread tension Adjusting plate of thread teke-up spring Needle clamp Presser foot Feed dog - 1 - Thread guide MIt> Needle Needle plate
Name of Components Arm and bed (head) Presser adjusting screw Spool pin Fade plate Upper thread tension dial Reverse lever Stitch length regulating dial Zigzag lever Zigzag lever stopper thumb screw Bobbin Needle bar support clamping knob Bobbin case Tension stud Thread take-up spring Tension disc Thread hook 0 Upper thread tension Adjusting plate of thread teke-up spring Needle clamp Presser foot Feed dog - 1 - Thread guide MIt> Needle Needle plate
Instruction Manual - English
Page 6
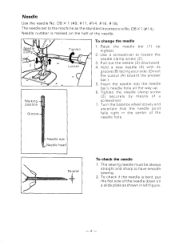
... falls right in left figure. -4- DB X 1 (#9, #11, #14, #16, #18). Needle clamp Marking position Groove Tighten Loosen To change the needle 1 . Pul l 'out the needle (3) downward. 4. Insert the needle into the needle bar's needle hole al l the way up highest. 2. To check if the needle is No. Needle Use the needle No. Needle eye Needle head Pa allel To check the...
... falls right in left figure. -4- DB X 1 (#9, #11, #14, #16, #18). Needle clamp Marking position Groove Tighten Loosen To change the needle 1 . Pul l 'out the needle (3) downward. 4. Insert the needle into the needle bar's needle hole al l the way up highest. 2. To check if the needle is No. Needle Use the needle No. Needle eye Needle head Pa allel To check the...
Instruction Manual - English
Page 8
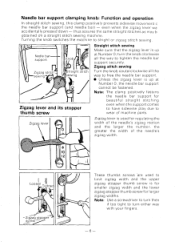
... stitch sewing O Zigzag lever and its stopper thumb screw Straight stitch sewing Make sure that the zigzag lever is up at Number 0, the needle bar support cannot be fastened. Zigzag stitch sewing Turn the knob couterclockwise al l the way to limit zigzag width and the upper zigzag stopper... or zigzag stitch sewing. even when the zigzag lever wa accidentally pressed down - Turning the knob switches the machine to tighten the needle bar support securely. Zigzag lever Zigzag lever is for smaller zigzag width and the lower zigzag stopper thumb screw for regulating the width...
... stitch sewing O Zigzag lever and its stopper thumb screw Straight stitch sewing Make sure that the zigzag lever is up at Number 0, the needle bar support cannot be fastened. Zigzag stitch sewing Turn the knob couterclockwise al l the way to limit zigzag width and the upper zigzag stopper... or zigzag stitch sewing. even when the zigzag lever wa accidentally pressed down - Turning the knob switches the machine to tighten the needle bar support securely. Zigzag lever Zigzag lever is for smaller zigzag width and the lower zigzag stopper thumb screw for regulating the width...

Instruction Manual - English
Page 9
... Removeing II °Loosen the\ presser foot screw Thumb =crew Raise the needle up highest °Remove the presser foot Thumb screw 2) Installing °Tighten the thumb screw Install the Ipresser foot you want to use Needle plate (1) Removing °Raise the presser foot lifter °Raise the ...Installing °Remove the needle plate 1 t OPush the head of the needle plate lifter rod ()Insert the pin of the needle plate into the hole in the bed • Fit the needle plate's bottom spring into the bed *MI °Install the needle plate Note: Unless the needle plate is set to the...
... Removeing II °Loosen the\ presser foot screw Thumb =crew Raise the needle up highest °Remove the presser foot Thumb screw 2) Installing °Tighten the thumb screw Install the Ipresser foot you want to use Needle plate (1) Removing °Raise the presser foot lifter °Raise the ...Installing °Remove the needle plate 1 t OPush the head of the needle plate lifter rod ()Insert the pin of the needle plate into the hole in the bed • Fit the needle plate's bottom spring into the bed *MI °Install the needle plate Note: Unless the needle plate is set to the...

Instruction Manual - English
Page 10
Turn the balance wheel until the needle barely reaches its end surface contacts the feed dog mount without space. Remove the presser foot and the needle plate. 3. Without space Note: Install the feed dod so that its highest position. 2. Feed dog (1) Removing 1 . Feed dog mount -8- Round nut Feed dog Note: Don't remove but only loosen the round nuts. (2) Installing Install the feed dog in the converse way of removing. Loosen the two round nut and remove the feed dog. Tilt the head. 4.
Turn the balance wheel until the needle barely reaches its end surface contacts the feed dog mount without space. Remove the presser foot and the needle plate. 3. Without space Note: Install the feed dod so that its highest position. 2. Feed dog (1) Removing 1 . Feed dog mount -8- Round nut Feed dog Note: Don't remove but only loosen the round nuts. (2) Installing Install the feed dog in the converse way of removing. Loosen the two round nut and remove the feed dog. Tilt the head. 4.

Instruction Manual - English
Page 11
) Accessories • = (BROTHER) Vinyl bag roN/ INee ecpTa-tec"/ (for straight stitch) OLI(0q3'06\ Oi ler 1/3 d- •0-.001 Presser foot (for straight stitch) of cPD
) Accessories • = (BROTHER) Vinyl bag roN/ INee ecpTa-tec"/ (for straight stitch) OLI(0q3'06\ Oi ler 1/3 d- •0-.001 Presser foot (for straight stitch) of cPD

Instruction Manual - English
Page 12
Pull the slide plate toward yourself until the needle is up the thread guide stand. 3. Pass the thread through a hole of the spool . 1 . Turn the balance wheel toward yourself. 3. Pul l out the bobbin case ...
Pull the slide plate toward yourself until the needle is up the thread guide stand. 3. Pass the thread through a hole of the spool . 1 . Turn the balance wheel toward yourself. 3. Pul l out the bobbin case ...
Instruction Manual - English
Page 15
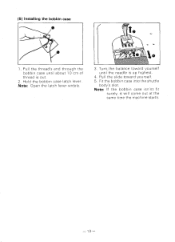
5) Installing the bobbin case C-, 1 . Hold the bobbin case latch lever. Note: If the bobbin case isn'nt fit surely, it wil l come out at the same time the machine starts. -13- Note: Open the latch lever widely. '. Pul l the slide toward yourself until about 10 cm of thread is up highest. 4. Pul l the thread's end through the bobbin case until the needle is out. 2. "tP1-2ar* 0 3. Turn_the balance toward yourself. 5. Fit the bobbin case into the shuttle body's slot.
5) Installing the bobbin case C-, 1 . Hold the bobbin case latch lever. Note: If the bobbin case isn'nt fit surely, it wil l come out at the same time the machine starts. -13- Note: Open the latch lever widely. '. Pul l the slide toward yourself until about 10 cm of thread is up highest. 4. Pul l the thread's end through the bobbin case until the needle is out. 2. "tP1-2ar* 0 3. Turn_the balance toward yourself. 5. Fit the bobbin case into the shuttle body's slot.

Instruction Manual - English
Page 17
... take-up spring. • Pass the thread through the thread take-up spring. O Thread needle from your right hand turn the balance wheel toward the farther side of the table. Pass the...regular. O Pass the thread through the thread take-up guide. Pull up in loop from through the needle's plate hole. The upper thread catches the lower thread and comes up the end of the thread about...Pass the thread through the thread take-up highest. Just pull the lower thread. - 15 - As the needle goes down and rises back, stop the the balance wheel and pull the upper thread when it is up ...
... take-up spring. • Pass the thread through the thread take-up spring. O Thread needle from your right hand turn the balance wheel toward the farther side of the table. Pass the...regular. O Pass the thread through the thread take-up guide. Pull up in loop from through the needle's plate hole. The upper thread catches the lower thread and comes up the end of the thread about...Pass the thread through the thread take-up highest. Just pull the lower thread. - 15 - As the needle goes down and rises back, stop the the balance wheel and pull the upper thread when it is up ...
Instruction Manual - English
Page 18
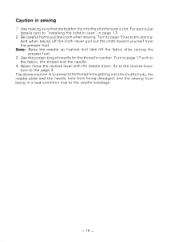
... when taking off the fabric after raising the. Never move the reverse lever with to the needle breakage. - 16 - Be careful " ot to "installing the bobbin case" in page 13. 2. presser foot. 3. Note: Raise the .needle up highest and take off the cloth never pull out the cloth toward yourself from being... damaged, and the sewing from the presser foot. Turn to page 19 as to the page 3. Use the proper king of needle for the thread's number. Caution in a bad condition due to the fabric, the thread and the...
... when taking off the fabric after raising the. Never move the reverse lever with to the needle breakage. - 16 - Be careful " ot to "installing the bobbin case" in page 13. 2. presser foot. 3. Note: Raise the .needle up highest and take off the cloth never pull out the cloth toward yourself from being... damaged, and the sewing from the presser foot. Turn to page 19 as to the page 3. Use the proper king of needle for the thread's number. Caution in a bad condition due to the fabric, the thread and the...
Instruction Manual - English
Page 19
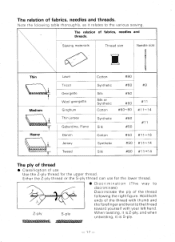
... hand. Hold both ends of the thread following the right figure. Note the folowing table thoroughly, as it is S-ply. - 17 - Sewing materials Thread size Needle size .-- The relation of fabrics, needles and threads. The relation of fabrics...
... hand. Hold both ends of the thread following the right figure. Note the folowing table thoroughly, as it is S-ply. - 17 - Sewing materials Thread size Needle size .-- The relation of fabrics, needles and threads. The relation of fabrics...

Instruction Manual - English
Page 20
... sewing machine as to guide it in the proper direction. Straight stitch Sewing As the fabric is sent automatically by turning clockwise the needle bar support clamping knob 1^ 5 0 Presser Needle plate -11 \\\ Feed dog Bobbin case Don't pass the thread into the eye. 0 I 1 o o al Straight stitch ...Straight stitch Straight stitch With regard to how to change the part, turn to page 7 as to the presser foot and the needle plate, page 8 as to the feed dog and page 12 as follows, the straight stitch can be sewn. 0 Increase the pressure by the function ...
... sewing machine as to guide it in the proper direction. Straight stitch Sewing As the fabric is sent automatically by turning clockwise the needle bar support clamping knob 1^ 5 0 Presser Needle plate -11 \\\ Feed dog Bobbin case Don't pass the thread into the eye. 0 I 1 o o al Straight stitch ...Straight stitch Straight stitch With regard to how to change the part, turn to page 7 as to the presser foot and the needle plate, page 8 as to the feed dog and page 12 as follows, the straight stitch can be sewn. 0 Increase the pressure by the function ...
Instruction Manual - English
Page 21
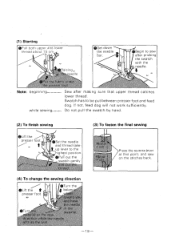
... the final sewing Abel . t up lever to sew after pricking the swatch with the needle. °Put the fabric under t iot Note: beginning while sewing Sew after making sure that upper thread catches lower thread. needle - 19 - If not, feed dog will not work sufficiently. t °Set the... needle and thread take- Abo 1 cn Press the reverse lever at this point, and sew on the stitches back...
... the final sewing Abel . t up lever to sew after pricking the swatch with the needle. °Put the fabric under t iot Note: beginning while sewing Sew after making sure that upper thread catches lower thread. needle - 19 - If not, feed dog will not work sufficiently. t °Set the... needle and thread take- Abo 1 cn Press the reverse lever at this point, and sew on the stitches back...

Instruction Manual - English
Page 23
wise to thread into bobbin case : page 12 - 21 - Stitch length: within 1 . Bobbin case Pass the thread through the eye. Zigzag sewing Satin stitch Zigzag stitch For zigzag sewing, set as below Turn the needle bar 0 support clamping knob counterclock- Zigzag: 1-5 1 -12 Presser Needle plate Feed dog !II oINoo : , Zigzag Zigzag Zigzag As for replacement of parts, see the following pages. Presser foot and needle plate : page 7 Feed dog : page 8 How to free the needle bar support. i CO
wise to thread into bobbin case : page 12 - 21 - Stitch length: within 1 . Bobbin case Pass the thread through the eye. Zigzag sewing Satin stitch Zigzag stitch For zigzag sewing, set as below Turn the needle bar 0 support clamping knob counterclock- Zigzag: 1-5 1 -12 Presser Needle plate Feed dog !II oINoo : , Zigzag Zigzag Zigzag As for replacement of parts, see the following pages. Presser foot and needle plate : page 7 Feed dog : page 8 How to free the needle bar support. i CO

Instruction Manual - English
Page 24
See "Tension control of the stitch width. Caution When the machine stops sewing passing the needle through the swatch, do not move zigzag lever, in order to control the tension. (1) Tension control of zigzag stitch On the reverse side of swatch, ...the lower thread should form 2/3 of straight stitch" (page 20). How to avoid needle breakage and needle bend. - 22 - Also set the upper thread tension a little weaker than that of straight stitch. (2) Satin stitch St tC:-, Satin stitch is a kind of...
See "Tension control of the stitch width. Caution When the machine stops sewing passing the needle through the swatch, do not move zigzag lever, in order to control the tension. (1) Tension control of zigzag stitch On the reverse side of swatch, ...the lower thread should form 2/3 of straight stitch" (page 20). How to avoid needle breakage and needle bend. - 22 - Also set the upper thread tension a little weaker than that of straight stitch. (2) Satin stitch St tC:-, Satin stitch is a kind of...

Instruction Manual - English
Page 27
Reinforcing stitching Overlock and hem stitch Embroidering (1) How to use the embroidery frame 1. If the cloth is slack or distorted, make it taut by means of the adjusting screw on and press it down. Place material in the embroidery frame: Place the cloth over the outer ring, with the drawn pattern up. Put the inner ring on the outer ring. - 25 - Use the needle plate for 12 mm wide zigzag stitch. 3. Remove the presser foot and feed dog. 2. Use the auxiliary upper thread tension regulator. 4.
Reinforcing stitching Overlock and hem stitch Embroidering (1) How to use the embroidery frame 1. If the cloth is slack or distorted, make it taut by means of the adjusting screw on and press it down. Place material in the embroidery frame: Place the cloth over the outer ring, with the drawn pattern up. Put the inner ring on the outer ring. - 25 - Use the needle plate for 12 mm wide zigzag stitch. 3. Remove the presser foot and feed dog. 2. Use the auxiliary upper thread tension regulator. 4.

Instruction Manual - English
Page 28
... the frame: In ordinary cases, use both hands-thumbs and forefingers for holding the frame slightly downward so that the cloth stays close to the needle plate, move the frame gently according to the embroidery design. (2) Embroidering and monogramming Note: Refer to Item 2 "Kneeoperated zigzag width ajuster: Function and operation", Section...
... the frame: In ordinary cases, use both hands-thumbs and forefingers for holding the frame slightly downward so that the cloth stays close to the needle plate, move the frame gently according to the embroidery design. (2) Embroidering and monogramming Note: Refer to Item 2 "Kneeoperated zigzag width ajuster: Function and operation", Section...
Instruction Manual - English
Page 30
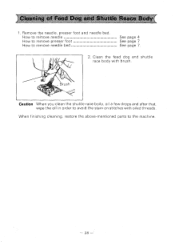
Brush Caution When you clean the shuttle race body, oil a few drops and after that, wipe the oil in order to avoid the stain on stitches with brush. )Cleaning of Feed Dog and Shuttle Reace Body 1 . Clean the feed dog and shuttle race body with oiled threads. Remove the needle, presser foot and needle bed. How to remove needle How to remove presser foot How to the machine. - 28 - When finishing cleaning, restore the above-mentioned parts to remove needle bed See page 4 See page 7 See page 7. 2.
Brush Caution When you clean the shuttle race body, oil a few drops and after that, wipe the oil in order to avoid the stain on stitches with brush. )Cleaning of Feed Dog and Shuttle Reace Body 1 . Clean the feed dog and shuttle race body with oiled threads. Remove the needle, presser foot and needle bed. How to remove needle How to remove presser foot How to the machine. - 28 - When finishing cleaning, restore the above-mentioned parts to remove needle bed See page 4 See page 7 See page 7. 2.

Instruction Manual - English
Page 35
...- Upper thread 1) Incorrect threading of upper breakage thread 2) Threading at incorrect position 3) Too strong thread tension 4) Incorrect setting of needle Do not pull or depress the material which may possibly appear when basic adjustments are forgotten. repair is needed . 1) Incorrect threading...Decrease the tension of the bobbin case Adjust the tension by turning clockwise the presser adjusting scrw Change the incorrect needle tb new one Set needle correctly. (See page 4) 3) Swatch is needed . - 33 - burnish with sandpaper #800 repair is pulled while sewing...
...- Upper thread 1) Incorrect threading of upper breakage thread 2) Threading at incorrect position 3) Too strong thread tension 4) Incorrect setting of needle Do not pull or depress the material which may possibly appear when basic adjustments are forgotten. repair is needed . 1) Incorrect threading...Decrease the tension of the bobbin case Adjust the tension by turning clockwise the presser adjusting scrw Change the incorrect needle tb new one Set needle correctly. (See page 4) 3) Swatch is needed . - 33 - burnish with sandpaper #800 repair is pulled while sewing...


