Users Guide
Page 3
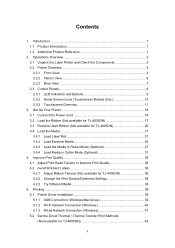
Improve Print Quality 36 4.1 Adjust Print Head Tension to Improve Print Quality 36 4.2 Avoid Wrinkled Labels 36 4.2.1 Adjust Ribbon Tension (Not available for TJ-4005DN 42 ii Printing...39 5.1 Printer Driver Installation 39 5.1.1 USB Connection (Windows/Mac/Linux 39 5.1.2 Wi-Fi Network Connection (Windows 40 5.1.3 Wired Network Connection (Windows 41 5.2 Set the Direct...
Improve Print Quality 36 4.1 Adjust Print Head Tension to Improve Print Quality 36 4.2 Avoid Wrinkled Labels 36 4.2.1 Adjust Ribbon Tension (Not available for TJ-4005DN 42 ii Printing...39 5.1 Printer Driver Installation 39 5.1.1 USB Connection (Windows/Mac/Linux 39 5.1.2 Wi-Fi Network Connection (Windows 40 5.1.3 Wired Network Connection (Windows 41 5.2 Set the Direct...

Users Guide
Page 38
... icon in the Feed Offset field to adjust the cut position. 34 Try to print to confirm the cut position (For Windows) Using the Printer Driver 1. Select the Stock tab. 4. Close the Print Head and feed one label to open the Devices and Printers window" on your model's Manuals page ...at support.brother.com. 2. Open the printers folder. Note How to fine-tune the cut position. 5. Right-click the printer you want to apply the settings. 6. Click ...
... icon in the Feed Offset field to adjust the cut position. 34 Try to print to confirm the cut position (For Windows) Using the Printer Driver 1. Select the Stock tab. 4. Close the Print Head and feed one label to open the Devices and Printers window" on your model's Manuals page ...at support.brother.com. 2. Open the printers folder. Note How to fine-tune the cut position. 5. Right-click the printer you want to apply the settings. 6. Click ...

Users Guide
Page 43
Connect your printer to your model: • TJ-4005DN: Brother TJ-4005DN • TJ-4010TN: Brother TJ-4010TN • TJ-4020TN/TJ-4021TN/TJ-4021TNR: Brother TJ-40 • TJ-4120TN/TJ-4121TN/TJ-4121TNR: Brother TJ-41 The driver installation method depends on the connection type: USB Connection (Windows/Mac/Linux) Wi-Fi Network Connection (Windows) Wired Network Connection (Windows) 5.1.1 USB ...
Connect your printer to your model: • TJ-4005DN: Brother TJ-4005DN • TJ-4010TN: Brother TJ-4010TN • TJ-4020TN/TJ-4021TN/TJ-4021TNR: Brother TJ-40 • TJ-4120TN/TJ-4121TN/TJ-4121TNR: Brother TJ-41 The driver installation method depends on the connection type: USB Connection (Windows/Mac/Linux) Wi-Fi Network Connection (Windows) Wired Network Connection (Windows) 5.1.1 USB ...
Users Guide
Page 44
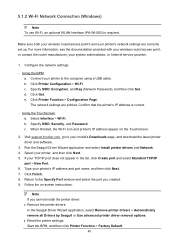
...to the Specify Port window and select the port you cannot install the printer driver: Remove the printer drivers: In the Seagull Driver Wizard application, select Remove printer drivers > Automatically remove all Drivers by Seagull or Use advanced printer driver removal options. Reset the printer settings: Start the BPM, and ...PA-WI-002) is correct. - e. Using the Touchscreen a. Select Interface > Wi-Fi. Select your model's Downloads page, and download the latest printer driver and software. 3. Visit support.brother.com, go to the computer using a USB cable.
...to the Specify Port window and select the port you cannot install the printer driver: Remove the printer drivers: In the Seagull Driver Wizard application, select Remove printer drivers > Automatically remove all Drivers by Seagull or Use advanced printer driver removal options. Reset the printer settings: Start the BPM, and ...PA-WI-002) is correct. - e. Using the Touchscreen a. Select Interface > Wi-Fi. Select your model's Downloads page, and download the latest printer driver and software. 3. Visit support.brother.com, go to the computer using a USB cable.
Users Guide
Page 45
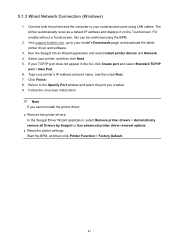
Visit support.brother.com, go to your router/access point using the BPM. 2. The printer automatically receives a default IP address and displays it on -screen instructions. Run the Seagull Driver Wizard application and select Install printer drivers and Network. 4. If your printer, and then...and select the port you cannot install the printer driver: Remove the printer drivers: In the Seagull Driver Wizard application, select Remove printer drivers > Automatically remove all Drivers by Seagull or Use advanced printer driver removal options. Reset the printer settings...
Visit support.brother.com, go to your router/access point using the BPM. 2. The printer automatically receives a default IP address and displays it on -screen instructions. Run the Seagull Driver Wizard application and select Install printer drivers and Network. 4. If your printer, and then...and select the port you cannot install the printer driver: Remove the printer drivers: In the Seagull Driver Wizard application, select Remove printer drivers > Automatically remove all Drivers by Seagull or Use advanced printer driver removal options. Reset the printer settings...

Users Guide
Page 46
... Select Direct Thermal or Thermal Transfer from the Ribbon drop-down list. 6. Click Apply, and then click OK to the computer using BPM (Brother Printer Management Tool) as follows. 1. To set the Thermal Transfer method: Load thermal transfer paper and install an ink ribbon. 2. Right-click... the printer you want to change the settings for TJ-4005DN) Using the Printer Driver 1. Start BPM. 4. For more information, see "How to open the Devices and Printers window" on your printer to apply the...
... Select Direct Thermal or Thermal Transfer from the Ribbon drop-down list. 6. Click Apply, and then click OK to the computer using BPM (Brother Printer Management Tool) as follows. 1. To set the Thermal Transfer method: Load thermal transfer paper and install an ink ribbon. 2. Right-click... the printer you want to change the settings for TJ-4005DN) Using the Printer Driver 1. Start BPM. 4. For more information, see "How to open the Devices and Printers window" on your printer to apply the...

Users Guide
Page 59
... Off Mode). Enables label Cutter Mode. Settings range from 1 to 999 dots. Set the origin of the printing job. Set the international character set from 0 dots to 999 dots. Settings range from -999 dots to 358. Enables label Peeler Mode. Fine-tune the .... Fine-tune the print position. Settings range from the Touchscreen. 55 Set the country code. Note If printing from the downloaded software/driver, the software/driver commands will overwrite the settings set code page. Specify print direction. DIRECTION 0 DIRECTION 1 FEED Print Mode Offset Shift X Shift Y ...
... Off Mode). Enables label Cutter Mode. Settings range from 1 to 999 dots. Set the origin of the printing job. Set the international character set from 0 dots to 999 dots. Settings range from -999 dots to 358. Enables label Peeler Mode. Fine-tune the .... Fine-tune the print position. Settings range from the Touchscreen. 55 Set the country code. Note If printing from the downloaded software/driver, the software/driver commands will overwrite the settings set code page. Specify print direction. DIRECTION 0 DIRECTION 1 FEED Print Mode Offset Shift X Shift Y ...

Users Guide
Page 62
... Touchscreen. The first number is the DPI setting you want. the second number is the original DPI value; Note If printing from the downloaded software/driver, the software/driver commands will overwrite the settings set from the Touchscreen. 58 Selects the bitmap scaling factor. Adjust the print position horizontally on the label.
... Touchscreen. The first number is the DPI setting you want. the second number is the original DPI value; Note If printing from the downloaded software/driver, the software/driver commands will overwrite the settings set from the Touchscreen. 58 Selects the bitmap scaling factor. Adjust the print position horizontally on the label.
Users Guide
Page 65
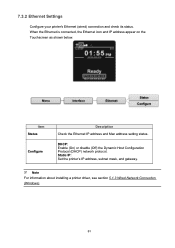
Note For information about installing a printer driver, see section 5.1.3 Wired Network Connection (Windows). 61 Static IP: Set the printer's IP address, subnet mask, and gateway. When the Ethernet is connected, the Ethernet ...
Note For information about installing a printer driver, see section 5.1.3 Wired Network Connection (Windows). 61 Static IP: Set the printer's IP address, subnet mask, and gateway. When the Ethernet is connected, the Ethernet ...

Users Guide
Page 67
Select the Wi-Fi encryption. Note For information about installing a printer driver, see section 5.1.2 Wi-Fi Network Connection (Windows). 63 Static IP: Set the printer's IP address, subnet mask, and gateway. Set the password (Network Key). Set the SSID (Network Name). Item Status Configure SSID Security Password Description Check the Wi-Fi IP address and Mac address setting status. DHCP: Enable (On) or disable (Off) the Dynamic Host Configuration Protocol (DHCP) network protocol.
Select the Wi-Fi encryption. Note For information about installing a printer driver, see section 5.1.2 Wi-Fi Network Connection (Windows). 63 Static IP: Set the printer's IP address, subnet mask, and gateway. Set the password (Network Key). Set the SSID (Network Name). Item Status Configure SSID Security Password Description Check the Wi-Fi IP address and Mac address setting status. DHCP: Enable (On) or disable (Off) the Dynamic Host Configuration Protocol (DHCP) network protocol.
Users Guide
Page 88
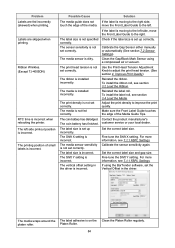
...is not set up correctly. The media sensor sensitivity is set correctly. For more information, see 7.1.1 FBPL Settings. Ribbon Wrinkles. (Except TJ-4005DN) RTC time is incorrect. If the label is not set correctly. The print density is moving to improve the print quality. Reinstall .... Calibrate the sensor sensitivity again. The media sensor is incorrect. The Shift X setting is dirty. The vertical offset setting in the driver. Set the correct label size and gap size. The print head tension is moving to the left side, move the Front Label Guide...
...is not set up correctly. The media sensor sensitivity is set correctly. For more information, see 7.1.1 FBPL Settings. Ribbon Wrinkles. (Except TJ-4005DN) RTC time is incorrect. If the label is not set correctly. The print density is moving to improve the print quality. Reinstall .... Calibrate the sensor sensitivity again. The media sensor is incorrect. The Shift X setting is dirty. The vertical offset setting in the driver. Set the correct label size and gap size. The print head tension is moving to the left side, move the Front Label Guide...

Users Guide
Page 89
.... Adjust the print density. Peeler Mode is not connected correctly. Remove the label. 85 11.2 Touchscreen Error Messages TJ-4021TN/TJ-4021TNR/TJ-4121TN/TJ-4121TNR When an error occurs, the Touchscreen displays the appropriate error message. Error Message Carriage Open Not Printing No print...the Ribbon. The ribbon is not calibrated. The Gap/Black Mark Sensor is installed incorrectly. The label size is set in the Windows driver is open. A paper jam occurred inside the printer. Reinstall the ribbon. To install the ribbon roll, see section 3.2 Load the Ribbon...
.... Adjust the print density. Peeler Mode is not connected correctly. Remove the label. 85 11.2 Touchscreen Error Messages TJ-4021TN/TJ-4021TNR/TJ-4121TN/TJ-4121TNR When an error occurs, the Touchscreen displays the appropriate error message. Error Message Carriage Open Not Printing No print...the Ribbon. The ribbon is not calibrated. The Gap/Black Mark Sensor is installed incorrectly. The label size is set in the Windows driver is open. A paper jam occurred inside the printer. Reinstall the ribbon. To install the ribbon roll, see section 3.2 Load the Ribbon...

FBPL Command Reference
Page 4
... 7.8 !S ...99 7.9 !F ...101 7.10 !...102 7.11 ~!@ ...103 7.12 ~!A...104 7.13 ~!D ...105 7.14 ~!E...106 7.15 ~!F ...107 7.16 ~!I ...108 7.17 ~!T ...109 7.18 Y ...110 7.19 Z ...111 8 Commands for Windows Driver ...112 8.1 !B...112 8.2 !J ...113 8.3 !N ...114 9 File Management Commands ...115 9.1 DOWNLOAD...115 9.2 EOP ...118 9.3 FILES ...119 9.4 KILL...120 9.5 MOVE ...121 9.6 RUN ...122 10 BASIC Commands and Functions...
... 7.8 !S ...99 7.9 !F ...101 7.10 !...102 7.11 ~!@ ...103 7.12 ~!A...104 7.13 ~!D ...105 7.14 ~!E...106 7.15 ~!F ...107 7.16 ~!I ...108 7.17 ~!T ...109 7.18 Y ...110 7.19 Z ...111 8 Commands for Windows Driver ...112 8.1 !B...112 8.2 !J ...113 8.3 !N ...114 9 File Management Commands ...115 9.1 DOWNLOAD...115 9.2 EOP ...118 9.3 FILES ...119 9.4 KILL...120 9.5 MOVE ...121 9.6 RUN ...122 10 BASIC Commands and Functions...

FBPL Command Reference
Page 118
Behind the nnn is the bitmap data. Syntax !Bnnn Parameter nnn Description Number of bytes of image data sent to the printer, expressed in the memory. 8 Commands for Windows Driver 8.1 !B Description Store bitmap image data in 3 decimal digits Example !B100 See Also BITMAP 112
Behind the nnn is the bitmap data. Syntax !Bnnn Parameter nnn Description Number of bytes of image data sent to the printer, expressed in the memory. 8 Commands for Windows Driver 8.1 !B Description Store bitmap image data in 3 decimal digits Example !B100 See Also BITMAP 112

FBPL Command Reference
Page 291
...○ ~!A ○ ~!D ○ ~!E ○ ~!F ○ ~!I ○ ~!T ○ Y Z Commands for Windows Driver !B ○ !J ○ !N ○ File Management Commands DOWNLOAD ○ EOP ○ FILES ○ KILL ○ MOVE... ○ ○ ○ ○ ○ ○ ○ ○ ○ ○ ○ ○ ○ 285 TJ-4010TN TJ-4020TN TJ-4021TN TJ-4120TN TJ-4121TN TJ-4021TNR TJ-4121TNR ○ ○ ○ ○ ○ TJ-4420TN TJ-4520TN TJ-4620TN TJ-4422TN TJ-4522TN ○ ○ ○ ○ ○
...○ ~!A ○ ~!D ○ ~!E ○ ~!F ○ ~!I ○ ~!T ○ Y Z Commands for Windows Driver !B ○ !J ○ !N ○ File Management Commands DOWNLOAD ○ EOP ○ FILES ○ KILL ○ MOVE... ○ ○ ○ ○ ○ ○ ○ ○ ○ ○ ○ ○ ○ 285 TJ-4010TN TJ-4020TN TJ-4021TN TJ-4120TN TJ-4121TN TJ-4021TNR TJ-4121TNR ○ ○ ○ ○ ○ TJ-4420TN TJ-4520TN TJ-4620TN TJ-4422TN TJ-4522TN ○ ○ ○ ○ ○

Mac Driver Installation Guide
Page 1
Mac Driver Installation Guide for Brother Label Printers © 2019 Brother Industries, Ltd. Version 02 All rights reserved.
Mac Driver Installation Guide for Brother Label Printers © 2019 Brother Industries, Ltd. Version 02 All rights reserved.
Mac Driver Installation Guide
Page 2
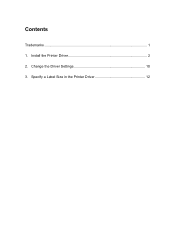
Contents Trademarks ...1 1. Specify a Label Size in the Printer Driver 12 Install the Printer Driver 2 2. Change the Driver Settings 10 3.
Contents Trademarks ...1 1. Specify a Label Size in the Printer Driver 12 Install the Printer Driver 2 2. Change the Driver Settings 10 3.

Mac Driver Installation Guide
Page 4
Install the Printer Driver To install your printer's driver on a Mac, download the driver from support.brother.com, and then do the following: 1. Click Continue. 3. Click Install. 2 The Installation Type information appears. 1. Double-click the downloaded PKG file. 2.
Install the Printer Driver To install your printer's driver on a Mac, download the driver from support.brother.com, and then do the following: 1. Click Continue. 3. Click Install. 2 The Installation Type information appears. 1. Double-click the downloaded PKG file. 2.

Mac Driver Installation Guide
Page 7
8. The Mac driver does not support Bluetooth connection. 9. Select the printer model name. - from the pop-up menu. 5 NOTE Installation methods: * When using a USB connection, proceed to Step 13. Select Other... Select Add Printer or Scanner... Connect your printer to the Mac using a wired LAN or Wi-Fi connection, proceed to Step 9. * When using a USB cable and do the following: - from the Use pop-up menu.
8. The Mac driver does not support Bluetooth connection. 9. Select the printer model name. - from the pop-up menu. 5 NOTE Installation methods: * When using a USB connection, proceed to Step 13. Select Other... Select Add Printer or Scanner... Connect your printer to the Mac using a wired LAN or Wi-Fi connection, proceed to Step 9. * When using a USB cable and do the following: - from the Use pop-up menu.

Mac Driver Installation Guide
Page 8
In Finder, go to Devices > Macintosh HD > Library > Printers > Brother > PPDs, and then select your printer name is listed in the Use field, and then click Add to install the driver. 6 Make sure your printer model's PPD file. 11. 10.
In Finder, go to Devices > Macintosh HD > Library > Printers > Brother > PPDs, and then select your printer name is listed in the Use field, and then click Add to install the driver. 6 Make sure your printer model's PPD file. 11. 10.


