

Instruction Manual - English
Page 3
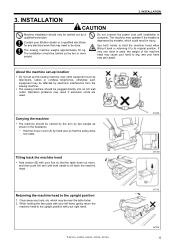
.... The sewing machine weighs approximately 50 kg. The machine may cause your Brother dealer or a qualified electrician for the sewing machine's power consumption. If the ground connection is complete. Keep the oil out of the reach of the machine head may operate if the treadle is free from the wall outlet. The relative humidity should occur in severe injury. If using a work that...
.... The sewing machine weighs approximately 50 kg. The machine may cause your Brother dealer or a qualified electrician for the sewing machine's power consumption. If the ground connection is complete. Keep the oil out of the reach of the machine head may operate if the treadle is free from the wall outlet. The relative humidity should occur in severe injury. If using a work that...

Instruction Manual - English
Page 4
... position. Use only the proper replacement parts as this may result in such a way so that if a needle breaks, parts of the machine head may result. When threading the needle When replacing the bobbin and needle When not using the machine and when leaving the machine unattended If using the sewing machine. Furthermore, do not get into your eyes or onto your nearest Brother dealer or a qualified technician. Keep the oil...
... position. Use only the proper replacement parts as this may result in such a way so that if a needle breaks, parts of the machine head may result. When threading the needle When replacing the bobbin and needle When not using the machine and when leaving the machine unattended If using the sewing machine. Furthermore, do not get into your eyes or onto your nearest Brother dealer or a qualified technician. Keep the oil...

Instruction Manual - English
Page 6
... the stitch length 23 4-7. Names and functions 30 6-2. Adjusting the thread tension 35 8-2. ADJUSTING THE ROTARY HOOK LUBRICATION AMOUNT 43 11. MACHINE SPECIFICATIONS 1 2. Connecting the cords 11 3-4-1. PREPARATION BEFORE SEWING .... 16 4-1. LOCK key 31 6-4. TROUBLESHOOTING 44 11-1. Table processing diagram 5 3-2. USING THE OPERATION PANEL (BASIC OPERATIONS 25 5-1. Adjusting the needle up amount 37 9. Sewing condensed stitches 34 8. Error code displays 49 T-8421A, 8422A, 8452A, 8722A, 8752A NAMES OF MAJOR PARTS 3 3. Installing the needle 16...
... the stitch length 23 4-7. Names and functions 30 6-2. Adjusting the thread tension 35 8-2. ADJUSTING THE ROTARY HOOK LUBRICATION AMOUNT 43 11. MACHINE SPECIFICATIONS 1 2. Connecting the cords 11 3-4-1. PREPARATION BEFORE SEWING .... 16 4-1. LOCK key 31 6-4. TROUBLESHOOTING 44 11-1. Table processing diagram 5 3-2. USING THE OPERATION PANEL (BASIC OPERATIONS 25 5-1. Adjusting the needle up amount 37 9. Sewing condensed stitches 34 8. Error code displays 49 T-8421A, 8422A, 8452A, 8722A, 8752A NAMES OF MAJOR PARTS 3 3. Installing the needle 16...

Instruction Manual - English
Page 9
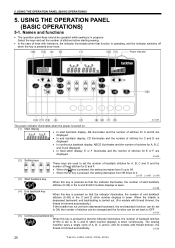
... MAJOR PARTS (1) Bobbin winder (3) Lifting lever (5) Presser foot (7) Knee lifter assembly (9) Stitch length dial (11) Oil gauge window (13) Operation panel (15) Stop lever (T-8452A, 8752A ) Safety devices (16) Thread take-up cover The settings for this sewing machine are carried out using the operation panel (13), and so this panel is not used. (Settings made using this panel will not affect sewing machine operation.) 2869M (2) Thread wiper (T-8422A, 8452A, 8722A, 8752A) (4) Quick reverse (Actuator) (6) Control box (8) Power switch (10) Reverse lever (12) Machine pulley...
... MAJOR PARTS (1) Bobbin winder (3) Lifting lever (5) Presser foot (7) Knee lifter assembly (9) Stitch length dial (11) Oil gauge window (13) Operation panel (15) Stop lever (T-8452A, 8752A ) Safety devices (16) Thread take-up cover The settings for this sewing machine are carried out using the operation panel (13), and so this panel is not used. (Settings made using this panel will not affect sewing machine operation.) 2869M (2) Thread wiper (T-8422A, 8452A, 8722A, 8752A) (4) Quick reverse (Actuator) (6) Control box (8) Power switch (10) Reverse lever (12) Machine pulley...
Instruction Manual - English
Page 10
... the power cord until installation is used . Operation problems may result if extension cords are used , the weight of the machine head may cause your hand to the upright position with your hand may be plugged directly into an AC wall outlet. While holding the face plate with your left hand, gently return the machine head to slip, and your right hand. 2871M T-8421A, 8422A...
... the power cord until installation is used . Operation problems may result if extension cords are used , the weight of the machine head may cause your hand to the upright position with your hand may be plugged directly into an AC wall outlet. While holding the face plate with your left hand, gently return the machine head to slip, and your right hand. 2871M T-8421A, 8422A...

Instruction Manual - English
Page 15
... when the machine head is . 1. Remove the rubber cap (1). 3. NOTE: Do not fill with lubricating oil past the reference line (4). Return the machine head to its original position. * If the lubricating oil level drops below the bottom reference line (6), be sure to use . Tilt back the machine head. 2. Use the accessory oiler (2) to add more oil. 2884M 9 T-8421A, 8422A, 8452A, 8722A, 8752A Replace the...
... when the machine head is . 1. Remove the rubber cap (1). 3. NOTE: Do not fill with lubricating oil past the reference line (4). Return the machine head to its original position. * If the lubricating oil level drops below the bottom reference line (6), be sure to use . Tilt back the machine head. 2. Use the accessory oiler (2) to add more oil. 2884M 9 T-8421A, 8422A, 8452A, 8722A, 8752A Replace the...

Instruction Manual - English
Page 21
... the power switch on for models with thread trimmer) and the needle rises above the needle plate and stops. 2117M 15 T-8421A, 8422A, 8452A, 8722A, 8752A Then check that the machine sews at high speed when the treadle (4) is gently pressed to position (D), (thread trimming is pressed to position (C). 3. If the treadle (4) is carried out for the first time The treadle and the operation panel...
... the power switch on for models with thread trimmer) and the needle rises above the needle plate and stops. 2117M 15 T-8421A, 8422A, 8452A, 8722A, 8752A Then check that the machine sews at high speed when the treadle (4) is gently pressed to position (D), (thread trimming is pressed to position (C). 3. If the treadle (4) is carried out for the first time The treadle and the operation panel...

Instruction Manual - English
Page 25
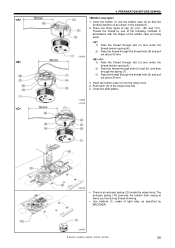
... the thread tension spring. 5. The machine may operate if the treadle is an anti-spin spring (6) inside the rotary hook. Close the slide plates. 2899M 2900M There is depressed by BROTHER. 2901M 19 T-8421A, 8422A, 8452A, 8722A, 8752A Installing the bobbin CAUTION Turn off the power switch before installing the bobbin. Use bobbins (1) made of approximately 50 mm. 6. Pull out the thread to a length of light alloy as during thread trimming...
... the thread tension spring. 5. The machine may operate if the treadle is an anti-spin spring (6) inside the rotary hook. Close the slide plates. 2899M 2900M There is depressed by BROTHER. 2901M 19 T-8421A, 8422A, 8452A, 8722A, 8752A Installing the bobbin CAUTION Turn off the power switch before installing the bobbin. Use bobbins (1) made of approximately 50 mm. 6. Pull out the thread to a length of light alloy as during thread trimming...
Instruction Manual - English
Page 26
..., 8422A, 8452A, 8722A, 8752A 20 Insert the bobbin case (2) into the bobbin case (2) so that the winding direction is an anti-spin spring (10) inside the rotary hook. Insert the bobbin (1) into the rotary hook. 4. The anti-spin spring (10) prevents the bobbin from racing at times such as specified by one of the bobbin case (2) being used. 1) Pass the thread through slot (3) and under the thread tension spring (4). 2) Pass the thread through the thread hole...
..., 8422A, 8452A, 8722A, 8752A 20 Insert the bobbin case (2) into the bobbin case (2) so that the winding direction is an anti-spin spring (10) inside the rotary hook. Insert the bobbin (1) into the rotary hook. 4. The anti-spin spring (10) prevents the bobbin from racing at times such as specified by one of the bobbin case (2) being used. 1) Pass the thread through slot (3) and under the thread tension spring (4). 2) Pass the thread through the thread hole...

Instruction Manual - English
Page 30
... of a single-needle machine, remove the needle which is not being used. Corner sewing method (T-8452A, 8752A) NOTE: If using this machine in place of the needle bars has been stopped. Number of stitches 6 3131M Sewing No. To stop the needle bars (right and left) Operate the stop lever after the needle has penetrated the material and has stopped moving , otherwise damage to the "R" position. of stitches: quick-reference guide Sewing angle 40...
... of a single-needle machine, remove the needle which is not being used. Corner sewing method (T-8452A, 8752A) NOTE: If using this machine in place of the needle bars has been stopped. Number of stitches 6 3131M Sewing No. To stop the needle bars (right and left) Operate the stop lever after the needle has penetrated the material and has stopped moving , otherwise damage to the "R" position. of stitches: quick-reference guide Sewing angle 40...
Instruction Manual - English
Page 31
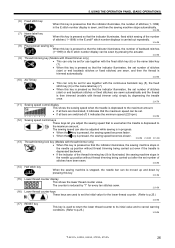
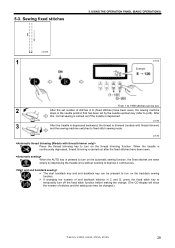
... be set the number of stitches before starting sewing. • In the case of end backtack stitches (0−99) in progress. The sewing machine sews a single cycle of backtack stitches (0−99) in the A, B, C and D stitch number displays is trimmed automatically. 2142M 25 T-8421A, 8422A, 8452A, 8722A, 8752A Select the keys and set back to ON, the number of stitches can be changed and the function can be set to...
... be set the number of stitches before starting sewing. • In the case of end backtack stitches (0−99) in progress. The sewing machine sews a single cycle of backtack stitches (0−99) in the A, B, C and D stitch number displays is trimmed automatically. 2142M 25 T-8421A, 8422A, 8452A, 8722A, 8752A Select the keys and set back to ON, the number of stitches can be changed and the function can be set to...
Instruction Manual - English
Page 32
... position without thread trimming being carried out after the set number of stitches have been sewn. 2152M (14) Half stitch key When the sewing machine is stopped, the needle bar can be set number of stitches (start or end backtack stitches or fixed stitches) are sewn, and then the thread is trimmed automatically. 2146M (10) AUTO key • This can only be set for the lower thread counter. (Refer to p.25.) (17) RESET...
... position without thread trimming being carried out after the set number of stitches have been sewn. 2152M (14) Half stitch key When the sewing machine is stopped, the needle bar can be set number of stitches (start or end backtack stitches or fixed stitches) are sewn, and then the thread is trimmed automatically. 2146M (10) AUTO key • This can only be set for the lower thread counter. (Refer to p.25.) (17) RESET...
Instruction Manual - English
Page 34
... depressed. 2159M 3 After the treadle is depressed backward, the thread is trimmed (models with thread trimmer) and the sewing machine switches to fixed stitch sewing mode. 2160M Press the thread trimming key to turn on the backtack sewing function. • If changing the number of end backtack stitches in the needle position that has been set number of stitches and the setting can be changed.) T-8421A, 8422A, 8452A, 8722A, 8752A 28
... depressed. 2159M 3 After the treadle is depressed backward, the thread is trimmed (models with thread trimmer) and the sewing machine switches to fixed stitch sewing mode. 2160M Press the thread trimming key to turn on the backtack sewing function. • If changing the number of end backtack stitches in the needle position that has been set number of stitches and the setting can be changed.) T-8421A, 8422A, 8452A, 8722A, 8752A 28
Instruction Manual - English
Page 35
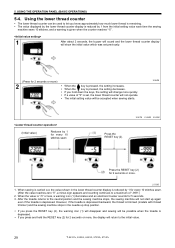
... 2 seconds or more quickly. The initial setting value will not operate. USING THE OPERATION PANEL (BASIC OPERATIONS) 5-4. If a value of "-999".) 2. If you know approximately how much lower thread is depressed. After the treadle returns to let you press and hold down the keys, the setting will not start up stop position. Press the RESET key (2) for every 10 stitches sewn. (After the...
... 2 seconds or more quickly. The initial setting value will not operate. USING THE OPERATION PANEL (BASIC OPERATIONS) 5-4. If a value of "-999".) 2. If you know approximately how much lower thread is depressed. After the treadle returns to let you press and hold down the keys, the setting will not start up stop position. Press the RESET key (2) for every 10 stitches sewn. (After the...

Instruction Manual - English
Page 42
... screw height" in the table below as a guide to adjust the presser foot pressure. 3. 8-2. Becomes stronger The presser foot pressure should be reduced; Reference values Use For foundation For light-weight and medium- Trailing thread Adjust by the pretension (1) only. Loosen the adjusting nut (1). 2. If the tension of the threads trailing from the needle tips will be increased. Turn the presser adjusting screw (2) to adjustment.) 1. Adjusting the presser foot pressure Correct stitches 0894M Upper thread 0895M Skipped stitches occur Uneven stitch length...
... screw height" in the table below as a guide to adjust the presser foot pressure. 3. 8-2. Becomes stronger The presser foot pressure should be reduced; Reference values Use For foundation For light-weight and medium- Trailing thread Adjust by the pretension (1) only. Loosen the adjusting nut (1). 2. If the tension of the threads trailing from the needle tips will be increased. Turn the presser adjusting screw (2) to adjustment.) 1. Adjusting the presser foot pressure Correct stitches 0894M Upper thread 0895M Skipped stitches occur Uneven stitch length...

Instruction Manual - English
Page 46
..., 8422A, 8452A, 8722A, 8752A 40 When "GREASEUP" appears (Semi dry specifications) If "GREASEUP" flashes on the main display (1) and a buzzer sounds when the power switch is turned on, it means that grease needs to be applied. (The sewing machine will not operate at this happens, apply grease and carry out the reset procedure. * If you continue to use the sewing machine...
..., 8422A, 8452A, 8722A, 8752A 40 When "GREASEUP" appears (Semi dry specifications) If "GREASEUP" flashes on the main display (1) and a buzzer sounds when the power switch is turned on, it means that grease needs to be applied. (The sewing machine will not operate at this happens, apply grease and carry out the reset procedure. * If you continue to use the sewing machine...

Instruction Manual - English
Page 50
... replace the feed dog with a fine grain or sandpaper to check that has slots on the type of purchase. Lower the position of the control box. Is the bobbin not turning smoothly? Pull out the lower thread to polish smooth the thread path. Adjust the thread take -up spring operating range too small? TROUBLESHOOTING Please check the following remedies do not fix the problem, turn off the power switch...
... replace the feed dog with a fine grain or sandpaper to check that has slots on the type of purchase. Lower the position of the control box. Is the bobbin not turning smoothly? Pull out the lower thread to polish smooth the thread path. Adjust the thread take -up spring operating range too small? TROUBLESHOOTING Please check the following remedies do not fix the problem, turn off the power switch...

Instruction Manual - English
Page 51
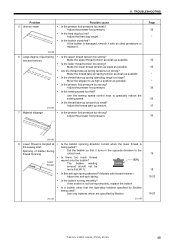
... the plate spring (1), adjust the installation position of the thread take -up spring. Use a presser foot without grooves. TROUBLESHOOTING 3 Skipped stitches occur while sewing 2945M 4 Skipped stitches at sewing start Thread unravelling at the sewing start feature. Adjust the height of the thread take-up spring operating range too large? Reduce the tension of the movable knife (2). 16 18-22 36 * * 37 * * 36 * 30 31 * Lower thread 2947M If sewing light or medium-weight materials, is a presser foot with a needle that...
... the plate spring (1), adjust the installation position of the thread take -up spring. Use a presser foot without grooves. TROUBLESHOOTING 3 Skipped stitches occur while sewing 2945M 4 Skipped stitches at sewing start Thread unravelling at the sewing start feature. Adjust the height of the thread take-up spring operating range too large? Reduce the tension of the movable knife (2). 16 18-22 36 * * 37 * * 36 * 30 31 * Lower thread 2947M If sewing light or medium-weight materials, is a presser foot with a needle that...
Instruction Manual - English
Page 52
... T-8421A, 8422A, 8452A, 8722A, 8752A 46 Is the anti-spin spring attached? (Models with an oiled grindstone or replace it turns in the opposite direction to the rotary hook. Use only bobbins which are specified by Brother being pulled? Adjust the presser foot pressure. Adjust the feed dog height. Adjust the presser foot pressure. Is the sewing speed too fast? Adjust the thread take -up amount too small? TROUBLESHOOTING Problem 5 Uneven seam 2948M 6 Large degree of bobbin during thread trimming Lower thread 2951M...
... T-8421A, 8422A, 8452A, 8722A, 8752A 46 Is the anti-spin spring attached? (Models with an oiled grindstone or replace it turns in the opposite direction to the rotary hook. Use only bobbins which are specified by Brother being pulled? Adjust the presser foot pressure. Adjust the feed dog height. Adjust the presser foot pressure. Is the sewing speed too fast? Adjust the thread take -up amount too small? TROUBLESHOOTING Problem 5 Uneven seam 2948M 6 Large degree of bobbin during thread trimming Lower thread 2951M...

Instruction Manual - English
Page 53
... the power supply connector disconnected from the control box? Replace the needle if it is bent or broken. If it is incorrect, thread the thread correctly. Is the oil tank filled with dust or thread scraps? Is the rotary hook blocked with lubricating oil? TROUBLESHOOTING Problem 9 Upper and lower threads are damaged, smooth them with excessive force during sewing? Clean the rotary hook. Is the rotary hook, feed dog or other part...
... the power supply connector disconnected from the control box? Replace the needle if it is bent or broken. If it is incorrect, thread the thread correctly. Is the oil tank filled with dust or thread scraps? Is the rotary hook blocked with lubricating oil? TROUBLESHOOTING Problem 9 Upper and lower threads are damaged, smooth them with excessive force during sewing? Clean the rotary hook. Is the rotary hook, feed dog or other part...


