
Users Manual - English
Page 1
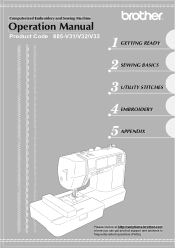
Computerized Embroidery and Sewing Machine Operation Manual Product Code 885-V31/V32/V33 GETTING READY SEWING BASICS UTILITY STITCHES EMBROIDERY APPENDIX Please visit us at http://solutions.brother.com where you can get product support and answers to frequently asked questions (FAQs).
Computerized Embroidery and Sewing Machine Operation Manual Product Code 885-V31/V32/V33 GETTING READY SEWING BASICS UTILITY STITCHES EMBROIDERY APPENDIX Please visit us at http://solutions.brother.com where you can get product support and answers to frequently asked questions (FAQs).
Users Manual - English
Page 3
... and unplug the power cord. • When transporting the sewing machine, be sure to persons. 2 Always unplug the machine from the electrical outlet when removing covers, lubricating, or when making any adjustments mentioned in the instruction manual • To unplug the machine, switch the machine to the symbol "O" position to make any sudden or careless movements...
... and unplug the power cord. • When transporting the sewing machine, be sure to persons. 2 Always unplug the machine from the electrical outlet when removing covers, lubricating, or when making any adjustments mentioned in the instruction manual • To unplug the machine, switch the machine to the symbol "O" position to make any sudden or careless movements...
Users Manual - English
Page 4
... Brother dealer. The contents of this manual. otherwise, the machine, power cord or garment being administered. • Do not use or store the machine near a heat source, such as an unsteady or slanted table, otherwise the sewing machine may fall, resulting in this manual and specifications of . Special care is required around the machine needle. • Switch the sewing machine...
... Brother dealer. The contents of this manual. otherwise, the machine, power cord or garment being administered. • Do not use or store the machine near a heat source, such as an unsteady or slanted table, otherwise the sewing machine may fall, resulting in this manual and specifications of . Special care is required around the machine needle. • Switch the sewing machine...

Users Manual - English
Page 23
... thread / needle replacement / embroidery unit attachment / Example: Upper threading embroidery frame attachment / embroidery foot attachment / presser foot replacement on the sewing machine. X The sewing machine help key) on b the display panel. X The initial stitch screen appears again. Simple explanations can be displayed. a X The LCD comes...simple explanations of setting upper thread / Press (Back key) to return to the d next page. Checking machine operating Press (Next page key) to switch to the item 1 selection screen. Press the item to the corresponding page in this ...
... thread / needle replacement / embroidery unit attachment / Example: Upper threading embroidery frame attachment / embroidery foot attachment / presser foot replacement on the sewing machine. X The sewing machine help key) on b the display panel. X The initial stitch screen appears again. Simple explanations can be displayed. a X The LCD comes...simple explanations of setting upper thread / Press (Back key) to return to the d next page. Checking machine operating Press (Next page key) to switch to the item 1 selection screen. Press the item to the corresponding page in this ...
Users Manual - English
Page 33
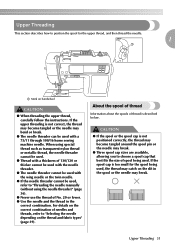
... be used with the wing needle or the twin needle. ● If the needle threader cannot be used with a 75/11 through 100/16 home sewing machine needle. Upper Threading 31 About the spool of thread Information about the spools of No. 20 or lower. ● Use the needle and the thread... a thickness of 130/120 or thicker cannot be used with the needle threader. ● The needle threader cannot be used, refer to "Threading the needle manually (without using the needle threader)" (page 36). ● Never use the thread of thread is too small for the upper thread, and then thread the...
... be used with the wing needle or the twin needle. ● If the needle threader cannot be used with a 75/11 through 100/16 home sewing machine needle. Upper Threading 31 About the spool of thread Information about the spools of No. 20 or lower. ● Use the needle and the thread... a thickness of 130/120 or thicker cannot be used with the needle threader. ● The needle threader cannot be used, refer to "Threading the needle manually (without using the needle threader)" (page 36). ● Never use the thread of thread is too small for the upper thread, and then thread the...
Users Manual - English
Page 38
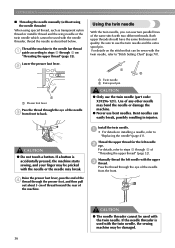
... needle threader, thread the needle as described below. Manually thread the left needle b eye. Thread the machine to the needle bar thread a guide according to back. If the needle threader is accidentally pressed, the machine starts sewing, and your finger may be pricked with the needle... or the needle may be damaged. 36 GETTING READY ■ Threading the needle manually (without using the needle threader) When using special thread, such...
... needle threader, thread the needle as described below. Manually thread the left needle b eye. Thread the machine to the needle bar thread a guide according to back. If the needle threader is accidentally pressed, the machine starts sewing, and your finger may be pricked with the needle... or the needle may be damaged. 36 GETTING READY ■ Threading the needle manually (without using the needle threader) When using special thread, such...
Users Manual - English
Page 39
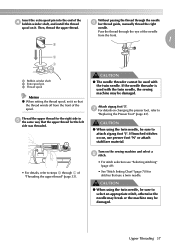
... the Presser Foot" (page 43). If the needle threader is used with the twin needle, the sewing machine may be sure to steps g through j of the d bobbin winder shaft, and install the thread spool on the sewing machine and select a h stitch. • For stitch selection see "Selecting stitching" (page 49). • See "Stitch Setting... to attach zigzag foot "J". If bunched stitches occur, use a twin needle. Then, thread the upper thread. Pass the thread through the needle f bar thread guide, manually thread the right needle.
... the Presser Foot" (page 43). If the needle threader is used with the twin needle, the sewing machine may be sure to steps g through j of the d bobbin winder shaft, and install the thread spool on the sewing machine and select a h stitch. • For stitch selection see "Selecting stitching" (page 49). • See "Stitch Setting... to attach zigzag foot "J". If bunched stitches occur, use a twin needle. Then, thread the upper thread. Pass the thread through the needle f bar thread guide, manually thread the right needle.
Users Manual - English
Page 76
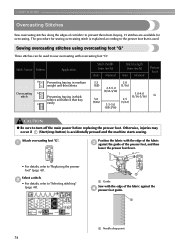
...Preventing fraying in medium weight and thin fabrics Preventing fraying in thick fabrics and fabrics that is accidentally pressed and the machine starts sewing. a G Position the fabric with the edge of the fabric c against the d presser foot guide. Otherwise, ... edges of cut fabric to prevent them from fraying. 15 stitches are available for sewing overcasting stitch is explained according to the presser foot that fray easily Stitch Width [mm (inch)] Auto Manual Stitch Length [mm (inch)] Auto Manual Presser Foot 3.5 2.0 (1/8) (1/16) 2.5-5.0 (3/32-3/16) 1.0-4.0 (1/16-3/16) G...
...Preventing fraying in medium weight and thin fabrics Preventing fraying in thick fabrics and fabrics that is accidentally pressed and the machine starts sewing. a G Position the fabric with the edge of the fabric c against the d presser foot guide. Otherwise, ... edges of cut fabric to prevent them from fraying. 15 stitches are available for sewing overcasting stitch is explained according to the presser foot that fray easily Stitch Width [mm (inch)] Auto Manual Stitch Length [mm (inch)] Auto Manual Presser Foot 3.5 2.0 (1/8) (1/16) 2.5-5.0 (3/32-3/16) 1.0-4.0 (1/16-3/16) G...
Users Manual - English
Page 77
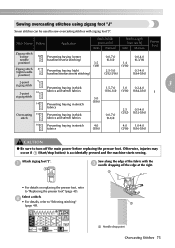
a J Sew along the edge of the fabric with zigzag foot "J". a Needle drop point Overcasting Stitches 75 Stitch Name Pattern Application Stitch Width [mm (inch)] Auto Manual Stitch Length [mm (inch)] Auto Manual Presser Foot Zigzag stitch (center 7 needle position) Zigzag stitch 8 (right needle... right. Select a stitch. Otherwise, injuries may occur if (Start/stop button) is accidentally pressed and the machine starts sewing. Attach zigzag foot "J". Sewing overcasting stitches using zigzag foot "J" Seven stitches can be used to "Selecting stitching" a (page 49). b &#...
a J Sew along the edge of the fabric with zigzag foot "J". a Needle drop point Overcasting Stitches 75 Stitch Name Pattern Application Stitch Width [mm (inch)] Auto Manual Stitch Length [mm (inch)] Auto Manual Presser Foot Zigzag stitch (center 7 needle position) Zigzag stitch 8 (right needle... right. Select a stitch. Otherwise, injuries may occur if (Start/stop button) is accidentally pressed and the machine starts sewing. Attach zigzag foot "J". Sewing overcasting stitches using zigzag foot "J" Seven stitches can be used to "Selecting stitching" a (page 49). b &#...
Users Manual - English
Page 78
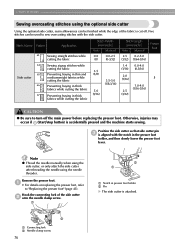
... needle threader. Position the side cutter so that side cutter pin c is accidentally pressed and the machine starts sewing. a • For details on replacing the presser foot, refer to turn off . Note z Thread the needle manually when using the side cutter, or only attach the side cutter after threading the needle using the...
... needle threader. Position the side cutter so that side cutter pin c is accidentally pressed and the machine starts sewing. a • For details on replacing the presser foot, refer to turn off . Note z Thread the needle manually when using the side cutter, or only attach the side cutter after threading the needle using the...
Users Manual - English
Page 80
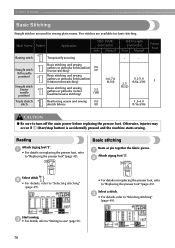
...are available for basic stitching. Otherwise, injuries may occur if (Start/stop button) is accidentally pressed and the machine starts sewing. a • For details on replacing the presser foot, refer to "Replacing the presser foot" (page ... Temporarily securing Stitch Width [mm (inch)] Auto Manual Stitch Length [mm (inch)] Auto Manual - - Presser Foot 1 Straight stitch Basic stitching and sewing gathers or pintucks (left baseline/ 0.0 reverse stitching) (0) (left needle position) 2 Basic stitching and sewing gathers or pintucks (left baseline/ reinforcement stitching) ...
...are available for basic stitching. Otherwise, injuries may occur if (Start/stop button) is accidentally pressed and the machine starts sewing. a • For details on replacing the presser foot, refer to "Replacing the presser foot" (page ... Temporarily securing Stitch Width [mm (inch)] Auto Manual Stitch Length [mm (inch)] Auto Manual - - Presser Foot 1 Straight stitch Basic stitching and sewing gathers or pintucks (left baseline/ 0.0 reverse stitching) (0) (left needle position) 2 Basic stitching and sewing gathers or pintucks (left baseline/ reinforcement stitching) ...

Users Manual - English
Page 82
a a b Use a chalk to mark on stretch fabrics Stitch Width [mm (inch)] Auto Manual Stitch Length [mm (inch)] Auto Manual Presser Foot 00 3← - →3 2.0 (1/16) 1.0-3.5 (1/16-1/8) R CAUTION ● Be sure to the following procedure. a Right side of fabric b Bottom side Fold... length is too short, the fabric will not feed and desired results may occur if (Start/stop button) is accidentally pressed and the machine starts sewing. Sew a blind hem according to turn off the main power before replacing the pressor foot. Otherwise, injuries may not achieved. Reverse the skirt ...
a a b Use a chalk to mark on stretch fabrics Stitch Width [mm (inch)] Auto Manual Stitch Length [mm (inch)] Auto Manual Presser Foot 00 3← - →3 2.0 (1/16) 1.0-3.5 (1/16-1/8) R CAUTION ● Be sure to the following procedure. a Right side of fabric b Bottom side Fold... length is too short, the fabric will not feed and desired results may occur if (Start/stop button) is accidentally pressed and the machine starts sewing. Sew a blind hem according to turn off the main power before replacing the pressor foot. Otherwise, injuries may not achieved. Reverse the skirt ...
Users Manual - English
Page 92
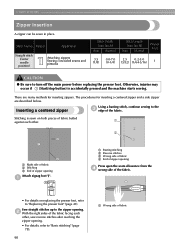
...machine starts sewing. UTILITY STITCHES Zipper Insertion A zipper can be sewn in place. b With the right sides of the fabric facing each other , sew reverse stitches after reaching the zipper opening . Stitch Name Pattern Application Straight stitch (center 3 needle position) Attaching zippers Sewing concealed seams and pintucks Stitch Width [mm (inch)] Auto Manual... Stitch Length [mm (inch)] Auto Manual Presser Foot 3.5 0.0-7.0 2.5 0.2-5.0 (1/8) ...
...machine starts sewing. UTILITY STITCHES Zipper Insertion A zipper can be sewn in place. b With the right sides of the fabric facing each other , sew reverse stitches after reaching the zipper opening . Stitch Name Pattern Application Straight stitch (center 3 needle position) Attaching zippers Sewing concealed seams and pintucks Stitch Width [mm (inch)] Auto Manual... Stitch Length [mm (inch)] Auto Manual Presser Foot 3.5 0.0-7.0 2.5 0.2-5.0 (1/8) ...

Users Manual - English
Page 97
... may occur if (Start/stop button) is accidentally pressed and the machine starts sewing. Stitch Name Pattern Application Triple stretch 4 stitch 5 Stretch stitch 2-...Manual 0.0 0.0-7.0 (0) (0-1/4) Stitch Length [mm (inch)] Auto Manual Presser Foot 2.5 1.5-4.0 (3/32) (1/16-3/16) 1.0 1.0-3.0 2.5 1.0-4.0 (1/16) (1/16-1/8) (3/32) (1/16-3/16) J 5.0 1.5-7.0 (3/16) (1/16-1/4) 3 1.0 0.2-4.0 (1/16) (1/64-3/16) 4.0 0.0-7.0 (3/16) (0-1/4) Observe the corresponding precautions when performing each of the following stitching operations. a J Sew the fabric without stretching it. Sewing...
... may occur if (Start/stop button) is accidentally pressed and the machine starts sewing. Stitch Name Pattern Application Triple stretch 4 stitch 5 Stretch stitch 2-...Manual 0.0 0.0-7.0 (0) (0-1/4) Stitch Length [mm (inch)] Auto Manual Presser Foot 2.5 1.5-4.0 (3/32) (1/16-3/16) 1.0 1.0-3.0 2.5 1.0-4.0 (1/16) (1/16-1/8) (3/32) (1/16-3/16) J 5.0 1.5-7.0 (3/16) (1/16-1/4) 3 1.0 0.2-4.0 (1/16) (1/64-3/16) 4.0 0.0-7.0 (3/16) (0-1/4) Observe the corresponding precautions when performing each of the following stitching operations. a J Sew the fabric without stretching it. Sewing...
Users Manual - English
Page 99
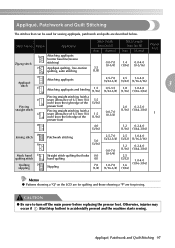
... for piecing. Otherwise, injuries may occur if (Start/stop button) is accidentally pressed and the machine starts sewing. CAUTION ● Be sure to turn off the main power before replacing the pressor foot. Stitch... Name Pattern Application 7 Zigzag stitch 24 Attaching appliqués (center baseline/reverse stitching) Appliqué quilting, free-motion quilting, satin stitching Stitch Width [mm (inch)] Auto Manual 0.0-7.0 3.5 (0-1/4) (1/8) Stitch Length [mm (inch)] Auto Manual...
... for piecing. Otherwise, injuries may occur if (Start/stop button) is accidentally pressed and the machine starts sewing. CAUTION ● Be sure to turn off the main power before replacing the pressor foot. Stitch... Name Pattern Application 7 Zigzag stitch 24 Attaching appliqués (center baseline/reverse stitching) Appliqué quilting, free-motion quilting, satin stitching Stitch Width [mm (inch)] Auto Manual 0.0-7.0 3.5 (0-1/4) (1/8) Stitch Length [mm (inch)] Auto Manual...
Users Manual - English
Page 110
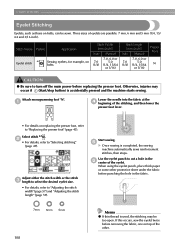
... 5mm 108 Memo z If thin thread is used, the stitching may occur if (Start/stop button) is completed, the sewing machine automatically sews reinforcement stitches, then stops. Attach monogramming foot "N". Adjust either the stitch width or the stitch c length to select the... the stitch length" (page 59). Stitch Name Eyelet stitch Pattern Application 62 Sewing eyelets, for example, on belts Stitch Width [mm (inch)] Auto Manual 7.0, 6.0 or 7.0 5.0 (1/4) (1/4, 15/64 or 3/16) Stitch Length [mm (inch)] Auto Manual 7.0, 6.0 or 7.0 5.0 (1/4) (1/4, 15/64 or 3/16) Presser Foot...
... 5mm 108 Memo z If thin thread is used, the stitching may occur if (Start/stop button) is completed, the sewing machine automatically sews reinforcement stitches, then stops. Attach monogramming foot "N". Adjust either the stitch width or the stitch c length to select the... the stitch length" (page 59). Stitch Name Eyelet stitch Pattern Application 62 Sewing eyelets, for example, on belts Stitch Width [mm (inch)] Auto Manual 7.0, 6.0 or 7.0 5.0 (1/4) (1/4, 15/64 or 3/16) Stitch Length [mm (inch)] Auto Manual 7.0, 6.0 or 7.0 5.0 (1/4) (1/4, 15/64 or 3/16) Presser Foot...

Users Manual - English
Page 116
...needle manually (without using the needle threader)" (page 36). a J Heirloom stitching When sewing with the seam. 1 a Right side of fabric 114 Attach zigzag foot "J". For details, refer to "Replacing the presser foot" (page 43). Attach monogramming foot "N". This is used with the wing needle, otherwise the sewing machine may ...the right sides of the two pieces b of fabric, and then open up , and then sew over the seam allowance of the needle from the front to plain weave fabrics. Manually pass the thread through the eye of joined fabrics. Turn the fabric over so that the ...
...needle manually (without using the needle threader)" (page 36). a J Heirloom stitching When sewing with the seam. 1 a Right side of fabric 114 Attach zigzag foot "J". For details, refer to "Replacing the presser foot" (page 43). Attach monogramming foot "N". This is used with the wing needle, otherwise the sewing machine may ...the right sides of the two pieces b of fabric, and then open up , and then sew over the seam allowance of the needle from the front to plain weave fabrics. Manually pass the thread through the eye of joined fabrics. Turn the fabric over so that the ...
Users Manual - English
Page 168
..., 109 L layout adjustment 143 LCD 18, 133 LCD button 134 LCD messages 159 LCD operation 18 M machine surface cleaning 152 main power switch 11 maintenance 152 manual needle threading 36 memory key 13 mirroring stitches 63 N needle bar thread guide 11 needle condition 40 needle ... stitching 53 selecting alphabet characters 136 selecting embroidery patterns 132 selecting stitches 49 selecting the needle 39 settings key 13 sewing basics 48 sewing direction change 65 sewing machine help key 13 sewing speed controller 12 shell tuck stitch 113 side cutter 76 smocking 112
..., 109 L layout adjustment 143 LCD 18, 133 LCD button 134 LCD messages 159 LCD operation 18 M machine surface cleaning 152 main power switch 11 maintenance 152 manual needle threading 36 memory key 13 mirroring stitches 63 N needle bar thread guide 11 needle condition 40 needle ... stitching 53 selecting alphabet characters 136 selecting embroidery patterns 132 selecting stitches 49 selecting the needle 39 settings key 13 sewing basics 48 sewing direction change 65 sewing machine help key 13 sewing speed controller 12 shell tuck stitch 113 side cutter 76 smocking 112
Instruction Manual/USB Connection - English and Spanish
Page 4
... trademark or a trademark of International Business Machines Corporation. • Microsoft and Windows are not clearly described within the text. 2 If this machine. The local authorized Brother dealer will manage embroidery data.... using our data design systems or sewing machines may break when sewing with a stitch density that it is compatible with a variety of Brother embroidery cards, as well as &#... USB port as desired. ■ Trademarks • IBM is mentioned in this manual has a Software License Agreement specific to its proprietary programs. All other brands and...
... trademark or a trademark of International Business Machines Corporation. • Microsoft and Windows are not clearly described within the text. 2 If this machine. The local authorized Brother dealer will manage embroidery data.... using our data design systems or sewing machines may break when sewing with a stitch density that it is compatible with a variety of Brother embroidery cards, as well as &#... USB port as desired. ■ Trademarks • IBM is mentioned in this manual has a Software License Agreement specific to its proprietary programs. All other brands and...

Instruction Manual/USB Connection - English and Spanish
Page 7
...use a computer to PC. z Refer to the Operation Manual for how to download the upgrade file for your sewing machine. z While the software is being upgraded, the buzzer will not be downloaded. X The "Removable Disk" icon appears in the sewing machine will not sound when a key is completed. At this... our website at "http://solutions.brother.com" for any different model cannot be deleted if you upgrade the software. Note z Be sure to check the version of available updates. When the screen shown in step a appears d again, press . Do not turn the machine off , then on the computer...
...use a computer to PC. z Refer to the Operation Manual for how to download the upgrade file for your sewing machine. z While the software is being upgraded, the buzzer will not be downloaded. X The "Removable Disk" icon appears in the sewing machine will not sound when a key is completed. At this... our website at "http://solutions.brother.com" for any different model cannot be deleted if you upgrade the software. Note z Be sure to check the version of available updates. When the screen shown in step a appears d again, press . Do not turn the machine off , then on the computer...


