

Users Manual - English
Page 8
... Frame 130 Attaching the embroidery frame ...130 Removing the embroidery frame ...131 Selecting Embroidery Patterns 132 Copyright information ...132 Embroidery pattern types ...132 LCD (liquid crystal display) operation ...133 Selecting alphabet characters ...136 Selecting an embroidery...the layout and the size...143 Adjusting the thread tension ...145 Connecting character patterns ...146 Resewing ...147 Thread runs out partway through a design...148 Stopping while embroidering ...148 Saving patterns...150 APPENDIX 151 Care and Maintenance ...152 Cleaning the machine surface ...152 ...
... Frame 130 Attaching the embroidery frame ...130 Removing the embroidery frame ...131 Selecting Embroidery Patterns 132 Copyright information ...132 Embroidery pattern types ...132 LCD (liquid crystal display) operation ...133 Selecting alphabet characters ...136 Selecting an embroidery...the layout and the size...143 Adjusting the thread tension ...145 Connecting character patterns ...146 Resewing ...147 Thread runs out partway through a design...148 Stopping while embroidering ...148 Saving patterns...150 APPENDIX 151 Care and Maintenance ...152 Cleaning the machine surface ...152 ...

Users Manual - English
Page 9
...). A red or orange light indicates an error or that the machine is ready to work on dark fabrics. i Embroidery You can embroider built-in embroidery patterns, characters, framed decorations, and designs from the built-in stitches You can select from optional embroidery cards (page 117). 7 b Fast bobbin winding system With the...
...). A red or orange light indicates an error or that the machine is ready to work on dark fabrics. i Embroidery You can embroider built-in embroidery patterns, characters, framed decorations, and designs from the built-in stitches You can select from optional embroidery cards (page 117). 7 b Fast bobbin winding system With the...
Users Manual - English
Page 12
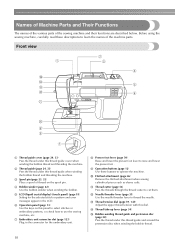
...take-up lever (page 34) o Bobbin-winding thread guide and pretension disc (page 24) Pass the thread under this panel to select stitches or embroidery patterns, or check how to cut them. Front view a Thread guide cover (page 24, 33) Pass the thread under this dial. i Operation buttons ... winding the bobbin thread and threading the machine. g Embroidery unit connector slot (page 123) Plug in the connector for the selected stitch or pattern and error messages appear in the LCD. l Needle threader lever (page 35) Use the needle threader lever to operate the machine. Before using...
...take-up lever (page 34) o Bobbin-winding thread guide and pretension disc (page 24) Pass the thread under this panel to select stitches or embroidery patterns, or check how to cut them. Front view a Thread guide cover (page 24, 33) Pass the thread under this dial. i Operation buttons ... winding the bobbin thread and threading the machine. g Embroidery unit connector slot (page 123) Plug in the connector for the selected stitch or pattern and error messages appear in the LCD. l Needle threader lever (page 35) Use the needle threader lever to operate the machine. Before using...

Users Manual - English
Page 15
... sound, and more. i Sewing machine help key Press to select a utility stitch. f Utility stitch key Press this key to enter alphabet character embroidery or embroidery patterns you have edited or adjusted, etc. Displays simple explanations of setting upper thread / bobbin winding / setting bobbin thread / needle replacement / embroidery unit attachment / embroidery frame... previous page when there are items that are not displayed on the LCD. a LCD (liquid crystal display) (touch panel) Setting for the selected stitch or pattern and error messages appear in the LCD.
... sound, and more. i Sewing machine help key Press to select a utility stitch. f Utility stitch key Press this key to enter alphabet character embroidery or embroidery patterns you have edited or adjusted, etc. Displays simple explanations of setting upper thread / bobbin winding / setting bobbin thread / needle replacement / embroidery unit attachment / embroidery frame... previous page when there are items that are not displayed on the LCD. a LCD (liquid crystal display) (touch panel) Setting for the selected stitch or pattern and error messages appear in the LCD.

Users Manual - English
Page 20
... LCD using the keys on the right side of the sewing machine. GETTING READY LCD (Liquid Crystal Display) Operation Selected stitch, pattern settings and messages are explained in "Selecting an embroidery pattern" (page 137). For details, refer to "Error messages" (page 159) for messages displayed on the screen with your finger or...
... LCD using the keys on the right side of the sewing machine. GETTING READY LCD (Liquid Crystal Display) Operation Selected stitch, pattern settings and messages are explained in "Selecting an embroidery pattern" (page 137). For details, refer to "Error messages" (page 159) for messages displayed on the screen with your finger or...
Users Manual - English
Page 65
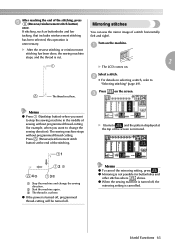
X After the reverse stitching or reinforcement Turn on the screen. The thread is cut. 2 X The LCD comes on selecting a stitch, refer to , and the pattern displayed at the end of the stitching. 1 2a 4c 3b a Stop the machine and change the sewing direction). Memo z To cancel the mirroring setting, press . a ...
X After the reverse stitching or reinforcement Turn on the screen. The thread is cut. 2 X The LCD comes on selecting a stitch, refer to , and the pattern displayed at the end of the stitching. 1 2a 4c 3b a Stop the machine and change the sewing direction). Memo z To cancel the mirroring setting, press . a ...

Users Manual - English
Page 66
...- b Memo z The default stitch length is pressed, the settings for each stitch. When the same stitch pattern is selected, the last settings saved are not saved unless is displayed. d • To reset the selected stitch patterns to 2.0 mm. a Press . SEWING BASICS Saving stitch settings This machine is preset with utility stitches. The...
...- b Memo z The default stitch length is pressed, the settings for each stitch. When the same stitch pattern is selected, the last settings saved are not saved unless is displayed. d • To reset the selected stitch patterns to 2.0 mm. a Press . SEWING BASICS Saving stitch settings This machine is preset with utility stitches. The...

Users Manual - English
Page 72
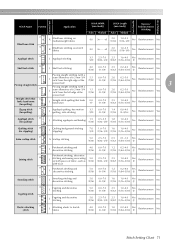
... the twin needle can be used are listed for utility stitches in the following table. Utility stitches Twin Needle Walking Foot Presser Foot Stitch Name Pattern Application Stitch Width [mm (inch)] Auto Manual 1 J Basic stitching, sewing gathers or pintucks, etc. 0.0 (0) 0.0-7.0 (0-1/4) Stitch Length [mm (inch)] Auto Manual Reverse/ Reinforcement Stitching 2.5 0.2-5.0 Yes (3/32...
... the twin needle can be used are listed for utility stitches in the following table. Utility stitches Twin Needle Walking Foot Presser Foot Stitch Name Pattern Application Stitch Width [mm (inch)] Auto Manual 1 J Basic stitching, sewing gathers or pintucks, etc. 0.0 (0) 0.0-7.0 (0-1/4) Stitch Length [mm (inch)] Auto Manual Reverse/ Reinforcement Stitching 2.5 0.2-5.0 Yes (3/32...
Users Manual - English
Page 73
Presser Foot Twin Needle Walking Foot Stitch Name Pattern Application 17 Blind hem stitch 18 R Blind hem stitching on mediumweight fabrics R Blind hem stitching on stretch fabrics Stitch Width [mm (inch)] Stitch Length [mm (...
Presser Foot Twin Needle Walking Foot Stitch Name Pattern Application 17 Blind hem stitch 18 R Blind hem stitching on mediumweight fabrics R Blind hem stitching on stretch fabrics Stitch Width [mm (inch)] Stitch Length [mm (...
Users Manual - English
Page 74
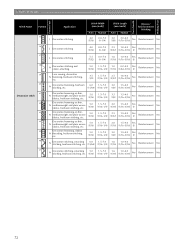
UTILITY STITCHES Presser Foot Twin Needle Walking Foot Stitch Name Pattern Application 35 J Decorative stitching Stitch Width [mm (inch)] Auto 4.0 (3/16) Manual 0.0-7.0 (0-1/4) Stitch Length [mm (inch)] Auto Manual Reverse/ Reinforcement Stitching 3.0 (1/8) 2.0-4.0 (1/16-3/16) No Reinforcement No ...
UTILITY STITCHES Presser Foot Twin Needle Walking Foot Stitch Name Pattern Application 35 J Decorative stitching Stitch Width [mm (inch)] Auto 4.0 (3/16) Manual 0.0-7.0 (0-1/4) Stitch Length [mm (inch)] Auto Manual Reverse/ Reinforcement Stitching 3.0 (1/8) 2.0-4.0 (1/16-3/16) No Reinforcement No ...
Users Manual - English
Page 75
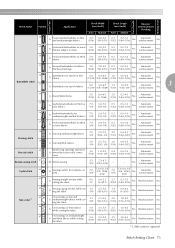
... seam easily comes loose 2.0 (1/16) 1.0-3.0 (1/16-1/8) 0.4 (1/64) 0.3-1.0 (1/64-1/16) No Automatic reinforcement No M Button sewing 3.5 2.5-4.5 (1/8) (3/32-3/16) - - Presser Foot Twin Needle Walking Foot Stitch Name Pattern Application 48 A Horizontal buttonholes on thin and mediumweight fabrics Stitch Width [mm (inch)] Stitch Length [mm (inch)] Auto Manual Auto Manual Reverse/ Reinforcement Stitching 5.0 (3/16...
... seam easily comes loose 2.0 (1/16) 1.0-3.0 (1/16-1/8) 0.4 (1/64) 0.3-1.0 (1/64-1/16) No Automatic reinforcement No M Button sewing 3.5 2.5-4.5 (1/8) (3/32-3/16) - - Presser Foot Twin Needle Walking Foot Stitch Name Pattern Application 48 A Horizontal buttonholes on thin and mediumweight fabrics Stitch Width [mm (inch)] Stitch Length [mm (inch)] Auto Manual Auto Manual Reverse/ Reinforcement Stitching 5.0 (3/16...
Users Manual - English
Page 76
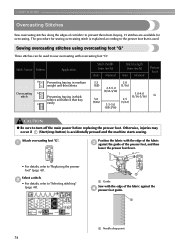
... using overcasting foot "G" Three stitches can be used . b • For details, refer to "Replacing the presser foot" (page 43). a a Needle drop point 74 Stitch Name Pattern Application 11 Overcasting 12 stitch 13 Preventing fraying in medium weight and thin fabrics Preventing fraying in thick fabrics and fabrics that is accidentally pressed...
... using overcasting foot "G" Three stitches can be used . b • For details, refer to "Replacing the presser foot" (page 43). a a Needle drop point 74 Stitch Name Pattern Application 11 Overcasting 12 stitch 13 Preventing fraying in medium weight and thin fabrics Preventing fraying in thick fabrics and fabrics that is accidentally pressed...
Users Manual - English
Page 77
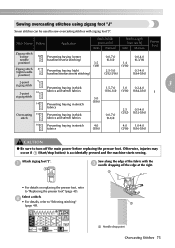
... before replacing the pressor foot. b • For details, refer to turn off the edge at the right. a Needle drop point Overcasting Stitches 75 Stitch Name Pattern Application Stitch Width [mm (inch)] Auto Manual Stitch Length [mm (inch)] Auto Manual Presser Foot Zigzag stitch (center 7 needle position) Zigzag stitch 8 (right needle position...
... before replacing the pressor foot. b • For details, refer to turn off the edge at the right. a Needle drop point Overcasting Stitches 75 Stitch Name Pattern Application Stitch Width [mm (inch)] Auto Manual Stitch Length [mm (inch)] Auto Manual Presser Foot Zigzag stitch (center 7 needle position) Zigzag stitch 8 (right needle position...
Users Manual - English
Page 78
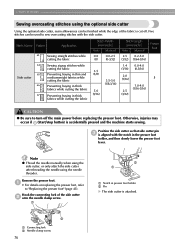
Position the side cutter so that side cutter pin c is cut off the main power before replacing the pressor foot. Stitch Name Pattern Application 63 64 65 Side cutter 66 67 Sewing straight stitches while cutting the fabric Sewing zigzag stitches while cutting the fabric Preventing fraying in ...
Position the side cutter so that side cutter pin c is cut off the main power before replacing the pressor foot. Stitch Name Pattern Application 63 64 65 Side cutter 66 67 Sewing straight stitches while cutting the fabric Sewing zigzag stitches while cutting the fabric Preventing fraying in ...
Users Manual - English
Page 80
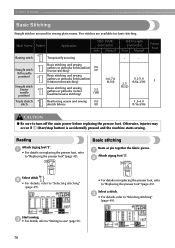
... details on replacing the presser foot, refer to "Selecting stitching" (page 49). Select a stitch. J Basic stitching Baste or pin together the fabric pieces. Stitch Name Pattern Application 6 Basting stitch Temporarily securing Stitch Width [mm (inch)] Auto Manual Stitch Length [mm (inch)] Auto Manual - -
... details on replacing the presser foot, refer to "Selecting stitching" (page 49). Select a stitch. J Basic stitching Baste or pin together the fabric pieces. Stitch Name Pattern Application 6 Basting stitch Temporarily securing Stitch Width [mm (inch)] Auto Manual Stitch Length [mm (inch)] Auto Manual - -

Users Manual - English
Page 82
... skirt or pants. Sew a blind hem according to slide onto the arm or the length is accidentally pressed and the machine starts sewing. Stitch Name Pattern Application 17 Blind hem stitch 18 Blind hem stitching on mediumweight fabrics Blind hem stitching on the fabric about 5 mm c (3/16 inch) from the side...
... skirt or pants. Sew a blind hem according to slide onto the arm or the length is accidentally pressed and the machine starts sewing. Stitch Name Pattern Application 17 Blind hem stitch 18 Blind hem stitching on mediumweight fabrics Blind hem stitching on the fabric about 5 mm c (3/16 inch) from the side...

Users Manual - English
Page 85
Stitch Name Pattern Application 48 Horizontal buttonholes on thin and mediumweight fabrics Stitch Width [mm (inch)] Auto Manual Stitch Length [mm (inch)] Auto Manual Presser Foot 49 Horizontal ...
Stitch Name Pattern Application 48 Horizontal buttonholes on thin and mediumweight fabrics Stitch Width [mm (inch)] Auto Manual Stitch Length [mm (inch)] Auto Manual Presser Foot 49 Horizontal ...
Users Manual - English
Page 92
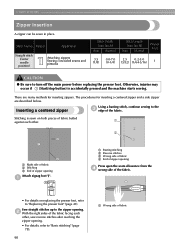
... methods for inserting zippers. Inserting a centered zipper Using a basting stitch, continue sewing to turn off the main power before replacing the pressor foot. Stitch Name Pattern Application Straight stitch (center 3 needle position) Attaching zippers Sewing concealed seams and pintucks Stitch Width [mm (inch)] Auto Manual Stitch Length [mm (inch)] Auto Manual...
... methods for inserting zippers. Inserting a centered zipper Using a basting stitch, continue sewing to turn off the main power before replacing the pressor foot. Stitch Name Pattern Application Straight stitch (center 3 needle position) Attaching zippers Sewing concealed seams and pintucks Stitch Width [mm (inch)] Auto Manual Stitch Length [mm (inch)] Auto Manual...

Users Manual - English
Page 97
...) 1.0 1.0-3.0 2.5 1.0-4.0 (1/16) (1/16-1/8) (3/32) (1/16-3/16) J 5.0 1.5-7.0 (3/16) (1/16-1/4) 3 1.0 0.2-4.0 (1/16) (1/64-3/16) 4.0 0.0-7.0 (3/16) (0-1/4) Observe the corresponding precautions when performing each of the following stitching operations. Stitch Name Pattern Application Triple stretch 4 stitch 5 Stretch stitch 2-point zigzag 9 stitch 3-point zigzag 10 stitch Elastic- 34 attaching stitch Stretch fabrics Stretch fabrics Attaching elastic Attaching elastic...
...) 1.0 1.0-3.0 2.5 1.0-4.0 (1/16) (1/16-1/8) (3/32) (1/16-3/16) J 5.0 1.5-7.0 (3/16) (1/16-1/4) 3 1.0 0.2-4.0 (1/16) (1/64-3/16) 4.0 0.0-7.0 (3/16) (0-1/4) Observe the corresponding precautions when performing each of the following stitching operations. Stitch Name Pattern Application Triple stretch 4 stitch 5 Stretch stitch 2-point zigzag 9 stitch 3-point zigzag 10 stitch Elastic- 34 attaching stitch Stretch fabrics Stretch fabrics Attaching elastic Attaching elastic...
Users Manual - English
Page 99
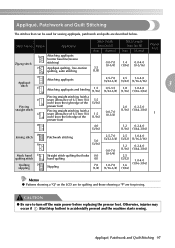
.../stop button) is accidentally pressed and the machine starts sewing. Appliqué, Patchwork and Quilt Stitching 97 Stitch Name Pattern Application 7 Zigzag stitch 24 Attaching appliqués (center baseline/reverse stitching) Appliqué quilting, free-motion quilting,... (3/32-1/4) 0.0-7.0 (0-1/4) 1.0-7.0 (1/16-1/4) 2.5 1.0-4.0 (3/32) (1/16-3/16) 1.2 0.2-4.0 (1/16) (1/64-3/16) 2.5 (3/32) 1.6 (1/16) 1.0-4.0 (1/16-3/16) Memo z Patterns showing a "Q" on the LCD are for quilting and those showing a "P" are for sewing appliqués, patchwork and quilts are described below.
.../stop button) is accidentally pressed and the machine starts sewing. Appliqué, Patchwork and Quilt Stitching 97 Stitch Name Pattern Application 7 Zigzag stitch 24 Attaching appliqués (center baseline/reverse stitching) Appliqué quilting, free-motion quilting,... (3/32-1/4) 0.0-7.0 (0-1/4) 1.0-7.0 (1/16-1/4) 2.5 1.0-4.0 (3/32) (1/16-3/16) 1.2 0.2-4.0 (1/16) (1/64-3/16) 2.5 (3/32) 1.6 (1/16) 1.0-4.0 (1/16-3/16) Memo z Patterns showing a "Q" on the LCD are for quilting and those showing a "P" are for sewing appliqués, patchwork and quilts are described below.


