
Users Manual - English
Page 1
Computerized Embroidery and Sewing Machine Operation Manual Product Code 885-V31/V32/V33 GETTING READY SEWING BASICS UTILITY STITCHES EMBROIDERY APPENDIX Please visit us at http://solutions.brother.com where you can get product support and answers to frequently asked questions (FAQs).
Computerized Embroidery and Sewing Machine Operation Manual Product Code 885-V31/V32/V33 GETTING READY SEWING BASICS UTILITY STITCHES EMBROIDERY APPENDIX Please visit us at http://solutions.brother.com where you can get product support and answers to frequently asked questions (FAQs).
Users Manual - English
Page 3
.... In addition, after using, when cleaning, when making any air openings blocked. Important Safety Instructions Please read the "Important Safety Instructions", and then study this embroidery and sewing machine. Return the machine to use .
.... In addition, after using, when cleaning, when making any air openings blocked. Important Safety Instructions Please read the "Important Safety Instructions", and then study this embroidery and sewing machine. Return the machine to use .

Users Manual - English
Page 8
... the Fabric ...126 Attaching a stabilizer material to the fabric 126 Setting the fabric in the embroidery frame ...127 Attaching the Embroidery Frame 130 Attaching the embroidery frame ...130 Removing the embroidery frame ...131 Selecting Embroidery Patterns 132 Copyright information ...132 Embroidery pattern types ...132 LCD (liquid crystal display) operation ...133 Selecting alphabet characters ...136 Selecting an...
... the Fabric ...126 Attaching a stabilizer material to the fabric 126 Setting the fabric in the embroidery frame ...127 Attaching the Embroidery Frame 130 Attaching the embroidery frame ...130 Removing the embroidery frame ...131 Selecting Embroidery Patterns 132 Copyright information ...132 Embroidery pattern types ...132 LCD (liquid crystal display) operation ...133 Selecting alphabet characters ...136 Selecting an...

Users Manual - English
Page 9
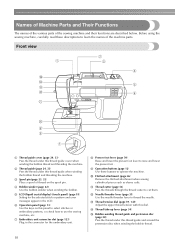
...-in utility stitches available (page 70). g Lighting Start/Stop button When the green light is on dark fabrics. i Embroidery You can select from the built-in embroidery patterns, characters, framed decorations, and designs from optional embroidery cards (page 117). 7 d Seven-point feed dogs Ensure smooth, even feeding of multiple fabric layers and a variety...
...-in utility stitches available (page 70). g Lighting Start/Stop button When the green light is on dark fabrics. i Embroidery You can select from the built-in embroidery patterns, characters, framed decorations, and designs from optional embroidery cards (page 117). 7 d Seven-point feed dogs Ensure smooth, even feeding of multiple fabric layers and a variety...

Users Manual - English
Page 11
...other areas) XC1807-121 XC1074-051 XD0474-151 SA432 EF62: XA6628-102 XC6283-001 XC4487-021 XC4842-022 XE3116-201 XE3118-001 XE3365-101(SE-350, LB-6770) XE7728-001(others) XE3124-001 182986-024 Memo z All specifications are correct at the time of printing. The ... thread (white) Embroidery bobbin thread (black) Part Code U.S.A. / Canada Others SAEBT EBT-CEN X81164-001 SAEBT999 EBT-CEBN XC5520-001 Memo z To obtain optional accessories or parts, visit [http://www.brother.com/], or [http://www.brothermall.com] (in USA). z Visit your nearest authorized dealer for a complete listing ...
...other areas) XC1807-121 XC1074-051 XD0474-151 SA432 EF62: XA6628-102 XC6283-001 XC4487-021 XC4842-022 XE3116-201 XE3118-001 XE3365-101(SE-350, LB-6770) XE7728-001(others) XE3124-001 182986-024 Memo z All specifications are correct at the time of printing. The ... thread (white) Embroidery bobbin thread (black) Part Code U.S.A. / Canada Others SAEBT EBT-CEN X81164-001 SAEBT999 EBT-CEBN XC5520-001 Memo z To obtain optional accessories or parts, visit [http://www.brother.com/], or [http://www.brothermall.com] (in USA). z Visit your nearest authorized dealer for a complete listing ...
Users Manual - English
Page 12
...) (page 18) Setting for the selected stitch or pattern and error messages appear in the connector for the embroidery unit. f Operation panel (page 13) Use the keys on the spool pin. g Embroidery unit connector slot (page 123) Plug in the LCD. j Flat bed attachment (page 46) Remove the ...cylindrical pieces such as sleeve cuffs. m Thread tension dial (page 59, 145) Adjust the upper thread tension with this panel to select stitches or embroidery patterns, or check how to operate the machine. Before using the sewing machine, carefully read these buttons to use the sewing machine, etc. i...
...) (page 18) Setting for the selected stitch or pattern and error messages appear in the connector for the embroidery unit. f Operation panel (page 13) Use the keys on the spool pin. g Embroidery unit connector slot (page 123) Plug in the LCD. j Flat bed attachment (page 46) Remove the ...cylindrical pieces such as sleeve cuffs. m Thread tension dial (page 59, 145) Adjust the upper thread tension with this panel to select stitches or embroidery patterns, or check how to operate the machine. Before using the sewing machine, carefully read these buttons to use the sewing machine, etc. i...
Users Manual - English
Page 13
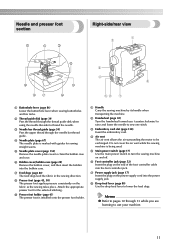
i Presser foot holder (page 45) The presser foot is being used. c Embroidery card slot (page 138) Insert the embroidery card. f Foot controller jack (page 52) Insert the plug on the power supply cord into the power supply jack. g Power supply jack (page 17) Insert ...
i Presser foot holder (page 45) The presser foot is being used. c Embroidery card slot (page 138) Insert the embroidery card. f Foot controller jack (page 52) Insert the plug on the power supply cord into the power supply jack. g Power supply jack (page 17) Insert ...

Users Manual - English
Page 15
..." (page 18). Displays simple explanations of setting upper thread / bobbin winding / setting bobbin thread / needle replacement / embroidery unit attachment / embroidery frame attachment / embroidery foot attachment / presser foot replacement. 13 i Sewing machine help key Press to get help on the LCD with your finger... Press to set the needle stop position, the buzzer sound, and more. h Settings key Press to enter alphabet character embroidery or embroidery patterns you have edited or adjusted, etc. c Previous page key Displays the previous page when there are items that are...
..." (page 18). Displays simple explanations of setting upper thread / bobbin winding / setting bobbin thread / needle replacement / embroidery unit attachment / embroidery frame attachment / embroidery foot attachment / presser foot replacement. 13 i Sewing machine help key Press to get help on the LCD with your finger... Press to set the needle stop position, the buzzer sound, and more. h Settings key Press to enter alphabet character embroidery or embroidery patterns you have edited or adjusted, etc. c Previous page key Displays the previous page when there are items that are...

Users Manual - English
Page 20
... contained i Horizontal mirror image j Automatic thread cutting k Automatic reverse/reinforcement l Single/twin needle sewing and needle stop position Memo z A different screen is displayed when the embroidery unit is attached. The details are displayed on the LCD (liquid crystal display) on the LCD. 18 z Refer to "Operation panel" (page 13). Change the... screen with your finger or a touch pen. GETTING READY LCD (Liquid Crystal Display) Operation Selected stitch, pattern settings and messages are explained in "Selecting an embroidery pattern" (page 137).
... contained i Horizontal mirror image j Automatic thread cutting k Automatic reverse/reinforcement l Single/twin needle sewing and needle stop position Memo z A different screen is displayed when the embroidery unit is attached. The details are displayed on the LCD (liquid crystal display) on the LCD. 18 z Refer to "Operation panel" (page 13). Change the... screen with your finger or a touch pen. GETTING READY LCD (Liquid Crystal Display) Operation Selected stitch, pattern settings and messages are explained in "Selecting an embroidery pattern" (page 137).

Users Manual - English
Page 21
.... - Initial needle position Language Selects whether "1 Straight stitch (left)" or "3 Straight stitch (middle)" that is automatically selected when the machine is selected) Embroidery/Country/Madeira poly/Madeira rayon/Sulky/ Robison Anton Display unit Selects the measurement units that can be changed . English/German/French/ Italian/Dutch/Spanish/ Japanese/... LCD (page 163). For details on operation, refer to embroider/Needle count/ Thread number (#123) (When "Thread No.#123" is turned on the embroidery screen (page 133). LCD (Liquid Crystal Display) Operation 19
.... - Initial needle position Language Selects whether "1 Straight stitch (left)" or "3 Straight stitch (middle)" that is automatically selected when the machine is selected) Embroidery/Country/Madeira poly/Madeira rayon/Sulky/ Robison Anton Display unit Selects the measurement units that can be changed . English/German/French/ Italian/Dutch/Spanish/ Japanese/... LCD (page 163). For details on operation, refer to embroider/Needle count/ Thread number (#123) (When "Thread No.#123" is turned on the embroidery screen (page 133). LCD (Liquid Crystal Display) Operation 19

Users Manual - English
Page 23
... g fe a Upper threading b Bobbin winding c Bobbin installation d Needle replacement e Presser foot replacement f Embroidery foot attachment g Embroidery frame attachment h Embroidery unit attachment X The first screen describing the procedure for the following items. Displays simple explanations of setting upper ... initial stitch screen appears again. bobbin winding / setting bobbin thread / needle replacement / embroidery unit attachment / Example: Upper threading embroidery frame attachment / embroidery foot attachment / presser foot replacement on . Turn on each topic, refer to the ...
... g fe a Upper threading b Bobbin winding c Bobbin installation d Needle replacement e Presser foot replacement f Embroidery foot attachment g Embroidery frame attachment h Embroidery unit attachment X The first screen describing the procedure for the following items. Displays simple explanations of setting upper ... initial stitch screen appears again. bobbin winding / setting bobbin thread / needle replacement / embroidery unit attachment / Example: Upper threading embroidery frame attachment / embroidery foot attachment / presser foot replacement on . Turn on each topic, refer to the ...
Users Manual - English
Page 25
... at the bottom. 1 Place the bobbin on the bobbin winder shaft so b that the spring on the slit in orange. Memo z For embroidering, use the embroidery bobbin thread. Pick up in the spool or the machine may be damaged. ● Winding/Installing the Bobbin 23 Slide the spool onto the pin...
... at the bottom. 1 Place the bobbin on the bobbin winder shaft so b that the spring on the slit in orange. Memo z For embroidering, use the embroidery bobbin thread. Pick up in the spool or the machine may be damaged. ● Winding/Installing the Bobbin 23 Slide the spool onto the pin...

Users Manual - English
Page 42
..., the stitching may be uneven or puckered or there may break while the machine is bent. If the combination of the fabric or thread. ■ Embroidery needles Use a 75/11 home sewing machine needle. CAUTION z The appropriate fabric, thread and needle combinations are shown in the table (page 39). Checking the...
..., the stitching may be uneven or puckered or there may break while the machine is bent. If the combination of the fabric or thread. ■ Embroidery needles Use a 75/11 home sewing machine needle. CAUTION z The appropriate fabric, thread and needle combinations are shown in the table (page 39). Checking the...
Users Manual - English
Page 45
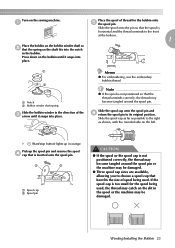
... b Presser foot holder X The presser foot holder releases the presser foot. Memo z For details on attaching the embroidery foot "Q", refer to raise the needle. Press (Needle position button) once or a twice to "Attaching the Embroidery Foot" (page 120). c a a Needle position button Turn off the sewing machine. CAUTION ● Use the presser foot...
... b Presser foot holder X The presser foot holder releases the presser foot. Memo z For details on attaching the embroidery foot "Q", refer to raise the needle. Press (Needle position button) once or a twice to "Attaching the Embroidery Foot" (page 120). c a a Needle position button Turn off the sewing machine. CAUTION ● Use the presser foot...
Users Manual - English
Page 47
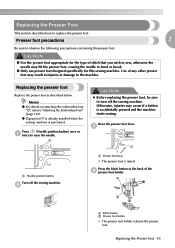
... to turn off the sewing machine. The needle may occur if a button is loose, the needle may hit the presser foot and break or bend. embroidery foot, optional free-motion open toe quilting foot "O" and optional walking foot. a Presser bar b Presser foot holder Hold the presser foot holder in your finger...
... to turn off the sewing machine. The needle may occur if a button is loose, the needle may hit the presser foot and break or bend. embroidery foot, optional free-motion open toe quilting foot "O" and optional walking foot. a Presser bar b Presser foot holder Hold the presser foot holder in your finger...

Users Manual - English
Page 119
4 EMBROIDERY The steps for embroidering are described in this chapter. Embroidering Neatly 118 Attaching the Embroidery Foot 120 Attaching the Embroidery Unit 123 Preparing the Fabric 126 Attaching the Embroidery Frame 130 Selecting Embroidery Patterns 132 Embroidering...139 Editing and Saving Patterns 143
4 EMBROIDERY The steps for embroidering are described in this chapter. Embroidering Neatly 118 Attaching the Embroidery Foot 120 Attaching the Embroidery Unit 123 Preparing the Fabric 126 Attaching the Embroidery Frame 130 Selecting Embroidery Patterns 132 Embroidering...139 Editing and Saving Patterns 143

Users Manual - English
Page 120
...the presser foot and the fabric, the fabric can be sure to sew incorrectly. To check the fabric thickness, attach the embroidery frame to the embroidery unit, and use a 90/14 home sewing machine needle. Otherwise, the needle may become tangled. Use a water soluble sheet...Needle position button) to the fabric" (page 126). ■ Needle Use a 75/11 home sewing machine needle. Memo z For good quality embroidery designs be embroidered. For details, refer to "Attaching a stabilizer material to raise the needle. When embroidering on large pieces of the pattern you continue...
...the presser foot and the fabric, the fabric can be sure to sew incorrectly. To check the fabric thickness, attach the embroidery frame to the embroidery unit, and use a 90/14 home sewing machine needle. Otherwise, the needle may become tangled. Use a water soluble sheet...Needle position button) to the fabric" (page 126). ■ Needle Use a 75/11 home sewing machine needle. Memo z For good quality embroidery designs be embroidered. For details, refer to "Attaching a stabilizer material to raise the needle. When embroidering on large pieces of the pattern you continue...

Users Manual - English
Page 121
... fabric, refer to "Preparing the Fabric" (page 126). ↓ 6 Embroidery frame attachment Attach the embroidery frame to the pattern. For details on attaching the embroidery frame, refer to "Attaching the Embroidery Frame" (page 130). ↓ 7 Pattern selection Turn the power on ...8595; 4 Attach a stabilizer material to "Upper Threading" (page 31). Embroidering Neatly 119 Embroidery step by step The basic steps for embroidery are as follows. 1 Presser foot attachment Attach the embroidery foot "Q". For details on replacing the needle, refer to "Replacing the needle" (page 41...
... fabric, refer to "Preparing the Fabric" (page 126). ↓ 6 Embroidery frame attachment Attach the embroidery frame to the pattern. For details on attaching the embroidery frame, refer to "Attaching the Embroidery Frame" (page 130). ↓ 7 Pattern selection Turn the power on ...8595; 4 Attach a stabilizer material to "Upper Threading" (page 31). Embroidering Neatly 119 Embroidery step by step The basic steps for embroidery are as follows. 1 Presser foot attachment Attach the embroidery foot "Q". For details on replacing the needle, refer to "Replacing the needle" (page 41...

Users Manual - English
Page 122
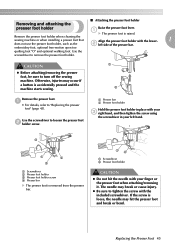
...foot is at the top position. Raise the presser foot lever. a CAUTION z Before attaching the embroidery foot, be sure to detach the presser foot. Have the included embroidery foot "Q" and a screwdriver ready. a a Needle position button Note z The needle is correctly raised...by the presser foot holder screw CAUTION ● Always use the embroidery foot "Q" when embroidering. Press (Needle position button) once or a twice to attach the embroidery foot "Q". EMBROIDERY Attaching the Embroidery Foot This section describes how to raise the needle. Check the ...
...foot is at the top position. Raise the presser foot lever. a CAUTION z Before attaching the embroidery foot, be sure to detach the presser foot. Have the included embroidery foot "Q" and a screwdriver ready. a a Needle position button Note z The needle is correctly raised...by the presser foot holder screw CAUTION ● Always use the embroidery foot "Q" when embroidering. Press (Needle position button) once or a twice to attach the embroidery foot "Q". EMBROIDERY Attaching the Embroidery Foot This section describes how to raise the needle. Check the ...

Users Manual - English
Page 123
... back of the foot. 4 a a Lever While pressing in the lever with your finger, fit g the embroidery foot bar over the needle clamp screw to attach the embroidery foot to tighten the screw with your right f hand, as shown. If the screw is loose, the needle...b a Screwdriver b Presser foot holder c Presser bar d Presser foot holder screw a a Presser foot holder screw Tighten the presser foot holder screw. Hold the embroidery foot "Q" with the presser h foot holder screw. The needle may break or bend. i Turn the screwdriver toward you (counterclockwise) slowly to make sure that the...
... back of the foot. 4 a a Lever While pressing in the lever with your finger, fit g the embroidery foot bar over the needle clamp screw to attach the embroidery foot to tighten the screw with your right f hand, as shown. If the screw is loose, the needle...b a Screwdriver b Presser foot holder c Presser bar d Presser foot holder screw a a Presser foot holder screw Tighten the presser foot holder screw. Hold the embroidery foot "Q" with the presser h foot holder screw. The needle may break or bend. i Turn the screwdriver toward you (counterclockwise) slowly to make sure that the...


