
Users Manual - English
Page 3
...not use if you notice anything unusual, such as an odor, heat, discoloration or deformation, stop using this machine, carefully read these safety instructions before attempting to the nearest authorized dealer or service center for examination, repair, electrical or mechanical adjustment. • While the machine is stored... and unplug the power cord. • When transporting the sewing machine, be sure to carry it by any adjustments mentioned in the instruction manual • To unplug the machine, switch the machine to the symbol "O" position to turn it off, then grasp the plug ...
...not use if you notice anything unusual, such as an odor, heat, discoloration or deformation, stop using this machine, carefully read these safety instructions before attempting to the nearest authorized dealer or service center for examination, repair, electrical or mechanical adjustment. • While the machine is stored... and unplug the power cord. • When transporting the sewing machine, be sure to carry it by any adjustments mentioned in the instruction manual • To unplug the machine, switch the machine to the symbol "O" position to turn it off, then grasp the plug ...
Users Manual - English
Page 4
..., or other parts to assure correct installation. 8 For repair or adjustment: • If the Light unit is required, first follow careful instruction when freehand stitching so that this sewing machine was supplied in should never be used. • Always consult the operation manual when replacing or.... • Do not place this machine, avoid direct sunlight and high humidity locations. If the problem persists, please consult your local authorized Brother dealer. • Never drop or insert any object into any opening. • Do not operate where aerosol (spray) products are subject ...
..., or other parts to assure correct installation. 8 For repair or adjustment: • If the Light unit is required, first follow careful instruction when freehand stitching so that this sewing machine was supplied in should never be used. • Always consult the operation manual when replacing or.... • Do not place this machine, avoid direct sunlight and high humidity locations. If the problem persists, please consult your local authorized Brother dealer. • Never drop or insert any object into any opening. • Do not operate where aerosol (spray) products are subject ...

Users Manual - English
Page 6
Contents Introduction ...1 Important Safety Instructions 1 Machine Features ...7 Accessories ...8 Included accessories ...8 Optional accessories ...9 Names of Machine Parts and Their Functions 10 Front view...10 Needle and presser foot section ...11 Right-...
Contents Introduction ...1 Important Safety Instructions 1 Machine Features ...7 Accessories ...8 Included accessories ...8 Optional accessories ...9 Names of Machine Parts and Their Functions 10 Front view...10 Needle and presser foot section ...11 Right-...
Users Manual - English
Page 33
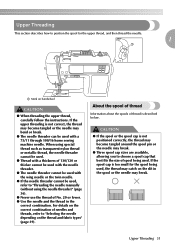
... is too small for the upper thread, and then thread the needle. 1 a a Mark on handwheel CAUTION ● When threading the upper thread, carefully follow the instructions. For details on the correct combination of needles and threads, refer to choose a spool cap that best fits the size of No. 20 or lower...
... is too small for the upper thread, and then thread the needle. 1 a a Mark on handwheel CAUTION ● When threading the upper thread, carefully follow the instructions. For details on the correct combination of needles and threads, refer to choose a spool cap that best fits the size of No. 20 or lower...
Users Manual - English
Page 34
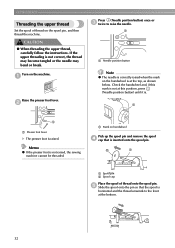
... unwinds to raise the needle. e Slide the spool onto the pin so that is raised. a CAUTION ● When threading the upper thread, carefully follow the instructions. a a Needle position button Note z The needle is correctly raised when the mark on handwheel Pick up the spool pin and remove the spool d cap that...
... unwinds to raise the needle. e Slide the spool onto the pin so that is raised. a CAUTION ● When threading the upper thread, carefully follow the instructions. a a Needle position button Note z The needle is correctly raised when the mark on handwheel Pick up the spool pin and remove the spool d cap that...
Users Manual - English
Page 43
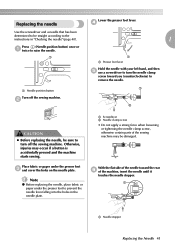
... the machine, insert the needle until it touches the needle stopper. a Lower the presser foot lever. Press (Needle position button) once or a twice to the instructions in the needle plate. Otherwise, injuries may be straight according to raise the needle.
... the machine, insert the needle until it touches the needle stopper. a Lower the presser foot lever. Press (Needle position button) once or a twice to the instructions in the needle plate. Otherwise, injuries may be straight according to raise the needle.

Users Manual - English
Page 104
... or break. CAUTION ● Be sure to the left as seen from the rear of sewing. Turn on the base, to (to use the following instructions with the optional free-motion open toe quilting foot "O" when making free-motion quilting. If the quilting foot (SA129, F005N (XC1948-002)) is used, the...
... or break. CAUTION ● Be sure to the left as seen from the rear of sewing. Turn on the base, to (to use the following instructions with the optional free-motion open toe quilting foot "O" when making free-motion quilting. If the quilting foot (SA129, F005N (XC1948-002)) is used, the...

Users Manual - English
Page 127
... embroidery carriage moves into a position where it can be saved. It may cause malfunctions if removed when the machine is completely stopped and follow the instructions below. Remove the embroidery frame. Turn off the sewing machine before removing the embroidery unit.
... embroidery carriage moves into a position where it can be saved. It may cause malfunctions if removed when the machine is completely stopped and follow the instructions below. Remove the embroidery frame. Turn off the sewing machine before removing the embroidery unit.

Users Manual - English
Page 133
... b twice to remove. a Remove the embroidery frame. X The embroidery frame will separate from the embroidery frame holder. If a button is completely stopped and follow the instructions below. Removing the embroidery frame Pass the embroidery frame under the presser d foot while raising the presser foot lever even further. Raise the presser foot...
... b twice to remove. a Remove the embroidery frame. X The embroidery frame will separate from the embroidery frame holder. If a button is completely stopped and follow the instructions below. Removing the embroidery frame Pass the embroidery frame under the presser d foot while raising the presser foot lever even further. Raise the presser foot...

Users Manual - English
Page 134
...'s memory. For details, refer to "Using an embroidery card" (page 138). For details, refer to "Selecting a frame pattern" (page 137). For details, refer to the instructions displayed on the various types of copyright law and is an infringement of embroidery patterns available and the procedure for selecting a pattern. c Frame patterns 10...
...'s memory. For details, refer to "Using an embroidery card" (page 138). For details, refer to "Selecting a frame pattern" (page 137). For details, refer to the instructions displayed on the various types of copyright law and is an infringement of embroidery patterns available and the procedure for selecting a pattern. c Frame patterns 10...

Users Manual - English
Page 144
Memo z When "APPLIQUE MATERIAL", "APPLIQUE POSITION" and "APPLIQUE" are displayed, a specific color thread does not appear. X The position for the appliqué is stitched, and the sewing machine stops. EMBROIDERY Apply a thin layer of fabric glue or spray h adhesive to match the appliqué piece. Use a proper color thread to the back of the appliqué piece, and attach it in the appliqué position. Follow the instructions on the screen, and j change thread colors as you sew. 142 Lower the presser foot lever, and press i (Start/stop button).
Memo z When "APPLIQUE MATERIAL", "APPLIQUE POSITION" and "APPLIQUE" are displayed, a specific color thread does not appear. X The position for the appliqué is stitched, and the sewing machine stops. EMBROIDERY Apply a thin layer of fabric glue or spray h adhesive to match the appliqué piece. Use a proper color thread to the back of the appliqué piece, and attach it in the appliqué position. Follow the instructions on the screen, and j change thread colors as you sew. 142 Lower the presser foot lever, and press i (Start/stop button).
Users Manual - English
Page 168
... 41 replacing presser foot 43 resewing 147 retrieving pattern 150 reverse stitching 53 reverse/reinforcement stitch button 12, 54 reverse/reinforcement stitches, automatic 61 S safety instructions 1 saving patterns 150 scallop stitch 109 scallop stitching 111 screwdriver 9 seam allowance, even 67 seam ripper 9 securing stitching 53 selecting alphabet characters 136 selecting embroidery...
... 41 replacing presser foot 43 resewing 147 retrieving pattern 150 reverse stitching 53 reverse/reinforcement stitch button 12, 54 reverse/reinforcement stitches, automatic 61 S safety instructions 1 saving patterns 150 scallop stitch 109 scallop stitching 111 screwdriver 9 seam allowance, even 67 seam ripper 9 securing stitching 53 selecting alphabet characters 136 selecting embroidery...

Quick Setup Guide - English and Spanish
Page 4
Refer to the operation manual for detailed instruction. Realice los siguientes pasos numerados en el orden indicado. Bobbin Winding and Setting Bobinado y ajuste Follow the numbered steps below in order. Utilice sólo la bobina incluida o bobinas del mismo tipo. 9 10 87 4 5 6 2 3 11 12 16 17 18 11.5 mm (approx. 7/16 inch) 14 11,5 mm (aprox. 7/16 pulg.) 15 1 2 13 22 23 24 20 3 1 19 4 5 6 7 8 9 2 Para obtener instrucciones detalladas, consulte el manual de instrucciones. Use only the enclosed bobbin or bobbins of the same type.
Refer to the operation manual for detailed instruction. Realice los siguientes pasos numerados en el orden indicado. Bobbin Winding and Setting Bobinado y ajuste Follow the numbered steps below in order. Utilice sólo la bobina incluida o bobinas del mismo tipo. 9 10 87 4 5 6 2 3 11 12 16 17 18 11.5 mm (approx. 7/16 inch) 14 11,5 mm (aprox. 7/16 pulg.) 15 1 2 13 22 23 24 20 3 1 19 4 5 6 7 8 9 2 Para obtener instrucciones detalladas, consulte el manual de instrucciones. Use only the enclosed bobbin or bobbins of the same type.

Instruction Manual/USB Connection - English and Spanish
Page 2
...instructions, may cause undesired operation. could void the user's authority to radio communications. Federal Communications Commission (FCC) Declaration of Conformity (For USA Only) Responsible Party: Brother International Corporation 100 Somerset Corporate Boulevard Bridgewater, NJ 08807-0911 USA TEL : (908) 704-1700 declares that the product Product Name: Model Number: Brother Sewing Machine HE-240 /SE-400...on, the user is encouraged to try to correct the interference by Brother Industries, Ltd. If this device must accept any interference received, including interference that may cause ...
...instructions, may cause undesired operation. could void the user's authority to radio communications. Federal Communications Commission (FCC) Declaration of Conformity (For USA Only) Responsible Party: Brother International Corporation 100 Somerset Corporate Boulevard Bridgewater, NJ 08807-0911 USA TEL : (908) 704-1700 declares that the product Product Name: Model Number: Brother Sewing Machine HE-240 /SE-400...on, the user is encouraged to try to correct the interference by Brother Industries, Ltd. If this device must accept any interference received, including interference that may cause ...

