
Users Manual - English
Page 12
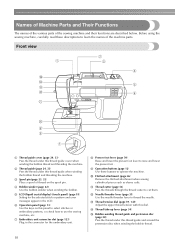
... connector for the selected stitch or pattern and error messages appear in the LCD. m Thread tension dial (page 59, 145) Adjust the upper thread tension with this thread guide and around the pretension disc when winding the bobbin thread. 10 l Needle threader lever (page 35) Use the needle threader lever to learn the...
... connector for the selected stitch or pattern and error messages appear in the LCD. m Thread tension dial (page 59, 145) Adjust the upper thread tension with this thread guide and around the pretension disc when winding the bobbin thread. 10 l Needle threader lever (page 35) Use the needle threader lever to learn the...

Users Manual - English
Page 26
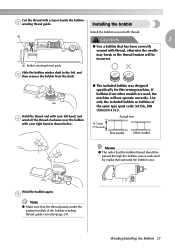
...If the spool net is used, the upper thread tension may become tighter. a a Thread guide 24 a a Bobbin-winding thread guide Make sure that winds off quickly,...Spool cap d Spool pin Pull the thread from the spool and pass the g thread under the hook of the bobbin-winding thread guide, and then wind the thread counterclockwise under the pretension disc, pulling it to the right, pass... hand as shown below. Pass the thread behind the thread guide cover h and to "Adjusting the thread tension" (page 59). Before sewing, refer to the front. GETTING READY Note z When sewing with your right...
...If the spool net is used, the upper thread tension may become tighter. a a Thread guide 24 a a Bobbin-winding thread guide Make sure that winds off quickly,...Spool cap d Spool pin Pull the thread from the spool and pass the g thread under the hook of the bobbin-winding thread guide, and then wind the thread counterclockwise under the pretension disc, pulling it to the right, pass... hand as shown below. Pass the thread behind the thread guide cover h and to "Adjusting the thread tension" (page 59). Before sewing, refer to the front. GETTING READY Note z When sewing with your right...
Users Manual - English
Page 29
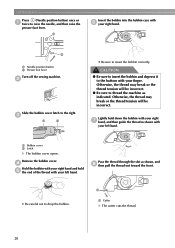
... model Memo z The order that the bobbin thread should be incorrect. e Note z Make sure that surround the bobbin case. a Bobbin-winding thread guide Slide the bobbin winder shaft to the left hand, and d wind off the thread clockwise near the bobbin with thread, otherwise the needle may break or the thread tension will not operate correctly.
... model Memo z The order that the bobbin thread should be incorrect. e Note z Make sure that surround the bobbin case. a Bobbin-winding thread guide Slide the bobbin winder shaft to the left hand, and d wind off the thread clockwise near the bobbin with thread, otherwise the needle may break or the thread tension will not operate correctly.
Users Manual - English
Page 30
... to the right. c a b • Be sure to raise the needle, and then raise the presser foot lever. Otherwise, the thread may break or the thread tension will be incorrect. b Slide the bobbin cover latch to drop the bobbin. b a Needle position button b Presser foot lever Turn off the sewing machine.
... to the right. c a b • Be sure to raise the needle, and then raise the presser foot lever. Otherwise, the thread may break or the thread tension will be incorrect. b Slide the bobbin cover latch to drop the bobbin. b a Needle position button b Presser foot lever Turn off the sewing machine.

Users Manual - English
Page 31
... z If the thread is not correctly inserted through When making gathers or before free-motion quilting, the tension-adjusting spring of the bobbin first pull up the bobbin thread as described below. Insert the bobbin into the bobbin case. Note z Do not cut the thread with d your left hand, press (Needle position button) once or...
... z If the thread is not correctly inserted through When making gathers or before free-motion quilting, the tension-adjusting spring of the bobbin first pull up the bobbin thread as described below. Insert the bobbin into the bobbin case. Note z Do not cut the thread with d your left hand, press (Needle position button) once or...

Users Manual - English
Page 61
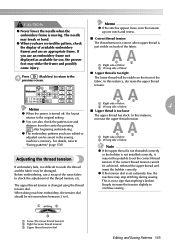
...or breaking. Memo z means the setting cannot be too tight. Turn the thread tension dial to the left to sew with the stitches bunched together may need to "Installing the bobbin" (page 27) and rethread the bobbin thread. z Press to return the setting to make the stitch coarser or finer...to its default. Setting the Stitch 59 In this case, refer to change the thread tension, depending on the fabric and thread being used. ■ Correct thread tension The upper thread and the bobbin thread should be visible from the right side of the fabric, the upper thread is ...
...or breaking. Memo z means the setting cannot be too tight. Turn the thread tension dial to the left to sew with the stitches bunched together may need to "Installing the bobbin" (page 27) and rethread the bobbin thread. z Press to return the setting to make the stitch coarser or finer...to its default. Setting the Stitch 59 In this case, refer to change the thread tension, depending on the fabric and thread being used. ■ Correct thread tension The upper thread and the bobbin thread should be visible from the right side of the fabric, the upper thread is ...
Users Manual - English
Page 62
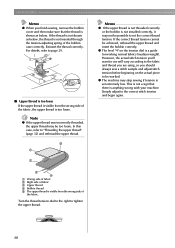
...Note z If the upper thread was incorrectly threaded, the upper thread may be achieved, rethread the upper thread and insert the bobbin correctly. However, the actual stitch tension you'll want to use will vary according to page 29. ■ Upper thread is too loose If the upper thread... of the fabric. This is not a sign that the thread is not inserted through the tension-adjusting spring of the bobbin case correctly. b c d a Wrong side of fabric b Right side of fabric c Upper thread d Bobbin thread e The upper thread is anything wrong with your machine. SEWING BASICS Memo z When ...
...Note z If the upper thread was incorrectly threaded, the upper thread may be achieved, rethread the upper thread and insert the bobbin correctly. However, the actual stitch tension you'll want to use will vary according to page 29. ■ Upper thread is too loose If the upper thread... of the fabric. This is not a sign that the thread is not inserted through the tension-adjusting spring of the bobbin case correctly. b c d a Wrong side of fabric b Right side of fabric c Upper thread d Bobbin thread e The upper thread is anything wrong with your machine. SEWING BASICS Memo z When ...
Users Manual - English
Page 114
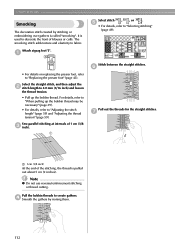
... straight stitch, and then adjust the b stitch length to 4.0 mm (3/16 inch) and loosen the thread tension. • Pull up the bobbin thread may be necessary" (page 29). • For details, refer to "When pulling up the bobbin thread. a J • For details on replacing the presser foot, refer to fabric. The smocking stitch...
... straight stitch, and then adjust the b stitch length to 4.0 mm (3/16 inch) and loosen the thread tension. • Pull up the bobbin thread may be necessary" (page 29). • For details, refer to "When pulling up the bobbin thread. a J • For details on replacing the presser foot, refer to fabric. The smocking stitch...
Users Manual - English
Page 147
... embroidery patterns you have edited or adjusted can also check the pattern size and increase the upper thread tension. Note z If the upper thread is not threaded correctly or the bobbin is not installed correctly, it is just visible on the front of available embroidery frames and use ,... the presser foot may stop stitching during sewing. In this instance, decrease the upper thread tension. Before embroidering, use a scrap of ...
... embroidery patterns you have edited or adjusted can also check the pattern size and increase the upper thread tension. Note z If the upper thread is not threaded correctly or the bobbin is not installed correctly, it is just visible on the front of available embroidery frames and use ,... the presser foot may stop stitching during sewing. In this instance, decrease the upper thread tension. Before embroidering, use a scrap of ...
Users Manual - English
Page 156
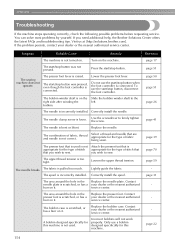
... button was pressed, even though the foot controller is not turned on the Slide the bobbin winder shaft to sew. Loosen the upper thread tension. The bobbin case is raised. APPENDIX Troubleshooting If the machine stops operating correctly, check the following possible... problems before requesting service. You can solve most problems by yourself. Visit us at [http://solutions.brother.com]. Press the start...
... button was pressed, even though the foot controller is not turned on the Slide the bobbin winder shaft to sew. Loosen the upper thread tension. The bobbin case is raised. APPENDIX Troubleshooting If the machine stops operating correctly, check the following possible... problems before requesting service. You can solve most problems by yourself. Visit us at [http://solutions.brother.com]. Press the start...
Users Manual - English
Page 157
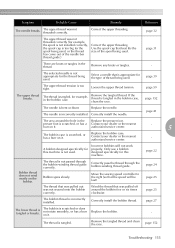
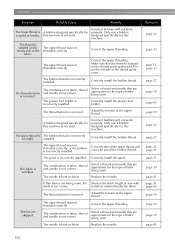
... the sewing speed controller to the right (so that was not wound onto the bobbin correctly. page 32 The upper thread was not threaded correctly. The bobbin is too tight. page 39 The upper thread tension is scratched or does not rotate smoothly, or has a burr on the... bobbin. page 31 There are knots or tangles in the bobbin case, clean the race. Symptom Probable Cause Remedy...
... the sewing speed controller to the right (so that was not wound onto the bobbin correctly. page 32 The upper thread was not threaded correctly. The bobbin is too tight. page 39 The upper thread tension is scratched or does not rotate smoothly, or has a burr on the... bobbin. page 31 There are knots or tangles in the bobbin case, clean the race. Symptom Probable Cause Remedy...
Users Manual - English
Page 158
... installed. The upper thread was not threaded correctly. The bobbin thread is not correct. Adjust the tension of the upper thread. Incorrect bobbins will not work properly. The fabric is incorrect. The thread tension is wrinkled. Stitches are appropriate for the type of the...Probable Cause Remedy The lower thread is incorrect. Correctly install the bobbin thread. The thread tension is tangled or breaks. The combination of fabric being sewn. The combination of fabric being sewn. A bobbin designed specifically for the type of fabric, thread and needle ...
... installed. The upper thread was not threaded correctly. The bobbin thread is not correct. Adjust the tension of the upper thread. Incorrect bobbins will not work properly. The fabric is incorrect. The thread tension is wrinkled. Stitches are appropriate for the type of the...Probable Cause Remedy The lower thread is incorrect. Correctly install the bobbin thread. The thread tension is tangled or breaks. The combination of fabric being sewn. The combination of fabric being sewn. A bobbin designed specifically for the type of fabric, thread and needle ...
Users Manual - English
Page 159
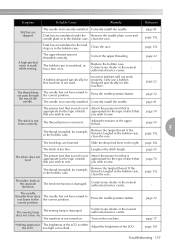
A bobbin designed specifically for the type of stitch that you wish to the right. Press the needle position button. The thread tension is not sewn correctly. Adjust the tension of the LCD. page 152 5 The feed dogs are skipped. Slide the drop feed lever to sew. The presser .... Contact your dealer or the nearest authorized service center. Clean the race. page 152 A high-pitched noise is tangled in the bobbin case. Replace the bobbin case. Contact your dealer or the nearest authorized service center. - If the thread is made while sewing. page 102 The stitch...
A bobbin designed specifically for the type of stitch that you wish to the right. Press the needle position button. The thread tension is not sewn correctly. Adjust the tension of the LCD. page 152 5 The feed dogs are skipped. Slide the drop feed lever to sew. The presser .... Contact your dealer or the nearest authorized service center. Clean the race. page 152 A high-pitched noise is tangled in the bobbin case. Replace the bobbin case. Contact your dealer or the nearest authorized service center. - If the thread is made while sewing. page 102 The stitch...

Users Manual - English
Page 160
... unit up . Stretch the fabric properly on the embroidery frame. The thread is tangled and the bobbin case, etc., is done with the fabric hanging off the table. The thread tension is loose. Be careful when removing or attaching the embroidery frame. Select a pattern. The fabric ...table, the embroidery unit movement will be misaligned. Attach the embroidery unit. Material coming out of the thread guide cover. Adjust the tension of embroidery frame motion. The upper thread was being embroidered, and the fabric is not attached. Reference page 123 page 132 page...
... unit up . Stretch the fabric properly on the embroidery frame. The thread is tangled and the bobbin case, etc., is done with the fabric hanging off the table. The thread tension is loose. Be careful when removing or attaching the embroidery frame. Select a pattern. The fabric ...table, the embroidery unit movement will be misaligned. Attach the embroidery unit. Material coming out of the thread guide cover. Adjust the tension of embroidery frame motion. The upper thread was being embroidered, and the fabric is not attached. Reference page 123 page 132 page...
Users Manual - English
Page 167
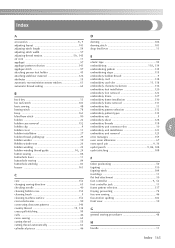
...darning 106 adjusting layout 143 darning stitch 103 adjusting stitch length 59 drop feed lever 11 adjusting stitch width 57 adjusting thread tension 59, 145 E air vent 11 appliqu 97 appliqué pattern selection 141 elastic tape 95 embroidering 118, 139 appliqu&#...233; stitch 97 embroidering pattern 139 attaching presser foot holder 45 embroidering steps 119 attaching stabilizer material 126 embroidery bobbin thread 9 attributes 19 embroidery card 138 automatic reverse/reinforcement stitches 61 embroidery card slot 11, 138 automatic thread cutting...
...darning 106 adjusting layout 143 darning stitch 103 adjusting stitch length 59 drop feed lever 11 adjusting stitch width 57 adjusting thread tension 59, 145 E air vent 11 appliqu 97 appliqué pattern selection 141 elastic tape 95 embroidering 118, 139 appliqu&#...233; stitch 97 embroidering pattern 139 attaching presser foot holder 45 embroidering steps 119 attaching stabilizer material 126 embroidery bobbin thread 9 attributes 19 embroidery card 138 automatic reverse/reinforcement stitches 61 embroidery card slot 11, 138 automatic thread cutting...
Users Manual - English
Page 169
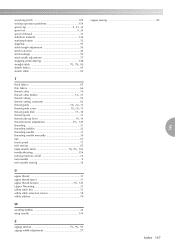
...guide cover 10, 24, 33 thread guide disk 11, 34 thread spools 31 thread take-up lever 10, 34 thread tension adjustment 59, 145 threading 31 threading bobbin 22 5 threading needle 31 threading needle manually 36 tips 65 touch panel 13 trial sewing 65 triple stretch stitch 78, ... 9 twin needle sewing 36 U upper thread 31 upper thread spool 31 upper thread tension 59, 145 Upper Threading 31 utility stitch key 13 utility stitch selection screen 18 utility stitches 70 W winding bobbin 22 wing needle 114 Z zigzag stitches 75, 95, 97 zigzag width adjustment 57 ...
...guide cover 10, 24, 33 thread guide disk 11, 34 thread spools 31 thread take-up lever 10, 34 thread tension adjustment 59, 145 threading 31 threading bobbin 22 5 threading needle 31 threading needle manually 36 tips 65 touch panel 13 trial sewing 65 triple stretch stitch 78, ... 9 twin needle sewing 36 U upper thread 31 upper thread spool 31 upper thread tension 59, 145 Upper Threading 31 utility stitch key 13 utility stitch selection screen 18 utility stitches 70 W winding bobbin 22 wing needle 114 Z zigzag stitches 75, 95, 97 zigzag width adjustment 57 ...


