
Users Manual - English
Page 3
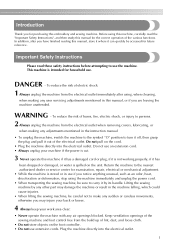
... electrical outlet when removing covers, lubricating, or when making any air openings blocked. To reduce the risk of the sewing machine and foot control free from the electrical outlet immediately after you notice anything unusual, such as an odor, heat, discoloration or deformation, stop using...household use the machine. In addition, after using, when cleaning, when making any sudden or careless movements, otherwise you for purchasing this embroidery and sewing machine. To reduce the risk of electric shock 1 Always unplug the machine from the build up of the electrical outlet. ...
... electrical outlet when removing covers, lubricating, or when making any air openings blocked. To reduce the risk of the sewing machine and foot control free from the electrical outlet immediately after you notice anything unusual, such as an odor, heat, discoloration or deformation, stop using...household use the machine. In addition, after using, when cleaning, when making any sudden or careless movements, otherwise you for purchasing this embroidery and sewing machine. To reduce the risk of electric shock 1 Always unplug the machine from the build up of the electrical outlet. ...

Users Manual - English
Page 8
... Embroidering Neatly ...118 What to prepare ...118 Embroidery step by step ...119 Attaching the Embroidery Foot 120 Attaching the embroidery foot ...120 Removing the embroidery foot ...122 Attaching the Embroidery Unit 123 Embroidery unit precautions ...123 Attaching the embroidery unit ...123 Removing the embroidery unit ...125 Preparing the Fabric ...126 Attaching a stabilizer material to the fabric 126 Setting the fabric in...
... Embroidering Neatly ...118 What to prepare ...118 Embroidery step by step ...119 Attaching the Embroidery Foot 120 Attaching the embroidery foot ...120 Removing the embroidery foot ...122 Attaching the Embroidery Unit 123 Embroidery unit precautions ...123 Attaching the embroidery unit ...123 Removing the embroidery unit ...125 Preparing the Fabric ...126 Attaching a stabilizer material to the fabric 126 Setting the fabric in...

Users Manual - English
Page 11
...pin 20 Spool net 4 Zipper foot "I" X59370-021 21 Foot controller 5 Zigzag foot "J" (on machine) 6 Blind stitch foot "R" 7 Button fitting foot "M" 8 Seam ripper 9 Bobbin ...Disc-shaped screwdriver 24 Embroidery foot "Q" Embroidery set (medium) 25 H 10 cm X W 10 cm (H 4 inches X W 4 inches) 26 Embroidery bobbin thread (white)...XC4487-021 XC4842-022 XE3116-201 XE3118-001 XE3365-101(SE-350, LB-6770) XE7728-001(others) XE3124-001 ... optional accessories available for your machine. 9 Part Name Embroidery bobbin thread (white) Embroidery bobbin thread (black) Part Code U.S.A. / Canada Others...
...pin 20 Spool net 4 Zipper foot "I" X59370-021 21 Foot controller 5 Zigzag foot "J" (on machine) 6 Blind stitch foot "R" 7 Button fitting foot "M" 8 Seam ripper 9 Bobbin ...Disc-shaped screwdriver 24 Embroidery foot "Q" Embroidery set (medium) 25 H 10 cm X W 10 cm (H 4 inches X W 4 inches) 26 Embroidery bobbin thread (white)...XC4487-021 XC4842-022 XE3116-201 XE3118-001 XE3365-101(SE-350, LB-6770) XE7728-001(others) XE3124-001 ... optional accessories available for your machine. 9 Part Name Embroidery bobbin thread (white) Embroidery bobbin thread (black) Part Code U.S.A. / Canada Others...
Users Manual - English
Page 12
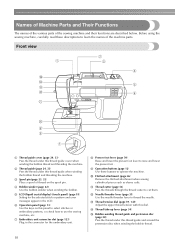
...the sewing machine, etc. m Thread tension dial (page 59, 145) Adjust the upper thread tension with this panel to select stitches or embroidery patterns, or check how to learn the names of the sewing machine and their functions are described below. Before using the sewing machine, carefully... for the selected stitch or pattern and error messages appear in the connector for the embroidery unit. g Embroidery unit connector slot (page 123) Plug in the LCD. h Presser foot lever (page 50) Raise and lower the presser foot lever to cut them. n Thread take-up lever (page 34) o Bobbin-winding...
...the sewing machine, etc. m Thread tension dial (page 59, 145) Adjust the upper thread tension with this panel to select stitches or embroidery patterns, or check how to learn the names of the sewing machine and their functions are described below. Before using the sewing machine, carefully... for the selected stitch or pattern and error messages appear in the connector for the embroidery unit. g Embroidery unit connector slot (page 123) Plug in the LCD. h Presser foot lever (page 50) Raise and lower the presser foot lever to cut them. n Thread take-up lever (page 34) o Bobbin-winding...
Users Manual - English
Page 13
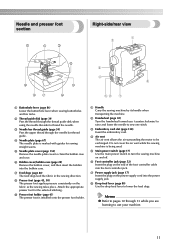
... (page 138) Insert the embroidery card. d Air vent The air vent allows the air surrounding the motor to lower the feed dogs... the needle. b Handwheel (page 50) Turn the handwheel toward you are learning to clean the bobbin case and race. f Foot controller jack (page 52) Insert the plug on the power supply cord into the power supply jack. g Power supply jack (...page 17) Insert the plug on the end of the foot controller cable into the bobbin case. d Needle plate (page 67) The needle plate is marked with guides for the selected...
... (page 138) Insert the embroidery card. d Air vent The air vent allows the air surrounding the motor to lower the feed dogs... the needle. b Handwheel (page 50) Turn the handwheel toward you are learning to clean the bobbin case and race. f Foot controller jack (page 52) Insert the plug on the power supply cord into the power supply jack. g Power supply jack (...page 17) Insert the plug on the end of the foot controller cable into the bobbin case. d Needle plate (page 67) The needle plate is marked with guides for the selected...

Users Manual - English
Page 15
b Back key Press to return to get help key Press to the previous screen. g Embroidery key Press this key to sew embroidery. i Sewing machine help on the LCD with your finger or the touch pen to set the ...simple explanations of setting upper thread / bobbin winding / setting bobbin thread / needle replacement / embroidery unit attachment / embroidery frame attachment / embroidery foot attachment / presser foot replacement. 13 For details, refer to enter alphabet character embroidery or embroidery patterns you have edited or adjusted, etc. e Memory key Press to "LCD (Liquid ...
b Back key Press to return to get help key Press to the previous screen. g Embroidery key Press this key to sew embroidery. i Sewing machine help on the LCD with your finger or the touch pen to set the ...simple explanations of setting upper thread / bobbin winding / setting bobbin thread / needle replacement / embroidery unit attachment / embroidery frame attachment / embroidery foot attachment / presser foot replacement. 13 For details, refer to enter alphabet character embroidery or embroidery patterns you have edited or adjusted, etc. e Memory key Press to "LCD (Liquid ...

Users Manual - English
Page 20
...finger or a touch pen, the following utility stitch selection screen is displayed. 1 l k 2 0 9 3 8 4 7 5 6 a Selected stitch b Presser foot to be used c Stitches d Stitch settings and twin needle sewing e Stitch width f Stitch length g Number of the selected stitch h Number of the sewing machine. ... reverse/reinforcement l Single/twin needle sewing and needle stop position Memo z A different screen is displayed when the embroidery unit is attached. GETTING READY LCD (Liquid Crystal Display) Operation Selected stitch, pattern settings and messages are explained in "Selecting an...
...finger or a touch pen, the following utility stitch selection screen is displayed. 1 l k 2 0 9 3 8 4 7 5 6 a Selected stitch b Presser foot to be used c Stitches d Stitch settings and twin needle sewing e Stitch width f Stitch length g Number of the selected stitch h Number of the sewing machine. ... reverse/reinforcement l Single/twin needle sewing and needle stop position Memo z A different screen is displayed when the embroidery unit is attached. GETTING READY LCD (Liquid Crystal Display) Operation Selected stitch, pattern settings and messages are explained in "Selecting an...

Users Manual - English
Page 23
...(Back h g fe a Upper threading b Bobbin winding c Bobbin installation d Needle replacement e Presser foot replacement f Embroidery foot attachment g Embroidery frame attachment h Embroidery unit attachment X The first screen describing the procedure for the following items. Displays simple explanations of setting...the display panel. bobbin winding / setting bobbin thread / needle replacement / embroidery unit attachment / Example: Upper threading embroidery frame attachment / embroidery foot attachment / presser foot replacement on each topic, refer to the d next page. Press (Sewing...
...(Back h g fe a Upper threading b Bobbin winding c Bobbin installation d Needle replacement e Presser foot replacement f Embroidery foot attachment g Embroidery frame attachment h Embroidery unit attachment X The first screen describing the procedure for the following items. Displays simple explanations of setting...the display panel. bobbin winding / setting bobbin thread / needle replacement / embroidery unit attachment / Example: Upper threading embroidery frame attachment / embroidery foot attachment / presser foot replacement on each topic, refer to the d next page. Press (Sewing...
Users Manual - English
Page 45
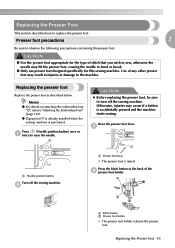
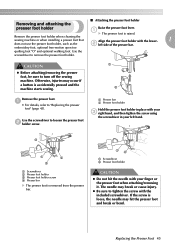
... sewing. Memo z For details on attaching the embroidery foot "Q", refer to replace the presser foot. Raise the presser foot lever. a b a Black button b Presser foot holder X The presser foot holder releases the presser foot. Replacing the Presser Foot This section describes how to "Attaching the Embroidery Foot" (page 120). Replacing the presser foot Replace the presser foot as described below. a CAUTION z Before replacing...
... sewing. Memo z For details on attaching the embroidery foot "Q", refer to replace the presser foot. Raise the presser foot lever. a b a Black button b Presser foot holder X The presser foot holder releases the presser foot. Replacing the Presser Foot This section describes how to "Attaching the Embroidery Foot" (page 120). Replacing the presser foot Replace the presser foot as described below. a CAUTION z Before replacing...
Users Manual - English
Page 47
... or cause injury. Use the screwdriver to turn off the sewing machine. embroidery foot, optional free-motion open toe quilting foot "O" and optional walking foot. c a d b a Screwdriver b Presser foot holder c Presser foot holder screw d Presser bar X The presser foot is loose, the needle may hit the presser foot and break or bend. z Be sure to tighten the screw with...
... or cause injury. Use the screwdriver to turn off the sewing machine. embroidery foot, optional free-motion open toe quilting foot "O" and optional walking foot. c a d b a Screwdriver b Presser foot holder c Presser foot holder screw d Presser bar X The presser foot is loose, the needle may hit the presser foot and break or bend. z Be sure to tighten the screw with...

Users Manual - English
Page 119
Embroidering Neatly 118 Attaching the Embroidery Foot 120 Attaching the Embroidery Unit 123 Preparing the Fabric 126 Attaching the Embroidery Frame 130 Selecting Embroidery Patterns 132 Embroidering...139 Editing and Saving Patterns 143 4 EMBROIDERY The steps for embroidering are described in this chapter.
Embroidering Neatly 118 Attaching the Embroidery Foot 120 Attaching the Embroidery Unit 123 Preparing the Fabric 126 Attaching the Embroidery Frame 130 Selecting Embroidery Patterns 132 Embroidering...139 Editing and Saving Patterns 143 4 EMBROIDERY The steps for embroidering are described in this chapter.

Users Manual - English
Page 120
... space between the presser foot and the fabric, the fabric can be absolutely sure not to sew incorrectly. Memo z For good quality embroidery designs be impaired, this could cause the pattern to use a 90/14 home sewing machine needle. CAUTION ● Do not embroider ...thread may not easily pierce the fabric, causing the needle to break. ■ Stabilizer material (option) Attach a stabilizer material for embroidery to the fabric to use embroidery thread designed for fabrics where stitches are optional. If you want to raise the needle. For details, refer to "Attaching a stabilizer ...
... space between the presser foot and the fabric, the fabric can be absolutely sure not to sew incorrectly. Memo z For good quality embroidery designs be impaired, this could cause the pattern to use a 90/14 home sewing machine needle. CAUTION ● Do not embroider ...thread may not easily pierce the fabric, causing the needle to break. ■ Stabilizer material (option) Attach a stabilizer material for embroidery to the fabric to use embroidery thread designed for fabrics where stitches are optional. If you want to raise the needle. For details, refer to "Attaching a stabilizer ...

Users Manual - English
Page 121
... attaching the embroidery foot, refer to "Attaching the embroidery foot" (page 120). ↓ 2 Checking the needle Use a needle matched to the embroidery unit. For details on setting up embroidery thread according to the fabric, and hoop it in an embroidery frame. Embroidery step by step The basic steps for embroidery are as follows. 1 Presser foot attachment Attach the embroidery foot "Q". For details...
... attaching the embroidery foot, refer to "Attaching the embroidery foot" (page 120). ↓ 2 Checking the needle Use a needle matched to the embroidery unit. For details on setting up embroidery thread according to the fabric, and hoop it in an embroidery frame. Embroidery step by step The basic steps for embroidery are as follows. 1 Presser foot attachment Attach the embroidery foot "Q". For details...

Users Manual - English
Page 122
... the embroidery foot Attach the embroidery foot "Q" when embroidering. Raise the presser foot lever. Check the handwheel mark is at the top position. Turn off the sewing machine. a CAUTION z Before attaching the embroidery foot, be sure to attach the embroidery foot "Q". a a Needle position button Note z The needle is raised. Have the included embroidery foot "Q" and a screwdriver ready. EMBROIDERY Attaching the Embroidery Foot This section...
... the embroidery foot Attach the embroidery foot "Q" when embroidering. Raise the presser foot lever. Check the handwheel mark is at the top position. Turn off the sewing machine. a CAUTION z Before attaching the embroidery foot, be sure to attach the embroidery foot "Q". a a Needle position button Note z The needle is raised. Have the included embroidery foot "Q" and a screwdriver ready. EMBROIDERY Attaching the Embroidery Foot This section...

Users Manual - English
Page 123
... the lever at the back of the foot. 4 a a Lever While pressing in the lever with your finger or the embroidery foot "Q" when attaching it. a Presser bar b Needle clamp screw c Embroidery foot bar Attaching the Embroidery Foot 121 Set the embroidery foot perpendicular. The needle may break or cause... slowly to tighten the screw with your finger, fit g the embroidery foot bar over the needle clamp screw to attach the embroidery foot to the presser foot bar. Hold the embroidery foot "Q" with the presser h foot holder screw. If the screw is loose, the needle may break ...
... the lever at the back of the foot. 4 a a Lever While pressing in the lever with your finger or the embroidery foot "Q" when attaching it. a Presser bar b Needle clamp screw c Embroidery foot bar Attaching the Embroidery Foot 121 Set the embroidery foot perpendicular. The needle may break or cause... slowly to tighten the screw with your finger, fit g the embroidery foot bar over the needle clamp screw to attach the embroidery foot to the presser foot bar. Hold the embroidery foot "Q" with the presser h foot holder screw. If the screw is loose, the needle may break ...

Users Manual - English
Page 124
... the machine starts sewing. Raise the presser foot lever. a While pressing in the lever at the back of the d embroidery foot with your finger, loosen the presser foot holder screw, and then remove embroidery foot "Q". CAUTION z Before removing the embroidery foot, be sure to turn off the sewing machine. EMBROIDERY Removing the embroidery foot Press (Needle position button) once or a twice...
... the machine starts sewing. Raise the presser foot lever. a While pressing in the lever at the back of the d embroidery foot with your finger, loosen the presser foot holder screw, and then remove embroidery foot "Q". CAUTION z Before removing the embroidery foot, be sure to turn off the sewing machine. EMBROIDERY Removing the embroidery foot Press (Needle position button) once or a twice...

Users Manual - English
Page 129
... of the outer frame. a Right side Memo z There are patterns for letters and other small embroidery. This is used for which embroidery frame (small) cannot be hit by the presser foot and cause injury or needle breakage. Tighten the adjustment screw by removing inner frame upward. CAUTION ●...; Use the embroidery frame that matches the size of the c fabric. Line up to 10 cm (4 inches) can be sewn. 1 4 This...
... of the outer frame. a Right side Memo z There are patterns for letters and other small embroidery. This is used for which embroidery frame (small) cannot be hit by the presser foot and cause injury or needle breakage. Tighten the adjustment screw by removing inner frame upward. CAUTION ●...; Use the embroidery frame that matches the size of the c fabric. Line up to 10 cm (4 inches) can be sewn. 1 4 This...

Users Manual - English
Page 141
For details, refer to "LCD Pass the thread through the embroidery foot c hole, and hold it lightly in the setting screen. Prepare embroidery thread of the color shown a on the screen. Give the thread a little slack. The pattern may break or bend. ● Do not let hands or ...
For details, refer to "LCD Pass the thread through the embroidery foot c hole, and hold it lightly in the setting screen. Prepare embroidery thread of the color shown a on the screen. Give the thread a little slack. The pattern may break or bend. ● Do not let hands or ...

Users Manual - English
Page 162
...You changed the stitch pattern settings, and then tried to save them by pressing the manual memory key. You tried to initialize the embroidery unit with the embroidery foot lowered. 160 A stitch other than the buttonhole, bar tack or darning stitch was 9 selected and the start/stop button was pressed ..., reverse/reinforcement stitch button or thread cutter button was pressed while the presser foot was raised. 12 The memory is full and the pattern cannot be saved. 13 You pressed the back key or the embroidery key when a pattern was selected or the utility stitch key when a stitch...
...You changed the stitch pattern settings, and then tried to save them by pressing the manual memory key. You tried to initialize the embroidery unit with the embroidery foot lowered. 160 A stitch other than the buttonhole, bar tack or darning stitch was 9 selected and the start/stop button was pressed ..., reverse/reinforcement stitch button or thread cutter button was pressed while the presser foot was raised. 12 The memory is full and the pattern cannot be saved. 13 You pressed the back key or the embroidery key when a pattern was selected or the utility stitch key when a stitch...
Users Manual - English
Page 167
... steps 119 attaching stabilizer material 126 embroidery bobbin thread 9 attributes 19 embroidery card 138 automatic reverse/reinforcement stitches 61 embroidery card slot 11, 138 automatic thread cutting 62 embroidery character selection 136 embroidery foot installation 120 B embroidery foot removal 122 embroidery frame 127 back key 13 embroidery frame installation 130 bar tack stitch 103 embroidery frame removal 131 basic sewing 48...
... steps 119 attaching stabilizer material 126 embroidery bobbin thread 9 attributes 19 embroidery card 138 automatic reverse/reinforcement stitches 61 embroidery card slot 11, 138 automatic thread cutting 62 embroidery character selection 136 embroidery foot installation 120 B embroidery foot removal 122 embroidery frame 127 back key 13 embroidery frame installation 130 bar tack stitch 103 embroidery frame removal 131 basic sewing 48...


