
Users Manual - English
Page 7
... ...70 Overcasting Stitches...74 Sewing overcasting stitches using overcasting foot "G 74 Sewing overcasting stitches using zigzag foot "J 75 Sewing overcasting stitches using the optional side cutter 76 Basic Stitching ...78 Basting ...78 Basic stitching ...78 Blind Hem Stitching ...80 Buttonhole Stitching ...83 Buttonhole sewing ...84 Button sewing ...88 Zipper Insertion ...90...
... ...70 Overcasting Stitches...74 Sewing overcasting stitches using overcasting foot "G 74 Sewing overcasting stitches using zigzag foot "J 75 Sewing overcasting stitches using the optional side cutter 76 Basic Stitching ...78 Basting ...78 Basic stitching ...78 Blind Hem Stitching ...80 Buttonhole Stitching ...83 Buttonhole sewing ...84 Button sewing ...88 Zipper Insertion ...90...
Users Manual - English
Page 12
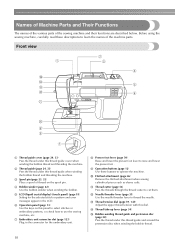
... slot (page 123) Plug in the connector for the selected stitch or pattern and error messages appear in the LCD. k Thread cutter (page 56) Pass the threads through the thread cutter to use the sewing machine, etc. f Operation panel (page 13) Use the keys on the spool pin. Names of Machine Parts...
... slot (page 123) Plug in the connector for the selected stitch or pattern and error messages appear in the LCD. k Thread cutter (page 56) Pass the threads through the thread cutter to use the sewing machine, etc. f Operation panel (page 13) Use the keys on the spool pin. Names of Machine Parts...
Users Manual - English
Page 14
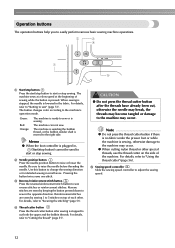
...bobbin winder shaft is sewing, otherwise damage to the right side. b Needle position button Press the needle position button to "Using the thread cutter" (page 56). Pressing the button twice sews one stitch. For details, refer to raise or lower the needle. Operation buttons The operation ...the threads may become tangled or damage to the machine may occur. z When cutting nylon thread or other special threads, use the thread cutter on top of each other. a Start/stop button Press the start/stop button to start or stop sewing. The button changes color according...
...bobbin winder shaft is sewing, otherwise damage to the right side. b Needle position button Press the needle position button to "Using the thread cutter" (page 56). Pressing the button twice sews one stitch. For details, refer to raise or lower the needle. Operation buttons The operation ...the threads may become tangled or damage to the machine may occur. z When cutting nylon thread or other special threads, use the thread cutter on top of each other. a Start/stop button Press the start/stop button to start or stop sewing. The button changes color according...
Users Manual - English
Page 27
.... X The bobbin winding will stop button) once. Otherwise, the sewing machine may wind around j the bobbin five or six times. l While using the cutter built into the slit in the bobbin winder seat, the thread may bend or break when the bobbin thread starts to run out. a a Guide slit... in bobbin winder seat (with built-in cutter) CAUTION ● Be sure to cut it clockwise. When the foot controller is correctly set before starting the bobbin winding. a CAUTION ● Be ...
.... X The bobbin winding will stop button) once. Otherwise, the sewing machine may wind around j the bobbin five or six times. l While using the cutter built into the slit in the bobbin winder seat, the thread may bend or break when the bobbin thread starts to run out. a a Guide slit... in bobbin winder seat (with built-in cutter) CAUTION ● Be sure to cut it clockwise. When the foot controller is correctly set before starting the bobbin winding. a CAUTION ● Be ...
Users Manual - English
Page 30
... position button) once or a twice to insert the bobbin correctly. c a b • Be sure to raise the needle, and then raise the presser foot lever. a a Cutter X The cutter cuts the thread. 28 CAUTION ● Be sure to insert the bobbin and depress it to the right. a Bobbin cover b Latch X The bobbin cover opens...
... position button) once or a twice to insert the bobbin correctly. c a b • Be sure to raise the needle, and then raise the presser foot lever. a a Cutter X The cutter cuts the thread. 28 CAUTION ● Be sure to insert the bobbin and depress it to the right. a Bobbin cover b Latch X The bobbin cover opens...

Users Manual - English
Page 31
... button X The bobbin thread is finished. case, it may be pulled up the bobbin thread. c a a Tension-adjusting spring Reattach the bobbin cover. Continue with the cutter. Memo z When making gathers or before free-motion quilting, pull up the bobbin thread by following the procedure in "Upper Threading" (page 31).
... button X The bobbin thread is finished. case, it may be pulled up the bobbin thread. c a a Tension-adjusting spring Reattach the bobbin cover. Continue with the cutter. Memo z When making gathers or before free-motion quilting, pull up the bobbin thread by following the procedure in "Upper Threading" (page 31).

Users Manual - English
Page 36
... side n of the machine. Pass the thread behind the needle bar thread guide by holding the thread in your right hand, as shown below. a a Thread cutter a Needle bar thread guide Lower the presser foot lever to raise the needle before passing the thread into the j thread take -up lever as shown...marked "7" all the way (2). a b a a Notch of the thread guide b Thread guide disc Cut the thread with your left hand, then feeding the thread with the cutter on the left , then pass the thread through the notch of the thread guide (1), and then firmly pull the thread from the front and insert...
... side n of the machine. Pass the thread behind the needle bar thread guide by holding the thread in your right hand, as shown below. a a Thread cutter a Needle bar thread guide Lower the presser foot lever to raise the needle before passing the thread into the j thread take -up lever as shown...marked "7" all the way (2). a b a a Notch of the thread guide b Thread guide disc Cut the thread with your left hand, then feeding the thread with the cutter on the left , then pass the thread through the notch of the thread guide (1), and then firmly pull the thread from the front and insert...
Users Manual - English
Page 46
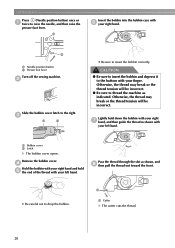
... correct presser foot, and then select the desired stitch again. Buttonhole foot "A" Overcasting foot "G" Zigzag foot "J" Button fitting foot "M" Monogramming foot "N" Blind stitch foot "R" Side cutter "S" (option) z For details on the presser foot that should be used with the notch in the holder. Check that the correct presser foot is attached...
... correct presser foot, and then select the desired stitch again. Buttonhole foot "A" Overcasting foot "G" Zigzag foot "J" Button fitting foot "M" Monogramming foot "N" Blind stitch foot "R" Side cutter "S" (option) z For details on the presser foot that should be used with the notch in the holder. Check that the correct presser foot is attached...
Users Manual - English
Page 57
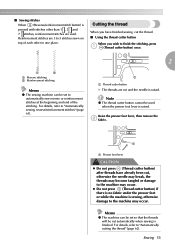
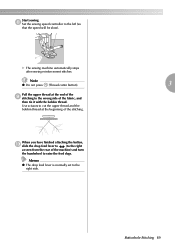
...the presser foot lever, then remove the b fabric. Memo z The machine can be cut and the needle is raised. z Do not press (Thread cutter button) if there is no fabric under the presser foot or while the machine is sewing, otherwise damage to 5 stitches sewn on top of the... thread When you have already been cut, otherwise the needle may break, the threads may become tangled or damage to finish the stitching, press a (Thread cutter button) once. 2 a b a Reverse stitching b Reinforcement stitching Memo z The sewing machine can be set so that the threads will be set to ...
...the presser foot lever, then remove the b fabric. Memo z The machine can be cut and the needle is raised. z Do not press (Thread cutter button) if there is no fabric under the presser foot or while the machine is sewing, otherwise damage to 5 stitches sewn on top of the... thread When you have already been cut, otherwise the needle may break, the threads may become tangled or damage to finish the stitching, press a (Thread cutter button) once. 2 a b a Reverse stitching b Reinforcement stitching Memo z The sewing machine can be set so that the threads will be set to ...

Users Manual - English
Page 58
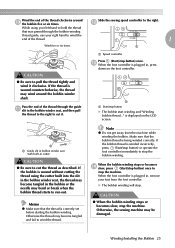
b a a Presser foot lever Pull the fabric to the left side of the machine to cut them. a a Thread cutter 56 a a Needle position button Raise the presser foot lever. SEWING BASICS Using the thread cutter When sewing with nylon or metallic threads, or other special threads, use the thread cutter on the side of the machine, c and then pass the threads through the thread cutter to cut the threads. When you wish to finish the stitching and the a sewing machine is stopped, press (Needle position button) once to raise the needle.
b a a Presser foot lever Pull the fabric to the left side of the machine to cut them. a a Thread cutter 56 a a Needle position button Raise the presser foot lever. SEWING BASICS Using the thread cutter When sewing with nylon or metallic threads, or other special threads, use the thread cutter on the side of the machine, c and then pass the threads through the thread cutter to cut the threads. When you wish to finish the stitching and the a sewing machine is stopped, press (Needle position button) once to raise the needle.
Users Manual - English
Page 75
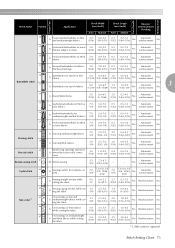
...Sewing straight stitches while cutting the fabric 0.0 (0) 0.0-2.5 (0-3/32) 2.5 (3/32) 0.2-5.0 (1/64-3/16) No Reinforcement No 64 65 Side cutter*1 66 67 S Sewing zigzag stitches while cutting the fabric 3.5 (1/8) 3.5-5.0 1.4 (1/8-3/16) (1/16) 0.0-4.0 (0-3/16) No Reinforcement No ...and thick fabrics while cutting the fabric 5.0 3.5-5.0 (3/16) (1/8-3/16) 2.5 (3/32) 1.0-4.0 (1/16-3/16) No Reinforcement No *1: Side cutter is optional. No Automatic reinforcement No N Sewing eyelets, for thick or furry fabrics 7.0 (1/4) 3.0-7.0 (1/8-1/4) 0.5 (1/32) 0.3-1.0 (1/64-1/...
...Sewing straight stitches while cutting the fabric 0.0 (0) 0.0-2.5 (0-3/32) 2.5 (3/32) 0.2-5.0 (1/64-3/16) No Reinforcement No 64 65 Side cutter*1 66 67 S Sewing zigzag stitches while cutting the fabric 3.5 (1/8) 3.5-5.0 1.4 (1/8-3/16) (1/16) 0.0-4.0 (0-3/16) No Reinforcement No ...and thick fabrics while cutting the fabric 5.0 3.5-5.0 (3/16) (1/8-3/16) 2.5 (3/32) 1.0-4.0 (1/16-3/16) No Reinforcement No *1: Side cutter is optional. No Automatic reinforcement No N Sewing eyelets, for thick or furry fabrics 7.0 (1/4) 3.0-7.0 (1/8-1/4) 0.5 (1/32) 0.3-1.0 (1/64-1/...
Users Manual - English
Page 78
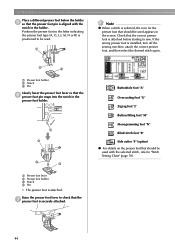
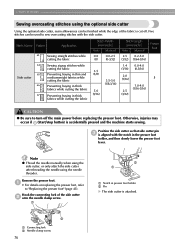
... screw. Remove the presser foot. Hook the connecting fork of the fabric is aligned with the side cutter. Stitch Name Pattern Application 63 64 65 Side cutter 66 67 Sewing straight stitches while cutting the fabric Sewing zigzag stitches while cutting the fabric Preventing fraying ... injuries may occur if (Start/stop button) is attached. UTILITY STITCHES Sewing overcasting stitches using the needle threader. Position the side cutter so that side cutter pin c is cut off the main power before replacing the pressor foot. a b a a Notch in presser foot holder b Pin X ...
... screw. Remove the presser foot. Hook the connecting fork of the fabric is aligned with the side cutter. Stitch Name Pattern Application 63 64 65 Side cutter 66 67 Sewing straight stitches while cutting the fabric Sewing zigzag stitches while cutting the fabric Preventing fraying ... injuries may occur if (Start/stop button) is attached. UTILITY STITCHES Sewing overcasting stitches using the needle threader. Position the side cutter so that side cutter pin c is cut off the main power before replacing the pressor foot. a b a a Notch in presser foot holder b Pin X ...

Users Manual - English
Page 79
...cm (3/4 inch) X A seam allowance is cut while the stitching is securely attached. f • For details, refer to check that the d side cutter is sewn. z If the side cutter can cut . 3 Lower the presser foot lever, and then start i sewing. Overcasting Stitches 77 a a Guide plate Memo z If the fabric is sewn... in the side cutter. z After using the side cutter, clean it out toward the rear of the side cutter. Make a cut of about 5 mm (3/16 inch). 1 a 5 mm (3/16 inch) z The side cutter can no longer cut in g the fabric at the beginning ...
...cm (3/4 inch) X A seam allowance is cut while the stitching is securely attached. f • For details, refer to check that the d side cutter is sewn. z If the side cutter can cut . 3 Lower the presser foot lever, and then start i sewing. Overcasting Stitches 77 a a Guide plate Memo z If the fabric is sewn... in the side cutter. z After using the side cutter, clean it out toward the rear of the side cutter. Make a cut of about 5 mm (3/16 inch). 1 a 5 mm (3/16 inch) z The side cutter can no longer cut in g the fabric at the beginning ...
Users Manual - English
Page 91
..., slide the drop feed lever to (to raise the feed dogs. X The sewing machine automatically stops after sewing reinforcement stitches. Note z Do not press (Thread cutter button). 3 Pull the upper thread at the beginning of the machine).
..., slide the drop feed lever to (to raise the feed dogs. X The sewing machine automatically stops after sewing reinforcement stitches. Note z Do not press (Thread cutter button). 3 Pull the upper thread at the beginning of the machine).

Users Manual - English
Page 162
... selected and the start/ stop button was pressed while the buttonhole lever is raised. 11 The start/stop button, reverse/reinforcement stitch button or thread cutter button was pressed while the presser foot was raised. 12 The memory is full and the pattern cannot be saved. 13 You pressed the back...
... selected and the start/ stop button was pressed while the buttonhole lever is raised. 11 The start/stop button, reverse/reinforcement stitch button or thread cutter button was pressed while the presser foot was raised. 12 The memory is full and the pattern cannot be saved. 13 You pressed the back...
Users Manual - English
Page 163
... 154). 25 You tried to use a function that will not fit within the frame. The reverse/reinforcement stitch button, needle position button or 18 thread cutter button was pressed while the bobbin winder shaft is moved to set a number of characters that cannot be used when the embroidery unit is attached...
... 154). 25 You tried to use a function that will not fit within the frame. The reverse/reinforcement stitch button, needle position button or 18 thread cutter button was pressed while the bobbin winder shaft is moved to set a number of characters that cannot be used when the embroidery unit is attached...
Users Manual - English
Page 168
... 39 settings key 13 sewing basics 48 sewing direction change 65 sewing machine help key 13 sewing speed controller 12 shell tuck stitch 113 side cutter 76 smocking 112
... 39 settings key 13 sewing basics 48 sewing direction change 65 sewing machine help key 13 sewing speed controller 12 shell tuck stitch 113 side cutter 76 smocking 112
Users Manual - English
Page 169
... stopping embroidering 148 straight stitch 70, 78, 90 stretch fabrics 95 stretch stitch 95 zipper sewing 90 T thick fabrics 65 thin fabrics 66 thread cutter 10 thread cutter button 12, 55 thread cutting 55 thread cutting, automatic 62 thread guide 10, 24, 33 thread guide cover 10, 24, 33 thread guide disk...
... stopping embroidering 148 straight stitch 70, 78, 90 stretch fabrics 95 stretch stitch 95 zipper sewing 90 T thick fabrics 65 thin fabrics 66 thread cutter 10 thread cutter button 12, 55 thread cutting 55 thread cutting, automatic 62 thread guide 10, 24, 33 thread guide cover 10, 24, 33 thread guide disk...


