
Users Manual - English
Page 3
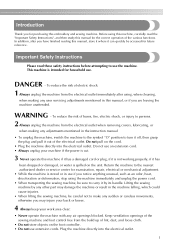
... and unplug the power cord. • When transporting the sewing machine, be careful not to carry it has been dropped or damaged, or water is intended for the correct operation of the electrical outlet. Important Safety Instructions Please read the "Important Safety Instructions", and then study this manual for household use. To reduce the...
... and unplug the power cord. • When transporting the sewing machine, be careful not to carry it has been dropped or damaged, or water is intended for the correct operation of the electrical outlet. Important Safety Instructions Please read the "Important Safety Instructions", and then study this manual for household use. To reduce the...
Users Manual - English
Page 4
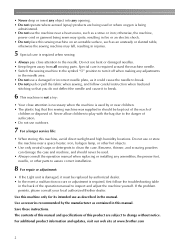
...sewn may ignite, resulting in the back of . If the problem persists, please consult your local authorized Brother dealer. Use this machine only for its intended use or store the machine near children. • The plastic bag that this manual. Use accessories recommended by authorized dealer. •... or adjustment: • If the Light unit is damaged, it must be replaced by the manufacturer as contained in this sewing machine was supplied in should never be kept out of the reach of children or disposed of the operation manual to the needle. Save these instructions.
...sewn may ignite, resulting in the back of . If the problem persists, please consult your local authorized Brother dealer. Use this machine only for its intended use or store the machine near children. • The plastic bag that this manual. Use accessories recommended by authorized dealer. •... or adjustment: • If the Light unit is damaged, it must be replaced by the manufacturer as contained in this sewing machine was supplied in should never be kept out of the reach of children or disposed of the operation manual to the needle. Save these instructions.

Users Manual - English
Page 6
...Instructions 1 Machine Features ...7 Accessories ...8 Included accessories ...8 Optional accessories ...9 Names of Machine Parts and Their Functions 10 Front view...10 Needle and presser foot section ...11 Right-side/rear view ...11 Operation buttons ...12 Operation panel ...13 GETTING READY 15 Turning the Machine... and attaching the presser foot holder 45 Sewing Cylindrical Pieces 46 Free-arm sewing ...46 SEWING BASICS 47 Sewing...48 General sewing procedure ...48 Selecting stitching ...49 Positioning the fabric ...50 Starting to sew...51 Securing the stitching ...53 Cutting the...
...Instructions 1 Machine Features ...7 Accessories ...8 Included accessories ...8 Optional accessories ...9 Names of Machine Parts and Their Functions 10 Front view...10 Needle and presser foot section ...11 Right-side/rear view ...11 Operation buttons ...12 Operation panel ...13 GETTING READY 15 Turning the Machine... and attaching the presser foot holder 45 Sewing Cylindrical Pieces 46 Free-arm sewing ...46 SEWING BASICS 47 Sewing...48 General sewing procedure ...48 Selecting stitching ...49 Positioning the fabric ...50 Starting to sew...51 Securing the stitching ...53 Cutting the...
Users Manual - English
Page 33
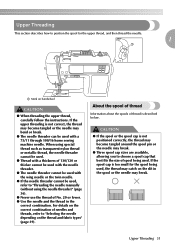
... (without using special thread such as transparent nylon thread or metallic thread, the needle threader cannot be used with a 75/11 through 100/16 home sewing machine needle. About the spool of thread Information about the spools of needles and threads, refer to "Selecting the needle depending on the thread and fabric... used. ● Thread with a thickness of spool being used, the thread may catch on handwheel CAUTION ● When threading the upper thread, carefully follow the instructions.
... (without using special thread such as transparent nylon thread or metallic thread, the needle threader cannot be used with a 75/11 through 100/16 home sewing machine needle. About the spool of thread Information about the spools of needles and threads, refer to "Selecting the needle depending on the thread and fabric... used. ● Thread with a thickness of spool being used, the thread may catch on handwheel CAUTION ● When threading the upper thread, carefully follow the instructions.
Users Manual - English
Page 34
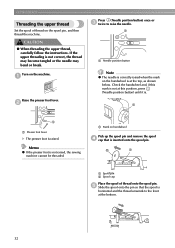
Turn on the spool pin, and then thread the machine. b a a Spool pin b Spool cap Place the spool of thread on the machine. a a Needle position button Note z The needle is correctly raised when the mark on handwheel Pick up the spool pin and remove the ...the top, as shown below. b a a a Presser foot lever X The presser foot is not raised, the sewing machine cannot be threaded. a CAUTION ● When threading the upper thread, carefully follow the instructions. Memo z If the presser foot is raised. GETTING READY Threading the upper thread Set the spool of thread onto...
Turn on the spool pin, and then thread the machine. b a a Spool pin b Spool cap Place the spool of thread on the machine. a a Needle position button Note z The needle is correctly raised when the mark on handwheel Pick up the spool pin and remove the ...the top, as shown below. b a a a Presser foot lever X The presser foot is not raised, the sewing machine cannot be threaded. a CAUTION ● When threading the upper thread, carefully follow the instructions. Memo z If the presser foot is raised. GETTING READY Threading the upper thread Set the spool of thread onto...
Users Manual - English
Page 43
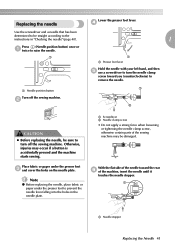
...sewing machine. With the flat side of the sewing machine may occur if a button is accidentally pressed and the machine starts sewing. a Screwdriver b Needle clamp screw • Do not apply a strong force when loosening or tightening the needle clamp screw, otherwise certain parts of the needle toward you (counterclockwise) to the instructions... in the needle plate. Place fabric or paper under the presser foot to raise the needle. a Needle position button Turn off the sewing machine.
...sewing machine. With the flat side of the sewing machine may occur if a button is accidentally pressed and the machine starts sewing. a Screwdriver b Needle clamp screw • Do not apply a strong force when loosening or tightening the needle clamp screw, otherwise certain parts of the needle toward you (counterclockwise) to the instructions... in the needle plate. Place fabric or paper under the presser foot to raise the needle. a Needle position button Turn off the sewing machine.

Users Manual - English
Page 104
... f then move the fabric at the beginning and end of sewing. Slide the drop feed lever, located at the rear of d the machine on the sewing machine, and then select a e stitch 3 or 24 . • For details, refer to use the following instructions with the screwdriver. a Pin b Needle clamp screw c Presser... quilting foot and the presser bar. 1 3 2 a a Drop feed lever (as seen from the rear of the machine) X The feed dogs are sewn at a consistent pace in order to sew uniform stitches roughly 2.02.5mm (approx. 1/16 - 3/32 inch) in length. a Presser foot holder screw CAUTION &#...
... f then move the fabric at the beginning and end of sewing. Slide the drop feed lever, located at the rear of d the machine on the sewing machine, and then select a e stitch 3 or 24 . • For details, refer to use the following instructions with the screwdriver. a Pin b Needle clamp screw c Presser... quilting foot and the presser bar. 1 3 2 a a Drop feed lever (as seen from the rear of the machine) X The feed dogs are sewn at a consistent pace in order to sew uniform stitches roughly 2.02.5mm (approx. 1/16 - 3/32 inch) in length. a Presser foot holder screw CAUTION &#...

Users Manual - English
Page 127
...malfunctions. ● Always turn off the sewing machine. Remove the embroidery frame. a X The embroidery carriage moves into a position where it can be saved. It may cause malfunctions if removed when the machine is completely stopped and follow the instructions below. b Hold the release button on... the bottom left . c a Release button X The embroidery unit separates from the sewing machine. 4 CAUTION CAUTION ● Do not carry ...
...malfunctions. ● Always turn off the sewing machine. Remove the embroidery frame. a X The embroidery carriage moves into a position where it can be saved. It may cause malfunctions if removed when the machine is completely stopped and follow the instructions below. b Hold the release button on... the bottom left . c a Release button X The embroidery unit separates from the sewing machine. 4 CAUTION CAUTION ● Do not carry ...

Users Manual - English
Page 133
.... e CAUTION ● Do not touch a button. a a a Presser foot lever Press (Needle position button) once or b twice to remove. Make sure that the sewing machine is accidentally pressed, the machine starts sewing, and your finger may be pricked with the needle or the needle may break. 4 a Needle position button Press the part of the embroidery... embroidery frame. Attaching the Embroidery Frame 131 X The embroidery frame will separate from the embroidery frame holder. If a button is completely stopped and follow the instructions below.
.... e CAUTION ● Do not touch a button. a a a Presser foot lever Press (Needle position button) once or b twice to remove. Make sure that the sewing machine is accidentally pressed, the machine starts sewing, and your finger may be pricked with the needle or the needle may break. 4 a Needle position button Press the part of the embroidery... embroidery frame. Attaching the Embroidery Frame 131 X The embroidery frame will separate from the embroidery frame holder. If a button is completely stopped and follow the instructions below.

Users Manual - English
Page 134
...Saving patterns" (page 150). 132 For details, refer to "Selecting a frame pattern" (page 137). For details, refer to the instructions displayed on the various types of copyright law and is strictly prohibited. bc a d e a Embroidery patterns There are intended for private ... the procedure for selecting a pattern. Copyright information The patterns saved in the machine's memory Press when retrieving patterns from the machine's memory. e Patterns saved in the sewing machine and embroidery cards are total 70 patterns. EMBROIDERY Selecting Embroidery Patterns This section ...
...Saving patterns" (page 150). 132 For details, refer to "Selecting a frame pattern" (page 137). For details, refer to the instructions displayed on the various types of copyright law and is strictly prohibited. bc a d e a Embroidery patterns There are intended for private ... the procedure for selecting a pattern. Copyright information The patterns saved in the machine's memory Press when retrieving patterns from the machine's memory. e Patterns saved in the sewing machine and embroidery cards are total 70 patterns. EMBROIDERY Selecting Embroidery Patterns This section ...

Users Manual - English
Page 144
Follow the instructions on the screen, and j change thread colors as you sew. 142 X The position for the appliqué is stitched, and the sewing machine stops. Memo z When "APPLIQUE MATERIAL", "APPLIQUE POSITION" and "APPLIQUE" are displayed, a specific color thread does not appear. Use a proper color thread to the back of fabric glue or spray h adhesive to match the appliqué piece. Lower the presser foot lever, and press i (Start/stop button). EMBROIDERY Apply a thin layer of the appliqué piece, and attach it in the appliqué position.
Follow the instructions on the screen, and j change thread colors as you sew. 142 X The position for the appliqué is stitched, and the sewing machine stops. Memo z When "APPLIQUE MATERIAL", "APPLIQUE POSITION" and "APPLIQUE" are displayed, a specific color thread does not appear. Use a proper color thread to the back of fabric glue or spray h adhesive to match the appliqué piece. Lower the presser foot lever, and press i (Start/stop button). EMBROIDERY Apply a thin layer of the appliqué piece, and attach it in the appliqué position.
Users Manual - English
Page 168
...109 L layout adjustment 143 LCD 18, 133 LCD button 134 LCD messages 159 LCD operation 18 M machine surface cleaning 152 main power switch 11 maintenance 152 manual needle threading 36 memory key 13 mirroring stitches...instructions 1 saving patterns 150 scallop stitch 109 scallop stitching 111 screwdriver 9 seam allowance, even 67 seam ripper 9 securing stitching 53 selecting alphabet characters 136 selecting embroidery patterns 132 selecting stitches 49 selecting the needle 39 settings key 13 sewing basics 48 sewing direction change 65 sewing machine help key 13 sewing...
...109 L layout adjustment 143 LCD 18, 133 LCD button 134 LCD messages 159 LCD operation 18 M machine surface cleaning 152 main power switch 11 maintenance 152 manual needle threading 36 memory key 13 mirroring stitches...instructions 1 saving patterns 150 scallop stitch 109 scallop stitching 111 screwdriver 9 seam allowance, even 67 seam ripper 9 securing stitching 53 selecting alphabet characters 136 selecting embroidery patterns 132 selecting stitches 49 selecting the needle 39 settings key 13 sewing basics 48 sewing direction change 65 sewing machine help key 13 sewing...

Instruction Manual/USB Connection - English and Spanish
Page 2
...Model Number: Brother Sewing Machine HE-240 /SE-400/LB-6800 This device complies with the limits for help. • The included interface cable should be determined by Brother Industries, Ltd. This equipment has been tested and found to comply with the instructions, may ...interference in a residential installation. Federal Communications Commission (FCC) Declaration of Conformity (For USA Only) Responsible Party: Brother International Corporation 100 Somerset Corporate Boulevard Bridgewater, NJ 08807-0911 USA TEL : (908) 704-1700 declares that interference will not occur...
...Model Number: Brother Sewing Machine HE-240 /SE-400/LB-6800 This device complies with the limits for help. • The included interface cable should be determined by Brother Industries, Ltd. This equipment has been tested and found to comply with the instructions, may ...interference in a residential installation. Federal Communications Commission (FCC) Declaration of Conformity (For USA Only) Responsible Party: Brother International Corporation 100 Somerset Corporate Boulevard Bridgewater, NJ 08807-0911 USA TEL : (908) 704-1700 declares that interference will not occur...


