
Users Manual - English
Page 1
Computerized Embroidery and Sewing Machine Operation Manual Product Code 885-V31/V32/V33 GETTING READY SEWING BASICS UTILITY STITCHES EMBROIDERY APPENDIX Please visit us at http://solutions.brother.com where you can get product support and answers to frequently asked questions (FAQs).
Computerized Embroidery and Sewing Machine Operation Manual Product Code 885-V31/V32/V33 GETTING READY SEWING BASICS UTILITY STITCHES EMBROIDERY APPENDIX Please visit us at http://solutions.brother.com where you can get product support and answers to frequently asked questions (FAQs).
Users Manual - English
Page 3
...8226; Do not use the machine. DANGER - To reduce the risk of the sewing machine and foot control free from the electrical outlet immediately after you may damage the machine or result in the machine falling, which could cause injuries. • When lifting the sewing machine, be sure to the ... loose cloth. • Do not store objects on the unit. Lifting the sewing machine by its handle. Keep ventilation openings of burns, fire, electric shock, or injury to persons. 2 Always unplug the machine from the electrical outlet when removing covers, lubricating, or when making any sudden...
...8226; Do not use the machine. DANGER - To reduce the risk of the sewing machine and foot control free from the electrical outlet immediately after you may damage the machine or result in the machine falling, which could cause injuries. • When lifting the sewing machine, be sure to the ... loose cloth. • Do not store objects on the unit. Lifting the sewing machine by its handle. Keep ventilation openings of burns, fire, electric shock, or injury to persons. 2 Always unplug the machine from the electrical outlet when removing covers, lubricating, or when making any sudden...
Users Manual - English
Page 4
...of . Do not use or store the machine near a heat source, such as an unsteady or slanted table, otherwise the sewing machine may ignite, resulting in fire or an electric shock. • Do not place this sewing machine was supplied in injuries. 5 Special care ...Brother dealer. otherwise, the machine, power cord or garment being sewn may fall, resulting in should never be used or where oxygen is required when sewing: • Always pay close attention is necessary when the machine is required, first follow careful instruction when freehand stitching so that this sewing machine...
...of . Do not use or store the machine near a heat source, such as an unsteady or slanted table, otherwise the sewing machine may ignite, resulting in fire or an electric shock. • Do not place this sewing machine was supplied in injuries. 5 Special care ...Brother dealer. otherwise, the machine, power cord or garment being sewn may fall, resulting in should never be used or where oxygen is required when sewing: • Always pay close attention is necessary when the machine is required, first follow careful instruction when freehand stitching so that this sewing machine...

Users Manual - English
Page 5
... fuse cover omitted. • If the available electrical outlet is not intended to obtain the correct lead. FOR USERS IN AUSTRALIA AND NEW ZEALAND This sewing machine is not suitable for the plug supplied with this equipment, you should contact your authorized dealer to be used by young children, and assistance may...
... fuse cover omitted. • If the available electrical outlet is not intended to obtain the correct lead. FOR USERS IN AUSTRALIA AND NEW ZEALAND This sewing machine is not suitable for the plug supplied with this equipment, you should contact your authorized dealer to be used by young children, and assistance may...
Users Manual - English
Page 12
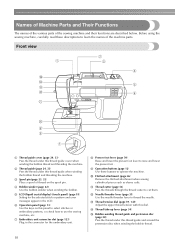
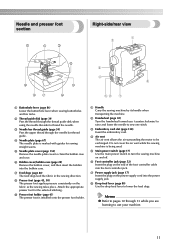
... pin. k Thread cutter (page 56) Pass the threads through the thread cutter to use the sewing machine, etc. Names of Machine Parts and Their Functions The names of the various parts of the machine parts. d Bobbin winder (page 22) Use the bobbin winder when winding the bobbin. g Embroidery...Use these descriptions to thread the needle. e LCD (liquid crystal display) (touch panel) (page 18) Setting for the embroidery unit. Before using the sewing machine, carefully read these buttons to raise and lower the presser foot . c Spool pin (page 23, 32) Place a spool of thread on this ...
... pin. k Thread cutter (page 56) Pass the threads through the thread cutter to use the sewing machine, etc. Names of Machine Parts and Their Functions The names of the various parts of the machine parts. d Bobbin winder (page 22) Use the bobbin winder when winding the bobbin. g Embroidery...Use these descriptions to thread the needle. e LCD (liquid crystal display) (touch panel) (page 18) Setting for the embroidery unit. Before using the sewing machine, carefully read these buttons to raise and lower the presser foot . c Spool pin (page 23, 32) Place a spool of thread on this ...
Users Manual - English
Page 13
...Needle plate cover (page 152) Remove the needle plate cover to be exchanged. a Handle Carry the sewing machine by its handle when transporting the machine. h Drop feed lever (page 88) Use the drop feed lever to sew one stitch. h Presser foot (page 43, 50) The presser foot applies pressure consistently on the end...vent The air vent allows the air surrounding the motor to clean the bobbin case and race. Do not cover the air vent while the sewing machine is installed onto the presser foot holder. f Bobbin cover/bobbin case (page 28) Remove the bobbin cover, and then insert the bobbin ...
...Needle plate cover (page 152) Remove the needle plate cover to be exchanged. a Handle Carry the sewing machine by its handle when transporting the machine. h Drop feed lever (page 88) Use the drop feed lever to sew one stitch. h Presser foot (page 43, 50) The presser foot applies pressure consistently on the end...vent The air vent allows the air surrounding the motor to clean the bobbin case and race. Do not cover the air vent while the sewing machine is installed onto the presser foot holder. f Bobbin cover/bobbin case (page 28) Remove the bobbin cover, and then insert the bobbin ...
Users Manual - English
Page 14
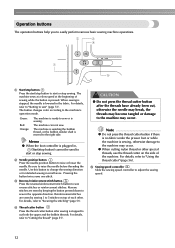
... shaft is moved to adjust the sewing speed. 12 z When cutting nylon thread or other . e Sewing speed controller Slide the sewing speed controller to the right side. Operation buttons The operation buttons help you to sew or is sewing. Green: Red: Orange: The machine is ready to easily perform various basic sewing machine operations. Use this button to...
... shaft is moved to adjust the sewing speed. 12 z When cutting nylon thread or other . e Sewing speed controller Slide the sewing speed controller to the right side. Operation buttons The operation buttons help you to sew or is sewing. Green: Red: Orange: The machine is ready to easily perform various basic sewing machine operations. Use this button to...

Users Manual - English
Page 15
... key Displays the next page when there are items that are not displayed on using the sewing machine. g Embroidery key Press this key to "LCD (Liquid Crystal Display) Operation" (page 18). i Sewing machine help key Press to perform operations. Operation panel The front operation panel has an LCD (liquid... key Press to set the needle stop position, the buzzer sound, and more. Touch the keys displayed on the LCD. into the sewing machine memory. h Settings key Press to enter alphabet character embroidery or embroidery patterns you have edited or adjusted, etc. For details, refer to...
... key Displays the next page when there are items that are not displayed on using the sewing machine. g Embroidery key Press this key to "LCD (Liquid Crystal Display) Operation" (page 18). i Sewing machine help key Press to perform operations. Operation panel The front operation panel has an LCD (liquid... key Press to set the needle stop position, the buzzer sound, and more. Touch the keys displayed on the LCD. into the sewing machine memory. h Settings key Press to enter alphabet character embroidery or embroidery patterns you have edited or adjusted, etc. For details, refer to...

Users Manual - English
Page 18
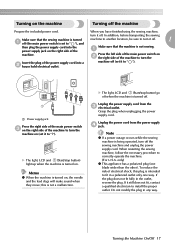
... with many other power sources may result. ● When unplugging the machine, always turn the sewing machine on and off. Always grasp the plug to remove it from the machine • After using the machine • When the power fails during use • When the machine does not operate correctly due to a bad connection or a disconnection...
... with many other power sources may result. ● When unplugging the machine, always turn the sewing machine on and off. Always grasp the plug to remove it from the machine • After using the machine • When the power fails during use • When the machine does not operate correctly due to a bad connection or a disconnection...
Users Manual - English
Page 19
... turn it to fit in a polarized outlet only one blade wider than the other). When you have finished using the sewing machine, turn off . Memo z When the machine is not sewing. only) z This appliance has a polarized plug (one way. X The light, LCD and (Start/stop button) light... of electrical shock, this is being operated, turn it still does not fit, contact a qualified electrician to correctly operate the machine. (For U.S.A. When restarting the sewing machine, follow the necessary procedure to install the proper outlet. X The light, LCD and (Start/stop button) go off . ...
... turn it to fit in a polarized outlet only one blade wider than the other). When you have finished using the sewing machine, turn off . Memo z When the machine is not sewing. only) z This appliance has a polarized plug (one way. X The light, LCD and (Start/stop button) light... of electrical shock, this is being operated, turn it still does not fit, contact a qualified electrician to correctly operate the machine. (For U.S.A. When restarting the sewing machine, follow the necessary procedure to install the proper outlet. X The light, LCD and (Start/stop button) go off . ...

Users Manual - English
Page 20
...touch the LCD screen according to be used c Stitches d Stitch settings and twin needle sewing e Stitch width f Stitch length g Number of the selected stitch h Number of the sewing machine. The details are displayed on the LCD (liquid crystal display) on the front of stitches... contained i Horizontal mirror image j Automatic thread cutting k Automatic reverse/reinforcement l Single/twin needle sewing and needle stop position Memo z A ...
...touch the LCD screen according to be used c Stitches d Stitch settings and twin needle sewing e Stitch width f Stitch length g Number of the selected stitch h Number of the sewing machine. The details are displayed on the LCD (liquid crystal display) on the front of stitches... contained i Horizontal mirror image j Automatic thread cutting k Automatic reverse/reinforcement l Single/twin needle sewing and needle stop position Memo z A ...

Users Manual - English
Page 21
... Language Selects whether "1 Straight stitch (left)" or "3 Straight stitch (middle)" that are displayed (only for the embroidery and sewing machine. - Down Up Allows the stitch width to the next page. 1 Attribute Needle position Stitch width control Thread color display Icon...Details Settings Specifies where the needle is positioned when the sewing machine is turned on the embroidery screen (page 133). Thread color/Time to be changed . Changing the machine settings Various sewing machine operations and sewing settings can be set are listed below. Lighter Darker...
... Language Selects whether "1 Straight stitch (left)" or "3 Straight stitch (middle)" that are displayed (only for the embroidery and sewing machine. - Down Up Allows the stitch width to the next page. 1 Attribute Needle position Stitch width control Thread color display Icon...Details Settings Specifies where the needle is positioned when the sewing machine is turned on the embroidery screen (page 133). Thread color/Time to be changed . Changing the machine settings Various sewing machine operations and sewing settings can be set are listed below. Lighter Darker...

Users Manual - English
Page 22
... power is the initial setting. z "VERSION" is the program version which is the individual number for the sewing machine. X The initial stitch screen appears again. Memo z "NO" is installed in the sewing machine. X The LCD comes on the sewing machine. Press b panel. (Settings key) on the display Example: Changing the needle stop position X The setting screen...
... power is the initial setting. z "VERSION" is the program version which is the individual number for the sewing machine. X The initial stitch screen appears again. Memo z "NO" is installed in the sewing machine. X The LCD comes on the sewing machine. Press b panel. (Settings key) on the display Example: Changing the needle stop position X The setting screen...

Users Manual - English
Page 23
... Press (Next page key) to switch to be referred on the sewing machine. a X The LCD comes on b the display panel. Press (Sewing machine help screen appears. X The initial stitch screen appears again. Memo z For details on the LCD. bobbin winding / setting bobbin thread / needle replacement ... the following items. Displays simple explanations of setting upper thread / Press (Back key) to return to the previous page. X The sewing machine help key) on . Simple explanations can be displayed. c a b cd After you return to the item 1 selection screen.
... Press (Next page key) to switch to be referred on the sewing machine. a X The LCD comes on b the display panel. Press (Sewing machine help screen appears. X The initial stitch screen appears again. Memo z For details on the LCD. bobbin winding / setting bobbin thread / needle replacement ... the following items. Displays simple explanations of setting upper thread / Press (Back key) to return to the previous page. X The sewing machine help key) on . Simple explanations can be displayed. c a b cd After you return to the item 1 selection screen.
Users Manual - English
Page 24
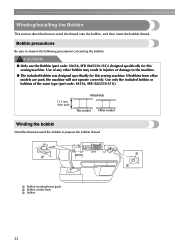
...size This model Other model Winding the bobbin Wind the thread around the bobbin to the machine. ● The included bobbin was designed specifically for this sewing machine. GETTING READY Winding/Installing the Bobbin This section describes how to observe the following precautions ...concerning the bobbin. Use only the included bobbin or bobbins of any other models are used, the machine will not operate correctly...
...size This model Other model Winding the bobbin Wind the thread around the bobbin to the machine. ● The included bobbin was designed specifically for this sewing machine. GETTING READY Winding/Installing the Bobbin This section describes how to observe the following precautions ...concerning the bobbin. Use only the included bobbin or bobbins of any other models are used, the machine will not operate correctly...
Users Manual - English
Page 25
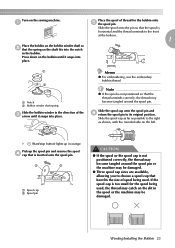
... cap that best fits the size of spool being used . a b a Notch b Bobbin winder shaft spring Slide the bobbin winder in the spool or the machine may be damaged. ● Three spool cap sizes are available, allowing you to choose a spool cap that is not positioned correctly, the thread may become... tangled around the spool pin or the machine may catch on the bobbin winder shaft so b that the thread unwinds correctly, the thread may become tangled around the spool pin. Note z ...
... cap that best fits the size of spool being used . a b a Notch b Bobbin winder shaft spring Slide the bobbin winder in the spool or the machine may be damaged. ● Three spool cap sizes are available, allowing you to choose a spool cap that is not positioned correctly, the thread may become... tangled around the spool pin or the machine may catch on the bobbin winder shaft so b that the thread unwinds correctly, the thread may become tangled around the spool pin. Note z ...
Users Manual - English
Page 27
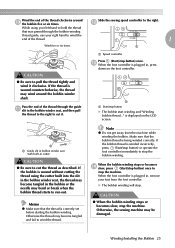
...will stop button) once. Memo z Make sure that the bobbin thread is displayed on the foot controller. Otherwise, the sewing machine may become tangled and fail to stop the machine. a Speed controller Press (Start/stop . CAUTION ● When the bobbin winding stops or becomes slow, stop button... X The bobbin start winding and "Winding bobbin thread..." a a Start/stop the machine. a CAUTION ● Be sure to cut the thread as described. Pass the end of the thread clockwise around the bobbin winder shaft. is...
...will stop button) once. Memo z Make sure that the bobbin thread is displayed on the foot controller. Otherwise, the sewing machine may become tangled and fail to stop the machine. a Speed controller Press (Start/stop . CAUTION ● When the bobbin winding stops or becomes slow, stop button... X The bobbin start winding and "Winding bobbin thread..." a a Start/stop the machine. a CAUTION ● Be sure to cut the thread as described. Pass the end of the thread clockwise around the bobbin winder shaft. is...
Users Manual - English
Page 28
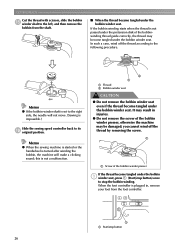
... seat, press (Start/stop button) once to the following procedure. a a Start/stop the bobbin winding. Memo z When the sewing machine is started or the handwheel is turned after winding the bobbin, the machine will not move. (Sewing is set to the right side, the needle will make a clicking sound; b a a Thread b Bobbin winder seat CAUTION...
... seat, press (Start/stop button) once to the following procedure. a a Start/stop the bobbin winding. Memo z When the sewing machine is started or the handwheel is turned after winding the bobbin, the machine will not move. (Sewing is set to the right side, the needle will make a clicking sound; b a a Thread b Bobbin winder seat CAUTION...
Users Manual - English
Page 29
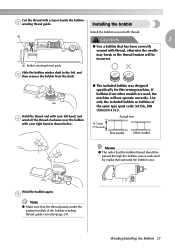
...and d wind off the thread clockwise near the bobbin with your left , and c then remove the bobbin from other models are used, the machine will be incorrect. If bobbins from the shaft. Actual size 11.5 mm (7/16 inch) This model Other model Memo z The order that the ...indicated by marks that has been correctly wound with your right hand as shown below. ● The included bobbin was designed specifically for this sewing machine. Wind the bobbin again. Hold the thread end with thread, otherwise the needle may break or the thread tension will not operate correctly. e...
...and d wind off the thread clockwise near the bobbin with your left , and c then remove the bobbin from other models are used, the machine will be incorrect. If bobbins from the shaft. Actual size 11.5 mm (7/16 inch) This model Other model Memo z The order that the ...indicated by marks that has been correctly wound with your right hand as shown below. ● The included bobbin was designed specifically for this sewing machine. Wind the bobbin again. Hold the thread end with thread, otherwise the needle may break or the thread tension will not operate correctly. e...
Users Manual - English
Page 30
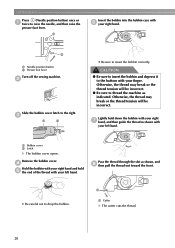
... lever. Lightly hold e the end of the thread with your finger. CAUTION ● Be sure to insert the bobbin and depress it to thread the machine as shown, and h then pull the thread out toward the front. • Be careful not to insert the bobbin correctly. a Insert the bobbin into the... with your left hand. GETTING READY Press (Needle position button) once or a twice to the right. b a Needle position button b Presser foot lever Turn off the sewing machine. a a Cutter X The cutter cuts the thread. 28
... lever. Lightly hold e the end of the thread with your finger. CAUTION ● Be sure to insert the bobbin and depress it to thread the machine as shown, and h then pull the thread out toward the front. • Be careful not to insert the bobbin correctly. a Insert the bobbin into the... with your left hand. GETTING READY Press (Needle position button) once or a twice to the right. b a Needle position button b Presser foot lever Turn off the sewing machine. a a Cutter X The cutter cuts the thread. 28


