Users Manual - English
Page 8
Contents Included Accessories Cover A Accessories ...Cover A Names of Machine Parts and Their Functions Cover B Front view ...Cover B Needle and presser foot section ...Cover C Right-side/rear view ...Cover C Operation buttons ...Cover D Operation panel ...Cover ... Needle ...33 Needle precautions ...33 Needle types and their uses...34 Checking the needle ...35 Replacing the needle...35 Replacing the Presser Foot 38 Presser foot precautions ...38 Replacing the presser foot ...38 Removing the presser foot holder ...40 Sewing Cylindrical Pieces 41 Free-arm sewing...41 SEWING BASICS 43 ...
Contents Included Accessories Cover A Accessories ...Cover A Names of Machine Parts and Their Functions Cover B Front view ...Cover B Needle and presser foot section ...Cover C Right-side/rear view ...Cover C Operation buttons ...Cover D Operation panel ...Cover ... Needle ...33 Needle precautions ...33 Needle types and their uses...34 Checking the needle ...35 Replacing the needle...35 Replacing the Presser Foot 38 Presser foot precautions ...38 Replacing the presser foot ...38 Removing the presser foot holder ...40 Sewing Cylindrical Pieces 41 Free-arm sewing...41 SEWING BASICS 43 ...
Users Manual - English
Page 11
DANGER - Close attention is necessary when the machine is used or where oxygen is damaged, it must be replaced by authorized dealer. Never operate the machine with this machine. 18.If the Light unit is being administered. 8. To reduce the risk of burns, fire, ... THESE INSTRUCTIONS This machine is not working properly, if it to break. 14.Switch the machine to be taken, including the following: Read all moving parts.
DANGER - Close attention is necessary when the machine is used or where oxygen is damaged, it must be replaced by authorized dealer. Never operate the machine with this machine. 18.If the Light unit is being administered. 8. To reduce the risk of burns, fire, ... THESE INSTRUCTIONS This machine is not working properly, if it to break. 14.Switch the machine to be taken, including the following: Read all moving parts.
Users Manual - English
Page 13
... 1. Do not touch the balance wheel, thread take-up lever, needle, or other hot objects. 2. Always consult the operation manual when replacing or installing any other parts to assure correct installation. To fully enjoy all the features, we suggest that you study the manual before using the machine. Remember to... machine, and should never be used. 3. Be sure to clean the case. Use only neutral soaps or detergents to keep your local authorized Brother dealer. Do not drop or hit the machine. 4. For additional product information and updates, visit our web site at www...
... 1. Do not touch the balance wheel, thread take-up lever, needle, or other hot objects. 2. Always consult the operation manual when replacing or installing any other parts to assure correct installation. To fully enjoy all the features, we suggest that you study the manual before using the machine. Remember to... machine, and should never be used. 3. Be sure to clean the case. Use only neutral soaps or detergents to keep your local authorized Brother dealer. Do not drop or hit the machine. 4. For additional product information and updates, visit our web site at www...
Users Manual - English
Page 35
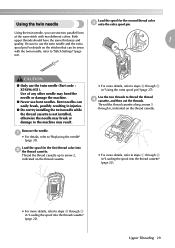
.... Be sure to use the twin needle and the extra spool pin.For details on the thread cassette. • For more details, refer to "Replacing the needle" (page 35). Remove the needle. Bent needles can sew two parallel lines of any other needle may result. Upper Threading 29 Use of... the same stitch with the twin needle, refer to the machine may bend the needle or damage the machine. ● Never use the twin needle (Part code : X59296-051). a • For details, refer to steps a through 6, indicated on the stitches that can be sewn with two different colors. Thread...
.... Be sure to use the twin needle and the extra spool pin.For details on the thread cassette. • For more details, refer to "Replacing the needle" (page 35). Remove the needle. Bent needles can sew two parallel lines of any other needle may result. Upper Threading 29 Use of... the same stitch with the twin needle, refer to the machine may bend the needle or damage the machine. ● Never use the twin needle (Part code : X59296-051). a • For details, refer to steps a through 6, indicated on the stitches that can be sewn with two different colors. Thread...
Users Manual - English
Page 42
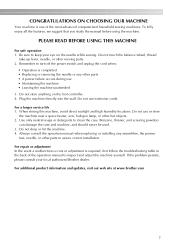
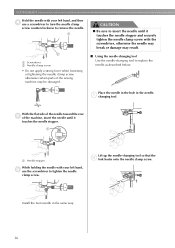
...needle. 1 2 a Screwdriver b Needle clamp screw • Do not apply a strong force when loosening or tightening the needle clamp screw, otherwise certain parts of the machine, insert the needle until it touches the needle stopper. 1 a Needle stopper While holding the needle with your left hand, and then... d use the screwdriver to replace the needle as described below. CAUTION ● Be sure to insert the needle until it touches the needle stopper and securely tighten the ...
...needle. 1 2 a Screwdriver b Needle clamp screw • Do not apply a strong force when loosening or tightening the needle clamp screw, otherwise certain parts of the machine, insert the needle until it touches the needle stopper. 1 a Needle stopper While holding the needle with your left hand, and then... d use the screwdriver to replace the needle as described below. CAUTION ● Be sure to insert the needle until it touches the needle stopper and securely tighten the ...
Users Manual - English
Page 50
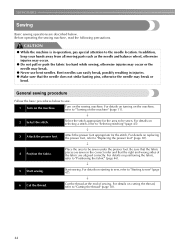
... stitch, refer to "Positioning the fabric" (page 46). ↓ 5 Start sewing.. Start sewing. In addition, keep your hands away from all moving parts such as the needle and balance wheel, otherwise injuries may occur. ● Do not pull or push the fabric too hard while sewing, otherwise injuries...45). ↓ 3 Attach the presser foot. Place the area to "Cutting the thread" (page 50). 44 For details on the machine, refer to "Replacing the presser foot" (page 38). ↓ 4 Position the fabric.. For details on turning on cutting the thread, refer to be sewn. For details on...
... stitch, refer to "Positioning the fabric" (page 46). ↓ 5 Start sewing.. Start sewing. In addition, keep your hands away from all moving parts such as the needle and balance wheel, otherwise injuries may occur. ● Do not pull or push the fabric too hard while sewing, otherwise injuries...45). ↓ 3 Attach the presser foot. Place the area to "Cutting the thread" (page 50). 44 For details on the machine, refer to "Replacing the presser foot" (page 38). ↓ 4 Position the fabric.. For details on turning on cutting the thread, refer to be sewn. For details on...
Users Manual - English
Page 87
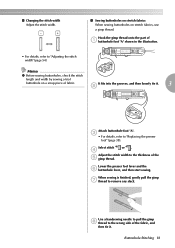
c • For details, refer to remove any slack. When sewing is finished, gently pull the gimp g thread to "Replacing the presser foot" (page 38). It fits into the grooves, and then loosely tie it . ■ Changing the stitch width Adjust the stitch width. ■ ... illustration. • For details, refer to the wrong side of the fabric, and then tie it . 3 b Attach buttonhole foot "A". Hook the gimp thread onto the part of the e gimp thread. Lower the presser foot lever and the f buttonhole lever, and then start sewing. Use a handsewing needle to pull the gimp h thread...
c • For details, refer to remove any slack. When sewing is finished, gently pull the gimp g thread to "Replacing the presser foot" (page 38). It fits into the grooves, and then loosely tie it . ■ Changing the stitch width Adjust the stitch width. ■ ... illustration. • For details, refer to the wrong side of the fabric, and then tie it . 3 b Attach buttonhole foot "A". Hook the gimp thread onto the part of the e gimp thread. Lower the presser foot lever and the f buttonhole lever, and then start sewing. Use a handsewing needle to pull the gimp h thread...
Users Manual - English
Page 164
... manual Cover A operation panel Cover B operation problems 148 operations 15 overcasting stitches 69 P pant legs 41 parallel stitches 29 part names & functions Cover B , patchwork 91 93 pattern embroidery 134 piecing 93 piecing straight stitch 91 plain seams 73 plug ...quilting stippling 91 quilting stitch 91 R recalling stored characters 140 , reinforcement stitching 49 98 removing presser foot holder 40 replacing needle 35 replacing presser foot 38 resewing 141 reverse stitching 49 , reverse/reinforcement stitch button Cover D 49 reverse/reinforcement stitches, automatic...
... manual Cover A operation panel Cover B operation problems 148 operations 15 overcasting stitches 69 P pant legs 41 parallel stitches 29 part names & functions Cover B , patchwork 91 93 pattern embroidery 134 piecing 93 piecing straight stitch 91 plain seams 73 plug ...quilting stippling 91 quilting stitch 91 R recalling stored characters 140 , reinforcement stitching 49 98 removing presser foot holder 40 replacing needle 35 replacing presser foot 38 resewing 141 reverse stitching 49 , reverse/reinforcement stitch button Cover D 49 reverse/reinforcement stitches, automatic...


