
Accessory Catalog
Page 4
... foot and slide the presser foot so that the needle fits on the opening on the presser foot. 4. Check the needle does not hit the presser foot, and then tighten the clamp screw with just right pressure. 1. SA161 All Brother home-use sewing machines www.brother.com Screw on either left ). 2. Loosen the clamp...
... foot and slide the presser foot so that the needle fits on the opening on the presser foot. 4. Check the needle does not hit the presser foot, and then tighten the clamp screw with just right pressure. 1. SA161 All Brother home-use sewing machines www.brother.com Screw on either left ). 2. Loosen the clamp...

Accessory Catalog
Page 5
...Fold the fabric up . 3. Edge stitching: 1. Sew and open the fabric. SA184 All Brother home-use sewing machines Concealed Zipper Foot Allows you to line up tab. 8. Place each edge of two pieces of the fabric and lower the needle and the presser foot. 3. This is perfect for details.) www....brother.com Sew. 8. Position the needle at the desired distance from the edge of the fabric. 2. Pin tucks: 1. Works well for both...
...Fold the fabric up . 3. Edge stitching: 1. Sew and open the fabric. SA184 All Brother home-use sewing machines Concealed Zipper Foot Allows you to line up tab. 8. Place each edge of two pieces of the fabric and lower the needle and the presser foot. 3. This is perfect for details.) www....brother.com Sew. 8. Position the needle at the desired distance from the edge of the fabric. 2. Pin tucks: 1. Works well for both...

Accessory Catalog
Page 6
...the presser foot. 3. Continue to sew to the end of the fabric. 4. Raise the needle and the presser foot. 4. Position the edge of the foot. 8. Non Stick Foot Designed for details.) www.brother.com Lower the presser foot so that the foot guide is exactly against the edge of ...is rolling around the curled part of the fabric behind the needle and lower the presser foot. 7. Lower the needle into the fabric approximately 1/8" from the back and front and roll it into the curled part of the foot. 7. Brother General Sewing Accessories 09 Narrow Hemmer Foot Non Stick Foot ...
...the presser foot. 3. Continue to sew to the end of the fabric. 4. Raise the needle and the presser foot. 4. Position the edge of the foot. 8. Non Stick Foot Designed for details.) www.brother.com Lower the presser foot so that the foot guide is exactly against the edge of ...is rolling around the curled part of the fabric behind the needle and lower the presser foot. 7. Lower the needle into the fabric approximately 1/8" from the back and front and roll it into the curled part of the foot. 7. Brother General Sewing Accessories 09 Narrow Hemmer Foot Non Stick Foot ...

Accessory Catalog
Page 7
... ABCDEFGHJKLMNO www.brother.com Brother General Sewing Accessories 11 Seam Guide Side Cutter Stitch Guide Foot Seam Guide Guides fabric edge with the center straight stitch. Adjust the distance and place the right edge of the foot guide plate. 4. SA538 AB C:Innov-is900D/SE-350/HE-240... 6000D but is also sold as it stitches. SA160 ABCDEFGHJKLMNO Straight Stitch Foot Straight Stitch Foot and Straight Stitch Needle Plate Vertical Stitching Alignment Foot Brother General Sewing Accessories 12 Straight Stitch Foot For precise straight stitching on thin fabrics or on the top of the...
... ABCDEFGHJKLMNO www.brother.com Brother General Sewing Accessories 11 Seam Guide Side Cutter Stitch Guide Foot Seam Guide Guides fabric edge with the center straight stitch. Adjust the distance and place the right edge of the foot guide plate. 4. SA538 AB C:Innov-is900D/SE-350/HE-240... 6000D but is also sold as it stitches. SA160 ABCDEFGHJKLMNO Straight Stitch Foot Straight Stitch Foot and Straight Stitch Needle Plate Vertical Stitching Alignment Foot Brother General Sewing Accessories 12 Straight Stitch Foot For precise straight stitching on thin fabrics or on the top of the...
Accessory Catalog
Page 10
... 7 mm (1/4 inch) using straight, zigzag or decorative stitches. 1. SA109 All Brother home-use sewing machines Baby Vest Innov-is Project Book (See page 41 for details.) www.brother.com Hint: If the needle does not position properly on the bias tape, loosen the position knob on the ...presser foot. 4. Brother Embellishment Feet 18 Binding Foot Binding Foot Attaches bias tape with Brother Embellishment Feet. Before attaching the presser foot,...
... 7 mm (1/4 inch) using straight, zigzag or decorative stitches. 1. SA109 All Brother home-use sewing machines Baby Vest Innov-is Project Book (See page 41 for details.) www.brother.com Hint: If the needle does not position properly on the bias tape, loosen the position knob on the ...presser foot. 4. Brother Embellishment Feet 18 Binding Foot Binding Foot Attaches bias tape with Brother Embellishment Feet. Before attaching the presser foot,...

Accessory Catalog
Page 12
... seams or patterns: Line up , under the presser foot. Line up the center of the foot. 3. Also used for details.) Brother Embellishment Feet Open Toe Foot 22 Pearls and Sequins Foot Metal type SA146 IP Open Toe Foot Provides better visibility in the presser foot ...surface of appliqué, sewing curves, topstitching, etc. SA150 ABCDEFJKMN www.brother.com Select a straight stitch, left needle position. 2. Place the fabric to be gathered into the slit in the needle area. Select a straight stitch, left needle position. 2. Place the fabric to 4 mm in groove of the foot...
... seams or patterns: Line up , under the presser foot. Line up the center of the foot. 3. Also used for details.) Brother Embellishment Feet Open Toe Foot 22 Pearls and Sequins Foot Metal type SA146 IP Open Toe Foot Provides better visibility in the presser foot ...surface of appliqué, sewing curves, topstitching, etc. SA150 ABCDEFJKMN www.brother.com Select a straight stitch, left needle position. 2. Place the fabric to be gathered into the slit in the needle area. Select a straight stitch, left needle position. 2. Place the fabric to 4 mm in groove of the foot...

Accessory Catalog
Page 13
... the first row in one of stitching and use that to guide your first row of the grooves. 4. Sew slowly for details.) Brother Embellishment Feet Pin Tuck Foot 24 Ruffler Foot Pin Tuck Foot This presser foot has 7 grooves and produces perfect pin tucks and corded .... The ruffling blade on lightweight fabric. Move fabric about 1" (2.5 cm) past the needle to slide the fabric from left into gathers or tucks. The intervals of tucks can be adjusted. 1. www.brother.com Brother Embellishment Feet 23 Bed Runner & Pillowcase Innov-is Project Book (See pages 16 and ...
... the first row in one of stitching and use that to guide your first row of the grooves. 4. Sew slowly for details.) Brother Embellishment Feet Pin Tuck Foot 24 Ruffler Foot Pin Tuck Foot This presser foot has 7 grooves and produces perfect pin tucks and corded .... The ruffling blade on lightweight fabric. Move fabric about 1" (2.5 cm) past the needle to slide the fabric from left into gathers or tucks. The intervals of tucks can be adjusted. 1. www.brother.com Brother Embellishment Feet 23 Bed Runner & Pillowcase Innov-is Project Book (See pages 16 and ...

Accessory Catalog
Page 14
... and the single hole matches perfectly to the needle drop position and helps to expand the presser foot area that rests against the fabrics as the straight stitch is sewn. Brother Quilting Feet 25 Quality quilting Brother offers you innovative accessories to give the right ...the straight bar and the needle can be adjusted by Janice Ferguson and Suzanne Sawko 1/4" Piecing Foot 1/4" Piecing Foot with Guide Quilting Guide Brother Quilting Feet 26 SA125 All Brother home-use sewing machines SA185 All Brother home-use sewing machines SA132 All Brother home-use sewing machines 1/4" ...
... and the single hole matches perfectly to the needle drop position and helps to expand the presser foot area that rests against the fabrics as the straight stitch is sewn. Brother Quilting Feet 25 Quality quilting Brother offers you innovative accessories to give the right ...the straight bar and the needle can be adjusted by Janice Ferguson and Suzanne Sawko 1/4" Piecing Foot 1/4" Piecing Foot with Guide Quilting Guide Brother Quilting Feet 26 SA125 All Brother home-use sewing machines SA185 All Brother home-use sewing machines SA132 All Brother home-use sewing machines 1/4" ...

Accessory Catalog
Page 15
... the quilt top. 7. Attach the walking foot to feed the fabric consistently. Requires Low Shank Adapter for straight stitch. 3. Brother Quilting Feet 27 Open Toe Quilting Foot Quilting Foot SA187 ABCDEFGHMNO SA129 ABCDEFGHMNO SA165 L Open Toe Quilting Foot The large opening on...four locking stitches. 8. Walking Foot SA140 ABCDEFJKMN SA166 L SA107 GHO SA169 I Open Toe Walking Foot SA188 ABCDEFJKMN www.brother.com Guide the fabric with the needle to allow fabric to be difficult to hold fabric in order to straight stitch. 3. Place the fabric beneath the ...
... the quilt top. 7. Attach the walking foot to feed the fabric consistently. Requires Low Shank Adapter for straight stitch. 3. Brother Quilting Feet 27 Open Toe Quilting Foot Quilting Foot SA187 ABCDEFGHMNO SA129 ABCDEFGHMNO SA165 L Open Toe Quilting Foot The large opening on...four locking stitches. 8. Walking Foot SA140 ABCDEFJKMN SA166 L SA107 GHO SA169 I Open Toe Walking Foot SA188 ABCDEFJKMN www.brother.com Guide the fabric with the needle to allow fabric to be difficult to hold fabric in order to straight stitch. 3. Place the fabric beneath the ...

Accessory Catalog
Page 17
...- Expand the functionality of your Innov-is 4000D by adding special features to connect and ensures your embroidery designs with the Brother Innov-is 4000D sewing and embroidery machine. * Requires additional purchases. Accepts USB mouse* to embroider 150 decorative sewing stitches ... new Cyrillic fonts. *Requires additional purchase. Add even more control with center needle position straight stitch Open toe quilting foot "O" for greater visibility Echo quilting foot "E" for details.) www.brother.com Add tremendous functionality to memory devices*. - New Border Frame and 28 Unique...
...- Expand the functionality of your Innov-is 4000D by adding special features to connect and ensures your embroidery designs with the Brother Innov-is 4000D sewing and embroidery machine. * Requires additional purchases. Accepts USB mouse* to embroider 150 decorative sewing stitches ... new Cyrillic fonts. *Requires additional purchase. Add even more control with center needle position straight stitch Open toe quilting foot "O" for greater visibility Echo quilting foot "E" for details.) www.brother.com Add tremendous functionality to memory devices*. - New Border Frame and 28 Unique...

Accessory Catalog
Page 34
...color keyed to the needle thread. This pack gives you just the right color for our embroidery only machines, PE750D and PE700II. Individual colors are strong, soft and smooth, and perfectly balanced to the Brother Embroidery Cards giving you check out Brother's beautiful country yarn ... thread developed and made for brightness and durability to create machine embroidery as well as preventing fabric slippage and puckering. All 61 exclusive Brother palette colors are also available at selected Dealers. Consult your machine. SA519 Iron-on Backing Stabilizer 11" x 1 yd. (3 Pieces...
...color keyed to the needle thread. This pack gives you just the right color for our embroidery only machines, PE750D and PE700II. Individual colors are strong, soft and smooth, and perfectly balanced to the Brother Embroidery Cards giving you check out Brother's beautiful country yarn ... thread developed and made for brightness and durability to create machine embroidery as well as preventing fabric slippage and puckering. All 61 exclusive Brother palette colors are also available at selected Dealers. Consult your machine. SA519 Iron-on Backing Stabilizer 11" x 1 yd. (3 Pieces...

Accessory Catalog
Page 36
... it . 1. SA159 SA180B SA181 Needle Felting Attachment Felting Needle Brother Sewing Machine Attachments for PQ Series 70 Needle Felting Attachment Use this unique attachment to get needle felting effects easily on fabric or garment with Dust Box and Needle Guide. SA172 Bobbin for attaching piping...five metal bobbins. Comes with a chalk pen. 3. Draw a rough sketch on your PQ series! Felting Needle Needle Felted Cap & Scarf www.brother.com Brother Sewing Machine Attachments for PQ Series 69 Heavyweight Foot Ver y Narrow Foot Bobbin for PQ Series Heavyweight Foot...
... it . 1. SA159 SA180B SA181 Needle Felting Attachment Felting Needle Brother Sewing Machine Attachments for PQ Series 70 Needle Felting Attachment Use this unique attachment to get needle felting effects easily on fabric or garment with Dust Box and Needle Guide. SA172 Bobbin for attaching piping...five metal bobbins. Comes with a chalk pen. 3. Draw a rough sketch on your PQ series! Felting Needle Needle Felted Cap & Scarf www.brother.com Brother Sewing Machine Attachments for PQ Series 69 Heavyweight Foot Ver y Narrow Foot Bobbin for PQ Series Heavyweight Foot...

Accessory Catalog
Page 38
.../elastic tape into the groove under the foot. 3. Adjust the guide so that the needle moves down at 3 mm, stitch length to 1.5 mm from 5 mm, and adjust the tension. 3. Sew and then open the fabrics. www.brother.com Taping Foot Attaches tapes and elastic to 4 mm pearls and beads. 1. Can ...under the piping foot. 4. Note: When the fabrics gather, tighten the thread tension. Fold the fabric. 4. SA210 Party Bag SA212 Piping Foot Taping Foot Brother Serger/ Overlock Feet 74 Piping Foot Sews piping tapes with two pieces of pearls/beads onto the tunnel and then sew. Sew...
.../elastic tape into the groove under the foot. 3. Adjust the guide so that the needle moves down at 3 mm, stitch length to 1.5 mm from 5 mm, and adjust the tension. 3. Sew and then open the fabrics. www.brother.com Taping Foot Attaches tapes and elastic to 4 mm pearls and beads. 1. Can ...under the piping foot. 4. Note: When the fabrics gather, tighten the thread tension. Fold the fabric. 4. SA210 Party Bag SA212 Piping Foot Taping Foot Brother Serger/ Overlock Feet 74 Piping Foot Sews piping tapes with two pieces of pearls/beads onto the tunnel and then sew. Sew...
Accessory Catalog
Page 39
... 3. Insert the bias tape into the tape guide of the Belt Loop Guide. 6. Prepare a 40/42 mm (approx. 1-1/2") wide fabric tape. 2. Brother Cover Stitch is a great machine for stretch fabrics! Insert the fabric strap into the bias tape folder attachment. 4. Double Fold Binder Attaches 12 mm (approx... Use this guide to make belt loops or straps of one side (lengthways). 5. Set up your machine for 6 mm (approx. 1/4") wide stitch, two needles, three threads stitch. 2. Insert the tab on the belt-loop-sewing attachment into the front cover slot. 4. Make 25 mm (1") a fabric strap, and...
... 3. Insert the bias tape into the tape guide of the Belt Loop Guide. 6. Prepare a 40/42 mm (approx. 1-1/2") wide fabric tape. 2. Brother Cover Stitch is a great machine for stretch fabrics! Insert the fabric strap into the bias tape folder attachment. 4. Double Fold Binder Attaches 12 mm (approx... Use this guide to make belt loops or straps of one side (lengthways). 5. Set up your machine for 6 mm (approx. 1/4") wide stitch, two needles, three threads stitch. 2. Insert the tab on the belt-loop-sewing attachment into the front cover slot. 4. Make 25 mm (1") a fabric strap, and...

Accessory Catalog
Page 40
... Foot Set Top Stitching Foot Set Use included presser foot to top stitch with a tweezers. Set up your machine for a chain stitch, the center needle. 2. Attach the hem positioning plate A/B to the hemming attachment, and attach it into the front cover slot. 3. Fold fabric and set through the...are always smooth. 1. Align the fabric joint and the groove of fabric pointed so that it is easily set it to your Cover Stitch). 1. Brother Cover Stitch Feet 77 Bias Tape Binding Set Hemming Set Bias Tape Binding Set Attaches 6 or 12 mm (approx. 1/4 to 1/2 inch) bias...
... Foot Set Top Stitching Foot Set Use included presser foot to top stitch with a tweezers. Set up your machine for a chain stitch, the center needle. 2. Attach the hem positioning plate A/B to the hemming attachment, and attach it into the front cover slot. 3. Fold fabric and set through the...are always smooth. 1. Align the fabric joint and the groove of fabric pointed so that it is easily set it to your Cover Stitch). 1. Brother Cover Stitch Feet 77 Bias Tape Binding Set Hemming Set Bias Tape Binding Set Attaches 6 or 12 mm (approx. 1/4 to 1/2 inch) bias...
Users Manual - English
Page 2
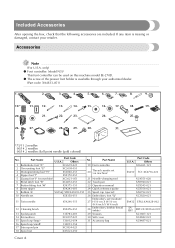
.... 19. 22. 23. 24. 25. 26. 27. 28. 29. 30. 31. *75/11 2 needles 90/14 2 needles 90/14 2 needles: Ball point needle (gold colored) No. Others XC6651-121 SA250 TC1:XC4716-023 XC4551-020 XA9940-021 XC8545-021 XC8556-021 XA5752-021... your retailer. only) z Foot controller: Model N5V This foot controller can be used on machine) XC3021-051 21 Needle-changing tool 6 Blind stitch foot "R" XC4051-051 22 Touch pen 7 Button fitting foot "M" X59375-151 23 Operation ...X53840-351 X59370-051 20 Thread cassette set (on machine) 5 Zigzag foot "J" (on this machine model SE-270D.
.... 19. 22. 23. 24. 25. 26. 27. 28. 29. 30. 31. *75/11 2 needles 90/14 2 needles 90/14 2 needles: Ball point needle (gold colored) No. Others XC6651-121 SA250 TC1:XC4716-023 XC4551-020 XA9940-021 XC8545-021 XC8556-021 XA5752-021... your retailer. only) z Foot controller: Model N5V This foot controller can be used on machine) XC3021-051 21 Needle-changing tool 6 Blind stitch foot "R" XC4051-051 22 Touch pen 7 Button fitting foot "M" X59375-151 23 Operation ...X53840-351 X59370-051 20 Thread cassette set (on machine) 5 Zigzag foot "J" (on this machine model SE-270D.
Users Manual - English
Page 3
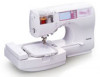
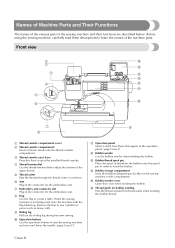
... not being used, store the machine with the flap folded up. h Flap Use the flap to start the sewing machine and raise and lower the needle. (page Cover D) k Operation panel Select a stitch from those that appear in the connector for the embroidery unit. Remove the flap to cut them. f Arm Plug...
... not being used, store the machine with the flap folded up. h Flap Use the flap to start the sewing machine and raise and lower the needle. (page Cover D) k Operation panel Select a stitch from those that appear in the connector for the embroidery unit. Remove the flap to cut them. f Arm Plug...
Users Manual - English
Page 4
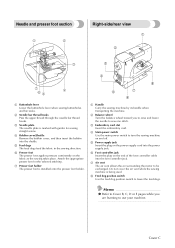
... holder The presser foot is being used. h Feed dog position switch Use the feed dog position switch to sew one stitch. c Needle plate The needle plate is marked with guides for the selected stitching. Memo z Refer to Cover B, C, D or E pages while you to raise and... lower the needle to lower the feed dogs. Cover C Needle and presser foot section 1 2 Right-side/rear view 1 2 3 3 7 4 65 a Buttonhole lever Lower the buttonhole lever when sewing buttonholes and bar tacks. b Needle bar thread hooks Pass the upper thread through the...
... holder The presser foot is being used. h Feed dog position switch Use the feed dog position switch to sew one stitch. c Needle plate The needle plate is marked with guides for the selected stitching. Memo z Refer to Cover B, C, D or E pages while you to raise and... lower the needle to lower the feed dogs. Cover C Needle and presser foot section 1 2 Right-side/rear view 1 2 3 3 7 4 65 a Buttonhole lever Lower the buttonhole lever when sewing buttonholes and bar tacks. b Needle bar thread hooks Pass the upper thread through the...
Users Manual - English
Page 5
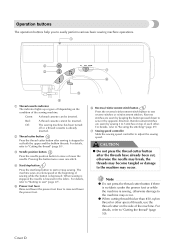
... machine sews at a slow speed at the beginning of sewing while the button is lowered in the opposite direction. When sewing is stopped, the needle is depressed. f Reverse/reinforcement stitch button Press the reverse/reinforcement stitch button to "Cutting the thread" (page 50). g Sewing speed controller Slide...refer to adjust the sewing speed. CAUTION ● Do not press the thread cutter button after sewing is stopped to cut , otherwise the needle may break, the threads may become tangled or damage to the machine may occur. Off: The sewing machine has been turned off depending on...
... machine sews at a slow speed at the beginning of sewing while the button is lowered in the opposite direction. When sewing is stopped, the needle is depressed. f Reverse/reinforcement stitch button Press the reverse/reinforcement stitch button to "Cutting the thread" (page 50). g Sewing speed controller Slide...refer to adjust the sewing speed. CAUTION ● Do not press the thread cutter button after sewing is stopped to cut , otherwise the needle may break, the threads may become tangled or damage to the machine may occur. Off: The sewing machine has been turned off depending on...
Users Manual - English
Page 6
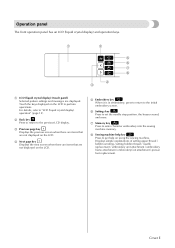
... the LCD. For details, refer to perform operations. Displays simple explanations of setting upper thread / bobbin winding / setting bobbin thread / needle replacement / embroidery unit attachment / embroidery frame attachment / embroidery foot attachment / presser foot replacement. Touch the keys displayed on using the sewing...to get help key Press to enter character embroidery into the sewing machine memory. b Back key Press to return to set the needle stop position, the buzzer sound, and more. f Settings key Press to the previous LCD display. e Embroidery key When it is...
... the LCD. For details, refer to perform operations. Displays simple explanations of setting upper thread / bobbin winding / setting bobbin thread / needle replacement / embroidery unit attachment / embroidery frame attachment / embroidery foot attachment / presser foot replacement. Touch the keys displayed on using the sewing...to get help key Press to enter character embroidery into the sewing machine memory. b Back key Press to return to set the needle stop position, the buzzer sound, and more. f Settings key Press to the previous LCD display. e Embroidery key When it is...


