
Accessory Catalog
Page 17
...continuous border patterns from the stunning designs that have been upgraded with the SAVR4000D Premium Package. Brother Embroidery Accessories 31 QuattroTM 6000D Embroidery Card Reader QuattroTM 6000D Border Frame Innov-is 4000D Premium Package SAECR1 Only compatible with QuattroTM...- Easy to add and easy to see embroidery designs. - Compatible with center needle position straight stitch Open toe quilting foot "O" for greater visibility Echo quilting foot "E" for the Innov-is 4000D sewing and embroidery machine. * Requires additional purchases. Includes three...
...continuous border patterns from the stunning designs that have been upgraded with the SAVR4000D Premium Package. Brother Embroidery Accessories 31 QuattroTM 6000D Embroidery Card Reader QuattroTM 6000D Border Frame Innov-is 4000D Premium Package SAECR1 Only compatible with QuattroTM...- Easy to add and easy to see embroidery designs. - Compatible with center needle position straight stitch Open toe quilting foot "O" for greater visibility Echo quilting foot "E" for the Innov-is 4000D sewing and embroidery machine. * Requires additional purchases. Includes three...
Users Manual - English
Page 2
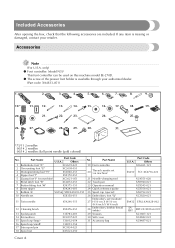
...25 Spool cap (special) 10 Needle set X58358-051 26 Embroidery foot "Q" 11 Twin needle X59296-151 Embroidery set (medium) 27 H 10 cm X W 10 cm (H 4 inch X W 4 inch) 12 Cleaning brush X59476-051 28 Embroidery bobbin thread (white) 13 Eyelet punch 135783-001 29 ...Cover A Others No. Part Name 1 Buttonhole foot "A" XC2691-021 19 Foot controller 2 Overcasting foot "G" 3 Monogramming foot "N" 4 Zipper foot "I" XC3098-051 X53840-351 X59370-051 20 Thread cassette set (on machine) 5 Zigzag foot "J" (on this machine model SE-270D. Included Accessories After opening the box, check ...
...25 Spool cap (special) 10 Needle set X58358-051 26 Embroidery foot "Q" 11 Twin needle X59296-151 Embroidery set (medium) 27 H 10 cm X W 10 cm (H 4 inch X W 4 inch) 12 Cleaning brush X59476-051 28 Embroidery bobbin thread (white) 13 Eyelet punch 135783-001 29 ...Cover A Others No. Part Name 1 Buttonhole foot "A" XC2691-021 19 Foot controller 2 Overcasting foot "G" 3 Monogramming foot "N" 4 Zipper foot "I" XC3098-051 X53840-351 X59370-051 20 Thread cassette set (on machine) 5 Zigzag foot "J" (on this machine model SE-270D. Included Accessories After opening the box, check ...
Users Manual - English
Page 4
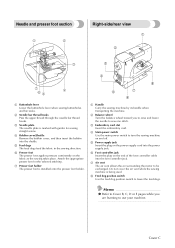
... on the fabric as the sewing takes place. b Balance wheel Turn the balance wheel toward you are learning to use your machine. c Embroidery card slot Insert the embroidery card. g Air vent The air vent allows the air surrounding the motor to turn the sewing machine on the end of the... foot controller cable into the foot controller jack. c Needle plate The needle plate is marked with guides for the selected stitching. d Main power switch Use ...
... on the fabric as the sewing takes place. b Balance wheel Turn the balance wheel toward you are learning to use your machine. c Embroidery card slot Insert the embroidery card. g Air vent The air vent allows the air surrounding the motor to turn the sewing machine on the end of the... foot controller cable into the foot controller jack. c Needle plate The needle plate is marked with guides for the selected stitching. d Main power switch Use ...
Users Manual - English
Page 6
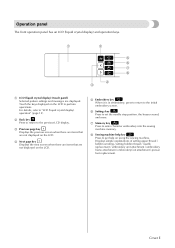
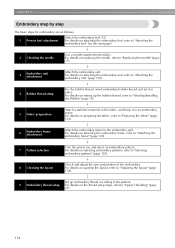
...LCD. Displays simple explanations of setting upper thread / bobbin winding / setting bobbin thread / needle replacement / embroidery unit attachment / embroidery frame attachment / embroidery foot attachment / presser foot replacement. Cover E d Next page key Displays the next screen when there are items that are not displayed ...using the sewing machine. For details, refer to perform operations. f Settings key Press to the initial embroidery screen. e Embroidery key When it is in embroidery, press to return to set the needle stop position, the buzzer sound, and more. b Back...
...LCD. Displays simple explanations of setting upper thread / bobbin winding / setting bobbin thread / needle replacement / embroidery unit attachment / embroidery frame attachment / embroidery foot attachment / presser foot replacement. Cover E d Next page key Displays the next screen when there are items that are not displayed ...using the sewing machine. For details, refer to perform operations. f Settings key Press to the initial embroidery screen. e Embroidery key When it is in embroidery, press to return to set the needle stop position, the buzzer sound, and more. b Back...
Users Manual - English
Page 10
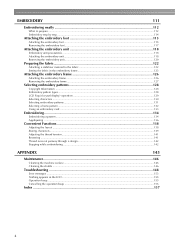
... embroidery foot 115 Attaching the embroidery foot ...115 Removing the embroidery foot ...117 Attaching the embroidery unit 118 Embroidery unit precautions ...118 Attaching the embroidery unit ...118 Removing the embroidery unit ...120 Preparing the fabric...122 Attaching a stabilizer material to the fabric 122 Setting the fabric in the embroidery frame ...123 Attaching the embroidery frame 126 Attaching the embroidery frame ...126 Removing the embroidery...
... embroidery foot 115 Attaching the embroidery foot ...115 Removing the embroidery foot ...117 Attaching the embroidery unit 118 Embroidery unit precautions ...118 Attaching the embroidery unit ...118 Removing the embroidery unit ...120 Preparing the fabric...122 Attaching a stabilizer material to the fabric 122 Setting the fabric in the embroidery frame ...123 Attaching the embroidery frame 126 Attaching the embroidery frame ...126 Removing the embroidery...
Users Manual - English
Page 18
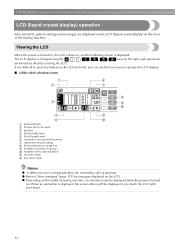
... can use the touch pen to operate the LCD display. ■ Utility stitch selection screen 1 6 2 7 3 4 5 a Selected stitch b Presser foot to "Error messages" (page 153) for messages displayed on the LCD. GETTING READY LCD (liquid crystal display) operation Selected stitch, pattern settings and messages are... of stitches in group j Number of the selected stitch k Increase value l Decrease value 8 9 0 A B Memo z A different screen is displayed when the embroidery unit is attached. Viewing the LCD When the power is turned on, the LCD comes on, and the following screen is displayed.
... can use the touch pen to operate the LCD display. ■ Utility stitch selection screen 1 6 2 7 3 4 5 a Selected stitch b Presser foot to "Error messages" (page 153) for messages displayed on the LCD. GETTING READY LCD (liquid crystal display) operation Selected stitch, pattern settings and messages are... of stitches in group j Number of the selected stitch k Increase value l Decrease value 8 9 0 A B Memo z A different screen is displayed when the embroidery unit is attached. Viewing the LCD When the power is turned on, the LCD comes on, and the following screen is displayed.
Users Manual - English
Page 21
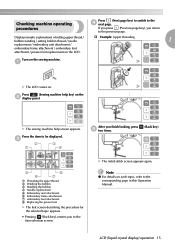
... / setting bobbin thread / needle † Example: Upper threading 1 replacement / embroidery unit attachment / embroidery frame attachment / embroidery foot attachment / presser foot replacement on . LCD (liquid crystal display) operation 15 Turn on the b display...7 a Threading the upper thread b Winding the bobbin c Installing the bobbin d Needle replacement e Embroidery unit attachment f Embroidery frame attachment g embroidery foot attachment h Replacing the presser foot X The first screen describing the procedure for the selected topic appears. • Pressing (Back key...
... / setting bobbin thread / needle † Example: Upper threading 1 replacement / embroidery unit attachment / embroidery frame attachment / embroidery foot attachment / presser foot replacement on . LCD (liquid crystal display) operation 15 Turn on the b display...7 a Threading the upper thread b Winding the bobbin c Installing the bobbin d Needle replacement e Embroidery unit attachment f Embroidery frame attachment g embroidery foot attachment h Replacing the presser foot X The first screen describing the procedure for the selected topic appears. • Pressing (Back key...
Users Manual - English
Page 45
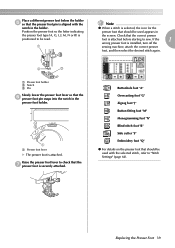
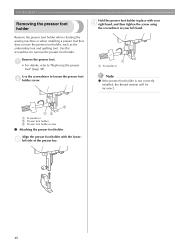
... 64). Place a different presser foot below the holder e so that the f presser foot pin snaps into the notch in the presser foot holder. 1 a Presser foot lever X The presser foot is attached. Replacing the Presser Foot 39 Buttonhole foot "A" Overcasting foot "G" Zigzag foot "J" Button fitting foot "M" Monogramming foot "N" Blind stitch foot "R" Side cutter "S" Embroidery foot "Q" z For details on the presser foot that should be used with...
... 64). Place a different presser foot below the holder e so that the f presser foot pin snaps into the notch in the presser foot holder. 1 a Presser foot lever X The presser foot is attached. Replacing the Presser Foot 39 Buttonhole foot "A" Overcasting foot "G" Zigzag foot "J" Button fitting foot "M" Monogramming foot "N" Blind stitch foot "R" Side cutter "S" Embroidery foot "Q" z For details on the presser foot that should be used with...
Users Manual - English
Page 46
... 38). Remove the presser foot holder when cleaning the sewing machine or when installing a presser foot that does not use the presser foot holder, such as the embroidery foot and quilting foot. Use the screwdriver to remove the presser foot holder. Remove the presser foot. GETTING READY Removing the presser foot holder Hold the presser foot holder in place with...
... 38). Remove the presser foot holder when cleaning the sewing machine or when installing a presser foot that does not use the presser foot holder, such as the embroidery foot and quilting foot. Use the screwdriver to remove the presser foot holder. Remove the presser foot. GETTING READY Removing the presser foot holder Hold the presser foot holder in place with...
Users Manual - English
Page 102
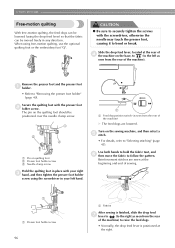
.... • Refer to follow the pattern. Turn on quilting foot b Presser foot holder screw c Needle clamp screw Hold the quilting foot in place with your right c hand, and then tighten the presser foot holder screw using free-motion quilting, use the optional quilting foot or the embroidery foot "Q". CAUTION ● Be sure to securely tighten the screws...
.... • Refer to follow the pattern. Turn on quilting foot b Presser foot holder screw c Needle clamp screw Hold the quilting foot in place with your right c hand, and then tighten the presser foot holder screw using free-motion quilting, use the optional quilting foot or the embroidery foot "Q". CAUTION ● Be sure to securely tighten the screws...
Users Manual - English
Page 117
4 EMBROIDERY The steps for embroidering will be explained here. Embroidering neatly 112 Attaching the embroidery foot 115 Attaching the embroidery unit 118 Preparing the fabric 122 Attaching the embroidery frame 126 Selecting embroidery patterns 128 Embroidering ...134 Convenient Functions 138
4 EMBROIDERY The steps for embroidering will be explained here. Embroidering neatly 112 Attaching the embroidery foot 115 Attaching the embroidery unit 118 Preparing the fabric 122 Attaching the embroidery frame 126 Selecting embroidery patterns 128 Embroidering ...134 Convenient Functions 138
Users Manual - English
Page 118
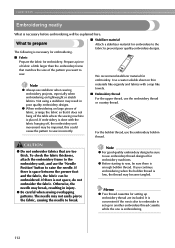
If there is necessary before embroidering will be explained here. Note z For good quality embroidery designs be sure to sew incorrectly. EMBROIDERY Embroidering neatly What is space between the presser foot and the fabric, the fabric can be embroidered. Not using a stabilizer may break, ... to sew, be impaired, this could cause the pattern to use the embroidery bobbin thread. z Before starting to raise the needle. For the bobbin thread, use embroidery thread designed for embroidery machines. Use a water soluble sheet on lightweight or stretch fabrics. What ...
If there is necessary before embroidering will be explained here. Note z For good quality embroidery designs be sure to sew incorrectly. EMBROIDERY Embroidering neatly What is space between the presser foot and the fabric, the fabric can be embroidered. Not using a stabilizer may break, ... to sew, be impaired, this could cause the pattern to use the embroidery bobbin thread. z Before starting to raise the needle. For the bobbin thread, use embroidery thread designed for embroidery machines. Use a water soluble sheet on lightweight or stretch fabrics. What ...
Users Manual - English
Page 120
..." (page 128). ↓ 8 Checking the layout Check and adjust the size and position of the embroidery. EMBROIDERY Embroidery step by step The basic steps for embroidery are as follows. 1 Presser foot attachment Attach the embroidery foot "Q". For details on selecting embroidery patterns, refer to "Attaching the embroidery unit" (page 118). ↓ 4 Bobbin thread setup For the bobbin thread, wind...
..." (page 128). ↓ 8 Checking the layout Check and adjust the size and position of the embroidery. EMBROIDERY Embroidery step by step The basic steps for embroidery are as follows. 1 Presser foot attachment Attach the embroidery foot "Q". For details on selecting embroidery patterns, refer to "Attaching the embroidery unit" (page 118). ↓ 4 Bobbin thread setup For the bobbin thread, wind...
Users Manual - English
Page 121
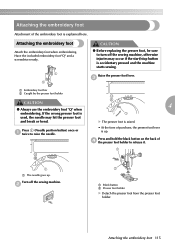
... machine starts sewing. Turn off the sewing machine, otherwise injuries may hit the presser foot and break or bend. Have the included embroidery foot "Q" and a screwdriver ready. 1 2 a Embroidery foot bar b Caught by the presser foot holder CAUTION ● Before replacing the presser foot, be sure to release it. 1 1 a The needle goes up . c CAUTION 4 ● Always use the...
... machine starts sewing. Turn off the sewing machine, otherwise injuries may hit the presser foot and break or bend. Have the included embroidery foot "Q" and a screwdriver ready. 1 2 a Embroidery foot bar b Caught by the presser foot holder CAUTION ● Before replacing the presser foot, be sure to release it. 1 1 a The needle goes up . c CAUTION 4 ● Always use the...

Users Manual - English
Page 122
...wheel toward the back. 2 13 a Screwdriver b Presser foot holder c Presser foot holder screw X Remove the presser foot holder. CAUTION ● Do not hit the needle with the included screwdriver. Set the embroidery foot perpendicular. Tighten the presser foot holder screw. If the screw is loose, the needle...slowly, and check to tighten the screw with your finger or the embroidery foot "Q" when attaching it. EMBROIDERY Loosen the presser foot holder screw and e remove the presser foot holder. Set the bar on the embroidery foot onto the f needle clamp screw bar. The needle could be sure...
...wheel toward the back. 2 13 a Screwdriver b Presser foot holder c Presser foot holder screw X Remove the presser foot holder. CAUTION ● Do not hit the needle with the included screwdriver. Set the embroidery foot perpendicular. Tighten the presser foot holder screw. If the screw is loose, the needle...slowly, and check to tighten the screw with your finger or the embroidery foot "Q" when attaching it. EMBROIDERY Loosen the presser foot holder screw and e remove the presser foot holder. Set the bar on the embroidery foot onto the f needle clamp screw bar. The needle could be sure...

Users Manual - English
Page 123
Turn off the sewing machine. c 1 a Presser foot lever X The presser foot is raised. Attaching the embroidery foot 117 b 4 Raise the presser foot lever. Removing the embroidery foot Press (Needle position button) once or a twice to "Attaching the presser foot holder" (page 40). 1 X The needle is raised. Loosen the presser foot holder screw and d remove the embroidery foot "Q". Turn the screwdriver toward the back. e • For details, refer to raise the needle. Attach the presser foot holder.
Turn off the sewing machine. c 1 a Presser foot lever X The presser foot is raised. Attaching the embroidery foot 117 b 4 Raise the presser foot lever. Removing the embroidery foot Press (Needle position button) once or a twice to "Attaching the presser foot holder" (page 40). 1 X The needle is raised. Loosen the presser foot holder screw and d remove the embroidery foot "Q". Turn the screwdriver toward the back. e • For details, refer to raise the needle. Attach the presser foot holder.

Users Manual - English
Page 129
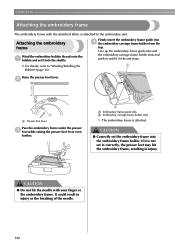
... a height of up to 17 cm (6-7/10 inch) and a width of up to 2 cm (1 inch) and a width of the embroidery pattern may be hit by the presser foot and cause injury or needle breakage. Press the inner frame in from the top of the pattern being embroidered. Tighten the adjustment... up to 10 cm (4 inch) and a width of the outer frame. Have a fabric with a stabilizer material attached and the embroidery frame (medium), (small) and (large) ready. ■ Embroidery set (medium) Patterns with the stabilizer material on b top of up on the inner frame and on a flat surface. Separate the...
... a height of up to 17 cm (6-7/10 inch) and a width of up to 2 cm (1 inch) and a width of the embroidery pattern may be hit by the presser foot and cause injury or needle breakage. Press the inner frame in from the top of the pattern being embroidered. Tighten the adjustment... up to 10 cm (4 inch) and a width of the outer frame. Have a fabric with a stabilizer material attached and the embroidery frame (medium), (small) and (large) ready. ■ Embroidery set (medium) Patterns with the stabilizer material on b top of up on the inner frame and on a flat surface. Separate the...
Users Manual - English
Page 132
... slots and push in until it into the shuttle. • For details, refer to the embroidery unit. b 1 a Presser foot lever Pass the embroidery frame under the presser c foot while raising the presser foot lever even further. 2 a Embroidery frame guide tabs b Embroidery carriage frame holder slots X The embroidery frame is not set it clicks and stops. 1 Raise the presser...
... slots and push in until it into the shuttle. • For details, refer to the embroidery unit. b 1 a Presser foot lever Pass the embroidery frame under the presser c foot while raising the presser foot lever even further. 2 a Embroidery frame guide tabs b Embroidery carriage frame holder slots X The embroidery frame is not set it clicks and stops. 1 Raise the presser...
Users Manual - English
Page 140
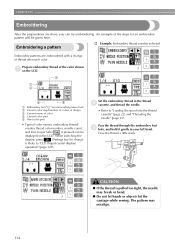
...slack. The pattern may break or bend. ● Do not let hands or objects hit the carriage while sewing. Pass the thread through the embroidery foot c hole, and hold it . CAUTION ● If the thread is pressed) can try embroidering. When switching the display, press (Settings key...of thread after is pulled too tight, the needle may misalign. 134 An example of the steps for an embroidery pattern will be displayed on the LCD. 3 1 2 4 5 a Embroidery foot "Q" (recommended presser foot) b Current color step/Number of colors in design c Current name of the color shown a on the ...
...slack. The pattern may break or bend. ● Do not let hands or objects hit the carriage while sewing. Pass the thread through the embroidery foot c hole, and hold it . CAUTION ● If the thread is pressed) can try embroidering. When switching the display, press (Settings key...of thread after is pulled too tight, the needle may misalign. 134 An example of the steps for an embroidery pattern will be displayed on the LCD. 3 1 2 4 5 a Embroidery foot "Q" (recommended presser foot) b Current color step/Number of colors in design c Current name of the color shown a on the ...
Users Manual - English
Page 163
... wheel Cover C, 46, 82 embroidery cards 133 embroidery character selection 130 bar tack stitch 98 embroidery fabric preparation 122 basic sewing 44 embroidery foot installation 115 basic stitching 73 embroidery foot removal 117 basting stitch 73 , embroidery frame Cover A 123 beep 155 embroidery frame installation 126 blind hem stitch 75 bobbin Cover A embroidery frame removal 127 embroidery key Cover E 5 bobbin installation...
... wheel Cover C, 46, 82 embroidery cards 133 embroidery character selection 130 bar tack stitch 98 embroidery fabric preparation 122 basic sewing 44 embroidery foot installation 115 basic stitching 73 embroidery foot removal 117 basting stitch 73 , embroidery frame Cover A 123 beep 155 embroidery frame installation 126 blind hem stitch 75 bobbin Cover A embroidery frame removal 127 embroidery key Cover E 5 bobbin installation...


