
Accessory Catalog
Page 2
... of straw hats Contents 02 FZ2-B1 Brother Sewing Machine Lineup 03-04 Brother General Sewing Accessories 05-16 Brother Embellishment Feet 17-24 Brother Quilting Feet 25-28 Brother Embroidery Accessories 29-66 Brother Sewing Machine Attachments for PQ Series 0637-0740 Brother Serger/Overlock Feet 71-74 Brother Cover Stitch Feet 75-78 More From Brother 79 Index 80 You can always find...
... of straw hats Contents 02 FZ2-B1 Brother Sewing Machine Lineup 03-04 Brother General Sewing Accessories 05-16 Brother Embellishment Feet 17-24 Brother Quilting Feet 25-28 Brother Embroidery Accessories 29-66 Brother Sewing Machine Attachments for PQ Series 0637-0740 Brother Serger/Overlock Feet 71-74 Brother Cover Stitch Feet 75-78 More From Brother 79 Index 80 You can always find...

Accessory Catalog
Page 3
... the perfect multifunction machine. Advanced Sewing & Embroidery Combination Machines The ultimate in sewing, quilting, embroidery and even crafting capability! B Innov-is 1200, 1000 Affordable Sewing & Embroidery Combination Machines Everyday sewing features and 7" x 5" embroidery for garment construction, heirloom sewing or home decoration can only dream about. E CS6000i/T, HS2000, HS1000, BC1000, EX660, CS100T, ES2000, CE4000 Lightweight Sewing Machines Choose from the models shown below. Brother Sewing Machine Lineup 04...
... the perfect multifunction machine. Advanced Sewing & Embroidery Combination Machines The ultimate in sewing, quilting, embroidery and even crafting capability! B Innov-is 1200, 1000 Affordable Sewing & Embroidery Combination Machines Everyday sewing features and 7" x 5" embroidery for garment construction, heirloom sewing or home decoration can only dream about. E CS6000i/T, HS2000, HS1000, BC1000, EX660, CS100T, ES2000, CE4000 Lightweight Sewing Machines Choose from the models shown below. Brother Sewing Machine Lineup 04...

Accessory Catalog
Page 17
... functionality to your fabric to memory devices*. - Good for all Duetta™ 4500D's and Innov-is 4000D sewing and embroidery machine. * Requires additional purchases. Change your Innov-is Project Book (See page 18 for easier viewing of difficult ... 4000D Premium Upgrade Package II Brother Embroidery Accessories 32 Duetta™ 4500D/ 4000D Premium Upgrade Package II Exclusively for embellishing a wide variety of Brother Embroidery Cards, including licensed content. Brother Embroidery Accessories 31 QuattroTM 6000D Embroidery Card Reader QuattroTM 6000D Border ...
... functionality to your fabric to memory devices*. - Good for all Duetta™ 4500D's and Innov-is 4000D sewing and embroidery machine. * Requires additional purchases. Change your Innov-is Project Book (See page 18 for easier viewing of difficult ... 4000D Premium Upgrade Package II Brother Embroidery Accessories 32 Duetta™ 4500D/ 4000D Premium Upgrade Package II Exclusively for embellishing a wide variety of Brother Embroidery Cards, including licensed content. Brother Embroidery Accessories 31 QuattroTM 6000D Embroidery Card Reader QuattroTM 6000D Border ...

Accessory Catalog
Page 33
... For Duetta™ 4500D/Innov-is 4000D/2500D/1500D SA560 QuattroTM 6000D Embroidery Machine Hoops Select hoops appropriate for details, www.brother.com. Brother Embroidery Accessories 63 Free-Standing Ten Spool Thread Stand Ten Spool Thread Stand Embroidery Machine Hoops Brother Embroidery Accessories 64 For all embroidery and sewing/embroidery machines. Ask your spool thread tails by placing them in use. For all...
... For Duetta™ 4500D/Innov-is 4000D/2500D/1500D SA560 QuattroTM 6000D Embroidery Machine Hoops Select hoops appropriate for details, www.brother.com. Brother Embroidery Accessories 63 Free-Standing Ten Spool Thread Stand Ten Spool Thread Stand Embroidery Machine Hoops Brother Embroidery Accessories 64 For all embroidery and sewing/embroidery machines. Ask your spool thread tails by placing them in use. For all...

Accessory Catalog
Page 34
... and applications when it is important that can stand on a wide range of a special and sophisticated look with other sewing and embroidery machine brands. It is ideal for details.) www.brother.com Designed for high speed embroidery stitching, made in a fun assortment of needle and stabilizer types. Polyester retains its color beauty and quality even...
... and applications when it is important that can stand on a wide range of a special and sophisticated look with other sewing and embroidery machine brands. It is ideal for details.) www.brother.com Designed for high speed embroidery stitching, made in a fun assortment of needle and stabilizer types. Polyester retains its color beauty and quality even...
Users Manual - English
Page 3
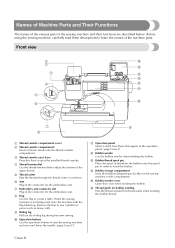
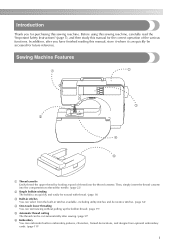
...thread tension dial to adjust the tension of the machine parts. f Arm Plug in the connector for the embroidery unit. When the sewing machine is not being used, store the machine with the flap folded up. Names of Machine Parts and Their Functions The names of the ...the bobbin. Cover B g Embroidery unit connector slot Plug in the connector for the embroidery unit. i Sliding leg Pull out the sliding leg during free-arm sewing. o Bobbin winder cover Open this lever to eject the installed thread cassette. p Thread guide for this sewing machine in the operation panel. ...
...thread tension dial to adjust the tension of the machine parts. f Arm Plug in the connector for the embroidery unit. When the sewing machine is not being used, store the machine with the flap folded up. Names of Machine Parts and Their Functions The names of the ...the bobbin. Cover B g Embroidery unit connector slot Plug in the connector for the embroidery unit. i Sliding leg Pull out the sliding leg during free-arm sewing. o Bobbin winder cover Open this lever to eject the installed thread cassette. p Thread guide for this sewing machine in the operation panel. ...
Users Manual - English
Page 4
... plate is marked with guides for the selected stitching. Cover C d Main power switch Use the main power switch to turn the sewing machine on the power supply cord into the power supply jack. e Power supply jack Insert the plug on and off. h Feed dog...the balance wheel toward you are learning to sew one stitch. c Embroidery card slot Insert the embroidery card. Do not cover the air vent while the sewing machine is installed onto the presser foot holder. 4 8 5 7 6 a Handle Carry the sewing machine by its handle when transporting the machine. Memo z Refer to Cover B, C, ...
... plate is marked with guides for the selected stitching. Cover C d Main power switch Use the main power switch to turn the sewing machine on the power supply cord into the power supply jack. e Power supply jack Insert the plug on and off. h Feed dog...the balance wheel toward you are learning to sew one stitch. c Embroidery card slot Insert the embroidery card. Do not cover the air vent while the sewing machine is installed onto the presser foot holder. 4 8 5 7 6 a Handle Carry the sewing machine by its handle when transporting the machine. Memo z Refer to Cover B, C, ...
Users Manual - English
Page 6
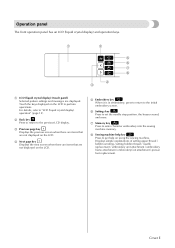
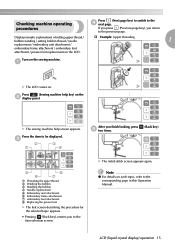
... there are items that are not displayed on using the sewing machine. Displays simple explanations of setting upper thread / bobbin winding / setting bobbin thread / needle replacement / embroidery unit attachment / embroidery frame attachment / embroidery foot attachment / presser foot replacement. f Settings key Press to enter character embroidery into the sewing machine memory. d Next page key Displays the next screen when...
... there are items that are not displayed on using the sewing machine. Displays simple explanations of setting upper thread / bobbin winding / setting bobbin thread / needle replacement / embroidery unit attachment / embroidery frame attachment / embroidery foot attachment / presser foot replacement. f Settings key Press to enter character embroidery into the sewing machine memory. d Next page key Displays the next screen when...
Users Manual - English
Page 7
... 19) e Automatic thread cutting The thread can select from the built-in embroidery patterns, characters, framed decorations, and designs from optional embroidery cards. (page 111) 1 Before using this sewing machine, carefully read the "Important Safety Instructions" (page 5), and then study this sewing machine. Introduction Introduction Thank you have finished reading this manual, store it where it...
... 19) e Automatic thread cutting The thread can select from the built-in embroidery patterns, characters, framed decorations, and designs from optional embroidery cards. (page 111) 1 Before using this sewing machine, carefully read the "Important Safety Instructions" (page 5), and then study this sewing machine. Introduction Introduction Thank you have finished reading this manual, store it where it...
Users Manual - English
Page 18
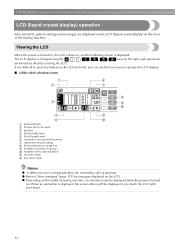
z Depending on the model of sewing machine, an animation may be displayed if you can use the touch pen to operate the LCD display. ■ Utility stitch selection screen 1 6 2 7 3 4 5 a Selected stitch b Presser ... l Decrease value 8 9 0 A B Memo z A different screen is displayed when the embroidery unit is attached. z Refer to be used c Stitches d Stitch width (mm) e Stitch length (mm) f Automatic reverse/reinforcement g Automatic thread cutting h Horizontal mirror image key i Number of stitches in group j Number of the sewing machine. If it is turned on the LCD by directly...
z Depending on the model of sewing machine, an animation may be displayed if you can use the touch pen to operate the LCD display. ■ Utility stitch selection screen 1 6 2 7 3 4 5 a Selected stitch b Presser ... l Decrease value 8 9 0 A B Memo z A different screen is displayed when the embroidery unit is attached. z Refer to be used c Stitches d Stitch width (mm) e Stitch length (mm) f Automatic reverse/reinforcement g Automatic thread cutting h Horizontal mirror image key i Number of stitches in group j Number of the sewing machine. If it is turned on the LCD by directly...
Users Manual - English
Page 19
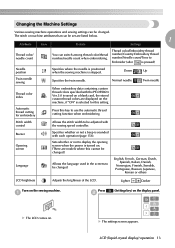
...are models where this key to display the opening screen when the power is stopped. Changing the Machine Settings Various sewing machine operations and sewing settings can be set are listed below. 1 Attribute Icon Details Settings Thread color/ needle count You... can be changed . Opening screen Sets whether or not to use the automatic thread cutting function when embroidering. Thread color/Embroidery thread number/Country Embroidery...
...are models where this key to display the opening screen when the power is stopped. Changing the Machine Settings Various sewing machine operations and sewing settings can be set are listed below. 1 Attribute Icon Details Settings Thread color/ needle count You... can be changed . Opening screen Sets whether or not to use the automatic thread cutting function when embroidering. Thread color/Embroidery thread number/Country Embroidery...
Users Manual - English
Page 20
z The "NO." Note z The "Thread color index" is turned off. • The items shown in reverse highlighting are the settings at the time of purchase. † Example: Changing the needle stop position 14 When settings are used. z Settings that are changed are not lost when the power is the color number display used when embroidery cards made by "PE-Design" are complete, press d key). (Back X The initial screen appears again. is the number for the sewing machine. c Switch screens using (Previous page key) and (Next page key). GETTING READY Press the item to be set.
z The "NO." Note z The "Thread color index" is turned off. • The items shown in reverse highlighting are the settings at the time of purchase. † Example: Changing the needle stop position 14 When settings are used. z Settings that are changed are not lost when the power is the color number display used when embroidery cards made by "PE-Design" are complete, press d key). (Back X The initial screen appears again. is the number for the sewing machine. c Switch screens using (Previous page key) and (Next page key). GETTING READY Press the item to be set.
Users Manual - English
Page 21
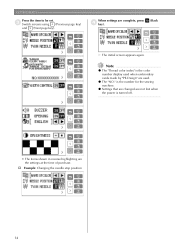
... . Press the item to the d next page. a X The LCD comes on the sewing machine. c 2 3 1 4 After you finish looking, press e two times. (Back key) 5 6 8 7 a Threading the upper thread b Winding the bobbin c Installing the bobbin d Needle replacement e Embroidery unit attachment f Embroidery frame attachment g embroidery foot attachment h Replacing the presser foot X The first screen describing the procedure for...
... . Press the item to the d next page. a X The LCD comes on the sewing machine. c 2 3 1 4 After you finish looking, press e two times. (Back key) 5 6 8 7 a Threading the upper thread b Winding the bobbin c Installing the bobbin d Needle replacement e Embroidery unit attachment f Embroidery frame attachment g embroidery foot attachment h Replacing the presser foot X The first screen describing the procedure for...
Users Manual - English
Page 40
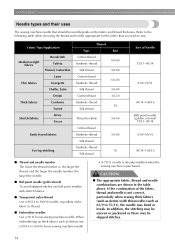
... the needle. ■ Ball point needle (gold colored) To avoid skipped stitches use a 90/14 or 100/16 home sewing machine needle. • A 75/11 needle is already installed when the sewing machine is purchased. CAUTION ● The appropriate fabric, thread and needle combinations are shown in the table above. GETTING READY Needle...-80 50-80 60-80 50-80 30-50 50 50-60 50-80 30 Size of the fabric or thread. ■ Embroidery needles Use a 75/11 home sewing machine needle. In addition, the stitching may be uneven or puckered or there may be used depends on thick fabrics such as denim, ...
... the needle. ■ Ball point needle (gold colored) To avoid skipped stitches use a 90/14 or 100/16 home sewing machine needle. • A 75/11 needle is already installed when the sewing machine is purchased. CAUTION ● The appropriate fabric, thread and needle combinations are shown in the table above. GETTING READY Needle...-80 50-80 60-80 50-80 30-50 50 50-60 50-80 30 Size of the fabric or thread. ■ Embroidery needles Use a 75/11 home sewing machine needle. In addition, the stitching may be uneven or puckered or there may be used depends on thick fabrics such as denim, ...
Users Manual - English
Page 45
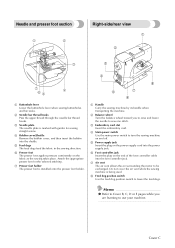
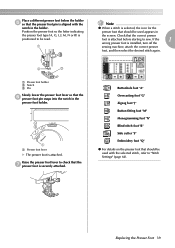
... Settings" (page 64). Buttonhole foot "A" Overcasting foot "G" Zigzag foot "J" Button fitting foot "M" Monogramming foot "N" Blind stitch foot "R" Side cutter "S" Embroidery foot "Q" z For details on the presser foot that should be used appears in the screen. Place a different presser foot below the holder e so ...check that the f presser foot pin snaps into the notch in the holder. If the 1 wrong presser foot is installed, turn off the sewing machine, attach the correct presser foot, and then select the desired stitch again. 2 3 a Presser foot holder b Notch c Pin Slowly lower ...
... Settings" (page 64). Buttonhole foot "A" Overcasting foot "G" Zigzag foot "J" Button fitting foot "M" Monogramming foot "N" Blind stitch foot "R" Side cutter "S" Embroidery foot "Q" z For details on the presser foot that should be used appears in the screen. Place a different presser foot below the holder e so ...check that the f presser foot pin snaps into the notch in the holder. If the 1 wrong presser foot is installed, turn off the sewing machine, attach the correct presser foot, and then select the desired stitch again. 2 3 a Presser foot holder b Notch c Pin Slowly lower ...
Users Manual - English
Page 46
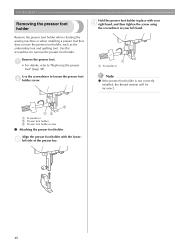
... the presser foot" (page 38). Remove the presser foot. Remove the presser foot holder when cleaning the sewing machine or when installing a presser foot that does not use the presser foot holder, such as the embroidery foot and quilting foot. GETTING READY Removing the presser foot holder Hold the presser foot holder in...
... the presser foot" (page 38). Remove the presser foot. Remove the presser foot holder when cleaning the sewing machine or when installing a presser foot that does not use the presser foot holder, such as the embroidery foot and quilting foot. GETTING READY Removing the presser foot holder Hold the presser foot holder in...
Users Manual - English
Page 102
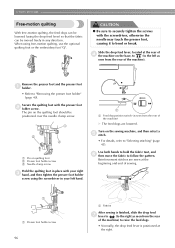
... screwdriver in any direction. Use both hands to hold the fabric taut, and f then move the fabric to bend or break. Turn on the sewing machine, and then select a e stitch. • For details, refer to "Removing the presser foot holder" (page 40). UTILITY STITCHES Free-motion ...quilting With free-motion quilting, the feed dogs can be lowered (using free-motion quilting, use the optional quilting foot or the embroidery foot "Q". Remove the presser foot and the presser foot a holder. • Refer to "Selecting stitching" (page 45). Reinforcement stitches are ...
... screwdriver in any direction. Use both hands to hold the fabric taut, and f then move the fabric to bend or break. Turn on the sewing machine, and then select a e stitch. • For details, refer to "Removing the presser foot holder" (page 40). UTILITY STITCHES Free-motion ...quilting With free-motion quilting, the feed dogs can be lowered (using free-motion quilting, use the optional quilting foot or the embroidery foot "Q". Remove the presser foot and the presser foot a holder. • Refer to "Selecting stitching" (page 45). Reinforcement stitches are ...
Users Manual - English
Page 118
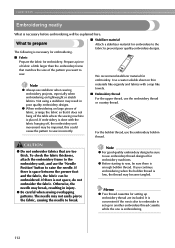
...Note z Always use stabilizer when sewing embroidery projects, especially when embroidering on thin materials like organdy and fabrics with the fabric hanging off the table where the sewing machine is convenient if the next color to use the embroidery bobbin thread. Use a water soluble...for embroidering. ■ Stabilizer material Attach a stabilizer material for embroidery to the fabric to sew. It is placed. If you want to prevent poor quality embroidery designs. ■ Fabric Prepare the fabric for embroidery machines. CAUTION ● Do not embroider fabrics that it does not ...
...Note z Always use stabilizer when sewing embroidery projects, especially when embroidering on thin materials like organdy and fabrics with the fabric hanging off the table where the sewing machine is convenient if the next color to use the embroidery bobbin thread. Use a water soluble...for embroidering. ■ Stabilizer material Attach a stabilizer material for embroidery to the fabric to sew. It is placed. If you want to prevent poor quality embroidery designs. ■ Fabric Prepare the fabric for embroidery machines. CAUTION ● Do not embroider fabrics that it does not ...

Users Manual - English
Page 119
z When replacing the needle, refer to use a 90/14 home sewing machine needle. When embroidering on thick fabrics such as pattern stitching and stretch fabrics, be broken or bent. 4 Embroidering neatly 113 CAUTION ● Since ball point needles (gold colored) are needles for fabrics where stitches are easily skipped, such as denim, use them for embroidery. Memo z A 75/11 needle is already installed when the sewing machine is purchased. Needle Use a 75/11 home sewing machine needle. The needle may be absolutely sure not to "Replacing the needle" (page 35).
z When replacing the needle, refer to use a 90/14 home sewing machine needle. When embroidering on thick fabrics such as pattern stitching and stretch fabrics, be broken or bent. 4 Embroidering neatly 113 CAUTION ● Since ball point needles (gold colored) are needles for fabrics where stitches are easily skipped, such as denim, use them for embroidery. Memo z A 75/11 needle is already installed when the sewing machine is purchased. Needle Use a 75/11 home sewing machine needle. The needle may be absolutely sure not to "Replacing the needle" (page 35).
Users Manual - English
Page 125
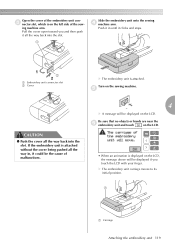
... attached without the cover being pushed all the way back into the slot. 1 Slide the embroidery unit onto the sewing d machine arm. If the embroidery unit is attached. X The embroidery unit carriage moves to its initial position. 1 a Carriage Attaching the embroidery unit 119 Pull the cover open toward you touch the LCD with your finger. ing...
... attached without the cover being pushed all the way back into the slot. 1 Slide the embroidery unit onto the sewing d machine arm. If the embroidery unit is attached. X The embroidery unit carriage moves to its initial position. 1 a Carriage Attaching the embroidery unit 119 Pull the cover open toward you touch the LCD with your finger. ing...


